HOTPOINT/ARISTON PCN 641 IX/HA EE Manualul utilizatorului
- Tip
- Manualul utilizatorului

PCN 641 IX/HA EE
English
Operating Instructions
HOB
Contents
Operating Instructions,1
Warnings,3
Assistance,7
Description of the appliance,8
Installation,10
Start-up and use,14
Precautions and tips,14
Maintenance and care,15
Troubleshooting,15
Română
Instrucţiuni de utilizare
HOB
Українська
Інструкція по використанню
ВАРИЛЬНА ПОВЕРХНЯ
Sumar
Instrucţiuni de utilizare,1
Avertismente,3
Asistenţă,7
Descrierea aparatului,8
Instalarea,16
Pornirea şi folosirea,20
Precauţii şi sfaturi,20
Întreţinere,21
Anomalii şi remedii,21
Зміст
Інструкція по використанню,1
Запобіжні заходи,4
Допомога,7
Опис приладу,8
Установка,22
Ввімкнення і використання,26
Запобіжні заходи та поради,26
Обслуговування та догляд,27
Усунення несправностей,27
Česky
Pokyny pro použití
VARNÁ DESKA
Slovensky
Návod na použitie
VARNÁ DOSKA
Obsah
Pokyny pro použití,1
Upozornění,4
Servisní služba,7
Popis zařízení,8
Instalace,28
Uvedení do činnosti a použití,32
Opatření a rady,32
Údržba a péče,33
Identikace a řešení problémů,33
Obsah
Návod na použitie,1
Upozornenia,5
Servisná služba,7
Popis zariadenia,9
Inštalácia,34
Uvedenie do činnosti a použitie,38
Opatrenia a rady,38
Údržba a starostlivosť,39
Identikácia a riešenie problémov,39

Ελληνικά
Οδηγίες χρήσης
ΠΆΓΚΟΣ
Magyar
Használati útmutató
FŐZŐLAP
Български
Инструкции за употреба
ГОТВАРСКИ ПЛОТ
Inhaltsverzeichnis
Οδηγίες χρήσης,2
Προειδοποίηση,5
Τεχνική υποστήριξη,7
Περιγραφή της συσκευής,9
Εγκατάσταση,40
Εκκίνηση και χρήση,44
Προφυλάξεις και συμβουλές,44
Συντήρηση και φροντίδα,45
Ανωμαλίες και λύσεις,45
Tartalomjegyzék
Használati útmutató,2
Figyelmeztetések,6
Szerviz,7
A készülék leírása,9
Üzembe helyezés,46
Bekapcsolás és használat,50
Óvintézkedések és tanácsok,50
Karbantartás és ápolás,51
Hibaelhárítás,51
Съдържание
Инструкции за употреба,2
Предупреждения,6
Техническо обслужване,7
Описание на уреда,9
Инсталиране,52
Пуск и експлоатация,56
Предпазни мерки и препоръки,56
Поддръжка и почистване,57
Отстраняване на неизправности,57

3
Warnings
WARNING: The appliance and its accessible parts
become hot during use. Care should be taken to
avoid touching heating elements. Children less than 8
years of age shall be kept away unless continuously
supervised. This appliance can be used by children
aged from 8 years and above and persons with
reduced physical, sensory or mental capabilities or
lack of experience and knowledge if they have been
given supervision or instruction concerning use of the
appliance in a safe way and understand the hazards
involved. Children shall not play with the appliance.
Cleaning and user maintenance shall not be made
by children without supervision.
WARNING: Unattended cooking on a hob with fat or
oil can be dangerous and may result in re. NEVER
try to extinguish a re with water, but switch off the
appliance and then cover ame e.g. with a lid or a
re blanket.
WARNING: Danger of re: do not store items on the
cooking surfaces.
Never use steam cleaners or pressure cleaners on
the appliance.
Remove any liquid from the lid before opening it. Do
not close the glass cover (if present) when the gas
burners or electric hotplates are still hot.
The appliance is not intended to be operated by
means of an external timer or separate remote
control system.
CAUTION: the use of inappropriate hob guards can
cause accidents.
Avertismente
ATENŢIE: Acest aparat şi părţile sale accesibile devin
foarte calde în timpul folosirii.Trebuie să ţi atenţi şi să
nu atingeţi elementele de încălzire.Îndepărtaţi copiii
sub 8 ani dacă nu sunt supravegheaţi continuu.Acest
aparat poate utilizat de copiii de peste 8 ani şi de
persoane cu capacităţi zice, senzoriale sau mentale
reduse sau fără experienţă şi cunoştinţe dacă se
află sub o supraveghere corespunzătoare sau
dacă au fost instruiţi cu privire la folosirea aparatului
în mod sigur şi dacă îşi dau seama de pericolele
corelate. Copiii nu trebuie să se joace cu aparatul.
Operaţiunile de curăţare şi de întreţinere nu trebuie
să e efectuate de copii fără supraveghere.
AVERTISMENT: Gătitul nesupravegheat pe o plită cu
grăsime sau ulei poate periculos şi poate lua foc.
Nu încercaţi NICIODATĂ să stingeţi focul cu apă, ci
opriţi aparatul şi apoi acoperiţi acăra, de exemplu,
cu un capac sau cu o pătură de incendiu.
AVERTISMENT: Pericol de incendiu: nu păstraţi
articole pe suprafeţele de gătit.
Nu folosiţi niciodată produse de curăţare cu aburi
sau sub presiune pe aparat.
Îndepărtaţi orice lichid de pe capac înainte de a-l
deschide. Nu închideţi capacul de sticlă (dacă există)
când arzătoarele pe gaz sau plitele electrice sunt
încă erbinţi.
Aparatul nu este conceput să funcţioneze prin
intermediul unui temporizator extern sau a unui
sistem separat de control la distanţă.
ATENŢIE: Utilizarea unor protecţii nepotrivite ale plitei
poate provoca accidente.

4
Запобіжні заходи
УВАГА! Під час роботи цей прилад, а також
його доступні частини нагріваються до високих
температур.Слід бути особливо обережними, щоб
не торкатися нагрівальних елементів.Діти віком до
8 років мають знаходитися на небезпечній відстані
від приладу, якщо неможливо забезпечити
постійний контроль над ними.Дозволяється
користування цим приладом дітьми віком від 8
років, а також особами з обмеженими фізичними,
сенсорними або розумовими можливостями або
особами без належного досвіду і знань, якщо
вони перебувають під постійним контролем або
проінструктовані щодо правил з небезпечного
користування приладу і усвідомлюють ступені
ризику. Не дозволяйте дітям гратися з приладом.
Операції з очищення і догляду не повинні
виконуватися дітьми без належного контролю.
УВАГА: Небезпечно залишати без нагляду плити
з жиром або олією, тому що це може призвести
до пожежі.
НІ В ЯКОМУ РАЗІ не слід намагатися погасити
полум’я/пожежу водою. Необхідно вимкнути
прилад і накрити полум’я, наприклад, кришкою
або вогнетривким покривалом.
УВАГА: Небезпека пожежі: не залишайте речі на
варильних поверхнях.
Забороняється використання апаратів для
очищення парою або високим тиском.
Витріть насухо всі наявні на кришці рідини, перш
ніж відкрити її. Не закривайте скляну кришку
(якщо вона наявна), якщо газові пальники або
електричні конфорки залишаються нагрітими.
Не передбачено увімкнення приладу за допомогою
зовнішнього таймеру або окремої системи
дистанційного керування.
УВАГА: використання невідповідних захисних
пристроїв варильної поверхні може призвести до
нещасних випадків.
Upozornění
UPOZORNĚNÍ: Toto zařízení a jeho přístupné části
dosahují během použití velmi vysoké teploty. Je
třeba dávat pozor a zabránit styku s topnými články.
Udržujte děti mladší 8 let v dostatečné vzdálenosti,
pokud nejsou pod neustálým dohledem.Toto zařízení
mohou používat děti od 8 let a osoby se sníženými
fyzickými, senzorickými nebo duševními schopnostmi
nebo osoby bez zkušeností a znalostí, které se
nacházejí pod náležitým dohledem nebo které
byly poučeny ohledně použití zařízení bezpečným
způsobem a které si uvědomují související nebezpečí.
Děti si nesmí hrát se zařízením. Děti nesmí provádět
operace čištění a údržby bez dohledu.
UPOZORNĚNÍ: Ponechání sporáku s ohřívanými
tuky a oleji může být nebezpe-čné a může způsobit
požár.NIKDY není třeba hasit plamen/požár vo-
dou, ale je nutné vypnout zařízení a zakrýt plamen
například víkem nebo hydrofobní dekou.
VAROVÁNÍ: Nebezpečí požáru, nenechávejte nic
na vaření.
Nikdy nepoužívejte k čištění zařízení vyso-kotlaký
parní čistič.
Před otevřením krytu setřete případné kapaliny,
které se na něm nacházejí. Neza-vírejte skleněný
kryt (je-li součástí) s ještě teplými plynovými hořáky
nebo elektrickou plotnou.
Přístroj není určen k uvedení do provozu pomocí
externího časovače nebo samostatného systému
dálkového ovládání.
UPOZORNNÍ: Použití nevhodných ochran varné
desky može zposobit nehody.

5
Upozornenia
VÝSTRAHA: Zariadenie a jeho prístupné časti sa
môžu počas použitia ohriať. Dávajte pozor, aby ste
sa nedotkli horúcich častí. Deti mladšie ako 8 rokov
musia byť udržiavané v bezpečnej vzdialenosti,
alebo musia byť nepretržite pod dohľadom. Toto
zariadenie môžu používať deti nad 8 rokov a osoby
s obmedzenými fyzickými, zmyslovými alebo
duševnými schopnosťami, alebo s nedostatočnými
skúsenosťami, len ak sú pod dohľadom, alebo ak
boli náležite poučené ohľadne bezpečného použitia
zariadenia a ak pochopili možné nebezpečenstvá.
Deti sa nesmú so zariadením hrať. Čistenie a
údržbu zverenú užívateľovi nesmú vykonávať deti
bez dohľadu.
VÝSTRAHA: Nepozornosť pri varení na varnej doske
s tukom alebo olejom môže byť nebezpečná a môže
spôsobiť požiar. NIKDY sa nepokúšajte hasiť oheň
vodou, ale vypnite zariadenie a prikryte plamene,
napr. vekom alebo hasiacou utierkou.
VÝSTRAHA: Nebezpečenstvo požiaru! Nenechávajte
predmety na varných povrchoch.
Nikdy nepoužívajte na čistenie zariadenia parný
alebo vysokotlakový čistič.
Pred otvorením veka z neho odstráňte všetky
tekutiny. Nezatvárajte sklenený kryt (ak je súčasťou),
keď sú horáky alebo elektrické platne ešte teplé.
Zariadenie nie je vhodné na ovládanie prostredníctvom
externých časovačov alebo samostatného systému
diaľkového riadenia.
UPOZORNENIE: použitie nevhodných ochranných
krytov varnej dosky môže spôsobiť nehodu.
Προειδοποίηση
ΠΡΟΣΟΧΉ: Η συσκευή αυτή και τα προσβάσιμα
μέρη της καθίστανται πολύ θερμά κατά τη χρήση.
Θα πρέπει να προσέχετε και να αποφεύγετε να
αγγίζετε τα θερμαντικά στοιχεία. Κρατάτε μακριά
τα παιδιά ηλικίας μικρότερης των 8 ετών ή να τα
επιτηρείτε συνεχώς. Η παρούσα συσκευή μπορεί να
χρησιμοποιηθεί από παιδιά μεγαλύτερα των 8 ετών
και από άτομα με μειωμένες φυσικές, αισθητηριακές
ή νοητικές ικανότητες ή χωρίς εμπειρία και γνώση
αν βρίσκονται υπό κατάλληλη επιτήρηση ή αν έχουν
εκπαιδευτεί στη χρήση της συσκευής με τρόπο
ασφαλή και αν αντιλαμβάνονται τους σχετικούς
κινδύνους. Τα παιδιά δεν πρέπει να παίζουν με τη
συσκευή. Οι ενέργειες καθαρισμού και συντήρησης
δεν πρέπει να διενεργούνται από τα παιδιά χωρίς
επιτήρηση.
ΠΡΟΣΟΧΉ: Είναι επικίνδυνο και μπορεί να
προκληθεί πυρκαγιά αν αφήσετε φούρνο αφύλακτο
με λίπη και λάδια. Δεν πρέπει ΠΟΤΕ να προσπαθείτε
να σβήσετε μια φλόγα/πυρκαγιά με νερό, αλλά θα
πρέπει να σβήσετε τη συσκευή και να καλύψετε
τη φλόγα, για παράδειγμα, με ένα καπάκι ή μια
πυρίμαχη κουβέρτα.
ΠΡΟΣΟΧΉ: Κίνδυνος πυρκαγιάς: Μην αφήνετε
αντικείμενα στις επιφάνειες μαγειρέματος.
Μη χρησιμοποιείτε ποτέ ατμοκαθαριστές ή
μηχανήματα καθαρισμού σε υψηλή πίεση για τον
καθαρισμό της συσκευής.
Απομακρύνετε ενδεχόμενα υγρά που υπάρχουν στο
καπάκι πριν το ανοίξετε. Μην κλείνετε το γυάλινο
καπάκι (αν υπάρχει) όσο οι καυστήρες αερίου ή η
ηλεκτρική εστία είναι ακόμα θερμά.
Η συσκευή δεν είναι desitnato να τεθούν σε λειτουργία
με τη βοήθεια ενός εξωτερικού χρονοδιακόπτη ή ένα
απομακρυσμένο σύστημα ελέγχου.

6
ΠΡΟΣΟΧΉ: η χρήση ακατάλληλων προστατευτικών
για την επιφάνεια μαγειρέματος μπορεί να προξενήσει
ατυχήματα.
Figyelmeztetések
FIGYELEM: A készülék és annak hozzáférhető
részei a használat közben rendkívüli módon
felmelegedhetnek.Vigyázzon, hogy nehogy
hozzáérjen a fűtőelemekhez.Ha a gyermekek
nincsenek folyamatos felügyelet alatt, tartsa távol
a 8 éven aluli gyermekeket.Ezt a készüléket a 8
éves kort betöltött gyermekek, valamint a testileg,
érzékszervileg vagy szellemileg korlátozott, nem
hozzáértő, illetve a terméket nem ismerő személyek
csak megfelelő felügyelet mellett, vagy a készülék
biztonságos használatával kapcsolatos alapvető
utasítások és a kapcsolódó veszélyek ismeretében
használhatják. Vigyázzon, hogy a gyermekek ne
játsszanak a készülékkel. A tisztítási és karbantartási
műveleteket gyermekek felügyelet nélkül nem
végezhetik.
FIGYELEM: A tűzhelyen felügyelet nélkül otthagyott
zsír vagy olaj veszélyes lehet, és tüzet okozhat.
SOHA ne próbálja meg vízzel eloltani a tüzet, hanem
zárja el a készüléket, és takarja le a lángot például
fedővel vagy tűzálló takaróval.
FIGYELEM: Tűzveszély! Ne tároljon semmit a főző
felületeken!
A készülék tisztításához soha ne használ-jon
gőztisztítót vagy nagynyomású tisz-títót.
A fedő kinyitása előtt távolítsa el az összes folyadékot!
Ne csukja be az üveg fedőt (típustól függően) ha a
gáz égők vagy elektromos főzőmezők még melegek.
A készüléket nem szabad külső időmérővel vagy
különálló távirányító rendszerrel használni.
FIGYELEM: A főzőlap nem megfelelő használata
balesetet okozhat.
Предупреждения
ПРЕДУПРЕЖДЕНИЕ: Уредът и достъпните му
части се нагорещяват по време на употреба.
Трябва да се избягва контакт с нагревателите.
Деца под 8 години трябва да бъдат държани
настрана, освен ако не са под непрекъснат
надзор. Уредът може да бъде използван от деца
над 8 години и от хора с ограничени физически,
сетивни или умствени способности или без опит
и познания, ако са наблюдавани, или са им
дадени указания относно използването на уреда
по безопасен начин, и са запознати с възможните
опасности. Децата не трябва да играят с уреда.
Почистването и поддръжката от потребителя не
трябва да се извършва от деца без надзор.
ПРЕДУПРЕЖДЕНИЕ: Готвенето без надзор с
мазнина или масло върху готварски плот може
да бъде опасно и да доведе до пожар. НИКОГА
не опитвайте да гасите пожар с вода, а изключете
уреда и след това покрийте пламъка, например
с капак или противопожарно одеяло.
ПРЕДУПРЕЖДЕНИЕ: Опасност от пожар: не
поставяйте предмети върху повърхностите за
готвене.
Никога не използвайте водочистачки или
парочистачки върху уреда.
Отстранете течността от капака, преди да
го отворите. Не затваряйте стъкления капак
(ако има такъв), когато газовите горелки или
електрическите котлони все още са горещи.
Уредът не е предназначен за управление
с външен таймер или отделна система за
дистанционно управление.
ВНИМАНИЕ: използването на неподходящи
готварски плотове може да доведе до инциденти.

7
Assistance
Communicating:
• the type of problem encountered.
• appliance model (Mod.)
• serial number (S/N)
This information is found on the data plate located on the appliance and/or
on the packaging.
Asistenţă
Comunicaţi:
• tipul de anomalie
• modelul aparatului (Mod.)
• numărul de serie (S/N)
Această informaţie se aă pe plăcuţa cu date amplasată pe aparat şi/sau
pe ambalaj.
Допомога
Повідомити:
• тип несправності;
• модель приладу (Mod.)
• cерійний номер (S/N)
Ці дані знаходяться на табличці з даними на самому приладі.
Servisní služba
Uveďte:
• druh poruchy;
• model zařízení (Mod.);
• výrobní číslo (S/N).
Tyto informace se nacházejí na štítku s jmenovitými údaji, umístěném na
zařízení.
Servisná služba
Uveďte:
• typ anomálie;
• model zariadenia (Mod.)
• výrobné číslo (S/N)
Tieto informácie sú uvedené na štítku s technickými údajmi, nachádzajúcom
sa na zariadení a/alebo na obale.
Τεχνική υποστήριξη
Γνωστοποιήστε:
• Τον τύπο της ανωμαλίας
• Το μοντέλο της μηχανής (Mod.)
• Τον αριθμό σειράς (S/N)
Αυτές οι τελευταίες πληροφορίες βρίσκονται στην ταμπελίτσα χαρακτηριστικών
που βρίσκεται στη συσκευή.
Szerviz
Adja meg az alábbiakat:
• az anomália típusa;
• a készülék modellje (Mod.)
• a készülék szériaszáma (S/N)
Az utóbbi információk a készüléken elhelyezett adattáblán találhatók.
Техническо обслужване
Подгответе следната информация:
• тип на възникналия проблем.
• модел на уреда (Mod.).
• сериен номер (S/N).
Тази информация се намира на табелката с данни върху уреда.

8
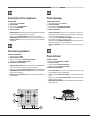
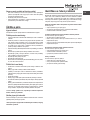
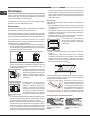
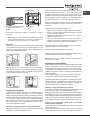
Description of the appliance
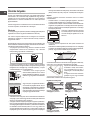
Overall view
1. Support Grid for COOKWARE
2. GAS BURNERS
3. Control Knobs for GAS BURNERS
4. Ignition for GAS BURNERS
5. SAFETY DEVICES
• GAS BURNERS differ in size and power. Use the diameter of the cookware
to choose the most appropriate burner to cook with.
• Control Knobs for GAS BURNERS adjust the size of the ame.
• GAS BURNER IGNITION enables a specic burner to be lit automatically.
• SAFETY DEVICE stops the gas flow if the flame is accidentally
extinguished.
Descrierea aparatului
Vedere de ansamblu
1. Grătar suport pentru VASE
2. ARZĂTOARELE DE GAZE
3. Butoane de control pentru ARZĂTOARE DE GAZE
4. Aprindere pentru ARZĂTOARE DE GAZE
5. DISPOZITIVE DE SIGURANŢĂ
• ARZĂTOARELE DE GAZE diferă ca mărime şi putere. Utilizaţi diametrul
vaselor pentru a alege cel mai potrivit arzător pentru gătit.
• Butoane de control pentru ARZĂTOARE DE GAZE pentru reglarea ăcării.
• APRINDEREA ARZĂTORULUI CU GAZ permite unui anumit arzător să
se aprindă în mod automat.
• DISPOZITIVUL DE SIGURANŢĂ opreşte uxul de gaz dacă acăra se
stinge accidental.
Опис приладу
Загальний вигляд
1. Підтримуюча Решітка для ПОСУДУ
2. ГАЗОВІ ПАЛЬНИКИ
3. Ручки управління ГАЗОВИХ ПАЛЬНИКІВ
4. Запалювання для ГАЗОВИХ ПАЛЬНИКІВ
5. ПРИСТРОЇ БЕЗПЕКИ
• ГАЗОВІ ПАЛЬНИКИ відрізняються за розмірами тапотужністю.
Використовуйте для приготування їжі посудз діаметром у відповідності
до розміру найбільшпідходящого пальника.
• ГАЗОВИMИПАЛЬНИКAMИ
полум’я
• Запалювання для ГАЗОВИХ ПАЛЬНИКІВ дозволяють, привключенні,
запалювати конкретні пальники автоматично.
• ПРИСТРІЙ БЕЗПЕКИ зупиняє потік газу, якщо полум’явипадково
гасне.
Popis zařízení
Celkový pohled
1. Mřížky pro uložení NÁDOBY NA VAŘENĺ
2. PLYNOVÉ HOŘÁKY
3. Otočné ovladače PLYNOVÝCH HOŘÁKŮ
4. Zapalovací svíčka PLYNOVÝCH HOŘÁKŮ
5. BEZPEČNOSTNÍ ZAŘÍZENÍ
• PLYNOVÉ HOŘÁKY jsou různých rozměrů a výkonu. Zvolte si ten, který
je nejvhodnější pro průměr použité nádoby.
• Otočné ovladače PLYNOVÝCH HOŘÁKŮ pro ovládání plamene nebo
výkonu.
• Zapalovací svíčka PLYNOVÝCH HOŘÁKŮ umožňuje automatické
zapálení zvoleného hořáku.
• BEZPEČNOSTNÍ ZAŘÍZENÍ pro případ náhodného zhasnutí plamene
přeruší výstup plynu.
1
3
2
5
4

9
Popis zariadenia
Celkový pohľad
1 Oporné mriežky pre NÁDOBY NA PECENIE
2 PLYNOVÉ HORÁKY
3 Otocné ovládace PLYNOVÝCH HORÁKOV
4 Zapalovacia sviečka PLYNOVÝCH HORÁKOV
5 BEZPEČNOSTNÉ ZARIADENIE
• PLYNOVÉ HORÁKY majú rôzne priemery a rôzne výkony. Zvoľte si ten,
ktorý je najvhodnejší pre priemer použitej nádoby.
• Otočné ovladače PLYNOVÝCH HORÁKOV pre regulovanie plameňa.
• Zapalovacia sviečka PLYNOVÝCH HORÁKOV umožňuje automatické
zapálenie zvoleného horáka.
• BEZPEČNOSTNÉ ZARIADENIE pre prípad náhodného zhasnutia
plameňa preruší prívod plynu.
Περιγραφή της συσκευής
Συνολική άποψη
1. Εστίες απόθεσης για ΣΚΕΥΗ ΜΑΓΕΙΡΕΜΑΤΟΣ
2. ΚΑΥΣΤΗΡΕΣ ΑΕΡΙΟΥ
3. Διακόπτες χειρισμού των ΚΑΥΣΤΗΡΩΝ ΑΕΡΙΟΥ
4. Κουμπί ανάφλεξης των ΚΑΥΣΤΗΡΩΝ ΑΕΡΙΟΥ
5. ΔΙΑΤΑΞΗ ΑΣΦΑΛΕΙΑΣ
• ΚΑΥΣΤHΡΕΣ ΑΕΡIΟΥ είναι διαφόρων διαστάσεων και ισχύος. Επιλέξτε
τον πλέον κατάλληλο για τη διάμετρο του δοχείου προς χρήση.
• Επιλογείς χειρισμού των ΚΑΥΣΤHΡΩΝ ΑΕΡIΟΥ για τη ρύθμιση της
φλόγας.
• Σπινθηριστής ανάφλεξης των ΚΑΥΣΤHΡΩΝ ΑΕΡIΟΥ επιτρέπει το
αυτόματο άναμμα του επιλεγμένου καυστήρα.
• ΔΙAΤΑΞΗ ΑΣΦΑΛΕIΑΣ σε περίπτωση τυχαίου σβησίματος της φλόγας,
διακόπτει την έξοδο αερίου.
A készülék leírása
A készülék áttekintése
1. Főzőedénytartó RÁCSOK
2. GÁZÉGŐK
3. Gázégő vezérlő TEKERŐGOMBOK
4. GYÚJTÓGYERTYA gázégők
5. BIZTONSÁGI SZERKEZET
• GÁZÉGŐK: Különböző méretűek és teljesítményűek. Válassza a
használni kívánt edény átmérőjének leginkább megfelelőt.
• Gázégő vezérlő TEKERŐGOMBOK: A teljesítmény szabályozására
szolgálnak.
• GYÚJTÓGYERTYA gázégők: A kiválasztott gázégő automatikus
meggyújtására szolgál.
• BIZTONSÁGI SZERKEZET: A láng véletlen kialvása esetén a gázellátás
kikapcsolására szolgál.
Описание на уреда
Общ преглед
1. Носеща скара за ГОТВАРСКИТЕ СЪДОВЕ
2. ГАЗОВИ ГОРЕЛКИ
3. Контролни превключватели за ГАЗОВИТЕ ГОРЕЛКИ
4. Запалване за ГАЗОВИТЕ ГОРЕЛКИ
5. МЕХАНИЗМИ ЗА БЕЗОПАСНОСТ
• ГАЗОВИТЕ ГОРЕЛКИ се различават по размер и мощност.
Използвайте диаметъра на готварския съд, за да изберете най-
подходящата горелка, с която да готвите.
• Контролните превключватели за ГАЗОВИТЕ ГОРЕЛКИ регулират
големината на пламъка.
• ЗАПАЛВАНЕТО ЗА ГАЗОВИ ГОРЕЛКИ позволява определена
горелка да се запали автоматично.
• МЕХАНИЗМЪТ ЗА БЕЗОПАСНОСТ спира потока от газ, ако пламъкът
бъде неволно изгасен.
1
3
2
5
4

10
GB
Installation
! Before operating your new appliance please read this instruction booklet
carefully. It contains important information for safe use, installation and care
of the appliance.
! Please keep these operating instructions for future reference. Pass them on
to possible new owners of the appliance.
Positioning
! Keep packaging material out of the reach of children. It can become a choking
or suffocation hazard (see Precautions and tips).
! The appliance must be installed by a qualied professional according to the
instructions provided. Incorrect installation may cause harm to people and
animals or may damage property.
! This unit may be installed and used only in permanently ventilated rooms
in accordance with current national regulations. The following requirements
must be observed:
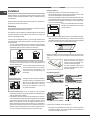
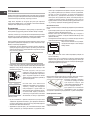
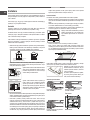
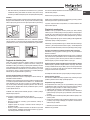
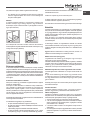
• The room must be equipped with an air extraction system that expels
any combustion fumes. This may consist of a hood or an electric fan that
automatically starts each time the appliance is switched on.
In a chimney stack or branched flue.
(exclusively for cooking appliances)
Directly to
the Outside
• The room must also allow proper air circulation, as air is needed for
combustion to occur normally. The ow of air must not be less than 2 m
3
/h
per kW of installed power.
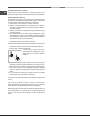
The air circulation system may take air directly
from the outside by means of a pipe with an
inner cross section of at least 100 cm
2
; the
opening must not be vulnerable to any type
of blockages.
The system can also provide the air needed for
combustion indirectly, i.e. from adjacent rooms
tted with air circulation tubes as described
above. However, these rooms must not be
communal rooms, bedrooms or rooms that
may present a re hazard.
• Intensive and prolonged use of the appliance may necessitate
supplemental ventilation, e.g. opening a window or increasing the power
of the air intake system (if present).
• Liquid petroleum gas sinks to the oor as it is heavier than air. Therefore,
rooms containing LPG cylinders must also be equipped with vents to allow
gas to escape in the event of a leak. As a result LPG cylinders, whether
partially or completely full, must not be installed or stored in rooms or
storage areas that are below ground level (cellars, etc.). It is advisable to
keep only the cylinder being used in the room, positioned so that it is not
subject to heat produced by external sources (ovens, replaces, stoves,
etc. ) which could raise the temperature of the cylinder above 50°C.
A
Examples of
ventilation holes
for comburant air.
Enlarging the ventilation slot
between window and floor.
Adjacent
Room
Room to be
Vented
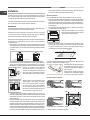
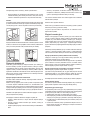
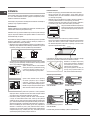
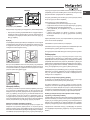
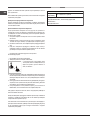
Fitting the appliance
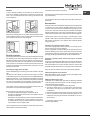
The following precautions must be taken when installing the hob:
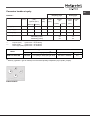
• Kitchen cabinets adjacent to the appliance and taller than the top of the
hob must be at least 200 mm from the edge of the hob.
• Hoods must be installed according to their relative installation instruction
manuals and at a minimum distance of 650 mm from the hob (see gure).
• Place the wall cabinets adjacent to the hood at a minimum height of 420
mm from the hob (see gure).
If the hob is installed beneath a wall cabinet,
the latter must be situated at a minimum of 700
mm above the hob.
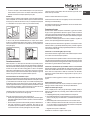
• The installation cavity should have the dimensions indicated in the gure.
Fastening hooks are provided, allowing you to fasten the hob to tops that
are between 20 and 40 mm thick. To ensure the hob is securely fastened
to the top, we recommend you use all the hooks provided.
555 mm
55 mm
475 mm
Before the installation remove the grids and burners from the hob and turn it
upside down, making sure you don’t damage the thermocouples and spark
plugs.
Apply the seals that come with the
appliance along the outer edges of
the hob to prevent any passage of air,
humidity and water (see Figure).
For proper application make sure the
surfaces to be sealed are clean, dry and
free of any grease/oil.
Hook fastening diagram
Hooking position for top H=20mm Hooking position for top H=30mm
Front
Hooking position for top H=40mm Back
! Use the hooks contained in the “accessory pack”.
• Where the hob is not installed over a built-in oven, a wooden panel must
be installed as insulation. This must be placed at a minimum distance of
20 mm from the lower part of the hob.
600mm min.
420mm min.
650mm min.

GB
11
Ventilation
To ensure adequate ventilation, the back panel of the cabinet must be
removed. It is advisable to install the oven so that it rests on two strips of
wood, or on a completely at surface with an opening of at least 45 x 560
mm (see diagrams).
560 mm.
45 mm.
Where a hob is installed above an oven without a forced ventilation cooling
system, adequate ventilation must be provided inside the cabinet by means
of air holes through which air can pass (see gure).
Electrical connection
Hobs equipped with a three-pole power supply cable are designed to operate
with alternating current at the voltage and frequency indicated on the data
plate (this is located on the lower part of the appliance). The earth wire in the
cable has a green and yellow cover. If the appliance is to be installed above
a built-in electric oven, the electrical connection of the hob and the oven must
be carried out separately, both for electrical safety purposes and to make
extracting the oven easier.
Connecting the supply cable to the mains
Install a standardised plug corresponding to the load indicated on the data
plate.
The appliance must be directly connected to the mains using an omnipolar
circuit-breaker with a minimum contact opening of 3 mm installed between the
appliance and the mains. The circuit-breaker must be suitable for the charge
indicated and must comply with current electrical regulations (the earthing
wire must not be interrupted by the circuit-breaker). The supply cable must
not come into contact with surfaces with temperatures higher than 50°C.
! The installer must ensure that the correct electrical connection has been
made and that it is compliant with safety regulations.
Before connecting to the power supply, make sure that:
• the appliance is earthed and the plug is compliant with the law.
• the socket can withstand the maximum power of the appliance, which is
indicated on the data plate.
• the voltage is in the range between the values indicated on the data plate.
• the socket is compatible with the plug of the appliance. If the socket is
incompatible with the plug, ask an authorised technician to replace it. Do
not use extension cords or multiple sockets.
! Once the appliance has been installed, the power supply cable and the
electrical socket must be easily accessible.
! The cable must not be bent or compressed.
! The cable must be checked regularly and replaced by authorised technicians
only (see Assistance).
! The manufacturer declines any liability should these safety measures not
be observed.
Gas connection
The appliance should be connected to the main gas supply or to a gas cylinder
in compliance with current national regulations. Before carrying out the
connection, make sure the cooker is compatible with the gas supply you wish
to use. If this is not the case, follow the instructions indicated in the paragraph
“Adapting to different types of gas.” When using liquid gas from a cylinder,
install a pressure regulator which complies with current national regulations.
! Check that the pressure of the gas supply is consistent with the values
indicated in Table 1 (“Burner and nozzle specications”). This will ensure the
safe operation and longevity of your appliance while maintaining efcient
energy consumption.
Connection with a rigid pipe (copper or steel)
! Connection to the gas system must be carried out in such a way as not to
place any strain of any kind on the appliance.
There is an adjustable L-shaped pipe tting on the appliance supply ramp
and this is tted with a seal in order to prevent leaks. The seal must always
be replaced after rotating the pipe tting (seal provided with appliance). The
gas supply pipe tting is a threaded 1/2 gas cylindrical male attachment.
Connecting a flexible jointless stainless steel pipe to a threaded
attachment
The gas supply pipe tting is a threaded 1/2 gas cylindrical male attachment.
These pipes must be installed so that they are never longer than 2000 mm
when fully extended. Once connection has been carried out, make sure that
the exible metal pipe does not touch any moving parts and is not compressed.
! Only use pipes and seals that comply with current national regulations.
Checking the tightness of the connection
! When the installation process is complete, check the pipe ttings for leaks
using a soapy solution. Never use a ame.
Adapting to different types of gas
To adapt the hob to a different type of gas other than default type (indicated
on the rating plate at the base of the hob or on the packaging), the burner
nozzles should be replaced as follows:
1. Remove the hob grids and slide the burners off their seats.
2. Unscrew the nozzles using a 7 mm socket spanner, and replace them
with nozzles for the new type of gas (see table 1 “Burner and nozzle
characteristics”).
3. Reassemble the parts following the above procedure in the reverse order.
4. Once this procedure is nished, replace the old rating sticker with one
indicating the new type of gas used. Sticker are available from any of our
Service Centres.
• Adjusting the burners’ primary air
Does not require adjusting.

12
GB
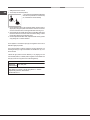
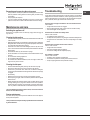
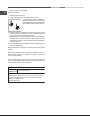
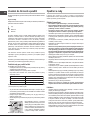
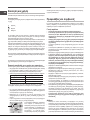
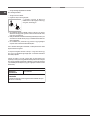
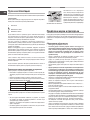
• Setting the burners to minimum
1. Turn the tap to the low ame position;
2. Remove the knob and adjust the adjustment
screw, which is positioned in or next to the tap
pin, until the ame is small but steady.
3. Having adjusted the ame to the required low setting, while the burner is
alight, quickly change the position of the knob from minimum to maximum
and vice versa several times, checking that the ame does not go out.
4. Some appliances have a safety device (thermocouple) tted. If the device
fails to work when the burners are set to the low ame setting, increase
this low ame setting using the adjusting screw.
5. Once the adjustment has been made, replace the seals on the by-passes
using sealing wax or a similar substance.
! If the appliance is connected to liquid gas, the regulation screw must be
fastened as tightly as possible.
! Once this procedure is nished, replace the old rating sticker with one
indicating the new type of gas used. Stickers are available from any of our
Service Centres.
! Should the gas pressure used be different (or vary slightly) from the
recommended pressure, a suitable pressure regulator must be tted to the
inlet pipe (in order to comply with current national regulations).
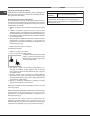
Electrical
connections
DATA PLATE
ECODESIGN
see data plate
This appliance conforms to the EU Regulation no. 66/2014
implementing Directive 2009/125/EC.
standard EN 30-2-1

GB
13
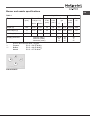
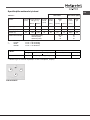
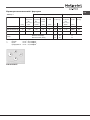
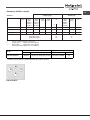
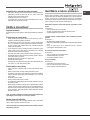
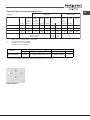
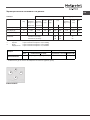
Ta
ble 1 Liquid Gas Natural Gas
Nominal (mbar)
Minimum (mbar)
Maximum (mbar)
37
25
45
28-30
20
35
20
17
25
Rapid (R)
Semi Rapid (S)
Auxiliary (A)
Supply pressures
Burner
Diameter
(mm)
Thermal Power
kW (p.c.s.*)
100
75
55
3.00
1.65
1.00
Nomin. Reduc.
0.70
0.40
0.40
By-pass
1/100
(mm)
39
28
28
Nozzle
1/100
(mm)
Flow*
g/h
***
86
64
50
Nozzle
1/100
(mm)
Flow*
l/h
132(H3)
96(Z)
79(6)
286
157
95
218
120
73
**
214
118
71
* At 15°C and 1013,25 mbar - dry gas
** Propane P.C.S. = 50.37 MJ/Kg
*** Butane P. C.S. = 49.47 MJ/Kg
Natural P.C.S. = 37.78 MJ/m
Burner and nozzle specifications
3
R
S
S
A
PCN 641 IX/HA EE

14
GB
Start-up and use
! The position of the corresponding gas burner is shown on every knob.
Gas burners
Each burner can be adjusted to one of the following settings using the
corresponding control knob:
● Off
Maximum
Minimum
To light one of the burners, hold a lit match or lighter near the burner and, at
the same time, press down and turn the corresponding knob anti-clockwise
to the maximum setting.
Since the burner is tted with a safety device, the knob should be pressed
for approximately 2-3 seconds to allow the automatic device keeping the
ame alight to heat up.
Models are equipped with an ignition button incorporated into the control
knob. If this is the case, the ignitor is present, but not the button.To light a
burner, simply press the corresponding knob all the way in and then turn it
in the counter-clockwise direction to the “High” setting, keeping it pressed
in until the burner lights.
! If a ame is accidentally extinguished, turn off the control knob and wait for
at least 1 minute before trying to relight it.
To switch off the burner, turn the knob in a clockwise direction until it stops
(when reaches the “●” position).
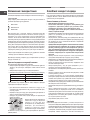
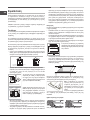
Practical advice on using the burners
To ensure the burners operate efciently:
• Use appropriate cookware for each burner (see table) so that the ames
do not extend beyond the bottom of the cookware.
• Always use cookware with a at base and a cover.
• When the contents of the pan reach boiling point, turn the knob to minimum.
Rapid (R)
Semi Rapid (S)
Auxiliary (A)
Ø Cookware Diameter (cm)
24 - 26
16 - 20
10 - 14
Burner
To identify the type of burner, refer to the designs in the section entitled, “Burner
and Nozzle Specications”.
• For maximum stability, always make sure that the pan supports are
correctly tted and that each pan is placed centrally over the burner.
• Pan handles should be positioned in line with one of the support bars on
the pan support grid.
• Pan handle should be positioned so not to protrude beyond the front edge
of the hob.
The more variable aspect in terms of pan
stability can often be the pan itself, (or
the positioning of that pan during use).
Well balanced pans, with at bases that
are placed centrally over the burner,
with the pan handles aligned with one
of the support ngers obviously offer the
greatest stability.
Precautions and tips
! This appliance has been designed and manufactured in compliance with
international safety standards. The following warnings are provided for safety
reasons and must be read carefully.
General safety
• This is a class 3 built-in appliance.
• Gas appliances require regular air exchange to maintain efcient
operation. When installing the hob, follow the instructions provided
in the paragraph on “Positioning” the appliance.
• These instructions are only valid for the countries whose symbols
appear in the manual and on the serial number plate.
• The appliance was designed for domestic use inside the home and is
not intended for commercial or industrial use.
• The appliance must not be installed outdoors, even in covered areas. It is
extremely dangerous to leave the appliance exposed to rain and storms.
• Do not touch the appliance with bare feet or with wet or damp hands and
feet.
• The appliance must be used by adults only for the preparation of food,
in accordance with the instructions outlined in this booklet. Any other
use of the appliance (e.g. for heating the room) constitutes improper
use and is dangerous. The manufacturer may not be held liable for
any damage resulting from improper, incorrect and unreasonable
use of the appliance.
• The openings used for ventilation and dispersion of heat must never be
covered.
• Always make sure the knobs are in the “●”/“○” position when the appliance
is not in use.
• When unplugging the appliance always pull the plug from the mains socket,
do not pull on the cable.
• Never carry out any cleaning or maintenance work without having detached
the plug from the mains.
• In case of malfunction, under no circumstances should you attempt to repair
the appliance yourself. Repairs carried out by inexperienced persons may
cause injury or further malfunctioning of the appliance. Contact a Service
Centre (see Assistance).
• Do not close the glass cover (if present) when the gas burners or electric
hotplates are still hot.
• The appliance should not be operated by people (including children)
with reduced physical, sensory or mental capacities, by inexperienced
individuals or by anyone who is not familiar with the product. These
individuals should, at the very least, be supervised by someone who
assumes responsibility for their safety or receive preliminary instructions
relating to the operation of the appliance.
• Do not let children play with the appliance.
• The appliance is not intended to be operated by means of an external
timer or separate remote-control system.
Disposal
• When disposing of packaging material: observe local legislation so that
the packaging may be reused.
• The European Directive 2012/19/EU on Waste Electrical and Electronic
Equipment (WEEE), requires that old household electrical appliances must
not be disposed of in the normal unsorted municipal waste stream. Old
appliances must be collected separately in order to optimise the recovery
and recycling of the materials they contain and reduce the impact on
human health and the environment.The crossed out “wheeled bin” symbol
on the product reminds you of your obligation, that when you dispose of
the appliance it must be separately collected.
Consumers should contact their local authority or retailer for information
concerning the correct disposal of their old appliance.

GB
15
Respecting and conserving the environment
• Cook your food in closed pots or pans with well-tting lids and use as little
water as possible. Cooking with the lid off will greatly increase energy
consumption.
• Use purely at pots and pans.
• If you are cooking something that takes a long time, it’s worth using a
pressure cooker, which is twice as fast and saves a third of the energy.
Maintenance and care
Switching the appliance off
Disconnect your appliance from the electricity supply before carrying out
any work on it.
Cleaning the hob surface
• All the enamelled and glass parts should be cleaned with warm water and
neutral solution.
• Stainless steel surfaces may be stained by calcareous water or aggressive
detergents if left in contact for too long. Any food spills (water, sauce, coffee,
etc.) should be wiped away before they dry.
• Clean with warm water and neutral detergent, and then dry with a soft
cloth or chamois. Remove baked-on dirt with specic cleaners for stainless
steel surfaces.
• Clean stainless steel only with soft cloth or sponge.
• Do not use abrasive or corrosive products, chlorine-based cleaners or pan
scourers.
• Do not use steam cleaning appliances.
• Do not use ammable products.
• Do not leave acid or alkaline substances, such as vinegar, mustard, salt,
sugar or lemon juice on the hob.
Cleaning the hob parts
• Clean the enamelled and glass parts only with soft cloth or sponge.
• Grids, burner caps and burners can be removed to be cleaned.
• Clean them by hand with warm water and non-abrasive detergent,
removing any food residues and checking that none of the burner openings
is clogged.
• Rinse and dry.
• Ret burners and burner caps correctly in the respective housings.
• When replacing the grids, make sure that the panstand area is aligned
with the burner.
• Models equipped with electrical ignition plugs and safety device require
thorough cleaning of the plug end in order to ensure correct operation.
Check these items frequently, and if necessary, clean them with a damp
cloth. Any baked-on food should be removed with a toothpick or needle.
! To avoid damaging the electric ignition device, do not use it when the
burners are not in their housing.
Gas tap maintenance
Over time, the taps may become jammed or difcult to turn. If this happens,
the tap must be replaced.
! This procedure must be performed by a qualied technician authorised
by the manufacturer.
Troubleshooting
It may happen that the appliance does not function properly or at all. Before
calling the service centre for assistance, check if anything can be done. First,
check to see that there are no interruptions in the gas and electrical supplies,
and, in particular, that the gas valves for the mains are open.
The burner does not light or the ame is not even around the burner.
Check whether:
• The gas holes on the burner are clogged.
• All the movable parts that make up the burner are mounted correctly.
• There are draughts near the appliance.
The ame dies in models with a safety device.
Check to make sure that:
• You pressed the knob all the way in.
• You keep the knob pressed in long enough to activate the safety device.
• The gas holes are not blocked in the area corresponding to the safety
device.
The burner does not remain lit when set to minimum.
Check to make sure that:
• The gas holes are not blocked.
• There are no draughts near the appliance.
• The minimum setting has been adjusted properly.
The cookware is unstable.
Check to make sure that:
• The bottom of the cookware is perfectly at.
• The cookware is positioned correctly at the centre of the burner.
• The pan support grids have been positioned correctly.

16
RO
Instalarea
! Înainte de a pune în funcţiune noul dumneavoastră aparat, vă rugăm să
citiţi cu atenţie această carte. Conţine informaţii importante pentru folosirea
în condiţii de siguranţă, instalarea şi îngrijirea aparatului.
! Vă rugăm să păstraţi aceste instrucţiuni de folosire pentru a consultate în
viitor. Transmiteţi-le noilor proprietari posibili ai aparatului.
Amplasarea
! Nu lăsaţi materialul ambalajului la îndemâna copiilor. Acesta poate deveni
un pericol de sufocare (a se vedea Precauţii şi sfaturi).
! Aparatul trebuie să e instalat de un profesionist calicat în conformitate
cu instrucţiunile furnizate. Instalarea incorectă poate provoca vătămarea
persoanelor şi animalelor şi poate aduce daune proprietăţii.
! Acest aparat poate instalat şi utilizat numai în încăperi ventilate permanent,
în conformitate cu reglementările locale în vigoare. Trebuie îndeplinite
următoarele cerinţe:
• Camera trebuie să e echipată cu un sistem de extracţie a aerului care
evacuează orice gaze de combustie. Acesta poate consta dintr-o hotă sau
un ventilator electric care porneşte automat de ecare dată când aparatul
este pornit.
În cazul şemineelor sau coşurilor de fum ramificate
(special pentru plită)
Direct în exterior
• Camera trebuie să permită, de asemenea, circulatia corespunzătoare a
aerului, aerul ind necesar pentru ca arderea să aibă loc în mod normal.
Debitul de aer nu trebuie să e de mic de 2 m
3
/h pe kW de putere instalată.
Sistemul de circulaţie a aerului poate lua
aer direct din exterior prin intermediul unei
conducte cu o secţiune transversală interioară
de cel puţin 100 cm
2
; deschiderea nu trebuie
să e vulnerabilă pentru niciun tip de blocaje.
Sistemul poate furniza, de asemenea, aerul
necesar arderii în mod indirect, de exemplu
de la camere adiacente dotate cu tuburi de
circulare a aerului, astfel cum este descris
mai sus. Totuşi, aceste camere nu trebuie să
e camere comunale, dormitoare sau camere
care pot prezenta un pericol de incendiu.
• O utilizare intensivă şi prelungită a aparatului poate avea nevoie de o
aerisire suplimentară, de exemplu deschiderea unei ferestre, sau o aerisire
suplimentară mai ecace, mărind puterea de aspiraţie mecanică, dacă
acesta există deja.
• Gazul petrolier lichid curge spre podea pentru că este mai greu decât aerul.
De aceea, încăperile care conţin butelii GPL trebuie să e, de asemenea,
prevăzute cu oricii pentru a permite ieşirea gazelor, în cazul unei scurgeri.
Aşadar, buteliile GPL, indiferent dacă sunt parţial sau complet pline, nu
trebuie să e instalate sau depozitate în camere sau în zone de depozitare
care sunt sub nivelul solului (pivniţe etc). Este recomandabil să se păstreze
doar butelia care este utilizată în cameră, poziţionată astfel încât să nu e
A
Exemple de orificii de
ventilație pentru aerul
comburant.
Încăpere
adiacentă
Camera ce
trebuie ventilată
Mărirea distanţei
între uşă şi podea
supusă căldurii produse din surse externe (cuptoare, şeminee, sobe etc),
care ar putea ridica temperatura buteliei peste 50°C.
Montarea aparatului
Când se instalează plita, trebuie luate următoarele măsuri de precauţie:
• Dulapurile de bucătarie adiacente aparatului şi mai înalte decât partea de
sus a plitei trebuie să se ae la cel puţin 200 mm faţă de marginea plitei.
• Hotele trebuie să e instalate în conformitate cu manualele respective cu
instrucţiuni de instalare şi la o distanţă minimă de 650 mm faţă de plită (a
se vedea gura).
• Puneţi dulapurile de perete adiacente hotei la o înălţime minimă de 420
mm faţă de plită (a se vedea gura).
Dacă plita este instalată sub un dulap de
perete, acesta din urmă trebuie să e situat la
cel puţin 700 mm deasupra plitei.
• Cavitatea de instalare trebuie să aibă dimensiunile indicate în gură.
Sunt furnizate cârlige de xare, permiţându-vă să xaţi plita de blaturi
cu o grosime între 20 si 40 mm. Pentru o xare sigură a plitei de blat, vă
recomandăm să folosiţi toate cârligele din dotare.
555 mm
55 mm
475 mm
Înainte de instalare, scoateţi grătarele şi arzătoarele plitei şi răsturnaţi-o, ind
atenţi să nu deterioraţi termocuplele şi bujiile.
Aplicaţi garniturile din dotarea aparatului
pe marginile externe ale plitei, pentru a
împiedica trecerea aerului, umidităţii şi a
apei (vezi gura).
Pentru o aplicare corectă, asiguraţi-vă că
suprafeţele care urmează să e sigilate
sunt curate, uscate şi fără unsori/uleiuri.
Schema de xare a cârligelor
Poziţie cârlig pentru blat H=20mm Poziţie cârlig pentru blat H=30mm
Faţă
Poziţie cârlig pentru blat H=40mm Spate
! Folosiţi cârligele din „pachetul de accesorii“.
600mm min.
420mm min.
650mm min.

17
RO
• În cazul în care plita nu este instalată deasupra unui cuptor încorporat,
trebuie instalat un panou de lemn ca izolaţie. Acesta trebuie plasat la o
distanţă minimă de 20 mm faţă de partea de jos a plitei.
Ventilarea
Pentru a asigura o ventilaţie corespunzătoare, panoul din spate al dulapului
trebuie îndepărtat. Se recomandă instalarea cuptorului astfel încât acesta
să se sprijine pe două scânduri de lemn sau pe o suprafaţă complet plană
cu o deschidere de cel puţin 45 x 560 mm (a se vedea schemele).
560 mm.
45 mm.
În cazul în care plita este instalată deasupra unui cuptor, fără un sistem
de răcire cu ventilaţie forţată, trebuie să se asigure o ventilare adecvată în
interiorul dulapului prin intermediul unor oricii de aer prin care poate trece
aerul (vezi gura).
Conexiunea electrică
Plitele echipate cu un cablu tripolar de alimentare sunt proiectate pentru a
funcţiona cu curent alternativ la tensiunea şi frecvenţa indicate pe plăcuţa de
date (aceasta este situată în partea de jos a aparatului). Firul de împământare
din cablu are un capac de culoare verde şi galben. În cazul în care aparatul
trebuie să e instalat deasupra unui cuptor electric încorporat, conexiunea
electrică a plitei şi cuptorului trebuie efectuate separat, atât pentru siguranţa
electrică, cât şi pentru a face mai uşoară scoaterea cuptorului.
Conectarea cablului de alimentare la reţea
Montaţi un ştecher standard corespunzător sarcinii indicate pe plăcuţa de date.
Aparatul trebuie să e conectat direct la reţea utilizând un întrerupător unipolar
cu o deschidere între contacte de cel puţin 3 mm instalat între aparat şi reţea.
Întrerupătorul trebuie să e adecvat pentru sarcina indicată şi trebuie să
respecte reglementările electrice în vigoare (cablul de împământare nu trebuie
să e întrerupt de întrerupător). Cablul de alimentare nu trebuie să intre în
contact cu suprafeţe având temperatura mai mare de 50°C.
! Instalatorul trebuie să se asigure că s-a făcut conexiunea electrică corectă
şi că aceasta este conformă normelor de siguranţă.
Înainte de conectarea la sursa de curent, asiguraţi-vă că:
• aparatul este legat la pământ şi ştecherul corespunde prevederilor legale.
• priza poate rezista la puterea maximă a aparatului, care este indicată pe
plăcuţa de date.
• tensiunea este cuprinsă între valorile indicate pe plăcuţa cu datele tehnice.
• priza este compatibilă cu ştecherul aparatului. dacă priza nu este
compatibilă cu ştecherul aparatului, solicitaţi înlocuirea acestuia de către
un tehnician autorizat. nu folosiţi prelungitoare sau prize multiple.
! După ce aparatul a fost instalat, cablul de alimentare şi priza de curent
trebuie să e uşor accesibile.
! Cablul nu trebuie să e îndoit sau comprimat.
! Cablul trebuie să e vericat în mod regulat şi înlocuit numai de tehnicieni
autorizaţi (a se vedea Asistenţa).
! Producătorul îşi declină orice responsabilitate în cazul în care aceste măsuri
de siguranţă nu sunt respectate.
Conectarea la gaze
Aparatul trebuie conectat la reţeaua de alimentare cu gaze sau la butelia
de gaz, conform reglementărilor naţionale în vigoare. Înainte de a efectua
conexiunea, asiguraţi-vă că aragazul este compatibil cu gazele pe care doriţi
să le utilizaţi. Dacă nu este acest caz, urmaţi instrucţiunile indicate în paragraful
„Adaptarea la diferite tipuri de gaz“.
Atunci când se utilizează gaz lichid de la o butelie, instalaţi un regulator de
presiune, care respectă reglementările naţionale în vigoare.
! Vericaţi că presiunea de alimentare cu gaz este în concordanţă cu valorile
indicate în tabelul 1 („Specicaţiile arzătorului şi duzei“). Aceasta va garanta
funcţionarea în condiţii de siguranţă şi longevitatea aparatului dvs., menţinând
consumul ecient de energie.
Conectarea cu o conductă rigidă (cupru sau oţel)
! Conectarea la sistemul de gaze trebuie să e realizată în aşa fel încât să
nu se creeze nicio solicitare asupra aparatului.
Pe rampa de alimentare a aparatului există un racord în formă de L reglabil, a
cărui etanşare este asigurată de o garnitură. Garnitura trebuie să e înlocuită
întotdeauna după rotirea racordului (garnitură furnizată cu aparatul). Racordul
de alimentare cu gaz este letat 1/2 cilindric tip tată.
Conectarea cu tub exibil din oţel inoxidabil continuu cu racord letat
Racordul de alimentare cu gaz este letat 1/2 cilindric tip tată. Aceste conducte
trebuie să e instalate astfel încât să nu e niciodată mai lungi de 2000 mm
atunci când sunt complet extinse. Odată ce conexiunea a fost efectuată,
asiguraşi-vă că tubul metalic exibil nu atinge piesele în mişcare şi că nu
este comprimat.
! Folosiţi doar conducte şi garnituri conforme cu reglementările naţionale în
vigoare.
Vericaţi etanşeitatea conexiunii
! Când procesul de instalare este complet, vericaţi că nu există scurgeri de
la tinguri, folosind o soluţie de săpun. Nu folosiţi niciodată acăra.
Adaptarea la diferite tipuri de gaz
Pentru a adapta plita la un alt tip de gaz decât tipul prestabilit (indicat pe
plăcuţa de la baza plitei sau pe ambalaj), duzele arzătorului trebuie să e
înlocuite astfel:
1. Îndepărtaţi grătarele plitei şi scoateţi arzătoarele din locaşurile lor.
2. Deşurubati duzele folosind o cheie tubulară de 7 mm şi înlocuiţi-le cu duze
pentru noul tip de gaz (a se vedea tabelul 1 „Caracteristicile arzătorului şi
duzelor“).
3. Reasamblaţi piesele urmând procedura de mai sus în ordine inversă.
4. Odată ce această procedură este terminată, înlocuiţi vechiul autocolant
cu unul care indică noul tip de gaz utilizat. Autocolantele sunt disponibile
la oricare din centrele noastre de service.
• Reglarea aerului primar al arzătoarelor:
Arzătoarele nu necesită nici o reglare a aerului primar.

18
RO
• Reglarea minimelor
1. Poziţionaţi robinetul de gaz pe poziţia minim;
2. Scoateţi butonul corespunzător arzătorului
vizat şi manevraţi şurubul (situat în interiorul
ştuţului sau lateral tijei robinetului) până obţineţi
o acără mică şi uniformă.
3. Vericaţi dacă, rotind rapid butonul de la maxim la minim, acăra nu se
stinge.
4. La aparatele echipate cu dispozitiv de siguranţă (termocuplu), dacă
dispozitivul nu funcţionează corect când arzătoarele sunt pe minim, măriţi
debitul minimelor manevrând şurubul de reglaj.
5. La încheierea operaţiei, aplicaţi ceara de sigiliu (sau un înlocuitor) pe by-
pass.
! În cazul utilizării gazului lichid, şurubul de reglare trebuie împins la refuz.
! Dacă presiunea gazului utilizat este diferită (sau variabilă) faţă de cea
prevăzută, trebuie instalat, pe canalul de aducţiune un regulator de presiune
corespunzător şi conform normelor naţionale în vigoare privind reţelele de gaz.
Conexiuni
electrice
PLĂCUŢA CU DATELE TEHNICE
a se vedea plăcuţa cu datele tehnice
Regulamentul UE nr. 66/2014 de integrare a Directivei
2009/125/CE.
regulamentul EN 30-2-1
ECODESIGN

19
RO
Tabelul 1 Gaz lichid Gaz natural (G20)
Nominală (mbar)
Minimă (mbar)
Maximă (mbar)
20
17
25
28-30
25
35
Rapid (R)
Semirapid (S)
Auxiliar (A)
Presiuni de furnizare
Arzător
Diametru
(mm)
Putere termică
kW (p.c.s.*)
100
75
55
3.10
1.75
1.05
Nomin. Redus.
0.80
0.45
0.45
By-pass
1/100
(mm)
39
28
28
Duză
1/100
Debit*
g/h
(mm) ***(G30)
86
64
50
Duză
1/100
Debit*
g/h
(mm)
132(H3)
96(Z)
79(6)
295
167
100
225
127
76
**(G31)
221
125
75
Specificaţiile arzătorului şi duzei
* La 15°C şi 1013,25 mbar - gaze uscate
** Propan P.C.S. = 50.37 MJ/Kg
*** Butan P. C.S. = 49.47 MJ/Kg
Natural P.C.S. = 37.78 MJ/m
PCN 641 IX/HA EE
3
II2H3B/P
Secțiune de gaz
7,65 (556 g/h-G30) (546 g/h-G31)
Putere nominală (kW)Categorie
Model
Secțiune electrice
220-240V~ 50/60Hz
Tensiune și frecvență
(1)
Putere (W)
0,6
Valorile în g/h se referă la capacităţile cu Gaz Lichid (Butan, Propan).
(1)
R
S
S
A
PCN 641 IX/HA EE

20
RO
Pornirea şi folosirea
! Pe ecare selector este indicată poziţia arzătoruluipe gaz corespunzătoare.
Arzătoarele de gaze
Fiecare arzător poate reglat pentru una din următoarele setări folosind
butonul de control corespunzător:
● Off
Maxim
Minim
Pentru a aprinde un arzător, ţineţi un chibrit aprins sau o brichetă aproape
de arzător şi, în acelaşi timp, apăsaţi şi rotiţi butonul corespunzător în sens
antiorar la valoarea maximă.
Având în vedere că arzătorul este echipat cu un dispozitiv de siguranţă, butonul
trebuie apăsat pentru aproximativ 2-3 secunde pentru a permite dispozitivului
automat care ţine acăra aprinsă să se încălzească.
Modele sunt echipate cu un buton de aprindere încorporat în butonul de
control. Dacă acesta este cazul, este prezent aprinzătorul, dar nu butonul.
Pentru a aprinde un arzător, apăsaţi pur şi simplu butonul corespunzător
până la capăt şi apoi rotiţi-l în sens antiorar la setarea „Mare", menţinându-l
apăsat până când se aprinde arzătorul.
! În cazul în care acăra este stinsă accidental, opriţi butonul de control şi
aşteptaţi cel puţin 1 minut înainte de a încerca să îl reaprindeţi.
Pentru a stinge arzătorul, rotiţi butonul în sensul acelor de ceasornic până
când se opreşte (atunci când ajunge la poziţia “●”).
Sfaturi practice pentru utilizarea arzătoarelor
Pentru a obţine randamentul maxim trebuie să luaţi în considerare următoarele
indicaţii:
• Utilizaţi recipiente adecvate ecărui arzător (a se vedea tabelul) pentru a
evita ca acăra să depăşească suprafaţa recipientelor;
• Utilizaţi întotdeauna recipiente cu fundul plat şi prevăzute cu capac;
• În momentul atingerii punctului de erbere, rotiţi selectorul până ajungeţi
în dreptul poziţiei minime.
Rapid (R)
Semirapid (S)
Auxiliar (A)
24 - 26
16 - 20
10 - 14
Arzător Ø Diametru Recipiente (cm)
Pentru identicarea tipului arzătorului, consultaţi gurile prezente în paragraful
“Caracteristici ale arzătoarelor şi injectoarelor”.
• Pentru stabilitate maximă, asiguraţi-vă că suporţii pentru recipientele de
coacere sunt poziţionaţi corect şi ecare recipient se aă în poziţie centrală
pe arzător.
• Asiguraţi-vă că mânerele recipientelor de coacere sunt aliniate cu una
dintre barele de sprijin ale suporţilor recipientelor.
• Poziţionaţi mânerele recipientelor de coacere astfel încât să nu iasă în
afară faţă de latura anterioară a planului de coacere.
Aspectul cel mai variabil din punct de
vedere al stabilităţii oalelor poate de
multe ori oala propriu-zisă (sau amplasarea
acesteia în timpul utilizării). Oalele bine
echilibrate, cu fundul plat, aşezate central
pe aragaz, cu torţile poziţionate la nivel
cu una dintre razele grilei oferă, în mod
evident, stabilitate maximă.
Precauţii şi sfaturi
! Aparatul a fost proiectat şi construit în conformitate cu normele internaţionale
de siguranţă. Aceste avertismente sunt furnizate din măsuri de siguranţă şi
trebuie citite cu atenţie.
Siguranţă generală
• Acest aparat face parte din clasa aparatelor încorporabile din clasa
3.
• Aparatele pe gaz necesită, pentru o corectă funcţionare, un regulator
de presiune. Vericaţi ca instalarea acestora să respecte indicaţiile
prevăzute în paragraful aferent capitolului “Poziţionare”.
• Instrucţiunile se adresează doar ţărilor a căror destinaţie şi simboluri
apar pe manualul de instrucţiuni şi pe eticheta aparatului.
• Aparatul a fost conceput pentru utilizarea de tip non-profesional, în interiorul
locuinţelor.
• Aparatul nu va instalat afară, chiar dacă spaţiul este protejat de un
acoperiş, deoarece este foarte periculoasă expunerea acestuia la ploi şi
la intemperii.
• Nu funcţionează la temperaturi mai mici de 16 grade C.
• Nu atingeţi aparatul dacă aveţi mâinile sau picioarele ude sau umede.
• Aparatul trebuie sa e utilizat numai pentru coacerea alimentelor
si numai de persoane adulte, conform instructiunilor din manual.
Orice alta utilizare (de exemplu: încalzirea locuintei) este considerata
improprie si deci periculoasa. Fabricantul nu va putea considerat
responsabil pentru eventuale daune provenite din utilizarea
improprie, gresita sau irationala a aparatului.
• Evitaţi contactul cablului de alimentare al altor aparate electrocasnice cu
părţile calde ale acestui aparat.
• Nu obstrucţionaţi oriciile de ventilare şi de propagare a căldurii.
• Vericaţi întotdeauna ca selectoarele să se ae în dreptul poziţiei “●”/“○”
în momentul neutilizării aparatului.
• Nu trageţi ştecherul din priza de curent, trăgând de cablu, ci de ştecher.
• Nu efectuaţi nici o operaţie de curăţare sau întreţinere fără a deconectat
mai întâi aparatul.
• În cazul apariţiei defecţiunilor, nu interveniţi în mecanismele interne ale
acestuia în vederea reparaţiei. Apelaţi Service-ul autorizat (a se vedea
cap. Asistenţă).
• Nu închideţi capacul de sticlă (dacă este prezent) în cazul în care
arzătoarele pe gaz sau plitele electrice sunt calde încă.
• Nu lăsaţi copiii să se joace cu aparatul.
• Este interzisă utilizarea aparatului de persoanele (inclusiv copiii) care
au o redusă capacitate zică sau senzorială sau mentală, precum şi de
cele fără experienţă sau care nu s-au familiarizat cu produsul, dacă nu
sunt supravegheate de un responsabil sau dacă nu au primit în prealabil
instrucţiuni asupra modului de folosire a aparaturii.
• Aparatul nu trebuie pus în funcţiune prin intermediul unui temporizator
extern sau al unui sistem separat de comandă la distanţă.
Eliminarea deşeurilor
• Eliminarea ambalajelor: respectaţi reglementările locale; astfel, ambalajele
ar putea reutilizate.
• Directiva Europeană 2012/19/EU cu privire la deşeurile care provin de
la aparatura electrică sau electronică (RAEE) prevede ca aparatele
electrocasnice să nu e colectate împreună cu deşeurile urbane solide,
obişnuite. Aparatele scoase din uz trebuie să e colectate separat atât pentru
a optimiza rata de recuperare şi de reciclare a materialelor componente, cât
şi pentru a evita pericolele care pot duce la dăunarea sănătăţii omului sau
poluarea mediului înconjurător. Simbolul tomberonului tăiat care apare pe
toate produsele vă aminteşte tocmai obligaţia de a le colecta separat.
Pentru informaţii suplimentare cu privire la scoaterea din uz a aparatelor
electrocasnice, deţinătorii acestora se vor putea adresa serviciului public
respectiv sau agenţilor de vânzare.
Pagina se încarcă...
Pagina se încarcă...
Pagina se încarcă...
Pagina se încarcă...
Pagina se încarcă...
Pagina se încarcă...
Pagina se încarcă...
Pagina se încarcă...
Pagina se încarcă...
Pagina se încarcă...
Pagina se încarcă...
Pagina se încarcă...
Pagina se încarcă...
Pagina se încarcă...
Pagina se încarcă...
Pagina se încarcă...
Pagina se încarcă...
Pagina se încarcă...
Pagina se încarcă...
Pagina se încarcă...
Pagina se încarcă...
Pagina se încarcă...
Pagina se încarcă...
Pagina se încarcă...
Pagina se încarcă...
Pagina se încarcă...
Pagina se încarcă...
Pagina se încarcă...
Pagina se încarcă...
Pagina se încarcă...
Pagina se încarcă...
Pagina se încarcă...
Pagina se încarcă...
Pagina se încarcă...
Pagina se încarcă...
Pagina se încarcă...
Pagina se încarcă...
Pagina se încarcă...
Pagina se încarcă...
Pagina se încarcă...
-
 1
1
-
 2
2
-
 3
3
-
 4
4
-
 5
5
-
 6
6
-
 7
7
-
 8
8
-
 9
9
-
 10
10
-
 11
11
-
 12
12
-
 13
13
-
 14
14
-
 15
15
-
 16
16
-
 17
17
-
 18
18
-
 19
19
-
 20
20
-
 21
21
-
 22
22
-
 23
23
-
 24
24
-
 25
25
-
 26
26
-
 27
27
-
 28
28
-
 29
29
-
 30
30
-
 31
31
-
 32
32
-
 33
33
-
 34
34
-
 35
35
-
 36
36
-
 37
37
-
 38
38
-
 39
39
-
 40
40
-
 41
41
-
 42
42
-
 43
43
-
 44
44
-
 45
45
-
 46
46
-
 47
47
-
 48
48
-
 49
49
-
 50
50
-
 51
51
-
 52
52
-
 53
53
-
 54
54
-
 55
55
-
 56
56
-
 57
57
-
 58
58
-
 59
59
-
 60
60


HOTPOINT/ARISTON PCN 641 IX/HA EE Manualul utilizatorului
- Tip
- Manualul utilizatorului
în alte limbi
Lucrări înrudite
-
HOTPOINT/ARISTON THC 641 W/IX/HA EE Manualul utilizatorului
-
-
-
-
-
HOTPOINT/ARISTON FTGHG 751D/HA(BK)LPG Manualul utilizatorului
-
HOTPOINT/ARISTON PK 644D GH X /HA LPG Manualul utilizatorului
-
-
-
HOTPOINT/ARISTON 9YPS 645 (BK) GH/HA Manualul utilizatorului