Philips GC9020/02 Manual de utilizare
- Categorie
- Stații de călcat cu abur
- Tip
- Manual de utilizare
Acest manual este potrivit și pentru

GC9040, GC9020

2

3
OF
F
O
N
22 23 24
1 2 4 53 6 7
26
27
28
8
13141516
12
11
10
9
17
21
18
19
20
25
1

4

GC9040, GC9020
ENGLISH 6
15
24
33
41
49
57
66
74
82
91
100
109
118
126
134

6
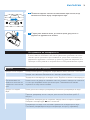
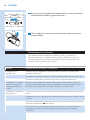
Introduction
Congratulations on your purchase and welcome to Philips! To fully benet
from the support that Philips offers, register your product at www.philips.
com/welcome.
Important
Read this user manual carefully before you use the appliance and save it for
future reference.
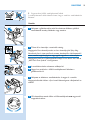
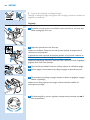
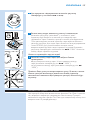
Danger
Never immerse the iron or the steam generator in water.
Warning
Check if the voltage indicated on the appliance corresponds to the
local mains voltage before you connect the appliance.
Do not use the appliance if the plug, the mains cord, the supply hose or
the appliance itself shows visible damage, or if the appliance has been
dropped or leaks.
If the mains cord or the supply hose is damaged, you must have it
replaced by Philips, a service centre authorised by Philips or similarly
qualied persons in order to avoid a hazard.
Never leave the appliance unattended when it is connected to the
mains.
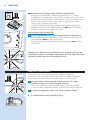
This appliance is not intended for use by persons (including children)
with reduced physical, sensory or mental capabilities, or lack of
experience and knowledge, unless they have been given supervision or
instruction concerning use of the appliance by a person responsible for
their safety.
Children should be supervised to ensure that they do not play with the
appliance.
Do not let the mains cord and supply hose come into contact with the
hot soleplate of the iron.
Fully unwind the mains cord before you plug it in the mains.
Caution
Only connect the appliance to an earthed wall socket.
Check the mains cord and the supply hose regularly for possible
damage.
Always place and use the iron and the steam generator on a stable,
level and horizontal surface.
The soleplate of the iron can become extremely hot and may cause
burns if touched.
When you have nished ironing, when you clean the appliance, and
also when you leave the iron even for a short while: put the iron on
the heat-resistant iron resting mat, switch off the appliance and remove
the mains plug from the wall socket.
This appliance is intended for household use only.
This Philips appliance complies with all standards regarding electromagnetic
elds (EMF). If handled properly and according to the instructions in this
user manual, the appliance is safe to use based on scientic evidence
available today.
-
-
-
-
-
-
-
-
-
-
-
-
-
-
-
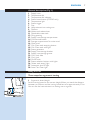
ENGLISH

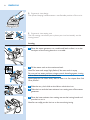
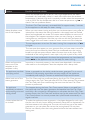
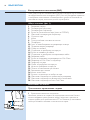
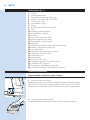
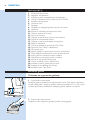
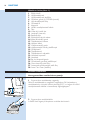
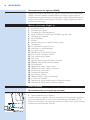
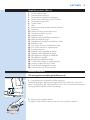
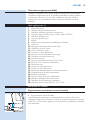
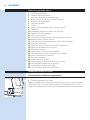
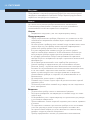
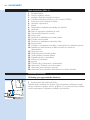
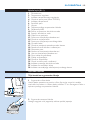
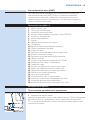
Supply hose
2
Temperature dial
3
Temperature dial indicator
4 Steam boost button (GC9040 only)
5
Temperature light
6
Steam trigger
7
Flap
8
Heat-resistant iron resting mat
9
Platform
Water tank release lever
Detachable water tank
Filling opening
Supply hose storage compartment
Cord rewind button
Storage compartment for mains cord
Mains cord
Calc Clean tank emptying button
Calc Clean tank with light
Steam generator
20 Supply hose storage bracket
Supply hose storage groove
22 Carry lock slide
23 Carry lock
24 On/off knob
25 Steam selection buttons with lights
26 ’Water tank empty’ light
27 Automatic shut-off light
28 Auto Calc Clean light
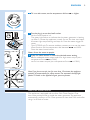
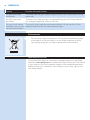
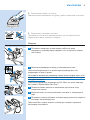
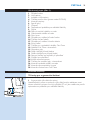
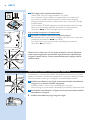
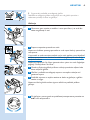
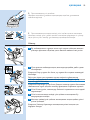
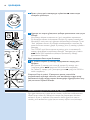
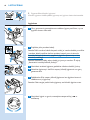
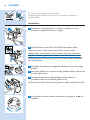
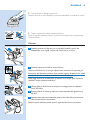
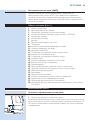
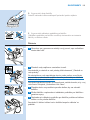
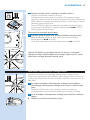
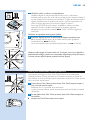
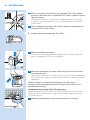
Ergonomic board height
Set the ironing board to the correct height. When you stand, the distance
between your elbow and the ironing board has to be approximately 27cm.
You can use the heat-resistant iron resting mat as a guide.
27 cm27 cm
ENGLISH 7

2 Ergonomic iron design
The upward sloping handle ensures a comfortable position of the wrist.
3 Ergonomic iron resting mat
The iron resting mat allows you to place your iron horizontally on the
ironing board.
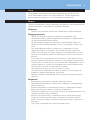
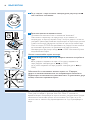
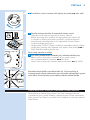
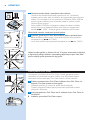
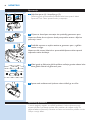
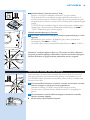
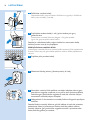
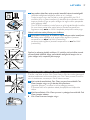
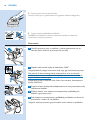
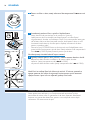
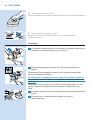
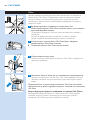
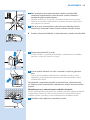
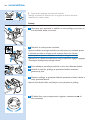
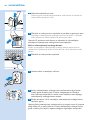
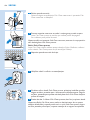
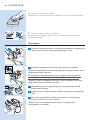
Ironing
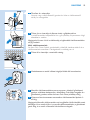
1 Place the steam generator on a stable and level surface, i.e. on the
hard part of the ironing board or on a table.
2 Fill the water tank to the maximum level.
Note: The ‘water tank empty’ light ashes if the water tank is empty.
Do not put hot water, perfume, vinegar, starch, descaling agents, ironing
aids or other chemicals in the water tank.
Note: Empty the Calc Clean tank if there is water in it. See chapter ‘Auto Calc
Clean function’.
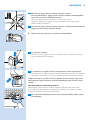
3 Slide the carry lock slide to the left to unlock the iron.
4 Take the iron and the heat-resistant iron resting mat off the steam
generator.
5 Place the heat-resistant iron resting mat on the ironing board and
put the iron on it.
Note: You can safely put the hot iron on the mat during ironing
MI
N
MA
X
MI
N
MA
X
ENGLISH8

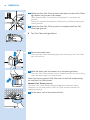
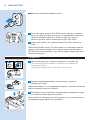
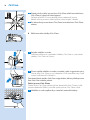
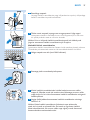
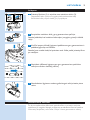
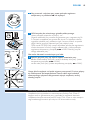
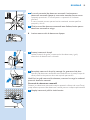
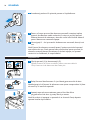
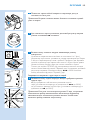
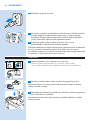
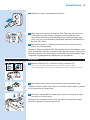
6 To iron with steam, set the temperature dial to 2 or higher.
7 Put the plug in an earthed wall socket.
Set the on/off knob to ‘on’.
The steam light ashes to indicate that the steam generator is heating
up. After 2 minutes the appliance is ready for use. You hear two beeps,
the steam light stops ashing and stays on. Press the steam trigger for
steam.
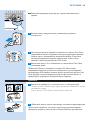
Type GC9040 only: To remove stubborn creases, you can use the steam
boost function. Set the temperature dial between
3 and MAX.
Press the steam boost button.
Never direct the steam at people.
8 Press the steam button to select the desired steam setting.
; for moderate steam output and # for high steam output (set a
temperature from 3 to MAX)
l for low steam output (set a temperature from 2 to MAX).
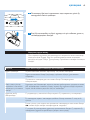
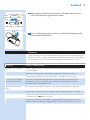
Note: If you do not use the iron for more than 10 minutes, the appliance
switches off automatically for safety reasons. The automatic shut-off light
ashes. To switch on the appliance again, press any button.
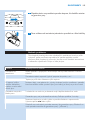
This appliance is equipped with an Auto Calc Clean function. Over
time, scale particles build up inside the steam generator. The appliance
automatically performs a Calc Clean process to clean itself from scale after
using 6 to 8 tanks of water.
-
-
-
-
-
OFF
O
N
OFF
O
N
O
N
O
N
O
FF
O
N
O
FF
O
N
ENGLISH 9

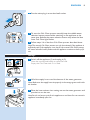
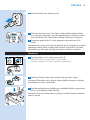
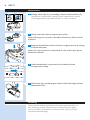
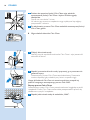
1 When the Auto Calc Clean process takes place, the Auto Calc Clean
light ashes and you hear short beeps.
Wait approximately 2 minutes for the appliance to complete the
process.
During this process, the appliance occasionally produces pumping and
clicking sounds.
2 When the Auto Calc Clean process is completed, the Auto Calc
Clean light goes off.
The Calc Clean tank light ashes.
3 Remove the water tank.
Press the Calc Clean tank emptying button and empty the Calc Clean
tank into the sink.
4 Rell the water tank and reattach it to the steam generator.
The Auto Calc Clean process is now nished and you can start ironing
when the steam light is on continuously.
Note: If you do not empty the Calc Clean tank, the tank will overow during
the next Auto Calc Clean process.
The Auto Calc Clean system keeps the appliance sufciently clean.
Hovewer, you can also perform the Calc Clean process manually for
additional cleaning.
1 Fill the water tank to the maximum level.
-
-
,
-
-
O
F
F
O
F
F
MI
N
MAX
MI
N
MAX
ENGLISH10

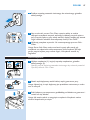
2 Put the mains plug in an earthed wall socket.
3 To start the Calc Clean process manually, keep the middle steam
selection button pressed while switching on the appliance at the
same time. Release the steam selection button only when the blue
Auto Calc Clean light ashes.
4 Follow steps 1-4 of the Auto Calc Clean process described above.
Note: The manual Calc Clean process can only be activated if the appliance is
sufciently cold. If the appliance is too hot for the manual Calc Clean process,
the steam selection button ashes and the appliance continues to heat up for
use.
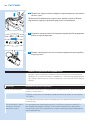
Storage
1
Switch off the appliance (1) and unplug it (2).
Press the cord rewind button to store the cord.
Empty the Calc Clean tank if it is lled.
2 Wind the supply hose round the bottom of the steam generator.
Note: Make sure the supply hose sits properly in the storage groove and inside
the bracket.
3 Place the heat-resistant iron resting mat on the steam generator and
put the iron on the mat.
Note: You do not have to wait for the appliance to cool down. You can store the
appliance immediately after use.
-
-
1 2
O
F
F
ON
1 2
O
F
F
ON
ENGLISH 11

4 Slide the carry lock slide to the right to lock the iron onto the steam
generator.
5 With one hand, you can now easily carry the whole appliance by the
handle of the iron.
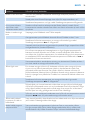
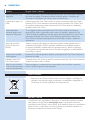
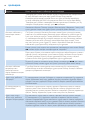
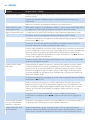
This chapter summarises the most common problems you could
encounter with the appliance. If you are unable to solve the problem with
the information below, please contact the Philips Consumer Care Centre in
your country.
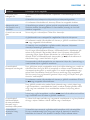
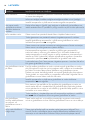
Problem Possible cause and solution
The appliance does not
become hot.
There is a connection problem. Check the mains cord, the plug and the wall
socket.
The appliance has not been switched on. Set the on/off knob to ‘on’.
The set temperature is too low. Set a higher temperature.
Smoke comes out of
my new ironing system
when I switch it on.
Some parts of the appliance have been lightly greased in the factory and
may initially give off some smoke when heated. This phenomenon is perfectly
normal and ceases after a short while
The appliance does not
produce any steam.
There is not enough water in the water tank. Fill the water tank.
The steam generator has not heated up sufciently. Wait approx. 2 minutes.
The set ironing temperature is too low for steam ironing. Select a
temperature of 2 or higher.
The water tank is not placed properly in the steam generator. Place the water
tank properly in the steam generator (‘click’).
ENGLISH12

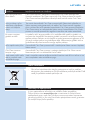
Problem Possible cause and solution
When the temperature dial is set to a very high temperature, the steam
produced is dry and hardly visible. It is even less visible when the ambient
temperature is relatively high and it is entirely invisible when the temperature
is set to MAX. Set the temperature dial to a lower temperature, e.g. 2, to
check if the iron produces steam.
The Auto Calc Clean process is activated. Wait for approximately 4 minutes
for the appliance to be ready for steam ironing.
Water droplets come
out of the soleplate
When you start steam ironing and when you continue steam ironing after an
interruption, the steam that was still present in the supply hose has cooled
down and condensed into water. This causes water droplets to come out of
the soleplate. This happens sometimes when you start ironing or continue
ironing after an interruption. Hold the iron over an old cloth and press the
steam trigger. Wait until steam instead of water comes out of the soleplate.
The set temperature is too low for steam ironing. Set a temperature of 2
or higher.
The wet spots that appear on your garment after you have steam ironed for
some time may be caused by steam that has condensed onto the ironing
board. Iron the wet spots without steam for some time to dry them. If the
underside of the ironing board is wet, wipe it dry with a piece of dry cloth.
Steam may have condensed in the hose, the temperature may have been set
below 3 or the appliance may not be ready for steam ironing.
Flakes and impurities
come out of the
soleplate or the
soleplate is dirty.
Impurities or chemicals present in the water have deposited in the steam
vents and/or on the soleplate. Clean the soleplate with a damp cloth.
The appliance produces
a pumping sound.
Water is pumped into the boiler inside the steam generator. This is normal.
However, if the pumping sound does not stop, switch off the appliance
immediately and unplug it. Contact an authorised Philips service centre.
Water leaks out of the
steam generator.
The Calc Clean tank has overowed during the Auto Calc Clean process.
Always empty the Calc Clean tank after the Calc Clean process. This prevents
the Calc Clean tank from overowing the next time the auto Calc Clean
process is performed.
The appliance
occasionally produces a
loud pumping noise and
clicking sound.
This happens during the Auto Calc Clean process. Water is pumped from
the water tank into the steam generator, and expelled into the Calc Clean
tank. Wait a few minutes for the appliance to complete the Auto Calc Clean
process. Empty the Calc Clean tank and then top up the water tank. The Auto
Calc Clean process is a normal process that is performed automatically at
regular intervals.
I cannot place the iron
on its heel.
To make the appliance more ergonomic, it has been designed in such a way
that the iron can only be put down horizontally. Place the iron horizontally on
the heat-resistant iron resting mat. The mat can be left on top of the steam
generator or you can place the mat on the ironing board. Do not place
the hot iron directly onto the ironing board without the heat-resistant iron
resting mat.
ENGLISH 13

Problem Possible cause and solution
The appliance beeps
continuously.
The water tank has gone empty during the Auto Calc Clean process. Fill the
water tank.
The Calc Clean tank
light ashes.
The Auto Calc Clean process is completed. Empty the Calc Clean tank. Do
not unplug the appliance when you do this.
The cord is not wound
completely when I press
the cord rewind button.
The cord is stuck inside the cord rewind system. Pull the cord out of the
appliance and press the cord rewind button again.
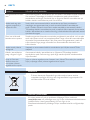
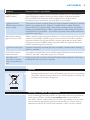
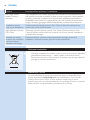
Environment
Do not throw away the appliance with the normal household waste
at the end of its life, but hand it in at an ofcial collection point for
recycling. By doing this, you help to preserve the environment.
If you need information or if you have a problem, please visit the Philips
website at www.philips.com or contact the Philips Consumer Care Centre
in your country (you nd its phone number in the worldwide guarantee
leaet). If there is no Consumer Care Centre in your country, go to your
local Philips dealer.
-
ENGLISH14

15
Поздравления за вашата покупка и добре дошли във Philips! За
да се възползвате изцяло от предлаганата от Philips поддръжка,
регистрирайте продукта си на www.philips.com/welcome.
Преди да използвате уреда, прочетете внимателно това ръководство
за експлоатация и го запазете за справка в бъдеще.
Никога не потапяйте ютията или генератора за пара във вода.
Преди да свържете уреда към мрежата, проверете дали
посоченото върху уреда напрежение отговаря на напрежението
на местната електрическа мрежа.
Не използвайте уреда, ако щепселът, захранващият кабел или
маркучът имат видими повреди, както и ако уредът е падал или
тече.
Ако захранващият кабел или маркучът е повреден, с оглед
предотвратяване на опасност той трябва да бъде сменен от
Philips, упълномощен от Philips сервиз или квалифициран техник.
Никога не оставяйте уреда без наблюдение, когато е включен в
контакт.
Този уред не е предназначен за ползване от хора (включително
деца) с намалени физически усещания или умствени недостатъци
или без опит и познания, ако са оставени без наблюдение и не са
инструктирани от страна на отговарящо за тяхната безопасност
лице относно начина на използване на уреда.
Наглеждайте децата, за да не си играят с уреда.
Не допускайте захранващият кабел и маркуч да се допират до
горещата гладеща повърхност на ютията.
Развийте докрай захранващия кабел, преди да включите уреда в
мрежата.
Включвайте уреда само в заземен мрежов контакт.
Проверявайте редовно за евентуални повреди по захранващия
кабел и маркуча.
Винаги поставяйте и използвайте ютията и генератора за пара
върху хоризонтална, равна и стабилна повърхност.
Гладещата повърхност на ютията може да се нагорещи много и да
причини изгаряне при докосване.
Когато сте приключили с гладенето, когато почиствате уреда
и когато оставяте ютията дори за момент: поставете ютията
върху топлоустойчивата поставка, изключете уреда и щепсела от
контакта.
Този уред е предназначен само за битови цели.
-
-
-
-
-
-
-
-
-
-
-
-
-
-
-

Този уред Philips е в съответствие с всички стандарти по отношение
на електромагнитните излъчвания (EMF). Ако се употребява правилно
и съобразно напътствията в Ръководството, уредът е безопасен за
използване според наличните досега научни факти.
Захранващ маркуч
2
Температурен регулатор
3
Температурен индикатор
4
Бутон за допълнителна пара (само за GC9040)
5
Светлинен температурен индикатор
6
Спусък за пара
7
Клапа
8
Топлоустойчива поставка на ютията
9
Платформа
Лост за освобождаване на резервоара за вода
Подвижен воден резервоар
Отвор за пълнене
Отделение за прибиране на маркуча
Бутон за навиване на кабела
Отделение за прибиране на захранващия кабел
Захранващ кабел
Бутон за изпразване на резервоара за Calc Clean
Резервоар за Calc Clean с индикатор
Генератор за пара
20 Скоба за прибиране на маркуча
Канал за прибиране на маркуча
22 Плъзгач за заключване при носене
23 Заключване при носене
24 Копче за вкл./изкл.
25 Бутони с индикатори за избор на пара
26 Светлинен индикатор за празен воден резервоар
27 Светлинен индикатор за автоматично изключване
28 Светлинен индикатор за Auto Calc Clean
Ергономична височина на дъската
Нагласете дъската за гладене на подходящата височина. Когато
стоите изправени, разстоянието между лакътя ви и дъската за
гладене трябва да е приблизително 27 см. Можете да използвате
топлоустойчивата поставка на ютията като мярка.
27 cm27 cm
16

2 Ергономичен дизайн на ютията
Извитата нагоре ръкохватка осигурява удобно положение на китката.
3
Ергономична поставка на ютията
Поставката на ютията ви дава възможност да поставяте ютията
хоризонтално върху дъската за гладене.
1 Поставете генератора за пара върху стабилна и равна
повърхност, например върху твърдата част на дъска за гладене
или на маса.
2 Напълнете резервоара за вода до максималното ниво.
Забележка: Индикаторът за празен воден резервоар мига, ако
резервоарът за вода е празен.
Не сипвайте във водния резервоар гореща вода, парфюм, оцет, кола,
препарати за отстраняване на накип, помощни препарати за гладене
или други химикали.
Забележка: Изпразнете резервоара на Calc Clean, ако в него има вода.
Вж. главата “Функция Auto Calc Clean”’.
3 Плъзнете наляво плъзгача за заключване при носене, за да
отключите ютията.
4 Свалете ютията и топлоустойчивата поставка от генератора за
пара.
5 Поставете топлоустойчивата поставка върху дъската за гладене и
поставете ютията върху нея.
Забележка: При гладене можете спокойно да оставяте горещата
ютия върху поставката.
MI
N
MA
X
MI
N
MA
X
17

6 За да гладите с пара, нагласете температурния регулатор на 2
или по-високо положение..
7 Включете щепсела в заземен контакт.
Поставете копчето вкл./изкл. в положение “включено”.
Светлинният индикатор на парата мига, за да покаже, че
генераторът за пара се нагрява. След 2 минути уредът е готов за
употреба. Чувате две бипвания, индикаторът за пара спира да мига
и свети постоянно. Натиснете спусъка за пара, за да излезе пара.
Само за модел GC9040: За премахване на упорити гънки можете
да използвате функцията за допълнителна пара. Нагласете
температурния регулатор между 3 и MAX. Натиснете бутона
за допълнителна пара.
Никога не насочвайте парата към хора.
8 Натиснете бутона за пара, за да изберете желаната настройка за
пара.
; за умерено подаване на пара и # за силно подаване на
пара (задайте температура от
3 до MAX)
l за слабо подаване на пара (задайте температура от 2 до
MAX)
Забележка: Ако не използвате ютията повече от 10 минути,
уредът се изключва автоматично от съображения за безопасност.
Индикаторът за автоматично изключване мига. За да включите уреда
отново, натиснете произволен бутон.
Този уред е снабден с функция Auto Calc Clean. С течение на
времето вътре в генератора за пара се отлагат частици накип. Уредът
автоматично изпълнява процес за почистване Calc Clean, за да се
почисти сам от накипа след изразходването на 6 до 8 резервоара с
вода.
-
-
-
-
-
OFF
O
N
OFF
O
N
O
N
O
N
O
FF
O
N
O
FF
O
N
18

1 Когато се извършва процесът Auto Calc Clean, светлинният
индикатор на Auto Calc Clean мига и се чуват кратки звукови
сигнали.
Изчакайте около 2 минути, докато уредът довърши процеса.
По време на този процес уредът издава от време на време звуци
на изпомпване и щракване.
2 Когато процесът Auto Calc Clean завърши, светлинният
индикатор на Auto Calc Clean се изключва.
Индикаторът на резервоара за Calc Clean започва да мига.
3 Свалете водния резервоар.
Натиснете бутона за изпразване на резервоара за Calc Clean и
изпразнете резервоара в мивката.
4 Напълнете отново резервоара за вода и го закачете отново към
генератора за пара.
Процесът Auto Calc Clean е завършен и можете да започнете
отново да гладите, като индикаторът за пара ще свети
непрекъснато.
Забележка: Ако не изпразните резервоара за Calc Clean, той ще се
препълни по време на следващия цикъл на Auto Calc Clean.
Системата Auto Calc Clean поддържа уреда достатъчно чист. Можете
обаче да изпълните процеса за премахване на накип Calc Clean и
ръчно за допълнително почистване.
1 Напълнете резервоара за вода до максималното ниво.
-
-
,
-
-
O
F
F
O
F
F
MI
N
MAX
MI
N
MAX
19

2 Включете щепсела в заземен контакт.
3 За да започнете процеса Calc Clean ръчно, задръжте средния
бутон за избор на пара натиснат, като същевременно включите
уреда. Освободете бутона за избор на пара чак когато е
започнал да мига синият индикатор на Auto Calc Clean.
4 Изпълнете стъпки 1-4 от процеса Auto Calc Clean, описан по-
горе.
Забележка: Ръчният процес Calc Clean може да се активира само ако
уредът е достатъчно охладен. Ако е твърде горещ за ръчен процес
Calc Clean, бутонът за избор на пара мига и уредът продължава да се
нагрява за употреба.
1
Изключете уреда (1) и извадете щепсела от контакта (2).
Натиснете бутона за навиване на кабела, за да приберете
захранващия кабел.
Изпразнете резервоара на Calc Clean, ако е пълен.
2 Навийте захранващия маркуч около долната страна на
генератора за пара.
Забележка: Уверете се, че захранващият маркуч е поставен правилно в
канала за маркуча и вътре в скобата.
3 Поставете топлоустойчивата поставка върху генератора за пара
и поставете ютията върху поставката.
Забележка: Не е необходимо да чакате уредът да се охлади. Можете
да прибирате уреда веднага след употреба.
-
-
1 2
O
F
F
ON
1 2
O
F
F
ON
20
Pagina se încarcă ...
Pagina se încarcă ...
Pagina se încarcă ...
Pagina se încarcă ...
Pagina se încarcă ...
Pagina se încarcă ...
Pagina se încarcă ...
Pagina se încarcă ...
Pagina se încarcă ...
Pagina se încarcă ...
Pagina se încarcă ...
Pagina se încarcă ...
Pagina se încarcă ...
Pagina se încarcă ...
Pagina se încarcă ...
Pagina se încarcă ...
Pagina se încarcă ...
Pagina se încarcă ...
Pagina se încarcă ...
Pagina se încarcă ...
Pagina se încarcă ...
Pagina se încarcă ...
Pagina se încarcă ...
Pagina se încarcă ...
Pagina se încarcă ...
Pagina se încarcă ...
Pagina se încarcă ...
Pagina se încarcă ...
Pagina se încarcă ...
Pagina se încarcă ...
Pagina se încarcă ...
Pagina se încarcă ...
Pagina se încarcă ...
Pagina se încarcă ...
Pagina se încarcă ...
Pagina se încarcă ...
Pagina se încarcă ...
Pagina se încarcă ...
Pagina se încarcă ...
Pagina se încarcă ...
Pagina se încarcă ...
Pagina se încarcă ...
Pagina se încarcă ...
Pagina se încarcă ...
Pagina se încarcă ...
Pagina se încarcă ...
Pagina se încarcă ...
Pagina se încarcă ...
Pagina se încarcă ...
Pagina se încarcă ...
Pagina se încarcă ...
Pagina se încarcă ...
Pagina se încarcă ...
Pagina se încarcă ...
Pagina se încarcă ...
Pagina se încarcă ...
Pagina se încarcă ...
Pagina se încarcă ...
Pagina se încarcă ...
Pagina se încarcă ...
Pagina se încarcă ...
Pagina se încarcă ...
Pagina se încarcă ...
Pagina se încarcă ...
Pagina se încarcă ...
Pagina se încarcă ...
Pagina se încarcă ...
Pagina se încarcă ...
Pagina se încarcă ...
Pagina se încarcă ...
Pagina se încarcă ...
Pagina se încarcă ...
Pagina se încarcă ...
Pagina se încarcă ...
Pagina se încarcă ...
Pagina se încarcă ...
Pagina se încarcă ...
Pagina se încarcă ...
Pagina se încarcă ...
Pagina se încarcă ...
Pagina se încarcă ...
Pagina se încarcă ...
Pagina se încarcă ...
Pagina se încarcă ...
Pagina se încarcă ...
Pagina se încarcă ...
Pagina se încarcă ...
Pagina se încarcă ...
Pagina se încarcă ...
Pagina se încarcă ...
Pagina se încarcă ...
Pagina se încarcă ...
Pagina se încarcă ...
Pagina se încarcă ...
Pagina se încarcă ...
Pagina se încarcă ...
Pagina se încarcă ...
Pagina se încarcă ...
Pagina se încarcă ...
Pagina se încarcă ...
Pagina se încarcă ...
Pagina se încarcă ...
Pagina se încarcă ...
Pagina se încarcă ...
Pagina se încarcă ...
Pagina se încarcă ...
Pagina se încarcă ...
Pagina se încarcă ...
Pagina se încarcă ...
Pagina se încarcă ...
Pagina se încarcă ...
Pagina se încarcă ...
Pagina se încarcă ...
Pagina se încarcă ...
Pagina se încarcă ...
Pagina se încarcă ...
Pagina se încarcă ...
Pagina se încarcă ...
Pagina se încarcă ...
Pagina se încarcă ...
Pagina se încarcă ...
Pagina se încarcă ...
Pagina se încarcă ...
Pagina se încarcă ...
Pagina se încarcă ...
Pagina se încarcă ...
-
 1
1
-
 2
2
-
 3
3
-
 4
4
-
 5
5
-
 6
6
-
 7
7
-
 8
8
-
 9
9
-
 10
10
-
 11
11
-
 12
12
-
 13
13
-
 14
14
-
 15
15
-
 16
16
-
 17
17
-
 18
18
-
 19
19
-
 20
20
-
 21
21
-
 22
22
-
 23
23
-
 24
24
-
 25
25
-
 26
26
-
 27
27
-
 28
28
-
 29
29
-
 30
30
-
 31
31
-
 32
32
-
 33
33
-
 34
34
-
 35
35
-
 36
36
-
 37
37
-
 38
38
-
 39
39
-
 40
40
-
 41
41
-
 42
42
-
 43
43
-
 44
44
-
 45
45
-
 46
46
-
 47
47
-
 48
48
-
 49
49
-
 50
50
-
 51
51
-
 52
52
-
 53
53
-
 54
54
-
 55
55
-
 56
56
-
 57
57
-
 58
58
-
 59
59
-
 60
60
-
 61
61
-
 62
62
-
 63
63
-
 64
64
-
 65
65
-
 66
66
-
 67
67
-
 68
68
-
 69
69
-
 70
70
-
 71
71
-
 72
72
-
 73
73
-
 74
74
-
 75
75
-
 76
76
-
 77
77
-
 78
78
-
 79
79
-
 80
80
-
 81
81
-
 82
82
-
 83
83
-
 84
84
-
 85
85
-
 86
86
-
 87
87
-
 88
88
-
 89
89
-
 90
90
-
 91
91
-
 92
92
-
 93
93
-
 94
94
-
 95
95
-
 96
96
-
 97
97
-
 98
98
-
 99
99
-
 100
100
-
 101
101
-
 102
102
-
 103
103
-
 104
104
-
 105
105
-
 106
106
-
 107
107
-
 108
108
-
 109
109
-
 110
110
-
 111
111
-
 112
112
-
 113
113
-
 114
114
-
 115
115
-
 116
116
-
 117
117
-
 118
118
-
 119
119
-
 120
120
-
 121
121
-
 122
122
-
 123
123
-
 124
124
-
 125
125
-
 126
126
-
 127
127
-
 128
128
-
 129
129
-
 130
130
-
 131
131
-
 132
132
-
 133
133
-
 134
134
-
 135
135
-
 136
136
-
 137
137
-
 138
138
-
 139
139
-
 140
140
-
 141
141
-
 142
142
-
 143
143
-
 144
144
-
 145
145
-
 146
146


Philips GC9020/02 Manual de utilizare
- Categorie
- Stații de călcat cu abur
- Tip
- Manual de utilizare
- Acest manual este potrivit și pentru
în alte limbi
- slovenčina: Philips GC9020/02 Používateľská príručka
Lucrări conexe
-
Philips GC6730/30 Informații importante
-
Philips GC7933/30 Informații importante
-
Philips GC7520/02 Informații importante
-
Philips GC8510/02 Manual de utilizare
-
Philips GC8460/02 Manual de utilizare
-
Philips GC8735/80 Manual de utilizare
-
-
-
Philips GC8376/02 Manual de utilizare
-
Philips GC8220/02 Manual de utilizare