Nedis SMARTLIFE 2000W WIFI VIFTEOVN Manual de utilizare
- Tip
- Manual de utilizare

ned.is/htfa20wtw
Wi-Fi Smart Ceramic Fan Heater
with digital thermostat and oscillation function
HTFA20WTW

a Quick start guide 5
c Kurzanleitung 6
b Guide de démarrage rapide 9
d Snelstartgids 11
j Guida rapida all’avvio 13
h Guía de inicio rápido 15
i Guia de iniciação rápida 17
e Snabbstartsguide 19
g Pika-aloitusopas 21
f Hurtigguide 23
2 Vejledning til hurtig start 25
k Gyors beüzemelési útmutató 26
n Przewodnik Szybki start 29
x Οδηγός γρήγορης εκκίνησης 31
1 Rýchly návod 33
l Rychlý návod 35
y Ghid rapid de inițiere 37
Specications
Input power 220 – 240 V ~ 50 Hz
Heating power 1400 / 2000 W
Model identier(s): HTFA20WTW
Item Symbol Value Unit Item Unit
Heat output Type of heat input, for electric storage local space heaters only
(select one)
Nominal heat
output
Pnom 2.0 kW manual heat charge control, with integrated
thermostat
No
Minimum
heat output
(indicative)
Pmin 1.4 kW manual heat charge control with room and/or outdoor
temperature feedback
No
Maximum
continuous heat
output
Pmax, c 2.0 kW electronic heat charge control with room and/or
outdoor temperature feedback
No
Auxiliary electricity consumption fan assisted heat output No
At nominal heat
output
elmax 0.000 kW Type of heat output/room temperature control (select one)
At minimum
heat output
elmin 0.000 kW single stage heat output and no room temperature
control
No
In standby mode elSB * kW two or more manual stages, no room temperature
control
No
with mechanic thermostat room temperature control No
with electronic room temperature control Yes
electronic room temperature control plus day timer No
electronic room temperature control plus week timer No
Other control options (multiple selections possible)
room temperature control, with presence detection No
room temperature control, with open window
detection
No
with distance control option No
with adaptive start control No
with working time limitation Yes
with black bulb sensor No
Contact details Nedis BV, De Tweeling 28, 5215 MC ’s-Hertogenbosch, The Netherlands
*Power consumption in networked standby mode: 1.868 W (limit ≤2 W).

8
1
7
2
3
9
6
5
2
3
4
5
6
7w
e
r
t
q
A

1 6432 5
B
C

5
a Quick start guide
Wi-Fi Smart Ceramic Fan
Heater
HTFA20WTW
For more information see the extended manual online:
ned.is/htfa20wtw
Intended use
This product is a heater that allows the user to control the
surrounding temperature.
This product can be controlled via the Nedis SmartLife app, the
buttons on the product or with the included remote control.
This product is only suitable for well insulated spaces or occasional
use.
The product is intended for indoor use only.
The product is intended for use in household environments for
typical housekeeping functions that may also be used by non-expert
users for typical housekeeping functions, such as: shops, oces
other similar working environments, farm houses, by clients in
hotels, motels and other residential type environments and/or in
bed and breakfast type environments.
This product is not intended for use by persons (including children)
with reduced physical, sensory or mental capabilities or lack of
experience and knowledge, unless they have been given supervision
or instruction concerning the use of the product by a person
responsible for their safety.
Any modication of the product may have consequences for safety,
warranty and proper functioning.
Main parts (image A)
1 Display
2 Temperature down button
3 Temperature up button
4 Oscillation/Wi-Fi button
5 Timer button
6 Mode button
7 Power button
8 Air outlet
9 Oscillation button
q Handle
w Air inlet
e On/o switch
r Base
t Power cable
Safety instructions
To avoid overheating, do not cover the product.
-
WARNING
• Ensure you have fully read and understood the instructions in
this document before you install or use the product. Keep the
packaging and this document for future reference.
• Do not drop the product and avoid bumping.
• Always keep button cell batteries, both full and empty, out of
reach of children to avoid the chance of swallowing. Dispose of
used batteries immediately and safely. Button cell batteries can
cause serious internal chemical burns in as little as two hours
when swallowed. Keep in mind that the rst symptoms may look
like child diseases like coughing or drooling. Seek immediate
medical attention when you suspect that batteries have been
swallowed.
• Wipe the battery terminals with a clean dry cloth if they are dirty.
• Non-rechargeable batteries are not to be recharged.
• Do not short-circuit a battery.
• Do not subject cells or batteries to mechanical shock.
• Do not dismantle, open or shred batteries.
• Do not remove a cell or battery from the original packaging until
required for use.
• Do not use any cell or battery that is not designed for use with
the product.
• Battery usage by children should be supervised.
• Observe the plus (+) and minus (–) marks on the cell or battery
and product and ensure correct use.
• Seek medical advice immediately if a cell or battery has been
swallowed.
• Do not expose batteries to heat or re. Avoid storage in direct
sunlight.
• Properly dispose of empty cells or batteries.
• Do not expose the product to water or moisture.
• Do not use this product in small rooms when they are occupied
by persons not capable of leaving the room on their own, unless
constant supervision is provided.
• Do not use this product in the immediate surroundings of a bath,
a shower or swimming pool.
• Only handle the product with dry hands. Handling with wet
hands might cause an electric shock.
• Do not use the product in rooms where ammable liquids or
gases are used or stored.
• The heat of the product may cause damage to the surface the
product is placed on. Always place the product on a at, stable
and heat resistant surface to prevent damage to the
surroundings of the product.
• Do not locate the product immediately below a power outlet.
• Only plug the power cable into a wall outlet. Do not use
extension cables.
• Do not plug the product in a power outlet of a power group with
other products that consume a lot of power.
• Always check that the voltage of the product corresponds to the
mains voltage.
• Only use the product in the upright position.
• Always unwind the power cable before using the product.
• Do not use the product if a part is damaged or defective. Replace
a damaged or defective product immediately.
• The power cable cannot be replaced. If the cable is damaged the
product should be scrapped.
• Do not unplug the product by pulling on the cable. Always grasp
the plug and pull.
• Unplug the product from the power source and other equipment
if problems occur.
• Unplug the product when not in use and before cleaning.
• Do not use external timers or remote control systems to switch
the product on or o.
• Do not use accessories that are not recommended or sold by the
manufacturer.
• To avoid overheating, do not cover the product. Keep a distance
of at least 1 meter from textiles, curtains, tent cloths and other
ammable objects to reduce the risk of a re.
• Keep objects at least 50 cm from the air inlet.
• Keep objects at least 1 meter from the air outlet.
• The surfaces of the product get hot during use. Only touch the
display and handles of the product to avoid burns.
• Only use the product as described in this document.
• Children should be supervised to ensure that they do not play
with the product.
• Before cleaning and maintenance, switch o the product and
disconnect the power. Let the product cool down completely.
• This product may only be serviced by a qualied technician for
maintenance to reduce the risk of electric shock.
• Clean the openings of the product regularly to reduce the risk of
overheating.
• Do not open the product, there are no user serviceable parts
inside.
Insert or change battery (image B)
1. Open the battery compartment.
2. Place the battery
3. Close the battery compartment.

6
Installing the Nedis SmartLife app
1. Download the Nedis Smartlife app for Android or iOS on your
phone via Google Play or the Apple App Store.
2. Open the Nedis Smartlife app on your phone.
3. Create an account with your e-mail address and tap Continue.
4You will receive a verication code on your e-mail address.
4. Enter the received verication code.
5. Create a password and tap Done.
6. Tap Add Home to create a SmartLife Home.
7. Set your location, choose the rooms you want to connect with
and tap Done.
Adding a product to the Nedis SmartLife app
1. Press the on/o switch Ae to switch on the product.
2. Press and hold the oscillation/Wi-Fi button A4 for 3 seconds.
4The Wi-Fi indicator C1 blinks fast and a beep sounds to indicate
pairing mode is active.
3. Tap + in the Nedis SmartLife app.
4. Select the product type you want to add from the list.
5. Follow the instructions in the Nedis SmartLife app.
6. After conrming you can control the product with your
smartphone.
To connect your SmartLife account to Amazon Alexa and/ or Google
Home, set it up using the “Smart Life” action or skill. For more details
check the instruction on either Amazon or Google.
4The Wi-Fi indicator C1 lights up when the product is connected.
Installing the product
Place the product on a stable and at surface.
4Keep objects at least 50 cm from the air inlet Aw.
4Keep objects at least 1 meter from the air outlet A8.
Switching on the product
1. Plug the power cable At into a power outlet.
2. Press the on/o switch Ae to switch on the product.
4The display shows the current room temperature C4.
3. Press the power button A7.
The display A1 switches on.
Indicators (image C)
The display A1 contains the following:
1 Wi-Fi indicator
2 Low power indicator
3 High power indicator
4 Current room temperature
5 Timer indicator
6 Oscillation indicator
Switching between power settings
1. Press the mode button A6 to switch between power settings.
2. Choose between:
• Low power mode
• High power mode
4The low power indicator C2 lights up to indicate the product is
in low power mode.
4The low and high power indicator C23 light up to indicate the
product is in high power mode.
Setting the timer
1. Press the timer button A5 to set a countdown timer.
2. Press the timer button A5 to increase the timer with 1 hour.
4The maximum countdown time is 12 hours.
3. Switch o the timer by pressing the timer button A5 once more
when the time is set to maximum.
4The timer is cancelled when the product is switched o.
Setting the temperature
1. Press the temperature up and down buttons A32 to adjust
the set room temperature.
4When the room temperature reaches the selected level, the
built-in thermostat automatically switches o, the fan remains
working.
4When the room temperature decreases, the built-in thermostat
automatically switches back on.
Switching the oscillation on/o
1. Press the Wi-Fi/oscillation button A49 to switch the oscillation
on/o.
The oscillation indicator C6 appears on the display A1 to indicate
the oscillation mode is activated.
Overheat protection
The product switches o automatically in case of overheating, e.g.
due to the total or partial obstruction of the air inlet or the air outlet
grid. After overheating, allow the product to cool down for at least
30 minutes before using it again.
Tip-over safety switch
The tip-over safety switch automatically switches o the product
when it falls over. Before using the product again: Switch o the
product, disconnect the power plug and check for damage.
Switching o the product
1. Press the power button A7.
2. Press the on/o switch Ae to switch o the product.
3. Unplug the power cable At from the power outlet.
Disposal
The product is designated for separate collection at
an appropriate collection point. Do not dispose of the
product with household waste.
For more information, contact the retailer or the local
authority responsible for the waste management.
Declaration of Conformity
We, Nedis B.V. declare as manufacturer that the product
HTFA20WTW from our brand Nedis®, produced in China, has been
tested according to all relevant CE standards and regulations and
that all tests have been passed successfully. This includes, but is not
limited to the RED 2014/53/EU regulation.
The complete Declaration of Conformity (and the safety datasheet if
applicable) can be found and downloaded via:
nedis.com/HTFA20WTW#support
c Kurzanleitung
WLAN-Smart
Keramik-Heizlüfter
HTFA20WTW
Weitere Informationen nden Sie in der erweiterten
Anleitung online: ned.is/htfa20wtw
Bestimmungsgemäße Verwendung
Dieses Produkt ist eine Heizung, die dem Benutzer die Kontrolle der
Umgebungstemperatur ermöglicht.
Dieses Produkt kann über die Nedis SmartLife-App, die Tasten am
Produkt oder mit der mit der mitgelieferter Fernbedienung bedient
werden.
Dieses Produkt ist nur für gut isolierte Räume oder für den
gelegentlichen Gebrauch geeignet.
Das Produkt ist nur zur Verwendung innerhalb von Gebäuden
gedacht.
Das Produkt ist zur Verwendung in Haushaltsumgebungen
für typische Haushaltsfunktionen gedacht, die auch von nicht
fachkundigen Benutzern ausgeführt werden können, wie z.B.:
in Geschäften, Büros und ähnlichen Arbeitsumgebungen,

7
Bauernhäusern, von Kunden in Hotels, Motels und anderen
Unterkünften und/oder in Pensionen.
Dieses Produkt ist nicht zur Verwendung durch Personen
(einschließlich Kinder) mit eingeschränkten körperlichen,
sensorischen oder geistigen Fähigkeiten oder ohne ausreichende
Erfahrung und Kenntnis geeignet, es sei denn, sie werden durch
eine für ihre Sicherheit verantwortliche Person beaufsichtigt und
eingewiesen.
Jegliche Modikation des Produkts kann Folgen für die Sicherheit,
Garantie und ordnungsgemäße Funktionalität haben.
Hauptbestandteile (Abbildung A)
1 Anzeige
2 Temperatur niedriger-Knopf
3 Temperatur höher-Knopf
4 Oszillieren/WLAN-Taste
5 Timer-Taste
6 Modus-Taste
7 Ein/Aus-Taste
8 Luftauslass
9 Oszillieren-Schalter
q Gri
w Lufteinlass
e Ein/Aus-Schalter
r Basis
t Stromkabel
Sicherheitshinweise
Um ein Überhitzen zu vermeiden, decken Sie das
Produkt nicht ab.
-
WARNUNG
• Vergewissern Sie sich, dass Sie die Anweisungen in diesem
Dokument vollständig gelesen und verstanden haben, bevor Sie
das Produkt installieren oder verwenden. Heben Sie die
Verpackung und dieses Dokument zum späteren Nachschlagen
auf.
• Lassen Sie das Produkt nicht herunterfallen und vermeiden Sie
Kollisionen.
• Bewahren Sie volle und leere Knopfzellenbatterien immer
außerhalb der Reichweite von Kindern auf, um die Gefahr des
Verschluckens zu vermeiden. Die Entsorgung verbrauchter
Batterien sollte immer unverzüglich und auf sichere Weise
erfolgen. Knopfzellenbatterien können beim Verschlucken
innerhalb von nur zwei Stunden schwere innere chemische
Verätzungen verursachen. Beachten Sie, dass die ersten
Anzeichen dafür wie Symptome von Kinderkrankheiten wie
Husten oder vermehrter Speicheluss aussehen können. Suchen
Sie sofort einen Arzt auf, wenn Sie den Verdacht haben, dass
Batterien verschluckt wurden.
• Wischen Sie die Batterieanschlüsse mit einem sauberen,
trockenen Tuch ab, wenn sie verschmutzt sind.
• Nicht wiederauadbare Batterien dürfen nicht wiederaufgeladen
werden.
• Schließen Sie keinesfalls eine Batterie kurz.
• Setzen Sie Zellen oder Batterien keinen mechanischen Stößen
aus.
• Batterien dürfen nicht zerlegt, geönet oder geschreddert
werden.
• Nehmen Sie den Akku oder die Batterie erst dann aus der
Originalverpackung, wenn Sie sie benötigen.
• Verwenden Sie keine Akkus oder Batterien, die nicht für die
Verwendung mit dem Gerät vorgesehen sind.
• Die Verwendung von Batterien durch Kinder sollte beaufsichtigt
werden.
• Achten Sie auf die Kennzeichnungen für plus (+) und minus (-)
am Akku oder den Batterien, um die korrekte Verwendung sicher
zu stellen.
• Holen Sie bei Verschlucken von einem Akku oder einer Batterie
sofort ärztlichen Rat ein.
• Setzen Sie Batterien nicht Hitze oder Feuer aus. Vermeiden Sie die
Lagerung in direktem Sonnenlicht.
• Entsorgen Sie leere Akkus oder Batterien ordnungsgemäß.
• Setzen Sie das Produkt keinem Wasser oder Feuchtigkeit aus.
• Verwenden Sie dieses Produkt nicht in kleinen Räumen, wenn
sich darin Personen benden, die den Raum nicht allein verlassen
könnten, es sei denn, es besteht eine ständige Aufsicht.
• Verwenden Sie dieses Produkt nicht in unmittelbarer Umgebung
einer Badewanne, Dusche oder eines Pools.
• Fassen Sie das Produkt nur mit trockenen Händen an. Hantieren
mit nassen Händen kann einen elektrischen Schlag verursachen.
• Verwenden Sie das Produkt nicht in Räumen, in denen brennbare
Flüssigkeiten oder Gase verwendet oder gelagert werden.
• Das erhitzte Produkt kann die Oberäche beschädigen, auf die es
gestellt wird. Stellen Sie das Produkt daher stets auf eine ache,
stabile und hitzebeständige Oberäche, um Schäden in der
Umgebung des Produkts zu vermeiden.
• Stellen Sie das Produkt nicht unmittelbar unter eine Steckdose.
• Stecken Sie das Stromkabel nur direkt in eine Wandsteckdose.
Verwenden Sie keine Verlängerungskabel.
• Schließen Sie das Produkt nicht zusammen mit anderen Geräten,
die viel Strom verbrauchen, an einer Steckdose in einem
Stromkreis an.
• Überprüfen Sie immer, ob die Spannung des Produkts mit der
Netzspannung übereinstimmt.
• Verwenden Sie das Produkt nur in aufrechter Position.
• Wickeln Sie das Stromkabel immer vollständig ab, bevor Sie das
Produkt verwenden.
• Verwenden Sie das Produkt nicht, wenn ein Teil beschädigt ist
oder es einen Mangel aufweist. Ersetzen Sie ein beschädigtes
oder defektes Produkt unverzüglich.
• Das Stromkabel kann nicht ersetzt werden. Wenn das Kabel
beschädigt ist, muss das Produkt entsorgt werden.
• Ziehen Sie das Produkt niemals am Kabel aus der Steckdose.
Halten Sie immer den Stecker fest und ziehen Sie daran.
• Trennen Sie das Produkt von der Stromquelle und anderer
Ausrüstung, falls Probleme auftreten.
• Trennen Sie das Produkt bei Nichtgebrauch und vor der
Reinigung von der Stromversorgung.
• Verwenden Sie keine externen Zeitschaltuhren oder
Fernbedienungssysteme, um das Produkt ein- oder
auszuschalten.
• Verwenden Sie kein Zubehör, das nicht vom Hersteller empfohlen
oder verkauft wird.
• Um ein Überhitzen zu vermeiden, decken Sie das Produkt nicht
ab. Halten Sie einen Abstand von mindestens 1 Meter von
Textilien, Vorhängen, Zeltplanen und anderen entzündlichen
Objekten ein, um die Brandgefahr zu verringern.
• Achten Sie auf einen Abstand von mindestens 50 cm zwischen
Gegenständen und dem Lufteinlass.
• Achten auf einen Abstand von mindestens 1 Meter zwischen
Gegenständen und dem Luftauslass.
• Die Oberächen des Produkts werden während der Verwendung
heiss. Berühren Sie nur das Display und die Grie des Produkts,
um Verbrennungen zu vermeiden.
• Verwenden Sie das Produkt nur wie in diesem Dokument
beschrieben.
• Kinder müssen beaufsichtigt werden, um sicherzustellen, dass sie
nicht mit dem Produkt spielen.
• Schalten Sie das Produkt vor der Reinigung und Wartung aus und
trennen Sie die Verbindung zur Stromversorgung. Lassen Sie das
Produkt vollständig abkühlen.
• Dieses Produkt darf nur von einem ausgebildeten Techniker
gewartet werden, um die Gefahr eines Stromschlags zu
reduzieren.
• Reinigen Sie die Önungen des Produkts regelmässig, um das
Risiko einer Überhitzung zu verringern.
• Önen Sie das Produkt nicht. Es benden sich keine vom
Benutzer zu wartenden Teile im Inneren.

8
Umschalten zwischen Leistungsstufen
1. Drücken Sie die Modus-Taste A6, um zwischen den
Leistungsstufen umzuschalten.
2. Wählen Sie zwischen:
• Niedriger Leistungsmodus
• Hoher Leistungsmodus
4Die Anzeige für niedrige Leistung C2 leuchtet auf, um
anzuzeigen, dass sich das Produkt im niedrigen Leistungsmodus
bendet.
4Die Anzeige für niedrige und hohe Leistungsstufe C23
leuchtet auf, um anzuzeigen, dass sich das Produkt im hohen
Leistungsmodus bendet.
Einstellen des Timers
1. Drücken Sie die Timer-Taste A5, um einen Countdown-Timer
einzustellen.
2. Drücken Sie die Timer-Taste A5, um den Timer um 1Stunde zu
erhöhen.
4Die maximale Countdown-Zeit beträgt 12 Stunden.
3. Schalten Sie den Timer aus, indem Sie die Timer-Taste A5 ein
weiteres Mal drücken, wenn die Zeit das Maximum erreicht hat.
4Der Timer wird abgebrochen, wenn das Produkt ausgeschaltet
wird.
Einstellen der Temperatur
1. Drücken Sie die Temperatur hoch- und runter-Tasten A32, um
die Soll-Raumtemperatur anzupassen.
4Wenn die Raumtemperatur den eingestellten Wert erreicht,
schaltet der eingebaute Thermostat das Produkt automatisch
aus, der Lüfter bleibt weiter in Betrieb.
4Wenn die Raumtemperatur sinkt, schaltet der eingebaute
Thermostat das Produkt automatisch wieder ein.
Ein-/Ausschalten des Oszillierens
1. Drücken Sie die WLAN/Oszillieren-Taste A49, um das
Oszillieren ein-/auszuschalten.
Die Oszillationsanzeige C6 erscheint auf dem Display A1, um
anzuzeigen, dass der Oszillationsmodus aktiviert ist.
Überhitzungsschutz
Bei Überhitzung, beispielsweise infolge eines teilweise oder
vollständig verdeckten Lufteinlass- oder Luftauslassgitters, schaltet
sich das Produkt automatisch ab. Lassen Sie das Produkt nach einem
Überhitzen mindestens 30Minuten abkühlen, bevor Sie es wieder
verwenden.
Kippschutzschalter
Der Kippschutzschalter schaltet das Produkt automatisch aus, wenn
es umkippt. Bevor Sie das Produkt erneut verwenden: Schalten Sie
das Produkt aus, ziehen Sie den Netzstecker und überprüfen Sie es
auf Schäden.
Ausschalten des Produkts
1. Drücken Sie die Ein/Aus-Taste A7.
2. Drücken Sie den Ein/Aus-Schalter Ae, um das Produkt
auszuschalten.
3. Ziehen Sie das Netzkabel At aus der Steckdose.
Entsorgung
Dieses Produkt muss an einer entsprechenden
Sammelstelle zur Entsorgung abgegeben
werden. Entsorgen Sie das Produkt nicht mit dem
Haushaltsabfall.
Weitere Informationen erhalten Sie beim Verkäufer oder
der für die Abfallwirtschaft verantwortlichen örtlichen
Behörde.
Einlegen oder Wechseln der Batterie (Abbildung
B)
1. Önen Sie das Batteriefach.
2. Einlegen der Batterie
3. Schließen Sie das Batteriefach.
Installation der Nedis SmartLife App
1. Laden Sie die Nedis SmartLife-App für Android oder iOS aus dem
Google Play Store oder dem Apple App Store auf Ihr Smartphone.
2. Önen Sie die Nedis SmartLife-App auf Ihrem Smartphone.
3. Erstellen Sie ein Konto mit Ihrer E-Mail-Adresse und tippen Sie
auf Continue.
4Sie erhalten einen Bestätigungscode an Ihre E-Mail-Adresse
gesandt.
4. Geben Sie den erhaltenen Bestätigungscode ein.
5. Erstellen Sie ein Passwort und tippen Sie auf Done (Fertigstellung).
6. Tippen Sie auf Add Home, um ein SmartLife-Zuhause zu erstellen.
7. Legen Sie Ihren Standort fest, wählen Sie die Räume aus mit
denen Sie eine Verbindung herstellen möchten, und tippen Sie
auf Done.
Hinzufügen eines Produkts zur Nedis
SmartLife-App
1. Drücken Sie den Ein/Aus-Schalter Ae, um das Produkt
einzuschalten.
2. Halten Sie die Oszillieren/WLAN-Taste A4 3Sekunden lang
gedrückt.
4Die WLAN-Anzeige C1 blinkt schnell und ein Piepton ertönt, um
anzuzeigen, dass der Kopplungsmodus aktiv ist.
3. Tippen Sie auf + in der Nedis SmartLife-App.
4. Wählen Sie den Gerätetyp, den Sie hinzufügen möchten, aus der
Liste aus.
5. Befolgen Sie die Anweisungen in der Nedis SmartLife-App.
6. Nach dem Bestätigen können Sie das Produkt über Ihr
Smartphone steuern.
Um Ihr SmartLife-Konto mit Amazon Alexa und/oder Google Home
zu verbinden, richten Sie es einfach über die „SmartLife“-Aktion oder
den „SmartLife“-Skill ein. Weitere Informationen dazu nden Sie in
der jeweiligen Anleitung von Amazon oder Google.
4Die WLAN-Anzeige C1 leuchtet auf, wenn das Produkt
verbunden ist.
Installation des Produkts
Stellen Sie das Produkt auf eine stabile, ebene Oberäche.
4Achten Sie auf einen Abstand von mindestens 50 cm zwischen
Gegenständen und dem Lufteinlass Aw.
4Achten Sie auf einen Abstand von mindestens 1 Meter zwischen
Gegenständen und dem Luftauslass A8.
Einschalten des Produkts
1. Stecken Sie das Stromkabel At in eine Steckdose.
2. Drücken Sie den Ein/Aus-Schalter Ae, um das Produkt
einzuschalten.
4Das Display zeigt die aktuelle Raumtemperatur an C4.
3. Drücken Sie die Ein/Aus-Taste A7.
Das Display A1 schaltet sich ein.
Symbole (Abbildung C)
Das Display A1 zeigt folgendes an:
1 WLAN-Anzeige
2 Anzeige niedrige
Betriebsleistung
3 Anzeige hohe
Betriebsleistung
4 Aktuelle Raumtemperatur
5 Timer-Anzeige
6 Oszillierenanzeige

9
• Ne pas laisser tomber le produit et éviter de le cogner.
• Gardez toujours les piles bouton, chargées et déchargées, hors
de portée des enfants an d’éviter tout risque d’ingestion. Jetez
les piles usagées immédiatement et en toute sécurité. Si elles
sont avalées, les piles bouton peuvent provoquer de graves
brûlures chimiques internes en seulement deux heures. Gardez à
l'esprit que les premiers symptômes peuvent ressembler à des
maladies infantiles comme la toux ou la bave. Si vous pensez que
des piles ont été avalées, consultez immédiatement un médecin.
• Essuyez les bornes de la batterie avec un chion propre et sec si
elles sont sales.
• Les piles non rechargeables ne doivent pas être rechargées.
• Ne pas court-circuiter une batterie.
• Ne pas soumettre les piles ou les batteries à des chocs
mécaniques.
• Ne pas démonter, ouvrir ou déchiqueter les batteries.
• Ne pas retirer une pile ou une batterie de son emballage
d'origine tant que vous ne l'utilisez pas.
• N'utiliser aucune pile ou batterie qui n'est pas conçue pour être
utilisée avec le produit.
• L'utilisation de la batterie par des enfants doit être surveillée.
• Respectez les marquages positif (+) et négatif (-) sur la pile, la
batterie et le produit et assurez-vous de les utiliser correctement.
• En cas d’ingestion d’une pile-bouton ou autre, consultez un
médecin immédiatement.
• Ne pas exposer les batteries à la chaleur ou au feu. Évitez tout
stockage à la lumière directe du soleil.
• Éliminez correctement les piles ou batteries déchargées.
• Ne pas exposer le produit à l'eau ou à l'humidité.
• N’utilisez pas ce produit dans de petites pièces lorsqu’elles sont
occupées par des personnes incapables de quitter la pièce par
elles-mêmes, sauf si une surveillance constante est assurée.
• N’utilisez pas ce produit à proximité immédiate d’un bain, d’une
douche ou d’une piscine.
• Manipulez le produit uniquement avec des mains sèches. La
manipulation avec des mains mouillées peut provoquer un choc
électrique.
• Ne pas utiliser le produit dans des pièces où des liquides ou des
gaz inammables sont utilisés ou stockés.
• La chaleur du produit peut endommager la surface sur laquelle il
est posé. Posez toujours le produit sur une surface plane, stable
et résistante à la chaleur an d’éviter d’endommager
l’environnement du produit.
• Ne pas placer le produit directement sous une prise de courant.
• Ne branchez le câble d’alimentation que dans une prise murale.
Ne pas utiliser de rallonge.
• Ne branchez pas le produit sur une prise de courant d’un groupe
d’alimentation avec d’autres produits qui consomment beaucoup
d’énergie.
• Vériez toujours que la tension du produit corresponde à la
tension du secteur.
• N’utilisez le produit que dans une position verticale.
• Déroulez toujours le câble d'alimentation avant d'utiliser le
produit.
• Ne pas utiliser le produit si une pièce est endommagée ou
défectueuse. Remplacez immédiatement un produit
endommagé ou défectueux.
• Le câble d'alimentation ne peut pas être remplacé. Si le câble est
endommagé, le produit doit être mis au rebut.
• Ne débranchez pas le produit en tirant sur le câble. Saisissez
toujours la che et tirez.
• Débranchez le produit de la source d’alimentation et tout autre
équipement en cas de problème.
• Débranchez le produit lorsque vous ne l'utilisez pas et avant de le
nettoyer.
Konformitätserklärung
Wir, Nedis B.V., erklären als Hersteller, dass das Produkt HTFA20WTW
unserer Marke Nedis®, produziert in China, nach allen geltenden
CE-Standards und Vorschriften getestet wurde und alle diese Tests
erfolgreich bestanden hat. Dies gilt unter anderem auch für die
Richtlinie RED 2014/53/EU.
Die vollständige Konformitätserklärung (und das
Sicherheitsdatenblatt, falls zutreend) steht zum Download zur
Verfügung unter:
nedis.de/HTFA20WTW#support
b Guide de démarrage rapide
Radiateur céramique
souant intelligent Wi-Fi
HTFA20WTW
Pour plus d'informations, consultez le manuel détaillé en
ligne : ned.is/htfa20wtw
Utilisation prévue
Ce produit est un radiateur qui permet à l’utilisateur de contrôler la
température ambiante.
Ce produit peut être contrôlé via l’application Nedis SmartLife, les
boutons du produit ou la télécommande incluse.
Ce produit ne peut être utilisé que dans des locaux bien isolés ou de
manière occasionnelle.
Le produit est prévu pour un usage intérieur uniquement.
Le produit est destiné à être utilisé dans des environnements
domestiques pour des fonctions de ménage typiques qui peuvent
également être réalisées par des utilisateurs non experts pour des
fonctions de ménage typiques, tels que : des magasins, bureaux,
autres environnements de travail similaires, fermes, par des clients
dans des hôtels, motels et autres environnements de type résidentiel
et/ou dans des environnements de type chambres d'hôtes.
Ce produit n'est pas destiné à être utilisé par des personnes (y
compris des enfants) ayant des capacités physiques, sensorielles ou
mentales réduites ou manquant d'expérience et de connaissances,
sauf si elles ont reçu une supervision ou des instructions concernant
l'utilisation du produit par une personne responsable de leur
sécurité.
Toute modication du produit peut avoir des conséquences sur la
sécurité, la garantie et le bon fonctionnement.
Pièces principales (image A)
1 Achage
2 Bouton de diminution de la
température
3 Bouton d’augmentation de
la température
4 Bouton oscillation/Wi-Fi
5 Bouton de minuterie
6 Bouton mode
7 Bouton d’alimentation
8 Sortie d’air
9 Bouton d'oscillation
q Poignée
w Entrée d'air
e Interrupteur marche/arrêt
r Base
t Câble d'alimentation
Consignes de sécurité
Pour éviter toute surchaue, ne couvrez pas le
produit.
-
AVERTISSEMENT
• Assurez-vous d'avoir entièrement lu et compris les instructions
de ce document avant d'installer ou d'utiliser le produit.
Conservez l'emballage et le présent document pour référence
ultérieure.

10
Installer le produit
Placez le produit sur une surface stable et plane.
4Gardez les objets à au moins 50 cm de l’entrée d’air Aw.
4Gardez les objets à au moins 1 mètre de la sortie d’air A8.
Mettre le produit sous tension
1. Branchez le câble d'alimentation At dans une prise de courant.
2. Appuyez sur le bouton marche/arrêt Ae pour mettre le produit
sous tension.
4L’écran ache la température ambiante actuelle C4.
3. Appuyez sur le bouton d’alimentation A7.
L’écran A1 s’allume.
Voyants (image C)
L’écran A1 contient les éléments suivants:
1 Voyant Wi-Fi
2 Voyant de basse puissance
3 Voyant de haute puissance
4 Température ambiante
actuelle
5 Indicateur de minuterie
6 Indicateur d'oscillation
Basculer entre les paramètres d'alimentation
1. Appuyez sur le bouton mode A6 pour basculer entre les
paramètres d’alimentation.
2. Choisissez entre:
• Mode basse puissance
• Mode haute puissance
4Le voyant de puissance faible C2 s’allume pour indiquer que le
produit est en mode puissance faible.
4Le voyant de puissance basse et haute C23 s’allume pour
indiquer que le produit est en mode basse puissance.
Réglage de la minuterie
1. Appuyez sur le bouton de minuterie A5 pour régler la
minuterie.
2. Appuyez sur le bouton de minuterie A5 pour augmenter la
minuterie d’une heure.
4Le compte à rebours maximum est de 12 heures.
3. Désactivez la minuterie en appuyant une fois de plus sur
le bouton de minuterie A5 lorsque la durée est réglée au
maximum.
4La minuterie est annulée lorsque le produit est mis hors tension.
Régler la température
1. Appuyez sur les boutons de température haut et bas A32
pour ajuster la température ambiante réglée.
4Lorsque la température ambiante atteint le niveau sélectionné,
le thermostat intégré se coupe automatiquement, le ventilateur
continue de fonctionner.
4Lorsque la température ambiante diminue, le thermostat intégré
remet automatiquement la tension.
Activer/Désactiver l’oscillation
1. Appuyez sur le bouton Wi-Fi/oscillation A49 pour activer/
désactiver l’oscillation.
Le voyant d’oscillation C6 apparaît à l’écran A1 pour indiquer que
le mode oscillation est activé.
Protection contre la surchaue
Le produit se met automatiquement hors tension en cas de
surchaue, par ex. en raison d’une obstruction totale ou partielle de
la grille d’entrée d’air ou de sortie d’air. Après une surchaue, laissez
le produit refroidir pendant au moins 30minutes avant de l’utiliser
à nouveau.
• Ne pas utiliser de minuteries externes ni de systèmes de
commande à distance pour mettre le produit sous ou hors
tension.
• N’utilisez pas d’accessoires qui ne sont pas recommandés ou
vendus par le fabricant.
• Pour éviter toute surchaue, ne couvrez pas le produit. Gardez
une distance d’au moins 1 mètre des textiles, rideaux, toiles de
tente et autres objets inammables an de réduire le risque
d’incendie.
• Gardez les objets à au moins 50 cm de l’entrée d’air.
• Gardez les objets à au moins 1 mètre de la sortie d’air.
• Les surfaces du produit deviennent chaudes pendant l’utilisation.
Ne touchez que l’écran et les poignées du produit an d’éviter les
brûlures.
• Utilisez le produit uniquement comme décrit dans le présent
document.
• Les enfants doivent être surveillés an de s’assurer qu’ils ne
jouent pas avec le produit.
• Avant le nettoyage et la maintenance, mettez le produit hors
tension, puis débranchez-le. Laissez le produit refroidir
complètement.
• Ce produit ne peut être réparé que par un technicien qualié an
de réduire les risques d'électrocution.
• Nettoyez régulièrement les ouvertures du produit pour réduire
les risques de surchaue.
• N’ouvrez pas le produit, il ne contient aucune pièce réparable par
l’utilisateur.
Insérez ou changez la batterie (image B)
1. Ouvrez le compartiment à pile.
2. Mettez la pile
3. Fermer le compartiment à piles.
Installez l'application Nedis SmartLife
1. Téléchargez l'application Nedis Smartlife pour Android ou iOS sur
votre téléphone via Google Play ou l’App Store d’Apple.
2. Ouvrez l'application Nedis Smartlife sur votre téléphone.
3. Créez un compte avec votre adresse e-mail et appuyez sur
Continue.
4Vous recevrez un code de vérication sur votre adresse e-mail.
4. Entrez le code de vérication reçu.
5. Créez un mot de passe et appuyez sur Done.
6. Appuyez sur Add Home pour créer une maison SmartLife.
7. Dénissez votre emplacement, choisissez les pièces avec
lesquelles vous souhaitez vous connecter et appuyez sur Done.
Ajouter un produit à l’application Nedis
SmartLife
1. Appuyez sur le bouton marche/arrêt Ae pour mettre le produit
sous tension.
2. Appuyez et maintenez le bouton oscillation/Wi-Fi A4 pendant 3
secondes.
4Le voyant Wi-Fi C1 clignote rapidement et une sonnerie retentit
pour indiquer que le mode appairage est actif.
3. Appuyez sur + dans l'application Nedis SmartLife.
4. Sélectionnez le type d’appareil que vous souhaitez ajouter dans
la liste.
5. Suivez les instructions dans l’application Nedis SmartLife.
6. Après conrmation, vous pouvez contrôler le produit avec votre
smartphone.
Pour connecter votre compte SmartLife à Amazon Alexa et/ou
Google Home, congurez-le à l’aide de l’action ou de la compétence
« Smart Life ». Pour plus de détails, consultez les instructions sur
Amazon ou Google.
4Le voyant Wi-Fi C1 s’allume lorsque le produit est connecté.

11
5 Timerknop
6 Modusknop
7 Aan-/uitknop
8 Luchtuitlaat
9 Oscillatieknop
q Handvat
w Luchtinlaat
e Aan/uit schakelaar
r Basis
t Stroomkabel
Veiligheidsvoorschriften
Dek het product niet af om oververhitting te
voorkomen.
-
WAARSCHUWING
• Zorg ervoor dat u de instructies in dit document volledig gelezen
en begrepen heeft voordat u het product installeert of gebruikt.
Bewaar de verpakking en dit document voor toekomstig gebruik.
• Laat het product niet vallen en voorkom stoten.
• Houd zowel volle als lege knoopcelbatterijen altijd buiten het
bereik van kinderen om inslikgevaar te voorkomen. Gooi
gebruikte batterijen onmiddellijk en op een veilige manier weg.
Binnen twee uur na inslikken kunnen knoopcelbatterijen door
een chemische reactie ernstige inwendige brandwonden
veroorzaken. NB: de eerste symptomen kunnen lijken op
kinderziektes zoals hoesten of kwijlen. Wanneer u vermoedt dat
er batterijen zijn ingeslikt, moet u onmiddellijk een arts
raadplegen.
• Veeg de accuklemmen met een schone, droge doek af als ze vuil
zijn.
• Niet-oplaadbare batterijen mogen niet worden opgeladen.
• Maak geen kortsluiting in een accu.
• Cellen of batterijen niet aan mechanische schokken blootstellen.
• Demonteer, open of versnipper batterijen niet.
• Verwijder een cel of batterij pas uit de originele verpakking als u
die gaat gebruiken.
• Gebruik geen cel of batterij die niet bedoeld is voor gebruik met
de apparatuur.
• Gebruik van de batterij door kinderen moet onder toezicht staan.
• Let op de plus (+) en min (-) markeringen op de cel, batterij en
het product en zorg dat het correct gebruikt wordt.
• Raadpleeg onmiddellijk een arts als een cel of batterij ingeslikt is.
• De batterijen niet aan hitte of vuur blootstellen. Vermijd opslag in
direct zonlicht.
• Voer lege batterijen op de juiste wijze af.
• Stel het product niet bloot aan water of vocht.
• Gebruik dit product niet in kleine kamers wanneer er personen
aanwezig zijn die niet in staat zijn om de kamer op eigen kracht
te verlaten, tenzij ze voortdurend onder toezicht staan.
• Gebruik dit product niet in de directe omgeving van een bad,
douche of zwembad.
• Raak het product alleen met droge handen aan. Aanraken met
natte handen kan een elektrische schok veroorzaken.
• Gebruik het product niet in ruimten waar ontvlambare
vloeistoen of gassen worden gebruikt of opgeslagen.
• De hitte van het product kan het oppervlak waarop het staat
beschadigen. Plaats het product altijd op een vlakke, stabiele,
hittebestendige ondergrond om schade te voorkomen aan de
omgeving van het product.
• Plaats het product niet direct onder een stopcontact.
• Steek het netsnoer alleen in een wandstopcontact. Gebruik geen
verlengsnoeren.
• Sluit het product niet aan op een stopcontact van een
stroomgroep met andere producten die veel stroom verbruiken.
• Controleer altijd of het voltage van het product overeenkomt
met de netspanning.
• Gebruik het product alleen rechtop.
• Wikkel het netsnoer altijd af voordat u het product gebruikt.
• Gebruik het product niet als een onderdeel beschadigd of defect
is. Vervang een beschadigd of defect product onmiddellijk.
Interrupteur de sécurité anti-basculement
L’interrupteur de sécurité anti-basculement met automatiquement
le produit hors tension lorsqu’il tombe. Avant d’utiliser à nouveau
le produit: Mettez le produit hors tension, débranchez la che
d’alimentation et vériez qu’il ne soit pas endommagé.
Mettre le produit hors tension
1. Appuyez sur le bouton d’alimentation A7.
2. Appuyez sur le bouton marche/arrêt Ae pour mettre le produit
hors tension.
3. Débranchez le câble d’alimentation At de la prise de courant.
Traitement des déchets
Le produit doit être jeté séparément des ordures
ménagères dans un point de collecte approprié.
Ne jetez pas le produit avec les ordures ménagères
ordinaires.
Pour plus d’informations, contactez le distributeur ou
l’autorité locale responsable de la gestion des déchets.
Déclaration de conformité
Nous, Nedis B.V., déclarons en tant que fabricant que le produit
HTFA20WTW de notre marque Nedis®, produit en Chine, a été
testé conformément à toutes les normes et réglementations CE
en vigueur et que tous les tests ont été réussis. Cela inclut, sans
toutefois s'y limiter, la directive RED 2014/53/UE.
La Déclaration de conformité complète (et la che de sécurité le cas
échéant) peut être trouvée et téléchargée via:
nedis.fr/HTFA20WTW#support
d Snelstartgids
Slimme keramische
wi-kachel
HTFA20WTW
Zie voor meer informatie de uitgebreide handleiding
online: ned.is/htfa20wtw
Bedoeld gebruik
Dit product is een kachel waarmee de gebruiker de
omgevingstemperatuur kan regelen.
Dit product kan bediend worden via de Nedis SmartLife-
app, de knoppen op het product of met de meegeleverde
afstandsbediening.
Dit product is uitsluitend geschikt voor goed geïsoleerde plaatsen of
voor incidenteel gebruik.
Het product is enkel bedoeld voor gebruik binnenshuis.
Het product is bedoeld voor gebruik in huishoudelijke omgevingen
voor typische huishoudelijke functies die ook kunnen worden
gebruikt door niet-deskundige gebruikers voor typische
huishoudelijke functies, zoals: winkels, kantoren en andere
soortgelijke werkomgevingen, boerderijen, door klanten in hotels,
motels en andere woonomgevingen en/of in omgevingen van het
type “bed & breakfast”.
Dit product is niet bedoeld voor gebruik door personen (waaronder
kinderen) met beperkte fysieke, sensorische of geestelijke
capaciteiten of met gebrek aan ervaring en kennis, tenzij ze onder
toezicht staan of instructies betreende het gebruik van het
apparaat hebben ontvangen van iemand die verantwoordelijk is
voor hun veiligheid.
Elke wijziging van het product kan gevolgen hebben voor de
veiligheid, garantie en correcte werking.
Belangrijkste onderdelen (afbeelding A)
1 Display
2 Temperatuur omlaag knop
3 Temperatuur omhoog knop
4 Oscillatie/wi-knop

12
te verbinden. Voor meer informatie: raadpleeg de instructies op
Amazon of Google.
4Wanneer het product is verbonden gaat de wi-indicator C1
branden.
Het product installeren
Plaats het product op een stabiele en vlakke ondergrond.
4Houd voorwerpen minimaal 50 cm van de luchtinlaat Aw.
4Houd voorwerpen minimaal 1 m van de luchtinlaat A8.
Het product aanzetten
1. Steek de stekker van de stroomkabel At in een stopcontact.
2. Druk op de aan/uit-schakelaar Ae om het product aan te zetten.
4Het scherm geeft de huidige kamertemperatuur aan C4.
3. Druk op de aan-/uitknop A7.
Het display A1 gaat aan.
Indicatoren (afbeelding C)
Het scherm A1 toont het volgende:
1 Wi-Fi-lampje
2 Laagvermogenindicator
3 Hoogvermogenindicator
4 Huidige kamertemperatuur
5 Timer-indicator
6 Oscillatie-indicator
Schakelen tussen de vermogensinstellingen
1. Druk op de modusknop A6 om tussen de
vermogensinstellingen te schakelen.
2. Kies uit:
• Spaarmodus
• Hoog-vermogenmodus
4De indicator voor spaarstand C2 licht op om aan te geven dat
het product in spaarstand staat.
4De indicator voor spaarmodus en hoog-vermogenmodus C23
gaat branden om aan te geven dat het product in de hoog-
vermogenmodus staat.
De timer instellen
1. Druk op de timerknop A5 om het aftellen in te stellen.
2. Druk op de timertoets A5 om de afteltijd met 1 uur te
verlengen.
4De maximale afteltijd is 12 uur.
3. Wanneer de maximale tijd is ingesteld, kunt u de timer
uitschakelen door nogmaals op de timertoets A5 te drukken.
4Wanneer u het product uitschakelt, wordt de timer geannuleerd.
De temperatuur instellen
1. Druk op de knoppen voor temperatuur omhoog en omlaag
A32 om de ingestelde kamertemperatuur aan te passen.
4Zodra de gewenste kamertemperatuur is bereikt, schakelt de
ingebouwde thermostaat de kachel automatisch uit, maar blijft
de ventilator werken.
4Wanneer de kamertemperatuur onder de ingestelde
temperatuur daalt, schakelt de ingebouwde thermostaat
automatisch weer in.
De oscillatie aan- of uitzetten
1. Druk op de oscillatie/wi-knop A49 om de oscillatie aan of uit
te zetten.
De oscillatie-indicator C6 verschijnt op het display A1 om aan te
geven dat de oscillatiemodus is ingeschakeld.
Oververhittingsbeveiliging
Bij oververhitting wordt het product automatisch uitgeschakeld, bijv.
door het geheel of gedeeltelijk blokkeren van de luchtinlaat of het
luchtuitlaatrooster. Laat het product na oververhitting tenminste 30
minuten afkoelen voordat u het opnieuw gebruikt.
• De voedingskabel kan niet vervangen worden. Als de kabel
beschadigd is, moet het product worden gesloopt.
• Trek de stekker niet uit het stopcontact door aan de kabel te
trekken. Pak altijd de stekker vast en trek eraan.
• Haal de stekker van het product uit de voedingsbron en
ontkoppel het van andere apparatuur als er zich problemen
voordoen.
• Haal de stekker van het product uit het stopcontact als het niet in
gebruik is en voordat u het schoonmaakt.
• Gebruik geen externe timers of afstandsbedieningen om het
product in of uit te schakelen.
• Gebruik geen accessoires die niet door de fabrikant worden
aanbevolen of verkocht.
• Dek het product niet af om oververhitting te voorkomen. Houd
minimaal 1 meter afstand van textiel, gordijnen, tentdoeken en
andere brandbare voorwerpen om het risico op brand te
verkleinen.
• Houd voorwerpen minimaal 50 cm van de luchtinlaat.
• Houd voorwerpen minimaal 1 m van de luchtinlaat.
• De oppervlakken van het product worden heet tijdens het
gebruik. Raak alleen het scherm en de handgrepen van het
product aan om brandwonden te voorkomen.
• Gebruik het product alleen zoals in dit document beschreven.
• Kinderen moeten onder toezicht staan om ervoor te zorgen dat
ze niet met het product spelen.
• Zet het product vóór reiniging en onderhoud uit en schakel de
stroomtoevoer uit. Laat het product volledig afkoelen.
• Dit product mag voor onderhoud alleen worden geopend door
een erkend technicus om het risico op elektrische schokken te
verkleinen.
• Maak de openingen van het product regelmatig schoon om het
risico op oververhitting te verminderen.
• Open het product niet. Er zitten geen onderdelen in die door de
gebruiker te onderhouden zijn.
Plaatsen of vervangen van de batterij
(afbeelding B)
1. Open het batterijvak.
2. Plaats de batterij
3. Sluit het batterijvak.
De Nedis SmartLife app installeren
1. Download de Nedis Smartlife app voor Android of iOS op je
telefoon via Google Play of de Apple App Store.
2. Open de Nedis Smartlife app op je telefoon.
3. Maak met uw e-mailadres een account aan en tik op Continue.
4U ontvangt een vericatiecode op uw e-mailadres.
4. Voer de ontvangen vericatiecode in.
5. Maak een wachtwoord aan en tik op Done.
6. Tik op Add Home om een SmartLife-huis aan te maken.
7. Stel je locatie in, kies de ruimtes waar je mee wilt verbinden en
tik op Done.
Een product toevoegen aan de Nedis SmartLife
app
1. Druk op de aan/uit-schakelaar Ae om het product aan te zetten.
2. Houd de oscillatie/wi-knop A4 3 seconden lang ingedrukt.
4De wi-indicator C1 knippert snel en er klinkt een piepje om
aan te geven dat de pairing-modus actief is.
3. Tik op + in de Nedis SmartLife app.
4. Selecteer uit de lijst het apparaat-type dat u wilt toevoegen.
5. Volg de aanwijzingen in de Nedis SmartLife app op.
6. Na bevestiging kunt u het product met uw smartphone
bedienen.
Stel uw SmartLife-account in met de "Smart Life"-actie of
-vaardigheid om deze met Amazon Alexa en/of Google Home

13
9 Pulsante oscillazione
q Maniglia
w Ingresso dell’aria
e Interruttore di accensione/
spegnimento
r Base
t Cavo di alimentazione
Istruzioni di sicurezza
Per evitare il surriscaldamento, non coprire il
prodotto.
-
ATTENZIONE
• Assicurarsi di aver letto e compreso pienamente le istruzioni
presenti nel documento prima di installare o utilizzare il prodotto.
Conservare la confezione e il presente documento per farvi
riferimento in futuro.
• Non far cadere il prodotto ed evitare impatti.
• Tenere sempre lontano dalla portata dei bambini le batterie a
bottone, sia cariche che scariche, per evitare la possibilità di
ingestione. Smaltire le batterie usate immediatamente e in
sicurezza. Le batterie a bottone possono causare ustioni chimiche
interne gravi in meno di due ore dall’ingestione. Tenere presente
che i primi sintomi potrebbero essere simili a quelli di malattie
infantili, come la tosse o l’eccessiva salivazione. Rivolgersi
immediatamente a un medico se si sospetta che le batterie siano
state ingerite.
• Se sono sporchi, stronare i morsetti della batteria con un panno
asciutto e pulito.
• Le batterie non ricaricabili non devono essere ricaricate.
• Non cortocircuitare una batteria.
• Proteggere le celle e le batterie da urti.
• Non smontare, aprire o tagliare le batterie.
• Non rimuovere una cella o una batteria dalla sua confezione
originale no a quando non ne è necessario l’utilizzo.
• Non utilizzare alcuna cella o batteria che non sia progettata per
essere utilizzata con il prodotto.
• L’utilizzo della batteria da parte dei bambini deve avvenire solo
se sotto la supervisione di un adulto.
• Rispettare i segni più (+) e meno (–) sulla cella/batteria e sul
prodotto per assicurare l’utilizzo corretto.
• Rivolgersi immediatamente a un medico in caso di ingestione di
una cella o una batteria.
• Non esporre le batterie al calore o al fuoco. Evitare di conservarle
alla luce diretta del sole.
• Smaltire correttamente le pile o le batterie scariche.
• Non esporre il prodotto all’acqua o all’umidità.
• Non usare il prodotto in ambienti piccoli occupati da persone
incapaci di abbandonare la stanza da sole, a meno che non siano
costantemente sorvegliate.
• Non usare il prodotto nelle immediate vicinanze di vasche, docce
o piscine.
• Maneggiare il prodotto solo con le mani asciutte. Se viene
maneggiato con le mani bagnate può causare scosse elettriche.
• Non utilizzare il prodotto in ambienti in cui sono utilizzati o
conservati liquidi o gas inammabili.
• Il calore del prodotto potrebbe danneggiare la supercie su cui è
appoggiato. Collocare il prodotto sempre su una supercie piana,
stabile e resistente al calore onde evitare di danneggiare la zona
circostante.
• Non posizionare il prodotto direttamente sotto a una presa di
corrente.
• Collegare il cavo di alimentazione solo a una presa di corrente.
Non utilizzare cavi di prolunga.
• Non collegare il prodotto alla presa elettrica di un gruppo di
alimentazione con altri prodotti che consumano molta corrente.
• Vericare sempre che la tensione del prodotto corrisponda alla
tensione di rete.
Kantelbeveiligingsschakelaar
De kantelbeveiliging schakelt de kachel automatisch uit wanneer
deze omvalt. Voordat u daarna het product weer gebruikt: Schakel
het product uit, haal de stekker uit het stopcontact en controleer
op schade.
Het product uitzetten
1. Druk op de aan-/uitknop A7.
2. Druk op de aan/uit-schakelaar Ae om het product uit te zetten.
3. Haal het netsnoer At uit het stopcontact.
Afdanking
Het product is bestemd voor gescheiden inzameling
bij een hiertoe aangewezen verzamelpunt. Werp het
product niet weg bij het huishoudelijk afval.
Neem voor meer informatie contact op met
de detailhandelaar of de lokale overheid die
verantwoordelijk is voor het afvalbeheer.
Verklaring van overeenstemming
Wij, Nedis B.V. verklaren als fabrikant dat het product HTFA20WTW
van ons merk Nedis®, geproduceerd in China, is getest conform alle
relevante CE-normen en voorschriften en dat alle tests met succes
zijn doorstaan. Dit omvat, maar is niet beperkt tot de richtlijn RED
2014/53/EU.
De volledige conformiteitsverklaring (en het blad met
veiligheidsgegevens indien van toepassing) kan worden gevonden
en gedownload via:
nedis.nl/HTFA20WTW#support
j Guida rapida all’avvio
Termoventilatore ceramico
smart Wi-Fi
HTFA20WTW
Per maggiori informazioni vedere il manuale esteso
online: ned.is/htfa20wtw
Uso previsto
Il prodotto è un riscaldatore che consente all’utente di controllare la
temperatura circostante.
Il prodotto può essere controllato tramite l’app Nedis SmartLife, i
pulsanti presenti sul prodotto o il telecomando incluso in dotazione.
Il presente prodotto è adatto solo a ambienti correttamente isolati o
ad un uso occasionale.
Il prodotto è inteso solo per utilizzo in interni.
Il prodotto è inteso per l’uso in ambienti domestici e può essere
utilizzato anche da utenti non esperti per funzioni tipicamente
domestiche come negozi, uci, altri ambienti di lavoro simili,
agriturismi, clienti di hotel, motel e altri ambienti di tipo residenziale
e/o ambienti di tipo bed and breakfast.
Questo prodotto non è inteso per l'uso da parte di persone (inclusi
i bambini) con capacità siche, mentali o sensoriali ridotte o con
mancanza di esperienza e conoscenza, a meno che non siano
sottoposte a supervisione o abbiano ricevuto istruzioni relative
all’utilizzo del prodotto da parte di una persona responsabile per la
loro sicurezza.
Eventuali modiche al prodotto possono comportare conseguenze
per la sicurezza, la garanzia e il corretto funzionamento.
Parti principali (immagine A)
1 Display
2 Pulsante Abbassa
temperatura
3 Pulsante Aumenta
temperatura
4 Pulsante oscillazione/Wi-Fi
5 Pulsante del timer
6 Pulsante Modalità
7 Pulsante di accensione
8 Uscita dell’aria

14
3. Premere + nell’app Nedis SmartLife.
4. Selezionare il tipo di dispositivo che si desidera aggiungere
dall’elenco.
5. Seguire le istruzioni nell’app Nedis SmartLife.
6. Vericare di poter controllare il prodotto con il proprio
smartphone.
Per collegare il proprio account SmartLife ad Amazon Alexa e/o
Google Home, utilizzare l’azione o abilità “Smart Life”. Per ulteriori
dettagli controllare le istruzioni di Amazon o Google.
4La spia del Wi-Fi C1 si illumina quando il prodotto è collegato.
Installazione del prodotto
Posizionare il prodotto su una supercie piana e stabile.
4Mantenere gli oggetti ad almeno 50 cm di distanza dall’ingresso
dell’aria Aw.
4Mantenere gli oggetti ad almeno 1 m di distanza dall’uscita
dell’aria A8.
Accensione del prodotto
1. Collegare il cavo di alimentazione At alla presa elettrica.
2. Premere l’interruttore on/o Ae per accendere il prodotto.
4Il display mostra la temperatura ambiente attuale C4.
3. Premere il pulsante di accensione A7.
Il display A1 si accende.
Indicatori (immagine C)
Il display A1 contiene quanto indicato di seguito:
1 Spia Wi-Fi
2 Indicatore di potenza bassa
3 Indicatore di potenza
elevata
4 Temperatura ambiente
attuale
5 Indicatore timer
6 Indicatore di oscillazione
Commutazione fra impostazioni di potenza
1. Premere il pulsante Modalità A6 per passare da
un’impostazione della potenza all’altra.
2. Scegliere fra:
• Modalità potenza bassa
• Modalità potenza elevata
4L’indicatore di potenza bassa C2 si accende a indicare che il
prodotto è in modalità di potenza bassa.
4Gli indicatori di potenza bassa ed elevata C23 si illuminano a
indicare che il prodotto è in modalità potenza elevata.
Impostazione del timer
1. Premere il pulsante timer A5 per impostare un timer di conto
alla rovescia.
2. Premere il pulsante del timer A5 per aumentare il timer di 1 ora.
4Il tempo massimo per il conto alla rovescia è 12 ore.
3. Spegnere il timer premendo ancora una volta il pulsante del
timer A5 quando il tempo è impostato al massimo.
4Il timer viene annullato quando il prodotto viene spento.
Impostazione della temperatura
1. Premere i pulsanti temperatura su e giù A32 per regolare la
temperatura ambiente impostata.
4Quando la temperatura ambiente raggiunge il livello selezionato,
il termostato integrato si spegne automaticamente e la ventola
continua a funzionare.
4Quando la temperatura ambiente scende, il termostato integrato
si riaccende automaticamente.
Accensione/spegnimento dell’oscillazione
1. Premere il pulsante oscillazione/Wi-Fi A49 per accendere/
spegnere l’oscillazione.
L’indicatore dell’oscillazione C6 apparirà sul display A1 a indicare
che la modalità oscillazione è stata attivata.
• Utilizzare il prodotto solo in posizione verticale.
• Svolgere sempre il cavo di alimentazione prima di usare il
prodotto.
• Non utilizzare il prodotto se una parte è danneggiata o difettosa.
Sostituire immediatamente un prodotto danneggiato o difettoso.
• Il cavo di alimentazione non può essere sostituito. Se il cavo è
danneggiato, il prodotto deve essere scartato.
• Non scollegare il prodotto tirandolo per il cavo. Aerrare sempre
la presa e tirare.
• Scollegare il prodotto dalla sorgente elettrica e da altre
apparecchiature se si vericano problemi.
• Scollegare il prodotto quando non viene utilizzato e prima della
pulizia.
• Non utilizzare timer esterni o sistemi di controllo a distanza per
accendere o spegnere il prodotto.
• Non usare accessori che non sono consigliati o non sono venduti
dal produttore.
• Per evitare il surriscaldamento, non coprire il prodotto. Per ridurre
il rischio di incendio, mantenere una distanza di almeno 1 metro
da tessuti, tende, tendaggi e altri oggetti inammabili.
• Mantenere gli oggetti ad almeno 50 cm di distanza dall’ingresso
dell’aria.
• Mantenere gli oggetti ad almeno 1 m di distanza dall’uscita
dell’aria.
• Le superci del prodotto diventano bollenti durante l’utilizzo.
Toccare solo il display e le maniglie del prodotto per evitare
ustioni.
• Utilizzare il prodotto solo come descritto nel presente
documento.
• I bambini devono essere sottoposti a supervisione per assicurarsi
che non giochino con il prodotto.
• Prima della pulizia e della manutenzione, spegnere il prodotto e
scollegare l’alimentazione. Lasciar rareddare completamente il
prodotto.
• Il prodotto può essere riparato e sottoposto a manutenzione
esclusivamente da un tecnico qualicato per ridurre il rischio di
scosse elettriche.
• Pulire regolarmente le aperture del prodotto per ridurre il rischio
di surriscaldamento.
• Non aprire il prodotto: all’interno non sono presenti parti
riparabili dall’utente.
Inserimento o sostituzione della batteria
(immagine B)
1. Aprire il vano batteria.
2. Posizionare la batteria
3. Chiudere il vano batteria.
Installazione dell’app SmartLife di Nedis
1. Scaricare l’app Nedis Smartlife per Android o iOS sul telefono
tramite Google Play o l’Apple App Store.
2. Aprire l’app Nedis Smartlife sul telefono.
3. Creare un account con il proprio indirizzo e-mail e premere
Continue.
4Si riceverà un codice di verica sul proprio indirizzo e-mail.
4. Immettere il codice di verica ricevuto.
5. Creare una password e toccare Done.
6. Toccare Add Home per creare una casa SmartLife.
7. Impostare la propria posizione, scegliere gli ambienti a cui
collegarsi e toccare Done.
Come aggiungere un prodotto all’app Nedis
SmartLife
1. Premere l’interruttore on/o Ae per accendere il prodotto.
2. Tenere premuto il pulsante oscillazione/Wi-Fi A4 per 3 secondi.
4La spia del Wi-Fi C1 lampeggia velocemente e il cicalino suona
a indicare che la modalità di accoppiamento è attiva.

15
Partes principales (imagen A)
1 Visualización
2 Botón para bajar la
temperatura
3 Botón para subir la
temperatura
4 Botón de oscilación/WiFi
5 Botón del temporizador
6 Botón de modo
7 Botón de encendido
8 Salida de aire
9 Botón de oscilación
q Asa
w Entrada de aire
e Interruptor de encendido/
apagado
r Base
t Cable de alimentación
Instrucciones de seguridad
Para evitar el sobrecalentamiento, no cubra el
producto.
-
ADVERTENCIA
• Asegúrese de que ha leído y entendido completamente las
instrucciones en este documento antes de instalar o utilizar el
producto. Guarde el embalaje y este documento para futuras
consultas.
• No deje caer el producto y evite que sufra golpes.
• Mantenga siempre las pilas de botón, tanto llenas como vacías,
fuera del alcance de los niños para evitar la posibilidad de ser
ingeridas. Deseche las pilas usadas de inmediato y de forma
segura. Las pilas de botón pueden causar graves quemaduras
químicas internas en tan solo dos horas cuando se ingieren.
Tenga en cuenta que los primeros síntomas podrían parecerse a
patologías infantiles como tos o babeo. Busque atención médica
inmediata si sospecha que se han ingerido pilas.
• Limpie los bornes de la batería con un paño seco y limpio si se
ensucian.
• Las pilas no recargables no se deben recargar.
• No cortocircuite una batería.
• No someta las pilas o baterías a golpes mecánicos.
• No desmonte, abra o despedace baterías.
• No retire una pila o batería del embalaje original hasta que sea
requerida para su uso.
• No utilice ninguna pila o batería que no esté diseñada para el uso
con el producto.
• El uso de la batería por los niños debe hacerse bajo supervisión.
• Observe las marcas de positivo (+) y negativo (–) en la pila o
batería y el producto y asegúrese de un uso correcto.
• Busque ayuda médica inmediatamente si alguien se ha tragado
una pila o batería.
• No exponga las baterías al calor o al fuego. Evite el
almacenamiento bajo luz solar directa.
• Elimine las pilas o baterías cumpliendo la normativa vigente.
• No exponga el producto al agua o a la humedad.
• No utilice este producto en habitaciones pequeñas que estén
ocupadas por personas que no sean capaces de salir de la
habitación por sí solas, excepto si hay una supervisión constante.
• No utilice este producto en las inmediaciones de un baño, una
ducha o una piscina.
• Maneje el producto solo con las manos secas. Tocarlo con las
manos húmedas puede causar una descarga eléctrica.
• No utilice el producto en estancias donde hayan o se almacenen
líquidos o gases inamables.
• El calor del producto puede dañar la supercie sobre la que está
colocado el mismo. Coloque siempre el producto sobre una
supercie plana, estable y resistente al calor para evitar daños en
los alrededores del producto.
• No sitúe el producto justo debajo de una toma de corriente.
• Enchufe el cable de alimentación solo a una toma de pared. No
utilice cables alargadores.
Protezione da surriscaldamento
Il prodotto si spegne automaticamente in caso di surriscaldamento,
ad es. a causa di un’ostruzione totale o parziale della griglia
di ingresso o di uscita dell’aria. Una volta surriscaldato, lasciar
rareddare il prodotto per almeno 30 prima di utilizzarlo di nuovo.
Interruttore di sicurezza anti-ribaltamento
L’interruttore di sicurezza spegne automaticamente il prodotto
in caso di ribaltamento. Prima di usare nuovamente il prodotto:
spegnere il prodotto, scollegare la spina di alimentazione e
controllare i danni.
Spegnimento del prodotto
1. Premere il pulsante di accensione A7.
2. Premere l’interruttore di accensione/spegnimento Ae per
spegnere il prodotto.
3. Scollegare il cavo di alimentazione At dalla presa elettrica.
Smaltimento
Questo prodotto è soggetto a raccolta dierenziata nei
punti di raccolta appropriati. Non smaltire il prodotto
con i riuti domestici.
Per maggiori informazioni, contattare il rivenditore o le
autorità locali responsabili per la gestione dei riuti.
Dichiarazione di conformità
Noi sottoscritti, Nedis B.V., dichiariamo, in quanto fabbricanti, che
il prodotto HTFA20WTW con il nostro marchio Nedis®, prodotto in
Cina, è stato collaudato ai sensi di tutte le norme e i regolamenti
CE pertinenti e che tutti i collaudi sono stati superati con successo.
Questo include, senza esclusione alcuna, la normativa RED 2014/53/
UE.
La Dichiarazione di conformità completa (e le schede di sicurezza, se
applicabili) sono disponibili e possono essere scaricate da:
nedis.it/HTFA20WTW#support
h Guía de inicio rápido
Ventilador calefactor
cerámico inteligente WiFi
HTFA20WTW
Para más información, consulte el manual ampliado en
línea: ned.is/htfa20wtw
Uso previsto por el fabricante
Este producto es un calefactor que permite al usuario controlar la
temperatura ambiente.
Este producto se puede controlar a través de la app Nedis SmartLife,
los botones del producto o con el mando a distancia incluido.
Este producto está indicado únicamente en lugares abrigados o para
una utilización puntual.
El producto está diseñado únicamente para uso en interiores.
El producto está diseñado para su uso en entornos domésticos para
tareas domésticas típicas y también puede ser utilizado por usuarios
no expertos para tareas domésticas típicas, tales como en tiendas,
ocinas, otros entornos de trabajo similares, granjas, por parte de
clientes en hoteles, moteles y otros entornos de tipo residencial y/o
en entornos de tipo alojamiento y desayuno.
Este producto no está concebido para ser utilizado por personas
(incluidos niños) con capacidades físicas, sensoriales o mentales
reducidas, o que tengan una falta de experiencia y conocimientos, a
no ser que hayan recibido supervisión o formación concerniente al
uso del producto por una persona responsable de su seguridad.
Cualquier modicación del producto puede tener consecuencias
para la seguridad, la garantía y el funcionamiento adecuado.

16
Vincular el producto a la aplicación Nedis
SmartLife
1. Pulse el botón de encendido/apagado Ae para encender el
producto.
2. Mantenga pulsado el botón de oscilación/WiFi A4 durante 3
segundos.
4El indicador de WiFi C1 parpadea rápidamente y suena un
pitido para indicar que el modo de emparejamiento está activo.
3. Toque “+” en la aplicación Nedis SmartLife.
4. Seleccione de la lista el tipo de dispositivo que quiera añadir.
5. Siga las instrucciones en la aplicación Nedis SmartLife.
6. Tras conrmar, ya podrá controlar el producto con su teléfono
inteligente.
Para conectar su cuenta SmartLife a Alexa de Amazon y/o a Google
Home, ajústela con la acción o funcionalidad ‘‘SmartLife’’. Para más
detalles, consulte las instrucciones en Amazon o Google.
4El indicador de WiFi C1 se ilumina cuando el producto está
conectado.
Cómo instalar el producto
Coloque el producto en una supercie estable y plana.
4Mantenga los objetos a una distancia mínima de 50cm de la
entrada de aire Aw.
4Mantenga los objetos a una distancia mínima de 1metro de la
salida de aire A8.
Cómo encender el producto
1. Enchufe el cable de alimentación At en un toma de corriente.
2. Pulse el botón de encendido/apagado Ae para encender el
producto.
4La pantalla muestra la temperatura ambiente actual C4.
3. Pulse el botón de encendido A7.
La pantalla A1 se enciende.
Indicadores (imagen C)
La pantalla A1 contiene lo siguiente:
1 Indicador de Wi-Fi
2 Indicador de baja potencia
3 Indicador de alta potencia
4 Temperatura ambiente
actual
5 Indicador de temporizador
6 Indicador de oscilación
Cómo cambiar entre los ajustes de potencia
1. Pulse el botón de modo A6 para alternar entre los ajustes de
potencia.
2. Escoja entre:
• Modo de baja potencia
• Modo de alta potencia
4El indicador de baja potencia C2 se ilumina para indicar que el
producto está en modo de baja potencia.
4El indicador de baja y alta potencia C23 se ilumina para
indicar que el producto está en modo de alta potencia.
Cómo ajustar el temporizador
1. Pulse el botón del temporizador A5 para ajustar el
temporizador de cuenta atrás.
2. Pulse el botón del temporizador A5 para aumentar el
temporizador en 1 hora.
4El tiempo máximo de cuenta atrás es de 12 horas.
3. Apague el temporizador pulsando el botón A5 una vez más
cuando el tiempo esté ajustado en el máximo.
4El temporizador se cancela cuando se apaga el producto.
Cómo ajustar la temperatura
1. Pulse los botones de subir y bajar la temperatura A32 para
ajustar la temperatura ambiente.
4Cuando la temperatura ambiente alcanza el nivel seleccionado, el
termostato integrado se apaga automáticamente, y el ventilador
sigue funcionando.
• No enchufe el producto a una toma de corriente de un grupo de
energía con otros productos que consuman mucha energía.
• Compruebe siempre que la tensión del producto se corresponde
con la tensión de la red.
• Utilice el producto únicamente en posición vertical.
• Desenrolle siempre el cable de alimentación antes de utilizar el
producto.
• No use el producto si alguna pieza está dañada o presenta
defectos. Sustituya inmediatamente un producto si presenta
daños o está defectuoso.
• El cable de alimentación no se puede reemplazar. Si el cable está
dañado, el producto se debería desechar.
• No desenchufe el producto tirando del cable. Sujete siempre el
enchufe y tire de él.
• Desconecte el producto de la fuente de corriente y de otros
equipos si surgen problemas.
• Desenchufar el producto cuando no esté en uso y antes de
limpiarlo.
• No utilice temporizadores externos o sistemas de control remoto
para encender o apagar el producto.
• No utilice accesorios que no sean recomendados o vendidos por
el fabricante.
• Para evitar el sobrecalentamiento, no cubra el producto.
Mantenga una distancia de, al menos, 1 metro de productos
textiles, cortinas, telas de tiendas de campaña y otros objetos
inamables para reducir el riesgo de incendio.
• Mantenga los objetos a una distancia mínima de 50 cm de la
entrada de aire.
• Mantenga los objetos a una distancia mínima de 1 metro de la
salida de aire.
• Las supercies del producto se calientan durante el uso. Toque
solo la pantalla y las asas del producto para evitar quemaduras.
• Utilice el producto únicamente tal como se describe en este
documento.
• Se debe supervisar a los niños para asegurarse de que no
jueguen con el producto.
• Antes de realizar las labores de limpieza y mantenimiento,
apague el producto y desenchufe la alimentación. Deje que el
producto se enfríe por completo.
• Este producto solo puede recibir servicio de un técnico
cualicado para su mantenimiento para así reducir el riesgo de
descargas eléctricas.
• Limpie las aberturas del producto con regularidad para reducir el
riesgo de sobrecalentamiento.
• No abra el producto, no existen piezas en el interior que puedan
ser reparadas por el usuario.
Cómo insertar o cambiar la pila (imagen B)
1. Abra el compartimento de las pilas.
2. Coloque la pila
3. Cierre el compartimento de las pilas.
Cómo instalar la app Nedis SmartLife
1. Descargue la aplicación Nedis Smartlife para Android o iOS en su
teléfono a través de Google Play o Apple App Store.
2. Abra la aplicación Nedis Smartlife en su teléfono.
3. Cree una cuenta con su dirección de correo electrónico y toque
Continue.
4Recibirá un código de vericación a su dirección de correo
electrónico.
4. Introduzca el código de vericación recibido.
5. Cree una contraseña y toque Done.
6. Toque Add Home para crear un hogar SmartLife.
7. Establezca su ubicación, escoja las habitaciones que quiera
conectar y toque Done.

17
Este produto destina-se a ser utilizado em ambientes domésticos
para tarefas domésticas típicas e também pode ser manipulado
por utilizadores não experientes para os mesmos ns, por exemplo
em lojas, escritórios, outros ambientes de trabalho semelhantes,
casas rurais, clientes em hotéis, motéis e outros ambientes de tipo
residencial e/ou alojamento local.
Este produto não se destina a ser utilizado por pessoas (incluindo
crianças) com capacidades físicas, sensoriais ou mentais reduzidas
ou com falta de experiência e conhecimento, a menos que sejam
vigiadas ou tenham recebido instruções relativas à utilização do
produto por parte de uma pessoa responsável pela sua segurança.
Qualquer alteração do produto pode ter consequências em termos
de segurança, garantia e funcionamento adequado.
Peças principais (imagem A)
1 Ecrã
2 Botão de descida de
temperatura
3 Botão de subida de
temperatura
4 Botão de oscilação/Wi-Fi
5 Botão temporizador
6 Botão de modo
7 Botão de ligar/desligar
8 Entrada de ar
9 Botão de oscilação
q Pega
w Entrada de ar
e Interruptor de ligar/desligar
r Base
t Cabo de alimentação
Instruções de segurança
Não cubra o produto, de modo a evitar o
sobreaquecimento.
-
AVISO
• Certique-se de que leu e compreendeu as instruções deste
documento na íntegra antes de instalar ou utilizar o produto.
Guarde a embalagem e este documento para referência futura.
• Não deixe cair o produto e evite impactos.
• Mantenha sempre as pilhas-botão, tanto cheias como vazias, fora
do alcance das crianças para evitar a possibilidade de ingestão.
Elimine as pilhas usadas imediatamente e de forma segura. As
pilhas-botão podem causar queimaduras químicas internas
graves em apenas duas horas, quando ingeridas. Tenha em
mente que os primeiros sintomas podem ser semelhantes a
doenças próprias das crianças, como tosse ou baba. Procure
assistência médica imediata se suspeitar que foram ingeridas
pilhas.
• Limpe os terminais da bateria com um pano limpo e seco se
apresentarem sinais de sujidade.
• As pilhas não recarregáveis não devem ser recarregadas.
• Não coloque uma bateria em curto-circuito.
• Não sujeite as pilhas ou baterias a choques mecânicos.
• Não desmonte, abra ou destrua as baterias.
• Não remova uma pilha ou bateria da embalagem original até que
seja necessário utilizá-la.
• Não utilize qualquer pilha que não tenha sido concebida para ser
utilizada com o produto.
• A utilização da bateria por crianças deve ser supervisionada.
• Respeite as marcas mais (+) e menos (–) na pilha e no produto
para garantir uma utilização correta.
• Procure imediatamente aconselhamento médico caso uma pilha
ou bateria tenha sido engolida.
• Não exponha a bateria ao calor ou ao fogo. Evite armazenar sob
luz solar direta.
• Elimine devidamente as pilhas ou baterias gastas.
• Não exponha o produto à água ou humidade.
• Não utilize este produto em divisões pequenas se estas estiverem
ocupadas por pessoas incapacitadas que não possam sair da
divisão por si próprias, a menos que seja assegurada supervisão
constante.
4Cuando la temperatura ambiente disminuye, el termostato
integrado vuelve a encenderse automáticamente.
Cómo encender/apagar la oscilación
1. Pulse el botón de oscilación/WiFi A49 para encender y apagar
la oscilación.
Se muestra el indicador de oscilación C6 en la pantalla A1 para
indicar que el modo de oscilación está activado.
Protección contra sobrecalentamiento
El producto se desconecta automáticamente en caso de
sobrecalentamiento debido, por ejemplo, a una obstrucción
total o parcial de la rejilla de entrada o salida de aire. Tras un
sobrecalentamiento, deje que el producto se enfríe durante, al
menos, 30 minutos antes de volver a utilizarlo.
Interruptor de seguridad de vuelco
El interruptor de seguridad de vuelco apaga automáticamente el
producto si se cae. Antes de volver a utilizar el producto: Apague el
producto, desconecte el enchufe de alimentación y compruebe si
hay daños.
Cómo apagar el producto
1. Pulse el botón de encendido A7.
2. Pulse el botón de encendido/apagado Ae para apagar el
producto.
3. Desenchufe el cable de alimentación At de la toma de
corriente.
Eliminación
El producto está diseñado para desecharlo por separado
en un punto de recogida adecuado. No se deshaga del
producto con la basura doméstica.
Para obtener más información, póngase en contacto
con el vendedor o la autoridad local responsable de la
eliminación de residuos.
Declaración de conformidad
Nosotros, Nedis B.V., declaramos como fabricante que el producto
HTFA20WTW de nuestra marca Nedis®, producido en China, ha
sido probado de acuerdo con todas las normas y regulaciones
relevantes de la CE y que se han superado todas las pruebas con
éxito. Esto incluye, entre otras, la directiva europea sobre equipos
radioeléctricos RED 2014/53/UE.
La declaración de conformidad completa (y la hoja de datos de
seguridad, si procede) se puede encontrar y descargar en:
nedis.es/HTFA20WTW#support
i Guia de iniciação rápida
Aquecedor com ventilador
de cerâmica inteligente com
Wi-Fi
HTFA20WTW
Para mais informações, consulte a versão alargada do
manual on-line: ned.is/htfa20wtw
Utilização prevista
Este produto é um aquecedor que permite ao utilizador controlar a
temperatura ambiente.
Este produto pode ser controlado através da aplicação Nedis
SmartLife, dos botões no produto ou do controlo remoto incluído.
Este produto é adequado apenas para espaços bem isolados
espaços ou utilização ocasional.
O produto destina-se apenas a utilização em interiores.

18
2. Abra a aplicação Nedis SmartLife no seu telefone.
3. Crie uma conta com o seu endereço de e-mail e toque em
Continue.
4Receberá um código de vericação na sua caixa de correio
eletrónico.
4. Introduza o código de vericação recebido.
5. Crie uma palavra-passe e prima Done.
6. Toque em Add Home para criar uma Casa SmartLife.
7. Dena a sua localização, escolha as divisões com que pretende
estabelecer ligação e prima Done.
Adicionar um produto à aplicação Nedis
SmartLife
1. Prima o botão de ligar/desligar Ae para ligar o produto.
2. Prima e mantenha o botão de oscilação/Wi-Fi A4 durante 3
segundos.
4O indicador de Wi-Fi C1 pisca rapidamente e toca um sinal
sonoro para indicar que o modo de emparelhamento está ativo.
3. Toque em + na aplicação Nedis SmartLife.
4. Selecione o tipo de dispositivo que pretende adicionar na lista.
5. Siga as instruções na aplicação SmartLife da Nedis.
6. Depois de conrmar, consegue controlar o produto através do
seu smartphone.
Para ligar a sua conta SmartLife à Amazon Alexa e/ou Google Home,
congure-a usando a ação ou aptidão «Smart Life». Para mais
detalhes, verique a instrução na Amazon ou Google.
4O indicador de Wi-Fi C1 acende enquanto o produto estiver
ligado.
Instalação do produto
Coloque o produto sobre uma superfície estável e plana.
4Mantenha os objetos a, pelo menos, 50 cm da entrada de ar Aw.
4Mantenha os objetos a, pelo menos, 1 metro da saída de ar A8.
Ligar o produto
1. Ligue o cabo de alimentação At a uma tomada elétrica.
2. Prima o botão de ligar/desligar Ae para ligar o produto.
4O visor exibe a temperatura ambiente atual C4.
3. Pressione o botão de alimentação A7.
O visor A1 liga-se.
Indicadores (imagem C)
O visor A1 contém o seguinte:
1 indicador de Wi-Fi
2 Indicador de potência baixa
3 Indicador de potência
elevada
4 Temperatura ambiente
atual
5 Indicador de temporizador
6 Indicador de oscilação
Alternar entre denições de potência
1. Prima o botão de modo A6 para alternar entre denições de
potência.
2. Escolha entre:
• Modo de baixa potência
• Modo de alta potência
4O indicador de baixa potência C2 acende para indicar que o
produto está em modo de baixa potência.
4O indicador de baixa e alta potência C23 acende para indicar
que o produto está em modo de alta potência.
Conguração do temporizador
1. Prima o botão do temporizador A5 para denir um
temporizador de contagem decrescente.
2. Prima o botão de temporizador A5 para aumentar o
temporizador 1 hora.
4O tempo máximo de contagem decrescente é de 12 horas.
3. Desligue o temporizador premindo o botão de temporizador
• Não utilizar este produto nas imediações de uma banheira, de
um chuveiro ou de uma piscina.
• Apenas manuseie o produto com as mãos secas. O
manuseamento com as mãos húmidas pode provocar choque
elétrico.
• Não utilize o produto em salas onde sejam utilizados ou
armazenados líquidos ou gases inamáveis.
• O calor do produto pode causar danos na superfície sobre a qual
está colocado. Coloque sempre o produto sobre uma superfície
plana, estável e resistente ao calor para evitar danos na
envolvência do produto.
• Não coloque o produto imediatamente debaixo de uma tomada
elétrica.
• Ligue o cabo de alimentação apenas a uma tomada de parede.
Não utilize cabos de extensão.
• Não ligue o produto numa tomada elétrica de um grupo elétrico
com outros produtos que consomem muita energia.
• Verique sempre se a tensão do produto corresponde à tensão
de alimentação.
• Utilize o produto apenas na posição vertical.
• Desenrole sempre o cabo de alimentação antes de utilizar o
produto.
• Não utilize o produto caso uma peça esteja danicada ou
defeituosa. Substitua imediatamente um produto danicado ou
defeituoso.
• O cabo de alimentação não pode ser substituído. Se o cabo
estiver danicado, o produto deve ser entregue numa sucata.
• Não desligue o produto da tomada puxando o cabo. Segure
sempre pela cha e puxe.
• Em caso de problema, desligue o produto da fonte de
alimentação bem como outros equipamentos.
• Desligue o produto quando não estiver a ser utilizado e antes de
limpar.
• Não utilize temporizadores externos ou sistemas de controlo
remoto para ligar ou desligar o produto.
• Não utilize acessórios que não sejam recomendados ou vendidos
pelo fabricante.
• Não cubra o produto, de modo a evitar o sobreaquecimento.
Mantenha uma distância de, pelo menos, 1 metro dos têxteis,
cortinas, panos de tenda e outros objetos inamáveis para
reduzir o risco de incêndio.
• Mantenha os objetos a, pelo menos, 50 cm da entrada de ar.
• Mantenha os objetos a, pelo menos, 1 metro da saída de ar.
• As superfícies do produto cam quentes durante a utilização.
Toque apenas no visor e nas pegas do produto para evitar
queimaduras.
• Utilize o produto apenas conforme descrito neste documento.
• As crianças devem ser supervisionadas para garantir que não
brincam com o produto.
• Antes da limpeza e manutenção, desligue o produto e desligue a
cha da tomada. Deixe-o arrefecer por completo.
• Este produto pode ser reparado apenas por um técnico
qualicado para manutenção a m de reduzir o risco de choque
elétrico.
• Limpe regularmente as aberturas do produto para reduzir o risco
de sobreaquecimento.
• Não abra o produto, este não contém peças reparáveis pelo
utilizador.
Inserir ou substituir a bateria (imagem B)
1. Abra o compartimento da pilha.
2. Colocar a bateria
3. Feche o compartimento das pilhas.
Instalação da aplicação SmartLife da Nedis
1. Faça o download da aplicação Nedis Smartlife para Android ou
iOS no seu telefone através do Google Play ou da Apple Store.

19
Denna produkt är endast lämpad för välisolerade utrymmen eller
sporadisk användning.
Denna produkt är endast avsedd för användning inomhus.
Denna produkt är avsedd för användning i hemmiljöer för typiska
hushållsfunktioner men kan även användas av personer som inte
är experter i typiska hushållsfunktioner såsom: butiker, kontor eller
liknande arbetsmiljöer, jordbruksbyggnader, av gäster på hotell,
motell och andra miljöer av boendetyp och/eller miljöer av typen
bed and breakfast.
Denna apparat är inte avsedd att användas av personer (inklusive
barn) med nedsatt fysik, sensoriskt eller mentalt handikapp, ej heller
av personer som saknar nödvändig erfarenhet och kunskap, utom
i sådana fall då de erhållit vägledning eller instruktion i apparatens
handhavande från en person som ansvarar för deras säkerhet.
Modiering av produkten kan medföra konsekvenser för säkerhet,
garanti och korrekt funktion.
Huvuddelar (bild A)
1 Display
2 Knappen Temperatur ner
3 Knappen Temperatur upp
4 Oscillations-/Wi-Fi-knapp
5 Timer-knapp
6 Lägesknapp
7 Kraftknapp
8 Luftutlopp
9 Oscillationsknapp
q Handtag
w Luftintag
e Till-/från-strömbrytare
r Bas
t Strömkabel
Säkerhetsanvisningar
För att undvika överhettning, täck inte över
produkten.
-
VARNING
• Säkerställ att du har läst och förstått alla instruktioner i detta
dokument innan du installerar och använder produkten. Behåll
förpackningen och detta dokument som framtida referens.
• Tappa inte produkten och skydda den mot slag.
• Förvara alltid knappcellsbatterier, både fulladdade och
urladdade, utom räckhåll för barn för att undvika att barnen
sväljer dem. Bortskaa uttjänta batterier snarast och säkert.
Knappcellsbatterier kan förorsaka allvarliga interna kemiska
brännskador inom så kort tid som två timmar om de sväljs. Kom
ihåg att de första symptomen kan se ut som en barnsjukdom
såsom hosta eller dregling. Uppsök omedelbart läkare om du
misstänker att batterier har svalts.
• Torka batteriets anslutningar med en ren trasa om de är
smutsiga.
• Icke laddningsbara batterier får inte laddas.
• Kortslut inte ett batteri.
• Utsätt inte celler eller batterier för mekaniskt slag.
• Demontera, öppna eller krossa inte batterier.
• Ta inte ut en cell eller ett batteri ur originalemballaget innan det
ska användas.
• Använd inte en cell eller ett batteri som inte är avsett för
användning tillsammans med produkten.
• Barn ska hållas under uppsikt när de använder batterier.
• Observera markeringarna plus (+) och minus (–) på cellen eller
batteriet och produkten, och säkerställ korrekt användning.
• Uppsök omedelbart läkare om en cell eller ett batteri har förtärts.
• Exponera inte batterier till hetta eller eld. Undvik förvaring i
direkt solljus.
• Bortskaa tomma celler eller batterier på korrekt sätt.
• Exponera inte produkten till vatten eller fukt.
• Använd inte denna produkt i små utrymmen där det nns
personer som inte kan lämna rummet på egen hand, om inte
produkten är under ständig uppsikt.
A5 mais uma vez quando o temporizador é denido no
máximo.
4O temporizador é cancelado quando se desliga o produto.
Denir a temperatura
1. Prima os botões de temperatura para cima e para baixo A32
para regular a temperatura ambiente denida.
4Quando a temperatura ambiente atinge o nível selecionado, o
termóstato integrado desliga automaticamente o produto, o
ventilador continua a funcionar.
4Quando a temperatura ambiente diminui, o termóstato
integrado volta a ligar automaticamente.
Ligar ou desligar a oscilação
1. Prima o botão de Wi-Fi A49 para ligar/desligar a oscilação.
Aparece o indicador de oscilação C6 no visor A1 para indicar que
o modo de ventilador está ativo.
Proteção de sobrecarga
O produto desliga automaticamente no caso de sobreaquecimento,
por exemplo, devido a obstrução total ou parcial da entrada ou da
saída de ar. Após um sobreaquecimento, deixe o produto arrefecer
durante, pelo menos, 30 minutos antes de voltar a utilizá-lo.
Interruptor de segurança contra basculamento
O interruptor de segurança anti basculamento desliga
automaticamente o produto quando este cai. Antes de utilizar
o produto novamente: Desligue o produto, desligue a cha de
alimentação e verique se há danos.
Desligar o produto
1. Pressione o botão de alimentação A7.
2. Prima o botão de ligar/desligar Ae para desligar o produto.
3. Desligue o cabo de alimentação At da tomada de corrente.
Eliminação
O produto deve ser eliminado separadamente num
ponto de recolha apropriado. Não elimine este produto
juntamente com o lixo doméstico.
Para obter mais informações, contacte o revendedor ou
o organismo local responsável pela gestão de resíduos.
Declaração de conformidade
A Nedis B.V. declara, na qualidade de fabricante, que o produto
HTFA20WTW da nossa marca Nedis®, produzido na China, foi
testado em conformidade com todas as normas e regulamentos CE
relevantes e que todos os testes foram concluídos com sucesso. Os
mesmos incluem, entre outros, o regulamento RED 2014/53/UE.
A Declaração de conformidade (e a cha de dados de segurança, se
aplicável) pode ser consultada e descarregada em:
nedis.pt/HTFA20WTW#support
e Snabbstartsguide
Smart keramisk värmeäkt
med Wi-Fi
HTFA20WTW
För ytterligare information, se den utökade manualen
online: ned.is/htfa20wtw
Avsedd användning
Denna produkt är en värmare som möjliggör för användaren att
kontrollera omgivningstemperaturen.
Denna produkt kan styras via Nedis SmartLife-appen, knapparna på
produkten eller med den medföljande ärrkontrollen.

20
6. Tryck på Add Home för att skapa ett SmartLife Home.
7. Ställ in din ort, välj det rum du önskar ansluta med och tryck på
Done.
Lägga till en produkt till Nedis SmartLife-appen
1. Tryck på till/från-knappen Ae för att slå på produkten.
2. Tryck på och håll oscillations-/Wi-Fi-knappen nertryckt A4 i 3
sekunder.
4Indikatorlampan för Wi-Fi C1 blinkar snabbt och en ljudsignal
hörs för att ange att parkopplingsläget är aktivt.
3. Vidrör + på Nedis SmartLife-appen.
4. Välj den typ av enhet du önskar lägga till från listan.
5. Följ anvisningarna i Nedis SmartLife-appen.
6. Efter bekräftelsen kan du kontrollera produkten med din
smarttelefon.
För att ansluta ditt SmartLife-konto till Amazon Alexa och/eller
Google Home, ställ in det med hjälp av ”SmartLife”-åtgärd eller
skicklighet. För ytterligare detaljer, se anvisningarna på antingen
Amazon eller Google.
4Indikatorlampan för Wi-Fi C1 tänds när produkten är ansluten.
Installera produkten
Placera produkten på en stabil och plan yta.
4Håll föremål på ett avstånd av minst 50 cm från luftintaget Aw.
4Håll föremål på ett avstånd av minst en (1) meter från
luftutloppet A8.
Att slå på produkten
1. Anslut nätsladden At till ett eluttag.
2. Tryck på till/från-knappen Ae för att slå på produkten.
4Displayen visar aktuell rumstemperatur C4.
3. Tryck på strömknappen A7.
Displayen A1 aktiveras.
Indikatorer (bild C)
Displayen A1 innehåller följande:
1 Indikatorlampa för Wi-Fi
2 Lågeektindikator
3 Högeektindikator
4 Nuvarande rumstemperatur
5 Timerindikator
6 Oscillationindikator
Att växla mellan eektinställningar
1. Tryck på lägesknappen A6 för att växla mellan
eektinställningar.
2. Välj mellan:
• Läge för låg strömförbrukning
• Läge för hög strömförbrukning
4Indikator för låg eekt C2 tänds för att indikera att produkten
står i läget för låg strömförbrukning.
4Indikator för låg och hög eekt C23 tänds för att indikera att
produkten står i läget för hög strömförbrukning.
Att ställa in timern
1. Tryck på timerknappen A5 för att ställa in en nedräkningstimer.
2. Tryck på timerknappen A5 för att öka timern med 1 timme.
4Längsta nedräkningstid är 12 timmar.
3. Stäng av timern genom att trycka ytterligare en gång på
timerknappen A5 när timern är inställd till längsta tid.
4Timern nollställs när produkten stängs av.
Att ställa in temperaturen
1. Tryck på temperaturens upp- och nerknappar A32 för att
justera den inställda rumstemperaturen.
4När rumstemperaturen når vald nivå, stänger den inbyggda
termostaten automatiskt av produkten och stängs av automatiskt
och äkten fortsätter att fungera.
4När rumstemperaturen går ner, sätter den inbyggda termostaten
igång igen.
• Använd inte denna produkt i närheten av ett badkar, en dusch
eller en pool.
• Hantera produkten med endast torra händer. Hantering med våta
händer kan resultera i elchock.
• Använd inte produkten i utrymmen där lättantändliga vätskor
eller gaser hanteras eller förvaras.
• Värmen från produkten kan orsaka skada på den yta som den är
placerad på. Placera alltid produkten på en plan, stabil och
värmetålig yta för att hindra skada på produktens omgivning.
• Placera inte produkten omedelbart under ett eluttag.
• Anslut endast nätsladden till ett eluttag. Använd inte
förlängningssladdar.
• Anslut inte produkten till ett eluttag med en grupp andra
produkter som drar mycket ström.
• Kontrollera alltid att produktens spänning motsvarar
nätspänningen.
• Använd produkten i endast upprätt läge.
• Linda alltid ut nätsladden innan produkten används.
• Använd inte produkten om en del är skadad eller defekt. Byt
omedelbart ut en skadad eller defekt produkt.
• Nätsladden kan inte bytas ut. Om sladden är skadad ska
produkten skrotas.
• Koppla inte ur produkten genom att dra i kabeln. Håll alltid i
kontakten när du drar.
• Koppla bort produkten från kraftkällan och annan utrustning i
händelse av problem.
• Dra ut stickkontakten ur eluttaget när apparaten inte används
och före rengöring.
• Använd inte externa timers eller ärrkontrollsystem för att slå på
eller stänga av produkten.
• Använd inte tillbehör som inte rekommenderas eller säljs av
tillverkaren.
• För att undvika överhettning, täck inte över produkten. Håll ett
avstånd på minst en (1) meter från textilier, gardiner, tältduk och
andra brandfarliga föremål för att minska risken för brand.
• Håll föremål på ett avstånd av minst 50 cm från luftintaget.
• Håll föremål på ett avstånd av minst en (1) meter från
luftutloppet.
• Produktens yta blir varm under användning. Vidrör endast
produktens display och handtag för att undvika brännskador.
• Använd produkten endast enligt anvisningarna i detta
dokument.
• Små barn bör hållas under uppsikt för att säkerställa att de inte
leker med produkten.
• Stäng av produkten och koppla från strömmen före rengöring
och underhåll. Låt produkten kallna helt.
• Denna produkt får, för att minska risken för elchock, endast
servas av en kvalicerad underhållstekniker.
• Rengör produktens öppningar regelbundet för att minska risken
för överhettning.
• Öppna inte upp produkten. Det nns inga invändiga delar som
användaren kan serva på egen hand.
Sätta i eller byta batteri (bild B)
1. Öppna batterifacket.
2. Sätt i batteriet
3. Stäng batterifacket.
Installera appen Nedis SmartLife
1. Ladda ner appen Nedis Smartlife för Android eller iOS till din
telefon via Google Play eller Apple App Store.
2. Öppna appen Nedis Smartlife på din telefon.
3. Skapa ett konto med din e-postadress och tryck på Continue.
4Du kommer att få en verieringskod till din e-postadress.
4. Skriv in den mottagna verieringskoden.
5. Skapa ett lösenord och tryck på Done.
Pagina se încarcă...
Pagina se încarcă...
Pagina se încarcă...
Pagina se încarcă...
Pagina se încarcă...
Pagina se încarcă...
Pagina se încarcă...
Pagina se încarcă...
Pagina se încarcă...
Pagina se încarcă...
Pagina se încarcă...
Pagina se încarcă...
Pagina se încarcă...
Pagina se încarcă...
Pagina se încarcă...
Pagina se încarcă...
Pagina se încarcă...
Pagina se încarcă...
Pagina se încarcă...
Pagina se încarcă...
-
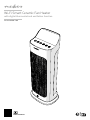 1
1
-
 2
2
-
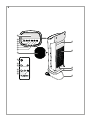 3
3
-
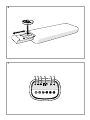 4
4
-
 5
5
-
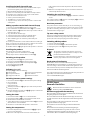 6
6
-
 7
7
-
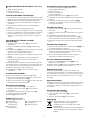 8
8
-
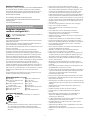 9
9
-
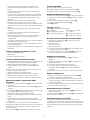 10
10
-
 11
11
-
 12
12
-
 13
13
-
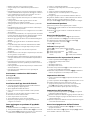 14
14
-
 15
15
-
 16
16
-
 17
17
-
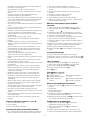 18
18
-
 19
19
-
 20
20
-
 21
21
-
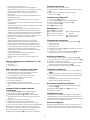 22
22
-
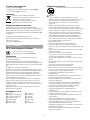 23
23
-
 24
24
-
 25
25
-
 26
26
-
 27
27
-
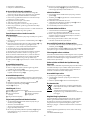 28
28
-
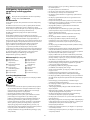 29
29
-
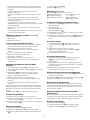 30
30
-
 31
31
-
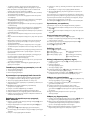 32
32
-
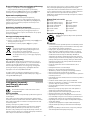 33
33
-
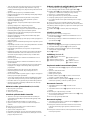 34
34
-
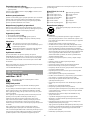 35
35
-
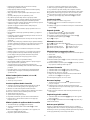 36
36
-
 37
37
-
 38
38
-
 39
39
-
 40
40


Nedis SMARTLIFE 2000W WIFI VIFTEOVN Manual de utilizare
- Tip
- Manual de utilizare
în alte limbi
- français: Nedis SMARTLIFE 2000W WIFI VIFTEOVN Manuel utilisateur
- slovenčina: Nedis SMARTLIFE 2000W WIFI VIFTEOVN Používateľská príručka
- Deutsch: Nedis SMARTLIFE 2000W WIFI VIFTEOVN Benutzerhandbuch
- italiano: Nedis SMARTLIFE 2000W WIFI VIFTEOVN Manuale utente
- svenska: Nedis SMARTLIFE 2000W WIFI VIFTEOVN Användarmanual
- dansk: Nedis SMARTLIFE 2000W WIFI VIFTEOVN Brugermanual
- português: Nedis SMARTLIFE 2000W WIFI VIFTEOVN Manual do usuário
- Nederlands: Nedis SMARTLIFE 2000W WIFI VIFTEOVN Handleiding
Lucrări înrudite
-
Nedis WIFICBO40BK Manualul utilizatorului
-
Nedis WIFIACMB1WT7 Manualul utilizatorului
-
-
-
Nedis ZBSM10WT Manual de utilizare
-
Nedis WIFIDS10 Manualul utilizatorului
-
-
Nedis WIFILS51CRGB Manualul utilizatorului