
IT Istruzioni di montaggio e d'uso
EN Instruction on mounting and use
DE Montage- und Gebrauchsanweisung
FR Prescriptions de montage et mode d’emploi
NL Montagevoorschriften en gebruiksaanwijzingen
ES Montaje y modo de empleo
PT Instruções para montagem e utilização
EL
SV Monterings- och bruksanvisningar
FI Asennus- ja käyttöohjeet
NO Instrukser for montering og bruk
DA Bruger- og monteringsvejledning
PL Instrukcja montau i obsugi
CS Návod na montáž a používání
SK Návod k montáži a užití
HU Felszerelési és használati utasítás
BG
RO Instruciuni de montaj i utilizare
RU
UK
ET Paigaldus- ja kasutusjuhend
LT Montavimo ir naudojimosi instrukcija
LV Ierkošanas un izmantošanas instrukcija
SR Uputstva za montažu i upotrebu
SL Navodila za montažo in uporabo
HR Uputstva za montažu i za uporabu
TR Montaj ve kullanım talimatları
KK
AR


13
IT - Istruzioni di montaggio e d'uso
Attenersi strettamente alle istruzioni riportate in questo
manuale. Si declina ogni responsabilità per eventuali incon-
venienti, danni o incendi provocati all'apparecchio derivati
dall'inosservanza delle istruzioni riportate in questo manuale.
La cappa è concepita per l'aspirazione dei fumi e vapori della
cottura ed è destinata al solo uso domestico.
La cappa può avere estetiche differenti rispetto a quanto
illustrato nei disegni di questo libretto, comunque le i-
struzioni per l'uso, la manutenzione e l'installazione ri-
mangono le stesse.
• E' importante conservare tutti i manuali che accompa-
gnano il prodotto per poterli consultare in ogni momento.
In caso di vendita, di cessione o di trasloco, assicurarsi
che restino insieme al prodotto.
• Leggere attentamente le istruzioni: ci sono importanti
informazioni sull'installazione, sull'uso e sulla sicurezza.
• Non effettuare variazioni elettriche o meccaniche sul
prodotto o sulle condotte di scarico.
• Verificare l'integrità della cappa prima di procedere con
l’installazione. In caso contrario contattare il rivenditore e
non proseguire con l'installazione.
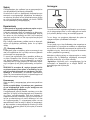
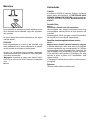
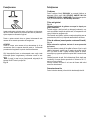
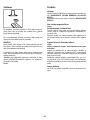
Avvertenze
• Prima di qualsiasi operazione di pulizia
o manutenzione, disinserire la cappa dal-
la rete elettrica togliendo la spina o stac-
cando l’interruttore generale
dell’abitazione.
• Per tutte le operazioni di installazione e
manutenzione utilizzare guanti da lavoro.
• L’apparecchio può essere utilizzato da
bambini di età non inferiore a 8 anni e da
persone con ridotte capacità fisiche, sen-
soriali o mentali, o prive di esperienza o
della necessaria conoscenza, purchè sot-
to sorveglianza oppure dopo che le stes-
se abbiano ricevuto istruzioni relative
all’uso sicuro dell’apparecchio e alla
comprensione dei pericoli ad esso ine-
renti.
• I bambini devono essere controllati af-
finché non giochino con l’apparecchio.
• La pulizia e la manutenzione non deve
essere effettuata da bambini senza sor-
veglianza.
• Il locale deve disporre di sufficiente ven-
tilazione, quando la cappa da cucina vie-
ne utilizzata contemporaneamente ad al-
tri apparecchi a combustione di gas o al-
tri combustibili.
• La cappa va frequentemente pulita sia
internamente che esternamente (ALME-
NO UNA VOLTA AL MESE), rispettare
comunque quanto espressamente indica-
to nelle istruzioni di manutenzione.
L’inosservanza delle norme di pulizia del-
la cappa e della sostituzione e pulizia dei
filtri comporta rischi di incendi.
• E’ severamente vietato fare cibi alla
fiamma sotto la cappa.
• Per la sostituzione della lampada utiliz-
zare solo il tipo lampada indicato nella
sezione manutenzione /sostituzione lam-
pada di questo manuale.
L’impiego di fiamma libera è dannoso ai filtri e può dar luogo
ad incendi, pertanto deve essere evitato in ogni caso.
La frittura deve essere fatta sotto controllo onde evitare che
l’olio surriscaldato prenda fuoco.
ATTENZIONE: Quando il piano di cottura è in funzione le parti
accessibili della cappa possono diventare calde.
• Non collegare l’apparecchio alla rete elettrica finche
l’installazione non è totalmente completata.
• Per quanto riguarda le misure tecniche e di sicurezza da
adottare per lo scarico dei fumi attenersi strettamente a quan-
to previsto dai regolamenti delle autorità locali competenti.
• L’aria aspirata non deve essere convogliata in un condotto
usato per lo scarico dei fumi prodotti da apparecchi a combu-
stione di gas o di altri combustibili.
• Non utilizzare o lasciare la cappa priva di lampade corretta-
mente montate per possibile rischio di scossa elettrica.
• Mai utilizzare la cappa senza griglia correttamente montata!
• La cappa non va MAI utilizzata come piano di appoggio a
meno che non sia espressamente indicato.
• Utilizzare solo le viti di fissaggio in dotazione con il prodotto
per l'installazione o, se non in dotazione, acquistare il tipo di
viti corretto.
• Utilizzare la lunghezza corretta per le viti che sono identificati
nella Guida all'installazione.
• In caso di dubbio, consultare il centro di assistenza autoriz-
zato o personale qualificata similare.

14
ATTENZIONE!
• La mancata installazione di viti e dispositivi di fissag-
gio in conformità di queste istruzioni può comportare
rischi di natura elettrica.
• Non utilizzare con un programmatore, timer, teleco-
mando separato o qualsiasi altro dispositivo che si at-
tiva automaticamente.
Questo apparecchio è contrassegnato in conformità alla Diret-
tiva Europea 2012/19/EC, Waste Electrical and Electronic
Equipment (WEEE). Assicurandosi che questo prodotto sia
smaltito in modo corretto, l'utente contribuisce a prevenire le
potenziali conseguenze negative per l'ambiente e la salute.
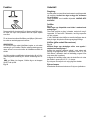
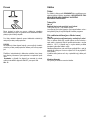
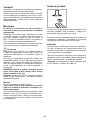
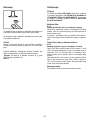
Il simbolo
sul prodotto o sulla documentazione di ac-
compagnamento indica che questo prodotto non deve essere
trattato come rifiuto domestico ma deve essere consegnato
presso l'idoneo punto di raccolta per il riciclaggio di apparec-
chiature elettriche ed elettroniche. Disfarsene seguendo le
normative locali per lo smaltimento dei rifiuti. Per ulteriori in-
formazioni sul trattamento, recupero e riciclaggio di questo
prodotto, contattare l'idoneo ufficio locale, il servizio di raccolta
dei rifiuti domestici o il negozio presso il quale il prodotto è
stato acquistato.
Apparecchiatura progettata, testata e realizzata nel rispetto
delle norme sulla:
• Sicurezza: EN/IEC 60335-1; EN/IEC 60335-2-31, EN/IEC
62233.
• Prestazione: EN/IEC 61591; ISO 5167-1; ISO 5167-3; ISO
5168; EN/IEC 60704-1; EN/IEC 60704-2-13; EN/IEC 60704-3;
ISO 3741; EN 50564; IEC 62301.
• EMC: EN 55014-1; CISPR 14-1; EN 55014-2; CISPR 14-2;
EN/IEC 61000-3-2; EN/IEC 61000-3-3. Suggerimenti per un
corretto utilizzo al fine di ridurre l’impatto ambientale: Quando
iniziate a cucinare, accendere la cappa alla velocità minima,
lasciandola accesa per alcuni minuti anche dopo il termine
della cottura. Aumentare la velocità solo in caso di grandi
quantità di fumo e vapore, utilizzando la funzione booster solo
in casi estremi. Per mantenere ben efficiente il sistema di
riduzione degli odori, sostituire, quando è necessario, il/i filtro/i
carbone. Per mantenere ben efficiente il filtro del grasso, pulir-
lo in caso di necessità. Per ottimizzare l’efficienza e minimiz-
zare i rumori, utilizzare il diametro massimo del sistema di
canalizzazione indicato in questo manuale.
Utilizzazione
La cappa è realizzata per essere utilizzata in versione filtrante
a ricircolo interno.
I fumi e vapori della cottura vengono aspirati all'interno della
cappa, filtrati e depurati passando attraverso il/i filtro/i grassi e
il/i filtro/i al carbone di cui DEVE essere fornita la cappa.
Installazione
L'installazione, sia elettrica che meccanica, deve essere
eseguita da personale specializzato.
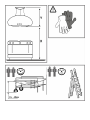
La distanza minima fra la superficie di supporto dei recipienti
sul dispositivo di cottura e la parte più bassa della cappa da
cucina deve essere non inferiore a 60cm in caso di cucine
elettriche e di 70cm in caso di cucine a gas o miste.
Se le istruzioni di installazione del dispositivo di cottura a gas
specificano una distanza maggiore, bisogna tenerne conto.
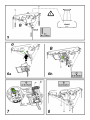
Collegamento Elettrico
La tensione di rete deve corrispondere alla tensione riportata
sull'etichetta caratteristiche situata all'interno della cappa.
Il prodotto è inteso per il collegamento diretto alla rete di ali-
mentazione, applicare quindi un interruttore bipolare a norme
che assicuri la disconnessione completa della rete nelle con-
dizioni della categoria di sovratensione III, conformemente alle
regole di installazione.
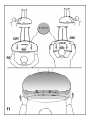
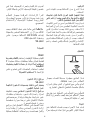
ATTENZIONE! Il particolare B , è dotato di conduttore
(giallo-verde) che deve essere collegato alla terra dell'im-
pianto elettrico domestico. Fig. 6a-b
Attenzione! La sostituzione del cavo di interconnessione
deve essere effettuata dal servizio assistenza tecnica autoriz-
zato.
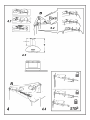
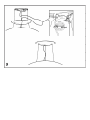
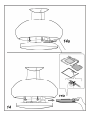
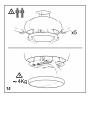
Montaggio
Questo tipo di cappa deve essere fissata al soffitto.
Prodotto dal peso eccessivo, la movimentazione e instal-
lazione della cappa deve essere fatta da almeno due o più
persone.
La cappa è dotata di tasselli di fissaggio adatti alla maggior
parte di pareti/soffitti. E’ tuttavia necessario interpellare un
tecnico qualificato per accertarVi sull’idoneità dei materiali a
seconda del tipo di parete/soffitto. La/il parete/soffitto deve
essere sufficientemente robusto da sostenere il peso della
cappa.

15
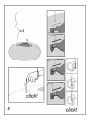
Funzionamento
Questo prodotto è predisposto per funzionare con radioco-
mando Elica,
a corredo con il prodotto o acquistabile separatamente come
optional.
Per poter controllare la cappa tramite radiocomando è neces-
sario eseguire la procedura di affiliazione.
ATTENZIONE!
Per iniziare è necessario scollegare e ricollegare la cappa alla
rete elettrica ed eseguire la procedura di affiliazione entro il
primo minuto di alimentazione.
Leggere le istruzioni a corredo del radiocomando dove sono
riportate tutte le informazioni per la sua l'affiliazione e per il
corretto utilizzo.
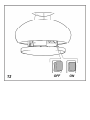
Nota: se la cappa non dovesse funzionare, verificare che il
pulsante ON/OFF della cappa sia in posizione ON.Fig. 12
Manutenzione
Pulizia
Per la pulizia usare ESCLUSIVAMENTE un panno inumidito
con detersivi liquidi neutri. NON UTILIZZARE UTENSILI O
STRUMENTI PER LA PULIZIA!
Evitare l’uso di prodotti contenenti abrasivi. NON UTILIZZARE
ALCOOL!
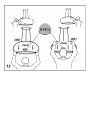
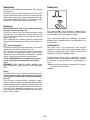
Filtro antigrasso Fig. 14
Trattiene le particelle di grasso derivanti dalla cottura.
Il filtro antigrasso metallico deve essere pulito una volta al
mese con detergenti non aggressivi, manualmente oppure in
lavastoviglie a basse temperature ed a ciclo breve.
Con il lavaggio in lavastoviglie il filtro antigrasso metallico può
scolorirsi ma le sue caratteristiche di filtraggio non cambiano
assolutamente.
Filtro ai carboni attivi (Solo per Versione Filtran-
te)Fig. 14
Trattiene gli odori sgradevoli derivanti dalla cottura.
Il filtro al carbone può essere lavato ogni due mesi in acqua
calda e detergenti idonei o in lavastoviglie a 65°C (in caso di
lavaggio in lavastoviglie eseguire il ciclo di lavaggio completo
senza stoviglie all'interno).
Togliere l'acqua in eccesso senza rovinare il filtro, dopodiché
riporlo nel forno per 10 minuti a 100°C per asciugarlo definiti-
vamente.
Sostituire il materassino ogni 3 anni e ogni volta che il panno
risulta danneggiato.
Sostituzione Lampade
Per la sostituzione rivolgersi al servizio assistenza tecnica.

16
EN - Instruction on mounting and use
Closely follow the instructions set out in this manual. All
responsibility, for any eventual inconveniences, damages or
fires caused by not complying with the instructions in this ma-
nual, is declined. This appliance is intended to be used in
household and similar application such as: - staff kitchen are-
as in shop, offices and other working environments; - farm
houses; - by clients in hotels, motels and other residential type
environments; - bed and breakfast type environments.
The hood can look different to that illustrated in the dra-
wings in this booklet. The instructions for use, mainte-
nance and installation, however, remain the same.
• It is important to conserve this booklet for consultation at
any moment. In the case of sale, cession or move, make
sure it is together with the product.
• Read the instructions carefully: there is important infor-
mation about installation, use and safety.
• Do not carry out electrical or mechanical variations on the
product or on the discharge conduits.
• Before proceeding with the installation of the appliance
verify that there are no damaged all components. Other-
wise contact your dealer and do not proceed with the in-
stallation.
Caution
• Before any cleaning or maintenance
operation, disconnect hood from the
mains by removing the plug or discon-
necting the mains electrical supply.
• Always wear work gloves for all installa-
tion and maintenance operations.
• This appliance can be used by children
aged from 8 years and above and per-
sons with reduced physical, sensory or
mental capabilities or lack of experience
and knowledge if they have been given
supervision or instruction concerning use
of the appliance in a safe way and un-
derstand the hazards involved.
• Children shall not be allowed to tamper
with the controls or play with the applian-
ce.
• Cleaning and user maintenance shall
not be made by children without
supervision.
• The premises where the appliance is
installed must be sufficiently ventilated,
when the kitchen hood is used together
with other gas combustion devices or o-
ther fuels.
• The hood must be regularly cleaned on
both the inside and outside (AT LEAST
ONCE A MONTH).
• This must be completed in accordance
with the maintenance instructions provi-
ded. Failure to follow the instructions
provided regarding the cleaning of the
hood and filters will lead to the risk of fi-
res.
• Do not flambé under the range hood.
• For lamp replacement use only lamp
type indicated in the Maintenan-
ce/Replacing lamps section of this ma-
nual.
The use of exposed flames is detrimental to the filters and
may cause a fire risk, and must therefore be avoided in all
circumstances.
Any frying must be done with care in order to make sure that
the oil does not overheat and ignite.
CAUTION: Accessible parts of the hood may become hot
when used with cooking appliances.
• Do not connect the appliance to the mains until the installa-
tion is fully complete.
• With regards to the technical and safety measures to be
adopted for fume discharging it is important to closely follow
the regulations provided by the local authorities.
• The air must not be discharged into a flue that is used for
exhausting fumes from appliance burning gas or other fuels.
• Do not use or leave the hood without the lamp correctly
mounted due to the possible risk of electric shocks.
• Never use the hood without effectively mounted grids.
• The hood must NEVER be used as a support surface unless
specifically indicated.
• Use only the fixing screws supplied with the product for in-
stallation or, if not supplied, purchase the correct screws type.
• Use the correct length for the screws which are identified in
the Installation Guide.
• In case of doubt, consult an authorized service assistance
center or similar qualified person.
WARNING!

17
• Failure to install the screws or fixing device in accor-
dance with these instructions may result in electrical
hazards.
• Do not use with a programmer, timer, separate remote
control system or any other device that switches on
automatically.
• This appliance is marked according to the European directi-
ve 2012/19/EC on Waste Electrical and Electronic Equipment
(WEEE).
• By ensuring this product is disposed of correctly, you will
help prevent potential negative consequences for the envi-
ronment and human health, which could otherwise be caused
by inappropriate waste handling of this product.
• The symbol
on the product, or on the documents
accompanying the product, indicates that this appliance may
not be treated as household waste. Instead it should be taken
to the appropriate collection point for the recycling of electrical
and electronic equipment. Disposal must be carried out in
accordance with local environmental regulations for waste
disposal.
• For further detailed information regarding the process, col-
lection and recycling of this product, please contact the ap-
propriate department of your local authorities or the local de-
partment for household waste or the shop where you purcha-
sed this product.
Appliance designed, tested and manufactured according to:
• Safety: EN/IEC 60335-1; EN/IEC 60335-2-31, EN/IEC
62233.
• Performance: EN/IEC 61591; ISO 5167-1; ISO 5167-3; ISO
5168; EN/IEC 60704-1; EN/IEC 60704-2-13; EN/IEC 60704-3;
ISO 3741; EN 50564; IEC 62301.
• EMC: EN 55014-1; CISPR 14-1; EN 55014-2; CISPR 14-2;
EN/IEC 61000-3-2; EN/IEC 61000-3-3. Suggestions for a
correct use in order to reduce the environmental impact:
Switch ON the hood at minimum speed when you start coo-
king and kept it running for few minutes after cooking is fini-
shed. Increase the speed only in case of large amount of
smoke and vapor and use boost speed(s) only in extreme
situations. Replace the charcoal filter(s) when necessary to
maintain a good odor reduction efficiency. Clean the grease
filter(s) when necessary to maintain a good grease filter effi-
ciency. Use the maximum diameter of the ducting system
indicated in this manual to optimize efficiency and minimize
noise.
Use
The hood has been made for use in the internal recirculating
filtering version.
Cooking fumes and steam are aspirated inside the hood, filte-
red and cleaned, passing through the fat filter/s and the car-
bon filter/s that MUST be supplied with the hood.
Installation
Specialised personnel must carry out both the electrical
and the mechanical installation.
The minimum distance between the supporting surface for the
cooking equipment on the hob and the lowest part of the ran-
ge hood must be not less than 60cm from electric cookers and
70cm from gas or mixed cookers.
If the instructions for installation for the gas hob specify a gre-
ater distance, this must be adhered to.
Electrical connection
The mains tension must correspond to the tension shown on
the characteristic label situated inside the hood.
The product is meant for connecting directly to the mains
supply, therefore apply a regulation bipolar switch that ensu-
res complete disconnection from the mains in the conditions of
category III over-tension, conforming to the installation rules.
Warning! Detail B is equipped with a conductor (yellow-
green) that must be connected to the earth of the dome-
stic electrical plant. Fig. 6a-b
Warining! Changing the interconnection cable must be car-
ried out by the authorised technical assistance service.
Mounting
This type of cooker hood must be fixed to the ceiling.
Very heavy product; hood handling and installation must
be carried out by at least two persons.
Expansion wall plugs are provided to secure the hood to most
types of walls/ceilings. However, a qualified technician must
verify suitability of the materials in accordance with the type of
wall/ceiling. The wall/ceiling must be strong enough to take
the weight of the hood.
Do not tile, grout or silicone this appliance to the wall.
Surface mounting only.

18
Operation
This product is designed to work with an Elica remote control,
either supplied with the product or purchased separately as an
optional.
To control the hood via remote control, the affiliation procedu-
re must be carried out.
CAUTION!
To begin, the hood must be disconnected and then reconnec-
ted to the power supply and the affiliation procedure must be
carried out within the first minute of connection to the power.
Read the instructions supplied with the remote control, which
provide detailed instructions on affiliation and correct use.
Note: if the hood does not work, make sure that it is ON by
using the ON/OFF button.Fig. 12
Maintenance
Cleaning
Clean using ONLY the cloth dampened with neutral liquid
detergent. DO NOT CLEAN WITH TOOLS OR INSTRU-
MENTS. Do not use abrasive products. DO NOT USE AL-
COHOL!
Grease filter Fig. 14
Traps cooking grease particles.
The grease filter must be cleaned once a month using non
aggressive detergents, either by hand or in the dishwasher,
which must be set to a low temperature and a short cycle.
When washed in a dishwasher, the grease filter may discolor
slightly, but this does not affect its filtering capacity.
Charcoal filter (filter version only) Fig. 14
It absorbs unpleasant odors caused by cooking.
The charcoal filter can be washed once every two months
using hot water and a suitable detergent, or in a dishwasher at
65°C (if the dishwasher is used, select the full cycle function
and leave dishes out).
Eliminate excess water without damaging the filter, then put it
in the oven for 10 minutes at 100° C to dry completely. Repla-
ce the mattress every 3 years and when the cloth is damaged.
Replacing lamps
For replacement, contact the technical service.

19
DE - Montage- und Gebrauchsanweisung
Die Anweisungen, die in diesem Handbuch gegeben wer-
den, müssen strikt eingehalten werden. Es wird keinerlei
Haftung übernommen für mögliche Mängel, Schäden oder
Brände der Dunstabzugshaube, die auf die Nichtbeachtung
der Vorschriften in diesem Handbuch zurückzuführen sind.
Die Dunstabzugshaube wurde für die Absaugung der beim
Kochen entstehenden Dünste und Dämpfe entwickelt. Sie ist
nur für den Hausgebrauch geeignet.
Die Dunstabzugshaube kann anders aussehen als auf den
Abbildungen in der vorliegenden Bedienungsanleitung.
Die Bedienungsanleitungen, die Wartung und die Installa-
tion sind aber gleich.
• Die Bedienungsanleitung muss aufbewahrt werden, da-
mit jederzeit ein Nachschlagen möglich ist. Bei Verkauf,
Abtretung oder Umzug muss die Bedienungsanleitung
immer beim Produkt bleiben.
• Die Bedienungsanleitung muss aufmerksam gelesen
werden, da sie wichtige Informationen über Installation,
Gebrauch und Sicherheit enthält.
• Es dürfen keine elektrischen oder mechanischen Ände-
rungen am Gerät oder an den Abluftleitungen vorge-
nommen werden.
• Vergewissern Sie sich vor der Installation, dass das Ge-
rät keine Transportschäden aufweist. Bei auftretenden
Problemen setzen Sie sich bitte mit Ihrem Händler in
Verbindung.
Warnung
• Vor jeglicher Reinigung bzw. Wartung,
muss das Gerät vom Stromnetz getrennt
werden, indem man den Stecker auszieht
bzw. den Hauptschalter ausschaltet.
• Alle Installations-und Wartungarbeiten
sind mit Arbeitshandschuhen durchzufü-
hren.
• Das Gerät kann von Kindern ab 8 Ja-
hren, sowie von Menschen mit verringer-
ten physischen, sinnlichen oder psychi-
schen Fähigkeiten (oder ohne Erfahrung
und Kenntnisse) benutzt werden, sofern
sie entsprechend überwacht werden bzw.
in die Benutzung des Geräts sicher ein-
gewiesen worden und sich den damit
verbundenen Gefahren bewusst sind.
• Darauf achten, dass Kinder mit dem
Gerät nicht spielen. Die Reinigungs- und
-Wartungsarbeiten müssen von unüber-
wachten Kindern nicht durchgeführt wer-
den.
• Der Raum muss ausreichend belüftet
sein, wenn die Dunstabzugshaube zu-
sammen mit anderen Gas-bzw. Bren-
nstoffgeräten verwendet wird.
• Die Dunstabzugshaube muss regelmä-
ßig von innen und außen gereinigt wer-
den (MINDESTENS EINMAL IM MO-
NAT), außerdem sollten die Anweisun-
gen zur Wartung befolgt werden. Das
nicht befolgen der Normen zur Reinigung
der Dunstabzugshaube, das nicht befol-
gen der Reinigung und des Austauschs
von Filtern führt zu Brandgefahr.
• Es ist streng verboten, Speisen auf der
Flamme unter der Dunstabzugshaube zu
kochen.
• Für den Lampenersatz verwenden Sie
nur den Lampentyp, der in dem Absatz
Lampenwartung / Ersatz des vorliegen-
den Handbuchs angegeben wird.
Die Verwendung von offener Flamme schadet den Filtern und
kann zu Brandgefahr führen, daher ist die in jedem Fall zu
vermeiden.
Das Frittieren muss mit Vorsicht durchgeführt werden, um zu
vermeiden, dass das überhitzte Öl Feuer fängt.
ACHTUNG: Ist das Kochfeld in Betrieb, können zugängliche
Teile der Dunstabzugshaube heiß werden.
Achtung! Das Gerät nicht an das Stromnetz anschließen, bis
die Installation vollständig abgeschlossen ist.
Für das Ableiten der Küchengerüche, sich streng an die Vo-
schriften der örtlichen Behörde halten.
• Bei gleichzeitigem Betrieb der Dunstabzugshaube im Abluf-
tbetrieb und gas- oder brennstoffbetriebenen Geräten darf im
Aufstellraum gas- oder brennstoffbetriebenen Geräten der
Unterdruck nicht größer als 4 Pa (4 x 10
-5
bar) sein.
• Die Abzugsluft darf nicht in eine Ableitung der Rauch-
bzw.Brennstoffgase geleitet werden.
• Die Dunstabzugshaube ohne richtig installierte Lampen nicht
verwenden bzw. lassen, um Stromschlaggefahr zu vermeiden.
• Die Dunstabzugshaube niemals ohne richtig installiertes
Gitter verwenden!

20
• Die Dunstabzugshaube darf NIEMALS als Auflagefläche
verwendet werden, sofern es nicht ausdrücklich angegeben
ist.
• Verwenden Sie nur die mit dem Produkt für die Installation
mitgelieferten Schrauben, oder, falls nicht im Lieferumfang
enthalten, kaufen Sie den richtigen Schraubentyp.
• Die Länge für die Schrauben verwenden, die im Installation-
shandbuch angegeben wird.
• Im Zweifelsfall, fragen Sie Ihren autorisierten Kundendienst
oder ein ähnliches Fachpersonal.
• Schrauben und Befestigungselemente, die nicht in
Übereinstimmung mit diesen Hinweisen sind, können
zur elektrischen Gefährdung führen.
In Übereinstimmung mit den Anforderungen der Europäischen
Richtlinie 2012/19/EC über Elektro- und Elektronik-Altgeräte
(WEEE) ist vorliegendes Gerät mit einer Kennzeichnung ver-
sehen.
Sie leisten einen positiven Beitrag für den Schutz der Umwelt
und die Gesundheit des Menschen, wenn Sie dieses Gerät
einer gesonderten Abfallsammlung zuführen. Im unsortierten
Siedlungsmüll könnte ein solches Gerät durch unsachgemäße
Entsorgung negative Konsequenzen nach sich ziehen.
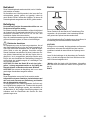
Auf dem Produkt oder der beiliegenden Produktdokumenta-
tion ist folgendes Symbol
einer durchgestrichenen
Abfalltonne abgebildet. Es weist darauf hin, dass eine Entsor-
gung im normalen Haushaltsabfall nicht zulässig ist. Entsor-
gen Sie dieses Produkt im Recyclinghof mit einer getrennten
Sammlung für Elektro- und Elektronikgeräte. Die Entsorgung
muss gemäß den örtlichen Bestimmungen zur Abfallbeseiti-
gung erfolgen.
Bitte wenden Sie sich an die zuständigen Behörden Ihrer Ge-
meindeverwaltung, an den lokalen Recyclinghof für Haushal-
tsmüll oder an den Händler, bei dem Sie dieses Gerät erwor-
ben haben, um weitere Informationen über Behandlung, Ver-
wertung und Wiederverwendung dieses Produkts zu erhalten.
Gerät entwickelt, getestet und hergestellt nach:
•Safety: EN/IEC 60335-1; EN/IEC 60335-2-31, EN/IEC 62233.
•Performance: EN/IEC 61591; ISO 5167-1; ISO 5167-3; ISO
5168; EN/IEC 60704-1; EN/IEC 60704-2-13; EN/IEC 60704-3;
ISO 3741; EN 50564; IEC 62301.
•EMC: EN 55014-1; CISPR 14-1; EN 55014-2; CISPR 14-2;
EN/IEC 61000-3-2; EN/IEC 61000-3-3. Empfehlungen für eine
korrekte Verwendung, um die Umweltbelastung zu verringern:
Schalten Sie Haube beim Kochbeginn bei kleinster Ge-
schwindigkeit EIN und lassen Sie die Haube einige Minuten
nachlaufen, wenn Sie mit dem Kochen fertig sind. Erhöhen
Sie die Geschwindigkeit nur bei großen Mengen von Ko-
chdunst und Dampf und benutzen Sie die Intesivstufe(n) nur
bei extemen Situationen. Wechseln Sie die Kohlefilter, wenn
notwendig, um eine gute Geruchsreduzierung zu gewährlei-
sten. Säubern Sie die Fettfilter, wenn notwendig, um eine
gute Fettfilterungseffizienz zu gewährleisten. Verwenden Sie
den in der Gebrauchsanweisung angegebenen grössten Dur-
chmesser des Luftaustrittssystems, um die Leistungsfähigkeit
zu optimieren und die Geräuschentwicklung zu minimieren.
Pagina se încarcă...
Pagina se încarcă...
Pagina se încarcă...
Pagina se încarcă...
Pagina se încarcă...
Pagina se încarcă...
Pagina se încarcă...
Pagina se încarcă...
Pagina se încarcă...
Pagina se încarcă...
Pagina se încarcă...
Pagina se încarcă...
Pagina se încarcă...
Pagina se încarcă...
Pagina se încarcă...
Pagina se încarcă...
Pagina se încarcă...
Pagina se încarcă...
Pagina se încarcă...
Pagina se încarcă...
Pagina se încarcă...
Pagina se încarcă...
Pagina se încarcă...
Pagina se încarcă...
Pagina se încarcă...
Pagina se încarcă...
Pagina se încarcă...
Pagina se încarcă...
Pagina se încarcă...
Pagina se încarcă...
Pagina se încarcă...
Pagina se încarcă...
Pagina se încarcă...
Pagina se încarcă...
Pagina se încarcă...
Pagina se încarcă...
Pagina se încarcă...
Pagina se încarcă...
Pagina se încarcă...
Pagina se încarcă...
Pagina se încarcă...
Pagina se încarcă...
Pagina se încarcă...
Pagina se încarcă...
Pagina se încarcă...
Pagina se încarcă...
Pagina se încarcă...
Pagina se încarcă...
Pagina se încarcă...
Pagina se încarcă...
Pagina se încarcă...
Pagina se încarcă...
Pagina se încarcă...
Pagina se încarcă...
Pagina se încarcă...
Pagina se încarcă...
Pagina se încarcă...
Pagina se încarcă...
Pagina se încarcă...
Pagina se încarcă...
Pagina se încarcă...
Pagina se încarcă...
Pagina se încarcă...
Pagina se încarcă...
Pagina se încarcă...
Pagina se încarcă...
Pagina se încarcă...
Pagina se încarcă...
Pagina se încarcă...
Pagina se încarcă...
Pagina se încarcă...
Pagina se încarcă...
Pagina se încarcă...
Pagina se încarcă...
Pagina se încarcă...
Pagina se încarcă...
Pagina se încarcă...
Pagina se încarcă...
Pagina se încarcă...
Pagina se încarcă...
Pagina se încarcă...
Pagina se încarcă...
Pagina se încarcă...
Pagina se încarcă...
Pagina se încarcă...
Pagina se încarcă...
Pagina se încarcă...
Pagina se încarcă...
-
 1
1
-
 2
2
-
 3
3
-
 4
4
-
 5
5
-
 6
6
-
 7
7
-
 8
8
-
 9
9
-
 10
10
-
 11
11
-
 12
12
-
 13
13
-
 14
14
-
 15
15
-
 16
16
-
 17
17
-
 18
18
-
 19
19
-
 20
20
-
 21
21
-
 22
22
-
 23
23
-
 24
24
-
 25
25
-
 26
26
-
 27
27
-
 28
28
-
 29
29
-
 30
30
-
 31
31
-
 32
32
-
 33
33
-
 34
34
-
 35
35
-
 36
36
-
 37
37
-
 38
38
-
 39
39
-
 40
40
-
 41
41
-
 42
42
-
 43
43
-
 44
44
-
 45
45
-
 46
46
-
 47
47
-
 48
48
-
 49
49
-
 50
50
-
 51
51
-
 52
52
-
 53
53
-
 54
54
-
 55
55
-
 56
56
-
 57
57
-
 58
58
-
 59
59
-
 60
60
-
 61
61
-
 62
62
-
 63
63
-
 64
64
-
 65
65
-
 66
66
-
 67
67
-
 68
68
-
 69
69
-
 70
70
-
 71
71
-
 72
72
-
 73
73
-
 74
74
-
 75
75
-
 76
76
-
 77
77
-
 78
78
-
 79
79
-
 80
80
-
 81
81
-
 82
82
-
 83
83
-
 84
84
-
 85
85
-
 86
86
-
 87
87
-
 88
88
-
 89
89
-
 90
90
-
 91
91
-
 92
92
-
 93
93
-
 94
94
-
 95
95
-
 96
96
-
 97
97
-
 98
98
-
 99
99
-
 100
100
-
 101
101
-
 102
102
-
 103
103
-
 104
104
-
 105
105
-
 106
106
-
 107
107
-
 108
108


ELICA Seashell BL/F/80 Dunstabzugshaube Manual de utilizare
- Tip
- Manual de utilizare
- Acest manual este potrivit și pentru
în alte limbi
Lucrări înrudite
Alte documente
-
HOTPOINT/ARISTON HAHTT 64 X Manualul utilizatorului
-
Indesit H 461 IX.1 Manualul utilizatorului
-
Whirlpool AKR 648/2 IX Manualul utilizatorului
-
-
Whirlpool WHSS92F Manualul proprietarului
-
Whirlpool WHVS 93F LT BSS Manualul proprietarului
-
-