Sharp A43SF7331EB00D Manual de utilizare
- Categorie
- Televizoare LCD
- Tip
- Manual de utilizare
Acest manual este potrivit și pentru

User manual
Instrukcja obsługi
Návod k obsluze
Návod na obsluhu
Használati útmutató
Manual de utilizare
Ръководство на потребителя
Korisnički priručnik
Korisničko uputstvo
Uporabniški priročnik
Εγχειρίδιο χρήστη
models: | modele: | modely: | modely: | modellek: | modele: | : | modeli: | modeli: | modeli: | οντέλα:
LC-43SFE7331E
LC-43SFE7332E
LC-49SFE7332E
LC-49SFE7331E
LC-55SFE7332E

GOTO
A-B
MENU
BACK
EXIT
OK
VOL
CH
SOURCE
NET+
USB
7
8
9
SOUND
0
1
2
3
4
5
6
SLEEP
AUDIO
TEXT
ANGLE
REPEAT
DISPLAY
REC LIST
INFO
SUBTITLE
TV
GUIDE
PICTURE
DTV
FAV
TEXT
HOLD
TEXT/DVD
ZOOM
PV R / DVD
2
6
7
14
11
12
9
17
15
19
23
27
32
35
45
29
37
1
3
10
13
8
16
18
21 22
25 26
20
24
28
30 31
33 34
36


EN
Important safety instructions
CAUTION
RISK OF ELECTRIC SHOCK
DO NOT OPEN
Please, read these safety instructions and respect
the following warnings before the appliance is
operated:
In order to prevent re always
keep candles and other open
ames away from this product.
• Television sets with 43”size screens or more must be lifted and carried by
at least two people.
• This TV does not contain any parts which could be repaired by the user.
In case of afault, contact the manufacturer or the authorised service
agent. Contact with certain parts inside the TV might endanger your life.
The guarantee does not extend to faults caused by repairs carried out by
unauthorized third parties.
• Do not remove the rear part of the appliance.
• This appliance is designed for the receiving and reproduction of video
and sound signals. Any other use is strictly forbidden.
• Do not expose the TV to dripping or splashing liquid.
• If the supply cord is damaged, it must be replaced by the manufacturer,
aservice agent or similarly quali ed persons in order to avoid ahazard.
• The ideal distance to watch TV is approximately ve times longer than
the diagonal of the screen. Re ections on the screen from other light
sources can make the quality of the picture worse.
• Ensure the TV has su cient ventilation and is not close to other appli-
ances and other pieces of furniture.
• Install the product at least 5 cm from the wall for ventilation.
• Ensure that the ventilation openings are clear of items such as newspa-
pers, table-cloths, curtains, etc.
• The TV set is designed to be used in amoderate climate.
• The TV set is designed exclusively for operation in adry place. When
using the TV outside, please, make sure it is protected against moisture
(rain, splashing water). Never expose to moisture.
• Do not place any containers with water on the TV, such as vases, etc.
These containers might get pushed over, which would endanger electric
safety. Place the TV exclusively on at and stable surfaces. Do not place
any objects such as newspaper or blankets, etc. on or under the TV.
• Make sure the appliance does not stand on any power cables as they
might get damaged. Mobile phones and other devices such as WLAN
adapters, monitoring cameras with wireless signal transmission, etc.
might cause electromagnetic interference and they should not be
placed near the appliance.
• Do not place the appliance near heating elements or in aplace with
direct sunlight as it has anegative e ect on cooling of the appliance.
Heat storage is dangerous and it can seriously reduce the lifetime of the
appliance. In order to ensure the safety, ask aquali ed person to remove
the dirt from the appliance.
• Try to prevent damage to the mains cable or mains adapter. The appli-
ance can only be connected with the supplied mains cable/ adapter.
• Storms are dangerous for all electric appliances. If the mains or aerial
wiring is struck by lightening the appliance might get damaged, even if
it is turned o . You should disconnect all the cables and connectors of
the appliance before astorm.
• To clean the screen of the appliance use only adamp and soft cloth. Use
only clean water, never detergents and in no case use solvents.
• Position the TV close to the wall to avoid the possibility of it falling when
pushed.
• Ensure that children do not climb or hang onto the TV.
• The instructions shown below are asafer way to set up the TV, by fixing it
to the wall and will avoid the possibility of it falling forwards and causing
injury and damage
• For this type of installation you will need afastening cord
A) Using one/both of the top wall-mounting holes and screws (the
screws are already supplied in the wall mounting holes) fasten one end
of the fastening chord/sto the TV.
B) Secure the other end of the fastening chord/sto your wall.
• The software on your TV and the OSD layout can be changed without
notice.
Warning:
• Never connect any external devices to alive appliance. Switch o not
only the TV but also the devices which are being connected! Plug the
TV plug into the wall socket after connecting any external devices and
the aerial!
• Always make sure there is free access to the TV mains plug.
• The appliance is not designed for ause in aworkplace tted with
monitors.
• The systematic use of headphones at high volume might lead to irrevers-
ible hearing damage.
• Ensure environmental disposal of this appliance and any components
including batteries. When in doubt, please, contact your local authority
for details of recycling.
• While installing the appliance, do not forget that furniture surfaces are
treated with various varnishes, plastics, etc. or they might be polished.
The chemicals contained in these products might have areaction with
the TV stand. This could result in bits of the material sticking to the furni-
ture surface, which are di cult to remove, if not impossible.
• The screen of your TV has been produced under top quality conditions
and was checked in detail for faulty pixels several times. Due to the tech-
nological properties of the manufacturing process, it is not possible to
eliminate the existence of asmall number of faulty points on the screen
(even with maximum care while in production). These faulty pixels are
not considered faults in terms of guarantee conditions, if their extent is
not greater than the boundaries de ned by DIN norm.
•
The manufacturer cannot be held responsible, or be liable, for customer
service-related issues related to the third party content or services. Any
questions, comments or service-related inquiries relating to the third
party content or service should be made directly to the applicable
content or service provider.
• There are a variety of reasons you may be unable to access content or
services from the device unrelated to the device itself, including, but not
limited to, power failure, the Internet connection, or failure to con gure
your device correctly. Universal Media Corporation, its directors, o cers,
employees, agents, contractors and a liates shall not be liable to you
or any third party with respect to such failures or maintenance outages,
regardless of cause or whether or not it could have been avoided.
• All third party content or services accessible via this device is provided to
you on an “as-is” and “as available” basis and Universal Media Corporation
and its a liates make no warranty or representation of any kind to you,
either express or implied, including, without limitation, any warranties
of merchantability, non-infringement, tness for a particular purpose
or any warranties of suitability, availability, accuracy, completeness, se-
curity, title, usefulness, lack of negligence or error-free or uninterrupted
operation or use of the content or services provided to you or that the
content or services will meet your requirements or expectations.
• ‘Universal Media Corporation’ is not an agent of and assumes no
responsibility for the acts or omissions of third party content or service
providers, nor any aspect of the content or service related to such third
party providers.

5
• In no event will ‘Universal Media Corporation’ and/or its a liates be
liable to you or any third party for any direct, indirect, special, incidental,
punitive, consequential or other damages, whether the theory of liability
is based on contract, tort, negligence, breach of warranty, strict liability
or otherwise and whether or not Universal Media Corporation and/or its
a liates have been advised of the possibility of such damages.
Important information regarding use of video
games, computers, captions and other xed image
displays.
• The extended use of xed image program material can cause aperma-
nent “shadow image “ on the LCD screen (this is sometimes incorrectly
referred to as “burnout to the screen“). This shadow image is then perma-
nently visible on the screen in the background. It is irreversible damage.
You can avoid such adamage by following instructions below:
• Reduce the brightness/contrast setting to aminimum viewing level.
• Do not display the xed image for along period of time. Avoid display-
ing of:
» Teletext time and charts,
» TV/DVD menu, e.g. DVD contents,
» In the„Pause“ mode (hold): Do not use this mode for along time,
e.g. while watching aDVD or avideo.
» Turn o the appliance if you are not using it.
Batteries
• Observe the correct polarity when inserting the batteries.
• Do not expose batteries to high temperatures and
do not place them on locations where the tempera-
ture might increase quickly, e.g. near the re or on
the direct sunshine.
• Do not expose batteries to excessive radiant heat,
do not throw them into the re, do not disassemble
them and do not try to recharge un-rechargeable
batteries. They could leak or explode.
» Never use di erent batteries together or mix
new and old ones.
» Dispose of batteries in an environmentally friendly way.
» Most of the EU countries regulate the disposal of batteries by law.
Disposal
• Do not dispose of this TV as unsorted municipal waste.
Return it to adesignated collection point for the recycling
of WEEE. By doing so, you will help to conserve resources
and protect the environment. Contact your retailer or local
authorities for more information.
CE Statement:
• Hereby, Universal Media Corporation s.r.o. declares that this LED TV
is in compliance with the essential requirements and other relevant
provisions of R&TTE Directive 1999/5/EC. http://www.sharp.eu/av/
documents-of-conformity
Trademarks
• The terms HDMI and HDMI High-De nition Multimedia Interface,
and the HDMI Logo are trademarks or registered trademarks of HDMI
Licensing, LLC in the United States and other countries.
• The “HD TV” Logo is atrademark of DIGITALEUROPE.
• The “HD TV 1080p” Logo is atrademark of DIGITALEUROPE.
• The DVB logo is the registered trademark of the Digital Video Broad-
casting - DVB - project.
• Manufactured under license from Dolby Laboratories.
• Dolby and the double-D symbol are trademarks of Dolby Laboratories.
•
For DTS patents, see http://patents.dts.com. Manufactured under
license from DTS Licensing Limited. DTS, the Symbol, & DTS and the
Symbol together are registered trademarks. DTS TruSurround is a
trademark of DTS, Inc. © DTS, Inc. All Rights Reserved.
• YouTube and the YouTube logo are trademarks of Google Inc
• The Wi-Fi CERTIFIED Logo is a certi cation mark of the Wi-Fi Alliance.
• Wi-Fi CERTIFIED Miracast and Miracast are trademarks of Wi-Fi Alliance
• DLNA, the DLNA Logo and DLNA CERTIFIED are trademarks, service
marks, or certi cation marks of the Digital Living Network Alliance.
Cd

EN
3D Safety Information
• If you watch a3D imaging too closely or for along period of time, it may
harm your eyesight.
• Watching the TV or playing video games that incorporate 3D imaging
with the 3D glasses for along period of time can cause drowsiness,
headaches or fatigue to you and/or your eyes. If you have aheadache, or
otherwise feel fatigued or drowsy, stop watching the TV and take arest.
• Pregnant woman, seniors, persons with heart problems or persons who
experience frequent drowsiness should refrain from watching 3D TV.
• Some 3D imaging may cause you to duck or dodge the image displayed
in the video. Therefore, it is best if you do not watch 3D TV near fragile
objects or near any objects that can be knocked over easily.
• Please prevent children under the age of 5 from watching 3D TV as it
may a ect their vision development.
Warning for photosensitization seizure:
• Some viewers may experience aseizure or epilepsy when exposed to
certain factors, including ashing lights or images on TV or in video
games. If you or anybody from your family has ahistory of epilepsy or
seizure, please consult with your doctor before watching 3D TV. Also cer-
tain symptoms can occur in unspeci ed conditions without any previous
history. If you experience any of the following symptoms, immediately
stop watching the 3D imaging and consult adoctor: dizziness or light
headedness, visual transition or altered vision, visual or facial instability,
such as eye or muscle twitching, un- conscious action, convulsion, loss of
conscience, confusion or disorientation, loss of directional sense, cramps,
or nausea. Parents should monitor their children, including teenagers,
for these symptoms as they may be more sensitive to the e ects of
watching 3D TV.
Risk of photosensitization seizure can be reduced
with the following actions.
• Take frequent breaks from watching 3D TV.
• For those who have vision that is di erent in each eye, they should
watch the TV after taking vision correction measures.
• Watch the TV so that your eyes are on the same level as the 3D screen
and refrain from sitting too closely to the TV.
• Do not watch the 3D imaging when tired or sick, and avoid watching the
3D imaging for along period of time.
• Do not wear the 3D glasses for any other purpose than viewing 3D
imaging on a3D TV.
• Some viewers may feel disoriented after watching 3D TV. Therefore, after
you watch 3D TV, take amoment to regain awareness of your situation
before moving.

7
What is included in the box
Supply of this TV includes following parts:
• 1x TV • 1x RF cable
• 1x Remote control • 1x TV stand installation packet
• 2x AAA batteries • 1x User guide
• 1x Mini Component adapter
cable
• 1x Mini Composite adapter
cable
• 4x 3D glasses • 2x Plastic clip
Attaching the Stand
Please follow the instructions on last page of this user manual.
Getting started - initial set up
1. Using the RF cable supplied, connect the TV to the TV Aerial wall
socket. Connect the power cable to the Electrical outlet.
2. For connecting to the Internet with a wired connection connect a
Cat 5/Ethernet cable (not included) from the TV to your broadband
modem/router.
3. Insert the batteries supplied into the Remote control.
4. Press and hold GREEN and YELLOW buttons together for more than
3 seconds to pair remote control with your TV. Then press Standby
button to power on TV.
5. You will be now welcomed with the First Time Installation screen.
If it does not appear, on the remote control, please press [MENU] then
8-8-8-8 and the menu will appear.
If you wish to make changes to any of the default settings, use the
scroll ▲/▼/◄/► buttons. To exit this menu at anytime, press [EXIT]
button.
6. Please set desired settings in FIRST TIME INSTALLATION screen.
DVB Antenna - You can choose between Terrestrial (DVB-T), Cable
(DVB-C) or Satellite (DVB-S)*.
Language - Set the TV Menu language.
Country - Set the desired country.
Tunning Mode - Choose if you want to tune only Digital (DTV)
Analogue (ATV) or both Digital and Analogue (DTV + ATV)
Operator - Select Cable provider. If your cable operator is not listed
select Others. (Avaliable only if DVB Antenna is set to CABLE)
Environment - Select the location of TV.
For home use, please select Home Mode.
For shop demonstration mode, set Store Mode.
Sorting by LCN - Set LCN to ON if you want to arrange channels by
provider preferences (only applies to DVB-T and DVB-C channels).
7. Press [Auto Tuning] button to start the tuning process.
8. Optional channel presets DVB-C:
Keep all default settings as recommended.
If DVB-C channels are not found, contact your network provider for the
valid "Network ID". Then perform anew search. Press the [MENU], select
"Network ID" and enter the network ID.
9. Optional channel presets DVB-S2*: Select "Satellite" in the "DVB
Antenna" in the menu for the optional channel presets. Here you can
choose between the various satellites. Since selection completed, then
the channel list of the exact satellite will be available to be imported
into your TV system.
Con rm with [OK] button on the remote control, to start scanning.
TIP: If you are missing channels, the reason for this is likely to be signal
strength, you should consider connecting signal booster and re-tuning the TV.
* - Available only for TVs with DVB-S tuner
Remote control
Radio controlled remote control - No more aiming in the TV direction!
Refer to remote control picture on the second page of this user
manual.
1.
STANDBY – Switch on TV when in standby or vice versa.
2.
MUTE – Mute the sound or vice versa.
3. NET+ – Displays AQUOS NET+ menu.
4. DTV – Switch to digital TV source.
5. USB – Switch to USB source.
6. YouTube – Displays YouTube application YouTube – Displays YouTube
application
7. 0 – 9 – to select aTV channel directly.
8. TV GUIDE – Opens the 7 Day TV Guide (Digital mode).
9.
– To return to the previous channel viewed.
10. VOL ▲/▼ – To increase / decrease the sound level.
11. SOUND – Scrolls through sound mode options.
12. PICTURE – Scrolls through picture mode options.
13. SOURCE – To display the input/source menu.
14. CH ▲/▼ – To increase or decrease the channel being watched.
15. (▲/▼/◄/►/ OK) – Allows you to navigate the on-screen menus and
adjust the system settings to your preference.
16. MENU – To display OSD menu.
17. EXIT – To exit all menus.
18. BACK – Back to previous menu.
19. FAV – To display favourites menu.
20. INFO – Press once for now/next channel information. Press twice for
programme information about current programme.
21. SLEEP – Press repeatedly to cycle through the sleep options.
22. AUDIO – To change the audio language (if available).
23. SUBTITLE – To switch the dialogue at the bottom of the screen (on/
o ).
24. TEXT – Teletext mode - To enter Teletext
25. TEXT HOLD – Teletext mode - Hold current page which is displayed
26. ZOOM – To zoom in
27.
DISPLAY – To switch o the screen when listening to radio
28. Rec
1
– PVR Record
29. Rec List
1
– Opens the list of recordings.
30.
– To restart the current chapter
31.
– To advance forward to the next chapter
32.
– To stop the playback
33.
– To play in fast rewind mode.
34.
– To play in fast forward mode.
35.
– To play/pause
36. COLOUR BUTTONS
– Additional teletext and OSD functions
37. 3D button
2
– Switches between 3D type settings
1
- available only with PVR function
2
- Available only for TVs with 3D function
TV buttons & Source menu
Vol+ Volume up and menu right
Vol- Volume down and menu left
CH+ Programme/Channel up and menu up
CH- Programme/Channel down and menu down
MENU Displays Menu/OSD
SOURCE Displays the input source menu
STANDBY Standby Power On/O

EN
*
Choosing Mode Input/Source
To switch between the di erent input/connections.
a) Using the buttons on the remote control:
1. Press
[SOURCE/ AV] - The source menu will appear.
2. Press
[▼] or [▲] to select the input you require.
3. Press
[OK].
b) Using the buttons on the Television:
1. Press
[SOURCE].
2. Scroll up / down using
CH+/ CH- buttons to the input/source you
require.
3. Press Vol+ to change input/source to the one selected.
Connections
Please see the table for connector types for
di erent models available on the page 84.
USB
USB-Input 1, 2
HDMI 1, 2, 3 (MHL) in
HDMI-Input 1, 2, 3
VGA(PC)
VGA PC-Input
VGA (PC) Audio In
3.5mm PC audio input
Mini AV
Video Input & Component / Video audio input
Mini YPbPr
Mini Component HD Input
SCART
SCART-Input
CI Card IN
CI input
RF In
RF / TV Aerial Input
Sat In*
Satellite Input
Digital Optical Audio Out
Digital optical output
RJ 45
Ethernet
HEADPHONES
3.5mm Headphone output
* - Only for models with DVB-S tuner
TV Menu navigation
To access this menu, press [MENU] button on the remote control. To enter
amenu press
[OK]. If you wish to make changes to any of the default
settings, use the scroll
(▲/▼/◄/►) buttons. To con rm any settings press
[OK] button. To exit this menu at anytime, press [EXIT] button.
Picture
Picture Mode - Choose from the following presets.
Standard - Default settings
Dynamic - Recommended settings for fast moving pictures
Mild - Set to be lighter in colour and less bright
Personal - Lets you manually alter all the settings
Eco - Consume 15% less energy.
Contrast - Switch the balance between black and white.
Brightness - Increase or decrease the brightness of the picture.
Tint - Lets you increase or decrease the level of tint
within the picture (for NTSC signal only)
Colour - Increases the colour from black and white.
Sharpness - Increase or decrease the sharpness of the picture.
Colour Temperature - Choose from the following presets.
Normal - Default settings
Warm - Increases red within the picture
Cold - Increases blue within the picture
Aspect Ratio - Picture format varies depending on the channel/broadcast.
There are a number of di erent options to best meet your needs.
Auto-Automatically displays the best picture format.
So the picture is in the correct position. May have
black lines at the top/bottom and/or sides.
4:3 - Displays the 4:3 picture in its original size.
Side bars are shown to ll the 16:9 screen.
16:9 - Fills the screen with a regular 16:9 signal.
Zoom 1/2 - The picture is the correct proportion
but zoomed in to ll the screen.
Dot by Dot (HDMI) - Will display the picture in its
original resolution without any change.
Full Screen - Stretch signal to ll the screen.
Noise Reduction - Filters and reduces the
noise (interference) of the picture
MPEG Noise Reduction - Allows you to reduce visible
interference caused by MPEG compression.
Active Contrast - Automatically optimises the ‘backlight’ and
‘contrast’ of the picture according to the brightness of the screen.
3D Settings
TIP: For the best 3D picture e ect, watch your TV from vertical angle +/- 10°.
3D Type - 3D Type- When connecting a3D product sometimes
the picture maybe displayed incorrectly; choose from the
following settings to correct this. You can toggle these
settings by pressing the ’3D' button on your remote.
O - Turns 3D o
Auto - Automatic 3D mode setting.
Side by Side - 3D format is commonly used in 3D broadcasting,
works by halving the horizontal resolution of videos to store left
and right eye images in each frame. It e ectively displays up to 960
x 1080-pixel pictures to each eye, enabling TV stations to telecast
3D content at amuch lower bandwidth compared with 3D Blu-ray
discs. Typical supported resolutions are limited to 720p and 1080i
for 3D TV programs. Users will need to manually select the correct
3D format to properly display side-by-side 3D content on a3D TV.
Top Bottom - 3D format is alternative for 3D broadcast, which
is pretty similar to side-by-side 3D except that it halves the
vertical resolution instead. Available primarily up to 720p
resolution, top-and-bottom 3D o ers 1,280 pixels horizontally.
The higher pixel count is generally considered more suitable
for displaying panning motion in sports programs.
Frame Packing - As its name suggests, this format stacks the left
and right eye images in each frame to retain the content’soriginal
resolution for the best 3D pictures. Most, if not all, 1080p 3D Blu-ray
movie discs and 720p PS3 3D games are produced utilizing this
technique. Another key di erentiator is that all 3D TVs should
114.

9
be able to automatically detect frame-packing 3D signals and
correctly display the content without user intervention.
LR View Switch- change picture sequence for di erent viewing
2D to 3D- Changes the picture from regular 2 dimensions to 3 (3D). Please
note as content is being changed by the TV the e ects are limited
3D Depth - Depth of pictures converted from 2D to 3D.
3D to 2D- Changes the picture from 3D to regular 2 dimensions (2D).
Sound
Sound Mode - Choose from the following presets
Standard - Default settings
Music - Emphasises music over voices
Movie - Provides live and full sound for movies
Personal - Selects your personal sound settings
Sports - Emphasises sound for sports
Tip: Treble and bass levels can only be adjusted when the sound mode
‘Personal’ is selected.
Equalizer - Adjusts the volume of di erent sound
frequencies. The equalizer sound levels can only be adjusted
when the sound mode ‘Personal’ is selected.
Balance - To switch the sound between the left and right speakers.
Auto Volume Level (AVL) - When ‘on’ is selected, the volume
will stay at aconstant level regardless of input/source.
DTS TruSurround - Allows you to turn surround sound e ect ON or OFF.
Digital Output - This is the digital Audio output.
Choose from the following options:
O - O
Auto - Selects the best settings automatically
PCM- Select this option if you are connecting to aStereo
Hi- via digital cable (Pulse-code modulation (PCM) is
adigital representation of an analogue signal)
Audio Description - Additional sound track for visually impaired.
Available only on selected DTV shows.
AD Volume - to adjust volume of Audio Description sound track
Audio Delay (ms) - Enables the user to adjust sound
setting to sync picture and audio for TV speakers.
SPDIF Delay (ms) - Enables the user to adjust sound setting to sync picture
and audio for external speakers connected via digital audio output.
PC
Auto Adjust - Lets you automatically con gure the
television to be used as acomputer monitor.
H O set - Changes the horizontal position of the picture.
VO set - Changes the vertical position of the picture.
Size - increase picture size.
Phase - To adjust delay time of phase in order to reduce the noise of picture
TIP: If the computer is left in-active for aperiod of time, the
television will switch into a‘sleep’ state (the screen will power o
to save power). To switch back on press the standby button.
TIP: If you do not press any buttons for 10 seconds, the menu
will automatically exit. You can change the length of time before
the menu exits automatically - see ‘OSD Timer’ section.
Channel
DVB Antenna - Set the type of DTV signal
Terrestrial - Terrestrial (DVB-T)
Cable - Cable (DVB-C)
Auto Tuning - Allows you to retune the television for all digital
channels, digital radio stations and analogue channels.
Analogue Manual Tuning - Allows you to
manually tune your analogue signal.
Digital Manual Tuning - Allows you to manually tune your digital signal.
Channel Edit - Allows you to delete, skip and add favourite channels.
Signal Information - Information about DVB signal.
CI Information - Pay per view services require a“smartcard” to be
inserted into the TV. If you subscribe to apay per view service the
provider will issue you with a‘CAM’ and a“smartcard”. The CAM can
then be inserted into the COMMON INTERFACE PORT (CI Card In).
Recorded list - List of recorded TV shows.
Schedule List - Lists your programme reminders.
Dish Setup* - This menu is only available in DVB-S2 mode. You can
select the type of satellite, your transponder and your LNB type, etc.
* - Only for models with DVB-Stuner
Lock
System Lock - Allows you to lock or unlock the menu. You will be
asked to enter a4 digit password. Use the ◄ button to quit the
password input. Use the ► button to clear. Default password is 0000.
Set Password - Change the default password.
Channel lock - Lock speci c TV channels.
Parental Guidance - Lock TV channels based on age restriction.
Key Lock - Lock the TV buttons.
O - All TV buttons are unlocked
Partial - Only Standby button is unlocked
Full - All TV buttons are locked
Time
Clock - Set the date and time. Date and time is
set up automatically in DVB mode.
O Time - Allows you to set aspeci c time for your TV to turn o .
On Time - Allows you to set aspeci c time for your TV to turn on, the
channel it will then display, the source it will be on and also the volume.
This function can then be toggled to repeat every day or acertain day.
Sleep Timer - Lets you set the sleep timer so the television automatically
switches o after aset amount of time. O -> 10min -> 20min ->
30min -> 60min -> 90min -> 120min -> 180min -> 240min.
OSD Timer - Lets you adjust the amount of time the On
Screen Menu stays on the screen before disappearing.
Auto standby - Adjustment for the auto standby in
hourly increments: O -> 3h -> 4h -> 5h.
Time Zone - Change your current time zone.
Network
Network Con guration - First you will need to select your connection
type. You can choose between either a Wi-Fi or Wire (cable) connection.
NOTE: For connecting to the Internet with a wired connection, connect a Cat
5/Ethernet cable (not included) from the TV to your broadband modem/router.
IP Con guration - LAN network connection settings
Auto - Will automatically connect the TV to your home network
(this is the default setting and is highly recommended)
Manual - Allows you to manually change the IP,
Netmask, Gateway and DNS information.
Wi–Fi Con guration - Wireless network connection settings
Wi–Fi Auto Search - Automatically searches for available wireless
networks. Select the desired Wi–Fi network and then enter the
network password (if network is password protected). Once
the password is accepted, you will not be asked for it again.
NOTE: The connection process may take a few minutes, please be

EN
patient. Every time the TV is then powered on it will automatically
connect to the network, this may also take some time.
Network Info - Information about the network settings
Network Test - A network connection test
Settings
Language - Allows you to change the language of the menu.
Audio Languages - Allows you to change audio
language on selected DVB channels.
Subtitle Language - Allows you to change subtitles
language on selected DVB channels.
Hearing Impaired - If signal provides support for the hearing
impaired, the subtitles can be played by pressing the “Subtitle”. If
you set Hearing Impaired ON and switch to achannel with supports
for hearing impaired subtitles will be activated automatically.
Blue Screen - Changes the background when there is no input between
transparent and ablue background (Only available on some sources).
PVR File System - PVR Recording options*
Select disk - Select USB port and disk partition
TimeShift Size - Set size time of shift bu er.
Format Start - You can format connected USB
storage device to FAT 32 le system.
WARNING: ALL DATA ON THE USB DEVICE WILL BE DELETED
Speed check - Tests write speed of connected USB storage devices.
* - only for devices with built in PVR function
First Time Installation - Starts the rst time installation.
Software Update (USB) - From time to time we may release new
rmware to improve the operation of the television (available to
download). This menu lets you install the new software/ rmware onto
the television. Further details of how to do this will be issued with the
rmware. Contact the helpline or refer to the ‘www.sharp.eu’ website.
Software Upgrade (NET) - Allows for the TV software to be updated over
the Internet. This function will search for new software and update it when
necessary. For this function the TV needs to be connected to the internet
and USB storage device with at least 200MB of free space connected to it.
NOTE: The TV will automatically search for new releases of software every
time it is turned on. If new software is found, it will ask you if you would
like to download and install it. If you select "Yes" the TV will upgrade
to the latest software. It is necessary to connect a USB storage device
to the TV with at least 200 MB of free space, before upgrade starts.
WARNING: Do not turn o the TV’s power until the upgrade is complete!
Reset TV - This resets the menus to factory settings.
HDMI CEC* - Allows you to operate devices
connected via HDMI with TV remote control.
Auto standby* - Automatically turn on/
o connected devices via HDMI CEC
Device list* - Allows you to access devices menu and
operate the menu using TV remote control.
HDMI ARC* - Sends audio signal from terrestrial/satellite broadcast
via HDMI to the AV receiver without using any additional audio
cables, this functions is available only on HDMI 2 output.
* - HDMI CEC must be supported by connected device.
LED Status - Allows the user to switch the LED Power indicator light ON
or OFF, when the TV is being operated. (When this option is set to OFF
the LED Power indicator light will flash when the remote control is used)
Version Info - shows version of TV software
Store Mode* - switch ON/OFF shop demonstration mode
* - available only if store mode was selected during rst time installation
APPLICATIONS
AQUOS NET+ - Opens the Sharp SMART portal.
USB Media - Multimedia mode o ers the playback of various
content saved on a USB Memory Stick. The content will be divided
into various le types: Photo, Music and Movie. The ‘File Option’
will show and allow you to play all types of supported content.
1. You can navigate through the menu using the scroll ▲/▼/◄/►
buttons. To con rm the item you wish to play/view press [OK] button.
2. Select the drive you require. (If your drive only has 1 partition you will
only see 1 item).
3. You can now access the item. Press OK to view.
4. While viewing content you can control the playback modes using the
remote control buttons or by bringing up the playback navigation
menu and selecting on-screen buttons ▲/▼/◄/► and [OK]
NOTE: USB extension cables are not recommended as
they can cause a reduction in picture/audio quality and
stoppages during play back of USB content.
Media Server - Automatically searches for digital media servers
(DMS) connected to your home network and enables the
playback and rendering of content from media servers
NOTE: ‘Media Server’ is not provided by the TV manufacturer, you can
download third party software and install it on your computer or NAS.
Wireless Connection - Allows you to view content from your smart phone
or notebook on the TV screen via Miracast or Intel Wireless Display.
Miracast connections are formed using Wi-Fi Direct, so access to a Wi-Fi
network is not needed. You can share content from your smartphone or
tablet based on Android 4.4 and newer system.
Wireless Display (WiDi) lets you easily stream movies, videos, photos
and music directly to your TV screen. You’ll need a laptop, smartphone,
or tablet with Intel® WiDi technology.
NOTE: This function is only available on selected smart phones and notebooks.
AQUOS NET+
To access the AQUOS NET+ Menu at any time press the NET+ button on the
remote control or select it from TV Multimedia menu.
NOTE: Please wait while the TV connects to the Wi-Fi network.
It may take a few minutes after you switch on the TV.
Navigate the menu using the scroll ▲/▼/◄/► buttons. To con rm the
item you wish to play/view press [OK] button. For ‘one-step’ back press
[Menu] button, and to access additional functions use the coloured
buttons. To leave AQUOS NET+ press [EXIT] button.
Home - Home screen with recommended movies
and recently opened applications
Browser - Opens the default web browser.
Red Button - Zoom in
Green Button - Zoom out
Yellow Button - Refresh page
Blue Button - Return to browser home screen.
Movies - Opens a list of available movies
TV Shows - Opens a list of available TV shows
Music - Opens a list of available Music and Music videos
Watchlist - Opens a list of movies you can select to watch later.
Apps - Opens a list of available applications
Login - Create an account or login to existing
account to personalize your AQUOS NET+.
Settings - Filter application based on selected languages.
RESET OF USER SETTINGS: If you wish to completely reset all user
settings on AQUOS NET+, you must rst enter the Settings menu
of the portal and press the YELLOW button on the remote control.
In the next screen, please select YES with cursor and then press OK
on the remote control to con rm the reset of the settings.
NOTE: To meet our customers’ demands, we are improving our
products. As a result of our ongoing e orts new applications will
be added continuously to the AQUOS NET+. Applications and
content in AQUOS NET+ can be changed without notice. Some of
the functions and content may not be available in your country.

11
7 Day TV Guide
TV Guide is available in Digital TV mode. It provides information about
forthcoming programmes (where supported by the Digital channel). You
can view the start and end time of all programmes and on all channels for
the next 7 days and set reminders.
1. Press
[TV GUIDE]. The following 7 Day TV Guide will appear.
2. Navigate through the menu using
▲/▼/◄/►.
You can now:
Record selected TV channel and TV show by pressing the RED button.*
Set areminder by pressing GREEN.
View aprevious day by pressing YELLOW.
View the next day by pressing BLUE.
[INFO] shows detailed
information about the selected post
3. Press
[EXIT] to exit the 7 day TV Guide.
* - only for models with recording function
USB Record - Digital mode*
Built into this television is aUSB record facility. This function is available in
Digital mode when used in conjunction with acompatible USB memory
stick or USB Hard drive. The bene ts of this are as follows:
• Pause live TV and then playback, fast forward and rewind (up to live TV).
• One button record, if you decide you want to record the current
programme.
• Easy programmable recording from the 7 day TV Guide
Due to the nature of the product, it is necessary to use ahigh speed USB
memory stick (as the TV reads from and writes to the memory stick at the
same time, some memory sticks may not be suitable).
Minimum Speci cation - USB Memory Stick
Read Speed - 20 MB/s(Mega Byte Per Second)
Write Speed - 6 MB/s(Mega Byte Per Second)
Pause Live TV (Time Shift)*
Pausing Live TV is very simple.
Press the play/pause button and the television will pause and the live
content will be recorded. To resume watching press play/pause again.
Press fast forward to go forward in arecording (i.e. to skip adverts).
Press fast rewind to go back in arecording
(i.e. if you fast forwarded too far).
TIP: When you switch the TV to standby or change channel the Time Shift
memory is wiped. To restart time shift you must press play/pause button.
One Button Record
At any point in time you may decide to record the current channel that you
are watching. To do this you need to press the [REC] button.
TIP: This television contains one TV tuner, therefore it can
only record the channel you are watching or record one
channel while the television is in standby mode.
NOTE: USB record function is only available in Digital TV mode.
Due to copyright laws and illegal copying/recording it is not
possible to record to/from any other input/output source.
* - only for devices with built in PVR function

EN
LC-43SFE7331E
LC-43SFE7332E
LC-49SFE7332E
LC-49SFE7331E
LC-55SFE7332E
A+ A+ A+
43" / 109cm 49" / 123cm 55" / 139cm
41,0 W 67,0 W 85,0 W
60 kWh 98 kWh 124 kWh
<0,50 W <0,50 W <0,50 W
1920 (H) x 1080 (V) 1920 (H) x 1080 (V) 1920 (H) x 1080 (V)
Product che
Trademark
Model
Energy e ciency class
Visible screen size (diagonal)
On-mode power consumption
Annual energy consumption *
Standby power consumption **
O mode power consumption
Screen resolution
* - Energy consumption XYZ kWh per year, based on the power consumption of the television operating 4 hours per day for 365 days. The actual
energy consumption will depend on how the television is used.
** - when the TV is turned o with the remote control and no function is active
N/A
Media File Ext.
Codec
Remark
Video Audio
Movie
.mpg MPEG-1, MPEG-2
MP3, WMA, AAC,
AC3, H-AC3
Max Resolution: 1920x1080
Max Data rate: 40 Mbps
.avi
Xvid, MJPEG, MPEG-4
SP/ASP, H.264
Max Resolution: 1920x1080
Max Data rate: 20 Mbps
.ts MPEG-2, H.264
".mov/
.mkv"
MPEG-4 SP/ASP, H.264
.dat MPEG-1
.mp4
MPEG-4 SP/ASP, H.264
MPEG-1, MPEG-2
Max Resolution: 720x576 Max
Data rate: 40 Mbps
.vob MPEG-2
Music
.mp3 - MP3
Sample Rate 8K-48KHz Bit rate: 32K -
320Kbps Channel: Mono/Stereo
.wma - WMA
".m4a/
.aac"
-AAC
Sample Rate 16K-48KHz Bit rate: 32K
~ 442Kbps Channel: Mono/Stereo
Photo
".jpg/
.jpeg"
Progressive JPEG Max Resolution: 1024x768
Baseline JPEG Max Resolution: 8192x8192
.bmp BMP
Max Resolution: 6500x6500 Pixel
Depth 1/4/8/16/24/32 bpp
.png
Non-Interlaced Max Resolution: 3000x3000
Interlaced Max Resolution: 1500x1500
Compatible les in USB Mode

13

PL
Ważne środki bezpieczeństwa
UWAGA
RYZYKO PORAŻENIA PRĄDEM
ELEKTRYCZNYM NIE OTWIERAĆ
Proszę zapoznać się zniniejszymi instrukcjami
bezpieczeństwa iwziąć pod uwagę poniższe
ostrzeżenia zanim urządzenie zostanie
uruchomione:
Żeby zapobiec pożarowi,
zawsze trzymaj świece i inne
źródła otwartego ognia z
daleka od urządzenia.
• Telewizory z ekranami o przekątnej 43”lub większymi muszą być przeno-
szone przez co najmniej dwie osoby.
• Niniejszy telewizor nie posiada żadnych części, które może naprawiać
użytkownik. W przypadku wystąpienia usterki skontaktuj się zprodu-
centem lub autoryzowanym serwisem. Styczność zniektórymi elemen-
tami wewnątrz obudowy może stanowić zagrożenie dla życia. Gwarancja
nie obejmuje usterek wywołanych naprawami wykonywanymi przez
strony trzecie.
• Nie demontuj tylnej części urządzenia.
• Urządzenie jest przeznaczone do odbioru iodtwarzania wideo idźwięku.
Wszelkie inne wykorzystanie jest ściśle zabronione.
• Nie wystawiaj telewizora na działanie kapiących lub rozpryskiwanych
cieczy.
• Jeśli kabel zasilający zostanie uszkodzony, należy go wymienić uprodu-
centa, w serwisie lub uinnej wykwali kowanej osoby, żeby ochronić się
przed zagrożeniem.
• Idealna odległość do oglądania telewizora jest równa mniej więcej
pięciokrotnej długości przekątnej ekranu. Odbicia innych źródeł światła
od ekranu mogą pogorszyć jakość obrazu.
• Zapewnij odpowiednią wentylację telewizora inie umieszczaj go blisko
innych urządzeń imebli.
• Zainstaluj urządzenie przynajmniej 5 cm od ściany, żeby zapewnić
przepływ powietrza.
• Upewnij się, że otwory wentylacyjne nie są zablokowane przedmiotami,
takimi jak gazety, ścierki, zasłony itp.
• Telewizor jest przeznaczony do użycia w klimacie umiarkowanym.
• Telewizor jest przeznaczony wyłącznie do pracy w suchym miejscu. Gdy
używasz telewizora na zewnątrz, upewnij się, że jest zabezpieczony
przed wilgocią (deszcz, chlapiąca woda). Nigdy nie wystawiaj urządzenia
na działanie wilgoci.
• Nie stawiaj na telewizorze żadnych pojemników zwodą, takich jak
wazony itp. Mogą one zostać potrącone, zagrażając bezpieczeństwu
elektrycznemu. Ustaw telewizor na płaskiej istabilnej powierzchni. Nie
umieszczaj przedmiotów, takich jak gazety, koce itp. na telewizorze lub
pod nim.
• Upewnij się, że urządzenie nie stoi na kablach zasilających, ponieważ
mogłyby one ulec uszkodzeniu. Telefony komórkowe iinne urządzenia,
takie jak adapter sieci WLAN, kamery monitoringu przesyłające sygnał
bezprzewodowo itp., mogą powodować zakłócenia elektromagnetyc-
zne, więc nie należy ich umieszczać w pobliżu urządzenia.
• Nie umieszczaj urządzenia w pobliżu elementów grzewczych lub w
miejscach narażonych na bezpośrednie działanie światła słonecznego,
ponieważ ma to negatywny wpływ na chłodzenie urządzenia. Zatrzymy-
wanie ciepła jest niebezpieczne imoże poważnie zmniejszyć żywotność
urządzenia. Żeby zapewnić bezpieczeństwo, poproś wykwali kowaną
osobę ousunięcie brudu zurządzenia.
• Postaraj się zapobiec uszkodzeniu kabli zasilających lub zasilacza.
Urządzenie może być podłączane wyłącznie do dostarczonego kabla
zasilającego/zasilacza.
• Burze stanowią niebezpieczeństwo dla wszystkich urządzeń elektryc-
znych. Jeśli kabel lub przewody antenowe zostaną tra one piorunem,
urządzenie może zostać uszkodzone, nawet gdy jest wyłączone. Przed
nadejściem burzy należy odłączyć od urządzenia wszystkie przewody
izłącza.
• Przy czyszczeniu ekranu urządzenia używaj wyłącznie wilgotnej
imiękkiej ściereczki. Używaj tylko czystej wody bez detergentów,
azwłaszcza bez rozpuszczalników.
• Ustaw telewizor w pobliżu ściany, żeby nie spadł w przypadku
popchnięcia.
• Instrukcje przedstawione poniżej opisują bezpieczniejszy sposób
montażu telewizora poprzez zamocowanie go do ściany, co chroni go
przed upadkiem do przodu ispowodowaniem obrażeń iszkód.
• Ta metoda jest również użyteczna, gdy telewizor stoi na szklanej powier-
zni lub gdy nie chcesz przykręcać niczego do mebli. Zwróć uwagę, żeby
dzieci nie wspinały inie zawieszały się na telewizorze.
• Przy instalacji tego typu potrzebny będzie pas mocujący.
A) Używając jednego/obu górnych otworów montażowych iśrub (śruby
znajdują się już w otworach montażowych) przypnij jeden koniec pasa
do telewizora.
B) Zamocuj drugi koniec do ściany.
• Oprogramowanie telewizora iukład menu ekranowego mogą ulec
zmianie bez powiadomienia.
Ostrzeżenie:
• Nigdy nie podłączaj żadnych zewnętrznych urządzeń do pracującego tel-
ewizora. Wyłącz nie tylko telewizor, ale również podłączane urządzenia!
Włóż wtyczkę do gniazdka w ścianie po podłączeniu urządzeń
zewnętrznych ianteny!
• Zawsze upewnij się, że masz swobodny dostęp do wtyczki telewizora.
• Urządzenie nie jest przeznaczone do wykorzystania w miejscu pracy
wyposażonym w monitory.
• Częste korzystanie ze słuchawek zustawionym wysokim poziomem
głośności może spowodować nieodwracalne uszkodzenia słuchu.
• Zapewnij przyjazną środowisku utylizację urządzenia ielementów -
włącznie zbateriami. W razie wątpliwości skontaktuj się zlokalnymi
władzami, żeby uzyskać informacje na temat recyklingu.
• Instalując urządzenie nie zapomnij, że powierzchnie mebli są pokryte
różnymi lakierami, plastikiem itp. lub mogą być wypolerowane. Sub-
stancje chemiczne zawarte w tych produktach mogą wchodzić w reakcje
zpodstawą telewizora. Może to spowodować przywarcie materiału do
powierzchni mebli, co utrudni przesunięcie, anawet je uniemożliwi.
• Ekran telewizora został wyprodukowany w najwyższej jakości warunkach
izostał kilkukrotnie szczegółowo sprawdzony pod kątem wadliwych
pikseli. Ze względu na charakter technologiczny procesu produkcyjnego
nie jest możliwe wyeliminowanie małej liczby wadliwych punktów
na ekranie (nawet przy zachowaniu maksymalnej dbałości podczas
produkcji). Te wadliwe piksele nie są uważane za wadliwe w znaczeniu
gwarancyjnym, jeśli ich liczba nie jest większa niż limity określone przez
normę DIN.
• Producent nie ponosi odpowiedzialności ani nie jest zobowiązany
do rozstrzygania kwestii obsługi klienta związanych z treściami bądź
usługami osób trzecich. Wszelkie pytania, komentarze lub zapytania o
usługi związane z treściami lub usługami osób trzecich powinny być
kierowane bezpośrednio do odpowiedniego dostawcy treści lub usług.
• Istnieje wiele powodów, dla których użytkownik może nie być w stanie
uzyskać dostępu do usług ze swojego urządzenia, niezwiązanych
z samym urządzeniem, w tym między innymi awaria zasilania lub
połączenia internetowego czy nieprawidłowa kon guracja urządzenia.
Firma Universal Media Corporation, jej dyrektorzy, urzędnicy, pracown-
icy, pełnomocnicy, wykonawcy i jednostki stowarzyszone nie ponoszą

15
odpowiedzialności przed użytkownikiem ani osobą trzecią w przypadku
wspomnianych awarii lub przestojów, niezależnie od powodów awarii
oraz tego, czy można było jej uniknąć.
• Wszelkie treści i usługi osób trzecich dostępne na niniejszym urądzeniu
są świadczone użytkownikowi w ich bieżącym stanie oraz w miarę
dostępności; Universal Media Corporation i jej spółki stowarzyszone nie
składają użytkownikowi żadnych oświadczeń ani zapewnień, wyraźnych
ani dorozumianych, w tym między innymi, choć nie wyłącznie, nie
udzielają gwarancji przydatności handlowej, nienaruszalności praw
i przydatności do określonego celu ani gwarancji adekwatności,
dostępności, dokładności, kompletności, bezpieczeństwa, własności,
użyteczności, braku zaniedbania czy bezbłędnego lub nieprzerwanego
działania lub użytkowania treści i usług świadczonych użytkownikowi
przez osoby trzecie, a także nie gwarantują, że takie treści lub usługi
będą zgodne z wymaganiami i oczekiwaniami użytkownika.
• Universal Media Corporation nie jest pośrednikiem i nie ponosi
odpowiedzialności za działania i zaniechania dostawców treści i usług
osób trzecich ani za żaden aspekt treści i usług takich dostawców.
• Universal Media Corporation i/lub jej spółki stowarzyszone w żadnym
wypadku nie będą odpowiedzialne przed użytkownikiem ani osobą
trzecią za żadne szkody bezpośrednie, pośrednie, szczególne,
karne, wynikające lub inne, niezależnie od tego, czy podstawą
odpowiedzialności jest umowa, delikt, zaniedbanie, naruszenie zasad
gwarancji, odpowiedzialność bezpośrednia czy inna oraz bez względu
na to, czy Universal Media Corporation i/lub jej spółki stowarzyszone
zostały poinformowane o możliwości wystąpienia takich szkód.
Ważne informacje dotyczące użycia gier wideo,
komputerów, napisów iinnych źródeł stałych
obrazów.
• Dłuższe wyświetlanie materiałów ze stałym obrazem może
spowodować pozostanie “obrazu resztkowego“ na ekranie LCD (czasami
nieprawidłowo nazywanego “wypaleniem na ekranie“). Ten obraz reszt-
kowy będzie stale widoczny w tle. Jest to uszkodzenie nieodwracalne.
Można uniknąć takiego uszkodzenia postępując zgodnie zponiższymi
instrukcjami:
• Zmniejsz jasność/kontrast do minimalnego poziomu, który jest odpow-
iedni do oglądania.
• Nie wyświetlaj stałego obrazu przez dłuższy czas. Unikaj wyświetlania:
» Tabel iczasu ztelegazety
» Menu telewizora/DVD, np. zawartości DVD
» W trybie „Pauza“ (wstrzymanie): Nie używaj tego trybu przez długi
czas, np. podczas oglądania DVD lub lmów.
» Wyłącz urządzenie, jeśli go nie używasz.
Baterie
• Zachowaj prawidłową polaryzację, gdy montujesz baterie.
• Nie wystawiaj baterii na działanie wysokich
temperatur inie umieszczaj ich w miejscach,
których temperatura może gwałtownie wzrosnąć,
np. w pobliżu ognia lub w bezpośrednim świetle
słonecznym.
• Nie wystawiaj baterii na działanie nadmiernego
ciepła, nie wrzucaj ich do ognia, nie rozmontowuj
inie próbuj ładować zwykłych baterii. Mogłyby
wyciec lub eksplodować.
» Nigdy nie stosuj jednocześnie różnych baterii inie łącz baterii
nowych ze starymi.
» Utylizuj baterie w sposób przyjazny dla środowiska.
» Większość państw UE posiada przepisy regulujące usuwanie baterii.
Utylizacja
• Nie wyrzucaj niniejszego telewizora do niesortowanych
śmieci zgospodarstwa domowego. Oddaj go do wyznac-
zonego punktu odbioru w celu przetworzenia zgodnie
zprzepisami WEEE. W ten sposób oszczędzasz zasoby
naturalne ichronisz środowisko. Więcej informacji możesz
uzyskać od sprzedawcy lub lokalnych władz.
Deklaracja zgodności:
• Universal Media Corporation s.r.o. niniejszym oświadcza, że ten telewizor
LED spełnia zasadnicze wymagania oraz inne odnośne normy określone
w dyrektywie R&TTE 1999/5/EC. http://www.sharp.eu/av/documents-
of-conformity
Znaki handlowe
• Nazwy HDMI i HDMI High-De nition Multimedia Interface oraz
logo HDMI są znakami towarowymi lub zarejestrowanymi znakami
towarowymi HDMI Licensing, LLC w Stanach Zjednoczonych i innych
krajach.
• Logo “HD TV” jest znakiem handlowym rmy DIGITALEUROPE.
• Logo “HD TV 1080p” jest znakiem handlowym rmy DIGITALEUROPE.
• Logo DVB jest zarejestrowanym znakiem handlowym projektu Digital
Video Broadcasting - DVB.
• Wyprodukowano na licencji Dolby Laboratories.
• Dolby i symbol z podwójnym D są znakami towarowymi rmy Dolby
Laboratories.
• Informacje dotyczące patentów DTS można znaleźć na stronie http://
patents.dts.com. Wyprodukowano na licencji DTS Licensing Limited.
DTS, symbol oraz DTS razem z symbolem są zarejestrowanymi znaka-
mi towarowymi. DTS TruSurround jest znakiem handlowym rmy DTS,
Inc. © DTS, Inc. All Rights Reserved.
• YouTube i logo YouTube są znakami towarowymi Google Inc
• Logo Wi-Fi CERTIFIED jest zastrzeżonym znakiem towarowym Wi-Fi
Alliance.
• Wi-Fi CERTIFIED Miracast i Miracast są zastrzeżonymi znakami towa-
rowymi Wi-Fi Alliance.
• DLNA, logo DLNA i DLNA CERTIFIED są zastrzeżonymi znakami towa-
rowymi, znakami serwisowymi lub oznaczeniami certy kacji Digital
Living Network Alliance.
Cd

PL
Informacja obezpieczeństwie tech-
nologii 3D
• Jeśli oglądasz obrazy 3D ze zbyt bliska lub przez dłuższy czas, możesz
zaszkodzić swojemu wzrokowi.
• Dłuższe oglądanie telewizji lub granie w gry wykorzystujące obra-
zowanie 3D przy pomocy okularów 3D może spowodować senność,
ból głowy izmęczenie użytkownika i/lub jego oczu. W przypadku
wystąpienia bólu głowy lub uczucia zmęczenia isenności, przerwij
oglądanie telewizji iodpocznij.
• Kobiety w ciąży, osoby starsze, osoby zchorobami serca lub osoby
często doświadczające senności powinny unikać oglądania telewizji w
technologii 3D.
• Niektóre obrazy 3D mogą wywołać uchylanie się od wyświetlanego
obrazu. Ztego względu najlepiej nie oglądać telewizji w trybie 3D w
pobliżu delikatnych przedmiotów lub przedmiotów, które można łatwo
wywrócić.
• Dzieci poniżej 5 roku życia nie powinny oglądać telewizji 3D, ponieważ
może to wpłynąć na rozwój ich wzroku.
Ostrzeżenie oatakach wywołanych nadwrażliwością
na światło:
• Niektórzy użytkownicy mogą doświadczyć ataku lub epilepsji pod
wpływem pewnych czynników, takich jak migające światło lub obrazy
telewizyjne izgier wideo. Jeśli Ty lub ktoś zTwojej rodziny posiadacie
historię epilepsji lub ataków, przed przystąpieniem do oglądania telewiz-
ji 3D zasięgnij porady lekarza. Pewne objawy mogą wystąpić również w
nieokreślonych warunkach bez wcześniejszej historii. Jeśli doświadczysz
jakichkolwiek znastępujących objawów, natychmiast przerwij oglądanie
obrazów 3D izasięgnij porady lekarza: zawroty głowy, zamroczenie,
zmienione widzenie, niestabilność wizualna lub twarzy, taka jak drżenia
oka lub mięśni, nieświadome działania, konwulsje, utrata świadomości,
zmieszanie idezorientacja, utrata poczucia kierunku, skurcze lub
mdłości. Rodzice powinni obserwować dzieci, także młodzież, pod
kątem powyższych objawów, ponieważ mogą być one bardziej wrażliwe
na efekty oglądania telewizji 3D.
Ryzyko ataku związanego znadwrażliwością na
światło może zostać zmniejszone poprzez podjęcie
następujących działań.
• Podczas oglądania telewizji 3D rób częste przerwy.
• Osoby mające różną wadę wzroku w każdym oku, powinny oglądać
telewizję zużyciem szkieł korekcyjnych.
• Patrz na telewizor ztego samego poziomu oczu co ekran iunikaj
siadania zbyt blisko.
• Nie oglądaj obrazów 3D, gdy jesteś zmęczony lub chory, atakże unikaj
oglądania obrazów 3D przez dłuższy czas.
• Nie używaj okularów 3D do innych zastosowań niż oglądanie obrazów
3D na telewizorze 3D.
• Niektórzy użytkownicy mogą czuć dezorientację po oglądaniu telewizji
3D. Ztego względu po oglądaniu telewizji 3D odczekaj chwilę, żeby
odzyskać orientację w sytuacji zanim się poruszysz.

17
Zawartość opakowania
Zestaw zawiera następujące elementy:
• 1x telewizor • 1x kabel RF
• 1x pilot zdalnego sterowania • 1x zestaw do instalacji
podstawy telewizora
• 2x bateria AAA • 1x instrukcja obsługi
• 1x Przewód-przejściówka Mini
Composit
• 1x Przewód-przejściówka Mini
Component
• 4x Okulary 3D • 2x Plastikowa osłona
Montaż podstawy
Proszę postępować zgodnie z instrukcjami z ostatniej strony niniejszej
instrukcji.
Przed uruchomieniem - początkowa
kon guracja
1. Przy pomocy dostarczonego kabla RF podłącz telewizor do gniazdka
antenowego w ścianie. Podłącz kabel zasilający do gniazdka
elektrycznego.
2. Aby połączyć się z Internetem połączeniem przewodowym, podłącz
kabel Cat 5/Ethernet telewizora (niezałączony) do szerokopasmowego
modemu/routera.
3. Włóż dołączone baterie do pilota.
4. Naciśnij i przytrzymaj przycisk ZIELONY i ŻÓŁTY przez ponad 3
sekundy, żeby sparować pilota z telewizorem. Następnie naciśnij
przycisk Standby, żeby włączyć telewizor.
5. Zostaniesz powitany ekranem Pierwsza instalacja. Jeśli nie pojawi
się, naciśnij na pilocie [MENU] i 8-8-8-8, a wyświetli się menu. Jeśli
chcesz dokonać zmian w ustawieniach domyślnych, użyj przycisków
przewijania ▲/▼/◄/►. Żeby w dowolnym momencie wyjść z tego
menu, naciśnij przycisk [EXIT].
6. Proszę skon gurować żądane ustawienia na ekranie PIERWSZA
INSTALACJA.
Antena DVB - Możesz wybrać między telewizją naziemną
(DVB-T), kablową (DVB-C) i satelitarną (DVB-S)*.
Język - Ustaw język menu telewizora.
Kraj - Ustaw żądany kraj.
Tryb strojenia - Wybierz czy chcesz stroić tylko kanały cyfrowe
(DTV), analogowe (ATV), czy wszystkie (DTV + ATV)
Dostawca - Wybierz dostawcę usługi sieci kablowej. Jeśli Twój
dostawca nie znajduje się na liście, wybierz Inny. (dostępne
tylko, gdy opcja Antena DVB jest ustawiona na DVB-C)
Otoczenie - Wybierz lokalizację telewizora. Przy
wykorzystaniu w domu proszę wybrać Tryb Domowy. Przy
demonstracji w sklepie, proszę wybrać Tryb Sklepowy.
Sortowanie po LCN - Ustaw opcję LCN na Włącz, jeśli
chcesz ustawić kanały według preferencji dostawcy
(dotyczy tylko kanałów DVB-T i DVB-C).
7. Naciśnij przycisk [Automatyczne wyszukiwnie], żeby rozpocząć
proces strojenia.
8. Opcjonalne ustawienia kanału DVB-C:
Pozostaw wszystkie domyślne ustawienia zgodnie z zaleceniami.
Jeśli kanały DVB-C nie zostaną znalezione, skontaktuj się ze swoim
dostawcą sieci w celu uzyskania prawidłowego "ID sieci". Następnie
przeprowadź nowe wyszukiwanie. Naciśnij [MENU], wybierz pozycję "ID
sieci" i wprowadź identy kator sieci.
9. Opcjonalne ustawienia kanału DVB-S2*:
Wybierz "Satelita" w sekcji "Antena DVB" menu opcjonalnych ustawień
kanału. Możesz tutaj dokonać wyboru między różnymi satelitami. Po
zakończeniu wyboru lista kanałów dla satelity będzie dostępna do
zaimportowania do systemu telewizora.
Potwierdź przyciskiem [OK] na pilocie, żeby rozpocząć
skanowanie.
WSKAZÓWKA: Jeśli brakuje kanałów, wynika to
prawdopodobnie z siły sygnału. Rozważ podłączenie
wzmacniacza sygnału lub przestrojenie telewizora.
* - Dostępny tylko dla telewizorów z tunerem DVB-S
Pilot zdalnego sterowania
Pilot sterowany radiem - koniec z celowaniem w stronę telewizora!
Zapoznaj się z rysunkiem pilota na drugiej stronie niniejszej instrukcji
obsługi.
1.
STANDBY – Włacza i wyłącza telewizor.
2.
MUTE – Wycisza dźwięk.
3. NET+ – wyświetla menu AQUOS NET+.
4. DTV – Przełacza na zródło telewizji cyfrowej.
5. USB – Przełącza na źródło USB.
6. YouTube – wyświetla aplikację YouTube.
7. 0 – 9 – Wybór kanałów telewizyjnych.
8. TV GUIDE – Otwiera 7-dniowy program telewizyjny (tryb cyfrowy DVB).
9.
– Powraca do poprzednio oglądanego kanału.
10. VOL ▲/▼ – Zwiększa/zmniejsza głośność.
11. SOUND – Ustawienia dźwięku.
12. PICTURE – Ustawienia obrazu.
13. SOURCE – Wybiera wejścia/zródła.
14. CH ▲/▼ – Przełącza na następny lub poprzedni ogladany kanał.
15. (▲/▼/◄/►/ OK) – Pozwala poruszać sie po menu ekranowym i
regulować ustawienia.
16. MENU – Wyswietla menu ekranowe.
17. EXIT – Wychodzi ze wszystkich menu.
18. BACK – Powrót do poprzedniego menu.
19. FAV – Wyświetla menu Ulubione.
20. INFO – Nacisnij jeden raz, żeby uzyskać informacje o bieżącym/
nastepnym kanale. Naciśnij dwa razy, żeby uzyskać informacje o
bieżącym programie.
21. SLEEP – Włącza opcje wyłącznika czasowego.
22. AUDIO – Zmienia język dźwięku (jeśli jest dostępny).
23. SUBTITLE – Zmienia język napisów (jeśli są dostępne).
24. TEXT – Tryb telegazety - Wchodzi w tryb telegazety.
25. TEXT HOLD – Tryb telegazety - Zatrzymuje aktualnie wyswietlaną
stronę.
26. ZOOM – Powieksza obraz.
27.
DISPLAY – Wyłacza ekran podczas słuchania tylko muzyki np. z
radia.
28. Rec
1
– Nagranie PVR.
29. Rec List
1
– Otwiera listę nagrań.
30.
– Cofnięcie bieżącego rozdziału.
31.
– Przejście do nastepnego rozdziału
32.
– Zatrzymanie odtwarzania (pauza)
33.
– Szybkie przewijanie do przodu.
34.
– Szybkie przewijanie do tyłu.
35.
– Odtwarzanie/pauza
36. KOLOROWE PRZYCISKI – Dodatkowe funkcje telegazety i menu
ekranowego
37. 3D przycisk
2
– Przełączanie pomiędzy ustawieniami typu 3D
1
- dostępne tylko dla funkcji PVR
2
- Funkcje są dostępne tylko dla telewizorów 3D.

PL
*
Przyciski telewizora
Vol+ Zwiększenie głośności i przejście w menu w prawo
Vol- Zmniejszenie głośności i przejście w menu w lewo
CH+ Następny program/kanał i przejście w menu do góry
CH- Poprzedni program/kanał i przejście w menu w dół
MENU Wyświetla menu/menu ekranowe
SOURCE Wyświetla menu źródła wejściowego
STANDBY Włączenie/wyłączenie trybu czuwania
Wybór trybu wejścia/źródła
Żeby przełączyć między różnymi wejściami/złączami.
a. Przy pomocy przycisków pilota:
1. Naciśnij [SOURCE/ AV] - Wyświetli się menu źródła.
2. Przyciskami [▼] i [▲] wybierz żądane wejście.
3. Naciśnij [OK].
b. Przy pomocy przycisków na telewizorze:
1. Naciśnij [SOURCE].
2. Przewiń w górę/dół przy pomocy przycisków CH+/ CH-, żeby
wybrać żądane wejście/źródło.
3. Naciśnij Vol+, żeby zmienić wejście/źródło na wybrane.
Złącza
Na stronie 114 dostępna jest tabela rodzajów
złącz dostępnych dla różnych modeli.
USB
Wejście USB 1, 2
HDMI 1, 2, 3 (MHL) in
Wejście HDMI 1, 2, 3
VGA(PC)
Wejście komputerowe VGA
VGA (PC) Audio In
Wejście dźwięku z komputera 3,5 mm
Mini AV
Wejście wideo i wejście Component/dźwięku wideo
Mini YPbPr
Wejście Mini Component HD
SCART
Wejście SCART
CI Card IN
Wejście CI
RF In
Wejście RF / anteny telewizyjnej
Sat In*
Wejście satelitarne
Digital Optical Audio Out
Cyfrowe wyjście optyczne
RJ 45
Sieć Ethernet
HEADPHONES
Wyjście słuchawkowe 3,5 mm
*- Tylko dla modeli z tunerem DVB-S
Poruszanie się po menu telewizora
Żeby uzyskać dostęp do tego menu, naciśnij na pilocie przycisk [MENU].
Żeby wejść do menu, naciśnij [OK]. Jeśli chcesz dokonać zmian w
ustawieniach domyślnych, użyj przycisków przewijania (▲/▼/◄/►). Żeby
zatwierdzić dowolne ustawienie, naciśnij przycisk [OK]. Żeby w dowolnym
momencie wyjść z tego menu, naciśnij przycisk [EXIT].
Obraz
Ustawienia obrazu - Dokonaj wyboru z następujących ustawień.
Standard - Ustawienia domyślne
Dynamiczny - Zalecane ustawienie do
szybko zmieniających się obrazów
Łagodny - Zalecane ustawienie do szybko zmieniających
się obrazów i bardzo jasnych pomieszczeń
Personalny - Pozwala ręcznie zmienić wszystkie ustawienia
Eco - Zużywa o 15% mniej energii.
Kontrast - Zwiększa lub zmniejsza kontrast obrazu
Jasność - Zwiększa lub zmniejsza jasność obrazu.
Odcień - Pozwala zmniejszyć lub zwiększyć poziom
odcieni w obrazie (tylko dla sygnału NTSC)
Kolor - Zwiększa intensywność koloru
Ostrość - Zwiększa lub zmniejsza ostrość obrazu.
Temperatura koloru - Dokonaj wyboru spośród następujących ustawień.
Normalna - Ustawienia domyślne
Ciepła - Zwiększa poziom czerwieni na obrazie
Zimna - Zwiększa poziom niebieskiego na obrazie
Proporcje obrazu - Format obrazu różni się w zależności od
kanału/rodzaju sygnału. Dostępne są liczne opcje pozwalające
najlepiej dopasować obraz, do Twoich potrzeb.
Auto - Automatycznie wyświetlany jest obraz w najlepszym
formacie. Obraz jest w prawidłowym położeniu. Mogą być
widoczne czarne pasy na górze/dole i/lub po bokach obrazu.
4:3 - Wyświetla obraz 4:3 w oryginalnym formacie.
Wyświetlają się pasy boczne, żeby wypełnić ekran 16:9.
16:9 - Ekran wypełniany jest standardowym sygnałem 16:9.
Powiększenie 1/2 - Obraz będzie wyświetlany w prawidłowych
proporcjach, ale powiększony, żeby wypełnić ekran.
Pixel w pixel (HDMI) - Oryginalny obraz będzie
wyświetlony bez żadnych zmian.
Pełny obraz - Obraz jest rozciągany, żeby wypełnić ekran.
Redukcja szumu - ltruje i redukuje szum (zakłócenia) obrazu.
Redukcja szumu MPEG - pozwala na redukcję widocznych
zakłóceń spowodowanych kompresją MPEG.
Aktywny kontrast - automatycznie dostosowuje
podświetlenie i kontrast obrazu do jasności ekranu.
3D kon guracja
W celu uzyskania najlepszego efektu 3D, należy oglądać transmisję
pod kątem nie większym niż 10 stopni od osi ekranu.
Typ 3D - Niekiedy podczas połączenia 3D obraz może być
niewłaściwie wyświetlony, w tym przypadku należy zponiżej
tabeli wybrać odpowiednie ustawienia. Ustawienia można
również zmieniać naciskając przycisk 3D na pilocie.
Wyłącz - Wyłącz 3D
Auto - Automatyczne ustawienia trybu 3D
Obok siebie - 3D Format” jest zazwyczaj używany przez nadawców
w transmisji 3D, zasada działania polega na dzieleniu rozdzielczości
obrazu w pionie na pół ijego przechowywaniu dla prawego ilewego
oka.Technologia pozwala na efektywne wyświetlanie obrazu w
rozdzielczości 960x1080 dla każdego oka umożliwiając nadawcom
transmisję treści 3D w niższej przepustowości w porównaniu
zdyskiem Blu-ray. Typowe obsługiwane rozdzielczości telewizji 3D

19
są ograniczone do 720p i1080i. Użytkownicy mogą ręcznie wybrać
właściwy format 3D aby wyświetlać materiał 3D na telewizorze.
Góra dół - 3D Format “ jest alternatywą dla transmisji 3D która
jest bardzo podobna do transmisji typu” jeden obok drugiego”
ztym wyjątkiem że rozdzielczość obrazu jest dzielona w poziomie
anie w pionie. Główna dostępna rozdzielczość to 720 p, system
„góra-dół” oferuje 1280 pixeli poziomo. Wyższa liczba pixeli
jest ogólnie uznawana za bardziej korzystną dla wyświetlania
obrazów w ruchu takich jak np. programy sportowe.
Frame Packing - Ten format zachowuje obrazy dla lewego
iprawego oka w każdej ramce tak aby zachować oryginalną
rozdzielczości dla najlepszych obrazów 3D. Większość,ale nie
wszystkie lmy na dysku bluray 3D igry na PS3 są produkowane
zwykorzystaniem tej technologii w rozdzielczości 720p. Inną
kwestią jest fakt, że wszystkie telewizory 3D powinny móc
automatycznie wykryć sygnał 3D nadawany w formacie „Frame
Packing” iwyświetlić go samoczynnie bez udziału użytkownika.
Przełącznik widoku LP - zmiana kolejności wyświetlania obrazu
2D do 3D - zmiana obrazu z2D na 3D. Proszę zwrócić uwagę,że jeśli
zawartość jest zmieniana przez telewizor to efekt może być ograniczony.
Głębokość efektu 3D - Głębokość zdjęć konwertowane z 2D do 3D
3D do 2D - Zmienia obraz 3D na standardowy 2D.
Dźwięk
Tryb dźwięku - Wybierz jedno z poniższych ustawień
Standard - Ustawienia domyślne
Muzyka - Uwypukla muzykę w stosunku do głosu
Kino - Zapewnia żywy i pełny dźwięk w lmach
Personalny - Wybiera Twoje osobiste ustawienia dźwięku
Sport - Uwypukla dźwięk przy sporcie
WSKAZÓWKA: Poziomy tonów wysokich i niskich można wyregulować
tylko wtedy, gdy wybrany jest tryb dźwięku ‘Personalny’.
Korektor dźwięku - dostosowuje głośność dźwięku o różnych
częstotliwościach. Poziomy głośności mogą być dostosowywane
tylko wtedy, gdy włączony jest "Osobisty" tryb dźwięku.
Balans - Reguluje balans dźwięku
Automatyczny poziom głośności - Gdy jest włączony, głośność
pozostanie na tym samym poziomie niezależnie od wejścia/źródła.
DTS TruSurround - Pozwala włączyć lub
wyłączyć efekt dźwięku dookólnego.
Wyjście cyfrowe - Jest to cyfrowe wyjście dźwięku.
Wybierz ustawienie z poniższych opcji:
Wyłącz - Wyłączone
Auto - Automatyczny wybór najlepszych ustawień
PCM - Wybierz tę opcję jeżeli łączysz się ze stereofonicznym
sprzętem Hi- poprzez kabel cyfrowy (kodowanie
dźwięku PCM - Pulse Code Modulation)
Przełącznik AD- Dodatkowa ścieżka dźwiękowa dla osób niedowidzących.
Dostępna tylko w wybranych programach telewizji cyfrowej.
Głośność AD - Regulacja głośności ścieżki dźwiękowej AD.
Opóźnienie audio (ms) - Pozwala użytkownikowi wyregulować
synchronizację obrazu i dźwięku dla głośników telewizora.
Opóźnienie wyj. cyfrowego (ms) - Pozwala użytkownikowi
wyregulować synchronizację obrazu i dźwięku dla zewnętrznych
głośników podłączonych poprzez cyfrowe wyjście dźwięku.
Komputer
Automatyczna regulacja - Pozwala automatycznie skon gurować
telewizor do wykorzystania jako monitor komputera.
Pozycja pozioma - Zmienia poziome położenie obrazu.
Pozycja pionowa - Zmienia pionowe położenie obrazu.
Rozmiar - Zmienia rozmiar obrazu.
Faza - Pozwala ustawić czas opóźnienia fazy,
żeby zmniejszyć zakłócenia obrazu.
WSKAZÓWKA: Jeśli komputer pozostaje nieaktywny przez
dłuższy czas, telewizor przełączy się w stan uśpienia (ekran
zostanie wyłączony, żeby oszczędzić energię). Żeby włączyć
go ponownie, naciśnij przycisk trybu czuwania.
WSKAZÓWKA: Jeśli przez 10 sekund nie naciśniesz żadnego przycisku, menu
zostanie automatycznie wyłączone. Możesz zmienić czas, który musi upłynąć
przed automatycznym wyłączeniem menu - patrz sekcja ‘Czas OSD’.
Kanał
Antena DVB - Ustawia typ sygnału DTV
DVB-T - Sygnał telewizji naziemnej
DVB-C - Sygnał telewizji kablowej
Automatyczne wyszukiwanie - Pozwala ponownie dostroić wszystkie
cyfrowe kanały, cyfrowe stacje radiowe i kanały analogowe.
Ręczne wyszukiwanie ATV - Pozwala ręcznie dostroić sygnał analogowy.
Ręczne wyszukiwanie DTV - Pozwala ręcznie dostroić sygnał cyfrowy.
Edycja programów - Pozwala kasować,
pomijać i dodawać ulubione kanały.
Informacje o sygnale - Informacje o sygnale DVB.
Informacja CI - Płatne usługi wymagają włożenia do telewizora
karty “smartcard”. Jeśli zapiszesz się do usługi płatnych programów
dostawca wyda Ci kartę ‘CAM’ i “smartcard”. Kartę CAM można
włożyć do gniazda COMMON INTERFACE PORT (CI Card In).
Lista nagrań - Lista zapisanych programów TV.
Zaplanowana lista - Lista przypomnień o programach.
Kon guracja anteny satelitarnej* - To menu dostępne jest tylko w
trybie DVB-S2. Możesz wybrać typ satelity, transponder, typ LNB, itp.
* - Tylko dla modeli z tunerem DVB-S
Blokada
Blokada systemowa - Pozwala zablokować lub odblokować menu.
Zostaniesz poproszony o wprowadzenie 4-cyfrowego hasła. Użyj przycisku
◄ , żeby wyjść z trybu wprowadzania hasła. Użyj przycisku ► , żeby
wyczyścić. Domyślne hasło to 0000.
Ustaw hasło - Zmiana domyślnego hasła.
Blokuj program - Blokada określonych programów.
Blokada dla dzieci - Blokada kanałów telewizyjnych
na podstawie ograniczeń wiekowych.
Blokada klawiszy - Blokada przycisków telewizora.
Wyłącz- Wszystkie przyciski telewizora są odblokowane.
Częściowa - Tylko przycisk Standby jest odblokowany.
Pełna - Wszystkie przyciski telewizora są zablokowane.
Czas
Zegar - Ustawianie daty i godziny. Data i godzina są
automatycznie ustawiane w trybie DVB.
Godzina wyłączenia - Pozwala ustawić
określony czas wyłączenia telewizora.
Godzina włączenia - Pozwala ustawić określony czas włączenia
telewizora, kanał, który zostanie wyświetlony, źródło i głośność. Funkcję
można przełączyć do powtarzania codziennie lub konkretnego dnia.
Wyłącznik czasowy - Pozwala ustawić wyłącznik czasowy, żeby
telewizor wyłączył się po określonym czasie. Wyłączony -> 10min ->
20min -> 30min -> 60min -> 90min -> 120min -> 180min -> 240min.
Czas OSD - Pozwala ustawić czas, po którym
menu ekranowe zostanie wyłączone.

PL
Automatyczny tryb czuwania - Ustawienie automatycznego trybu
czuwania ze skokiem godzinnym: Wyłącz -> 3h -> 4h -> 5h.
Strefa czasowa - Zmiana bieżącej strefy czasowej.
Sieć
Kon guracja sieci - najpierw musisz wybrać typ połączenia.
Możesz wybrać między Wi-Fi i połączeniem przewodowym.
UWAGA: Aby połączyć się z Internetem połączeniem
przewodowym, podłącz kabel Cat 5/Ethernet telewizora
(niezałączony) do szerokopasmowego modemu/routera.
Kon guracja IP - ustawienia połączenia sieci LAN
Automatyczna - automatycznie połączy komputer z Twoją siecią
domową (zalecane jest właśnie to ustawienie domyślne).
Manualna - pozwala samodzielnie zmienić IP, maskę
sieci, bramę sieciową i informacje o serwerach DNS.
Kon guracja Wi–Fi - ustawienia połączenia sieci bezprzewodowej
– Automatyczne wyszukiwanie Wi–Fi - automatycznie wyszukuje
dostępne sieci bezprzewodowe. Wybierz sieć Wi–Fi, a następnie
wprowadź hasło (jeśli sieć jest nim chroniona). Gdy hasło zostanie
zaakceptowane, nie będziesz później musiał wpisywać go ponownie.
UWAGA: Łączenie z siecią może potrwać kilka minut - zachowaj
cierpliwość. Przy każdym włączeniu telewizor będzie automatycznie
łączył się z wybraną siecią. To również może chwilę potrwać.
Informacje o sieci - Informacje o ustawieniach sieci
Test sieci - Test połączenia sieciowego
Ustawienia
Język - Pozwala zmienić język menu.
Język dźwięku - Pozwala zmienić język dźwięku
dla wybranych kanałów DVB.
Język napisów - Pozwala zmienić język napisów
dla wybranych kanałów DVB.
Pomoc dla niesłyszących - Jeśli sygnał zapewnia wsparcie dla
niesłyszących, można wyświetlić napisy naciskając przycisk “Subtitle”.
Jeśli pomoc dla niesłyszących jest włączona i przełączysz telewizor na
program obsługujący napisy, zostaną one uaktywnione automatycznie.
Niebieski ekran - Gdy nie ma sygnału wejściowego, zmienia tło między
przezroczystym a niebieskim (dostępne tylko dla niektórych źródeł).
System plików PVR - Opcje nagrywania PVR*
Wybierz dysk - Wybierz gniazdo USB i partycję dysku
Rozmiar pliku Timeshift - Ustaw czas dla
bufora przesunięcia czasowego
Formatowanie- Możesz sformatować podłączony
dysk USB w systemie plików FAT 32.
OSTRZEŻENIE: WSZYSTKIE DANE Z DYSKU
USB ZOSTANĄ SKASOWANE
Szybkość- Testuje prędkość zapisu dla podłączonych dysków USB.
* - tylko dla urządzeń z wbudowaną funkcją PVR
Pierwsza instalacja - Uruchamia pierwszą instalację.
Aktualizacja oprogramowania (USB) - Od czasu do czasu możemy
wypuszczać nowe wersje oprogramowania rmware usprawniające
działanie telewizora (dostępne do pobrania). To menu pozwala
zainstalować nowe oprogramowanie/ rmware w telewizorze. Szczegółowy
opis tej operacji będzie dołączony do oprogramowania rmware.
Skontaktuj się z linią pomocy lub zapoznaj się ze stroną ‘www.sharp.eu’.
Aktualizacja oprogramowania (NET) - pozwala na aktualizację
oprogramowania telewizora przez Internet. Ta funkcja będzie
wyszukiwać nowe oprogramowanie i aktualizować je, gdy zajdzie
potrzeba. By powyższa funkcja działała prawidłowo, telewizor
musi być podłączony do internetu, zaś do telewizora musi być
podłączony dysk USB z co najmniej 200 MB wolnego miejsca.
UWAGA: Po każdym włączeniu telewizor będzie automatycznie szukał
nowych wersji oprogramowania. Gdy znajdzie aktualizację, zapyta Cię, czy
chciałbyś ją pobrać i zainstalować. Jeśli wybierzesz "Tak", telewizor zaktualizuje
oprogramowanie do najnowszej wersji. Przed rozpoczęciem aktualizacji należy
podłączyć do telewizora dysk USB z co najmniej 200 MB wolnego miejsca.
OSTRZEŻENIE: Nie wyłączaj telewizora przed zakończeniem aktualizacji!
Ustawienia fabryczne - Resetowanie menu do wartości fabrycznych.
HDMI CEC* - Pozwala sterować urządzeniami podłączonymi
przez HDMI używając pilota od telewizora.
Automatyczny tryb czuwania* - Automatycznie włącza/
wyłącza podłączone urządzenia poprzez HDMI CEC.
Lista urządzeń* - Pozwala uzyskać dostęp do menu urządzeń
i obsługiwać menu przy pomocy pilota od telewizora.
HDMI ARC* - Wysyła sygnał dźwiękowy z telewizji naziemnej/
satelitarnej poprzez HDMI do odbiornika AV bez użycia dodatkowych
kabli audio. Te funkcje są dostępne tylko dla wyjścia HDMI 2.
* - HDMI CEC musi być obsługiwany przez podłączone urządzenie.
Status LED - Pozwala użytkownikowi włączyć lub wyłączyć
wskaźnik diodowy zasilania, gdy telewizor pracuje. (Gdy ta
opcja jest wyłączona, wskaźnik zasilania będzie pulsował,
gdy używany jest pilot zdalnego sterowania.)
Informacja o wersji - Pokazuje wersję oprogramowania telewizora.
Tryb Sklepowy* - Włącza/wyłącza sklepowy tryb demonstracyjny.
* - Dostępny tylko, jeśli tryb demo został wybrany przy pierwszej
instalacji.
APLIKACJE
AQUOS NET+ - uruchamia portal Sharp SMART.
USB Media - tryb multimediów umożliwia odtwarzanie zawartości
zapisanej na dysku USB. Zawartość zostanie podzielona na
różne typy plików: zdjęcia, muzyka i lmy. "Opcja pliku" pokaże i
pozwoli odtworzyć wszystkie typy obsługiwanej zawartości.
1. Możesz poruszać się po menu, używając strzałek ▲/▼/◄/►. By
wybrać plik, który chcesz odtworzyć/wyświetlić, wciśnij przycisk [OK].
2. Wybierz odpowiedni napęd. (Jeśli napęd ma tylko 1 partycję,
zobaczysz tylko jeden dysk).
3. Masz teraz dostęp do pliku. Wciśnij OK, by go wyświetlić.
4. Wyświetlając zawartość możesz zmieniać tryby odtwarzania
przy użyciu pilota lub otwierając menu odtwarzania, wybierając
tryb przyciskami ekranowymi ▲/▼/◄/► i zatwierdzając wybór
przyciskiem [OK].
UWAGA: Nie są zalecane przedłużacze kabli USB, ponieważ
mogą powodować pogorszenie jakości obrazu/dźwięku oraz
przerwy w odtwarzaniu materiałów z pamięci USB.
Serwer mediów - automatycznie wyszukuje serwery mediów
cyfrowych (DMS) podłączone do Twojej sieci domowej i umożliwia
odtwarzanie oraz renderowanie zawartości z serwerów mediów.
UWAGA: Funkcja "Serwer mediów" nie jest dostarczana przez
producenta telewizora; możesz pobrać oprogramowanie innych rm
i zainstalować je na swoim komputerze lub urządzeniu NAS.
Połączenie bezprzewodowe - pozwala wyświetlać zwartość
ze smartfona czy notebooka na ekranie telewizora dzięki
standardom Miracast lub Intel Wireless Display.
Połączenie Miracast używa Wi-Fi Direct, dzięki czemu dostęp do sieci
Wi-Fi nie jest wymagany. Dzięki tej technologii możesz wyświetlać na
telewizorze bezprzewodowo kontent ze swojego smartfona czy tabletu
bazującego na systemie Android 4.4 lub wyższym.
Wireless Display (WiDi) pozwala Ci na bezprzewodowe wyświetlanie
multimediów z Twojego urządzenia na telewizorze. Wymagany jest
komputer, smartfon lub tablet z technologią Intel® WiDi.
UWAGA: Ta funkcja jest dostępna tylko na wybranych
modelach smartfonów i notebooków.
Pagina se încarcă ...
Pagina se încarcă ...
Pagina se încarcă ...
Pagina se încarcă ...
Pagina se încarcă ...
Pagina se încarcă ...
Pagina se încarcă ...
Pagina se încarcă ...
Pagina se încarcă ...
Pagina se încarcă ...
Pagina se încarcă ...
Pagina se încarcă ...
Pagina se încarcă ...
Pagina se încarcă ...
Pagina se încarcă ...
Pagina se încarcă ...
Pagina se încarcă ...
Pagina se încarcă ...
Pagina se încarcă ...
Pagina se încarcă ...
Pagina se încarcă ...
Pagina se încarcă ...
Pagina se încarcă ...
Pagina se încarcă ...
Pagina se încarcă ...
Pagina se încarcă ...
Pagina se încarcă ...
Pagina se încarcă ...
Pagina se încarcă ...
Pagina se încarcă ...
Pagina se încarcă ...
Pagina se încarcă ...
Pagina se încarcă ...
Pagina se încarcă ...
Pagina se încarcă ...
Pagina se încarcă ...
Pagina se încarcă ...
Pagina se încarcă ...
Pagina se încarcă ...
Pagina se încarcă ...
Pagina se încarcă ...
Pagina se încarcă ...
Pagina se încarcă ...
Pagina se încarcă ...
Pagina se încarcă ...
Pagina se încarcă ...
Pagina se încarcă ...
Pagina se încarcă ...
Pagina se încarcă ...
Pagina se încarcă ...
Pagina se încarcă ...
Pagina se încarcă ...
Pagina se încarcă ...
Pagina se încarcă ...
Pagina se încarcă ...
Pagina se încarcă ...
Pagina se încarcă ...
Pagina se încarcă ...
Pagina se încarcă ...
Pagina se încarcă ...
Pagina se încarcă ...
Pagina se încarcă ...
Pagina se încarcă ...
Pagina se încarcă ...
Pagina se încarcă ...
Pagina se încarcă ...
Pagina se încarcă ...
Pagina se încarcă ...
Pagina se încarcă ...
Pagina se încarcă ...
Pagina se încarcă ...
Pagina se încarcă ...
Pagina se încarcă ...
Pagina se încarcă ...
Pagina se încarcă ...
Pagina se încarcă ...
Pagina se încarcă ...
Pagina se încarcă ...
Pagina se încarcă ...
Pagina se încarcă ...
Pagina se încarcă ...
Pagina se încarcă ...
Pagina se încarcă ...
Pagina se încarcă ...
Pagina se încarcă ...
Pagina se încarcă ...
Pagina se încarcă ...
Pagina se încarcă ...
Pagina se încarcă ...
Pagina se încarcă ...
Pagina se încarcă ...
Pagina se încarcă ...
Pagina se încarcă ...
Pagina se încarcă ...
Pagina se încarcă ...
Pagina se încarcă ...
Pagina se încarcă ...
Pagina se încarcă ...
Pagina se încarcă ...
Pagina se încarcă ...
-
 1
1
-
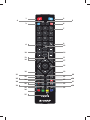 2
2
-
 3
3
-
 4
4
-
 5
5
-
 6
6
-
 7
7
-
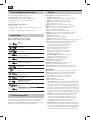 8
8
-
 9
9
-
 10
10
-
 11
11
-
 12
12
-
 13
13
-
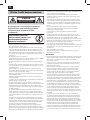 14
14
-
 15
15
-
 16
16
-
 17
17
-
 18
18
-
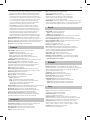 19
19
-
 20
20
-
 21
21
-
 22
22
-
 23
23
-
 24
24
-
 25
25
-
 26
26
-
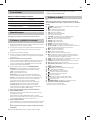 27
27
-
 28
28
-
 29
29
-
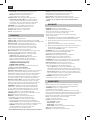 30
30
-
 31
31
-
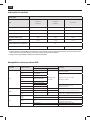 32
32
-
 33
33
-
 34
34
-
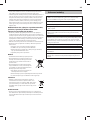 35
35
-
 36
36
-
 37
37
-
 38
38
-
 39
39
-
 40
40
-
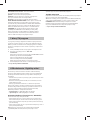 41
41
-
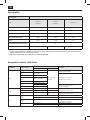 42
42
-
 43
43
-
 44
44
-
 45
45
-
 46
46
-
 47
47
-
 48
48
-
 49
49
-
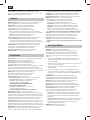 50
50
-
 51
51
-
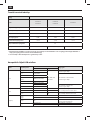 52
52
-
 53
53
-
 54
54
-
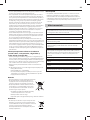 55
55
-
 56
56
-
 57
57
-
 58
58
-
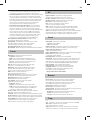 59
59
-
 60
60
-
 61
61
-
 62
62
-
 63
63
-
 64
64
-
 65
65
-
 66
66
-
 67
67
-
 68
68
-
 69
69
-
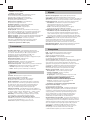 70
70
-
 71
71
-
 72
72
-
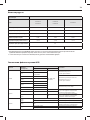 73
73
-
 74
74
-
 75
75
-
 76
76
-
 77
77
-
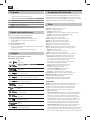 78
78
-
 79
79
-
 80
80
-
 81
81
-
 82
82
-
 83
83
-
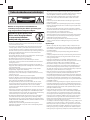 84
84
-
 85
85
-
 86
86
-
 87
87
-
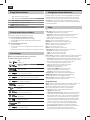 88
88
-
 89
89
-
 90
90
-
 91
91
-
 92
92
-
 93
93
-
 94
94
-
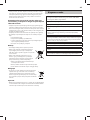 95
95
-
 96
96
-
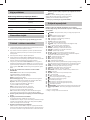 97
97
-
 98
98
-
 99
99
-
 100
100
-
 101
101
-
 102
102
-
 103
103
-
 104
104
-
 105
105
-
 106
106
-
 107
107
-
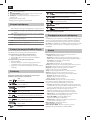 108
108
-
 109
109
-
 110
110
-
 111
111
-
 112
112
-
 113
113
-
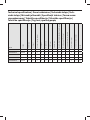 114
114
-
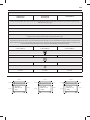 115
115
-
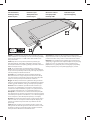 116
116
-
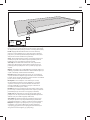 117
117
-
 118
118
-
 119
119
-
 120
120


Sharp A43SF7331EB00D Manual de utilizare
- Categorie
- Televizoare LCD
- Tip
- Manual de utilizare
- Acest manual este potrivit și pentru
în alte limbi
- slovenčina: Sharp A43SF7331EB00D Používateľská príručka
- polski: Sharp A43SF7331EB00D Instrukcja obsługi