
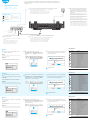
Internet
Power Socket
Turn off the modem and remove the
battery if it has one.
1
Modem
Apague el módem y retire la batería si tiene una.
Éteignez le modem et retirez la batterie s'il en a une.
Desligue o modem, e retire a bateria, se a tiver.
Spegni il modem e rimuovi la batteria se ne ha una.
Schalten Sie das Modem aus und entfernen Sie den Akku, falls
vorhanden.
Connect router’s WAN Port to DSL/Cable/Satellite Modem.
2
Conecte el puerto WAN del enrutador al módem DSL/Cable/Satélite.
Connectez le port WAN du routeur au modem DSL/câble/satellite.
Conecte a porta WAN do roteador ao modem DSL/cabo/satélite.
Collegare la porta WAN del router al modem DSL/via cavo/satellitare.
Verbinden Sie den WAN-Port des Routers mit dem DSL-/Kabel-/Satellitenmodem.
Turn on the modem and then wait about 2 minutes for it to restart.
3
Encienda el módem y luego espere unos 2 minutos para que se reinicie.
Allumez le modem et attendez environ 2 minutes pour qu'il redémarre.
Ligar o modem e depois esperar cerca de 2 minutos para o reiniciar.
Accendi il modem e attendi circa 2 minuti per riavviarlo.
Schalten Sie das Modem ein und warten Sie ca. 2 Minuten, bis es neu gestartet wird.
If your internet source is an Ethernet cable coming from the wall directly instead of a
DSL/Cable/Satellite modem, connect the Ethernet cable to the router’s WAN port and
skip steps 1, 2 ,3.
Quick Installation Guide
English Deutsch
Español
Italiano
Português
Français
5
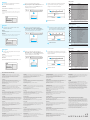
English
Wired
Wireless
Connect your device to the router’s Wi-Fi using the SSID (network
name) and Password printed on the bottom of the router.
Connect your computer to the router
(Wired or Wireless).
Turn off the Wi-Fi on your computer and connect it to router’s LAN
port via an Ethernet cable.
6Launch a web browser, and enter
http://cudy.net/ or http://192.168.10.1/ in
the address bar. Use admin for password to
log in.
Log In
http://cudy.net/
English
admin
7The window below will pop up, please follow
the step-by-step instructions to set up the
internet connection.
Enjoy the internet!
Quick Setup
Mode Timezone WAN Wireless Summary
Exit Next
Wireless Router
Opertion Mode
Wireless Access Point
Wireless Extender
WISP
45
3
2
1
Quick Setup
Mode Timezone WAN Wireless Summary
Exit Next
Wireless Router
Opertion Mode
Wireless Access Point
Wireless Extender
WISP
45
3
2
1
Quick Setup
Mode Timezone WAN Wireless Summary
Exit Next
Wireless Router
Opertion Mode
Wireless Access Point
Wireless Extender
WISP
45
3
2
1
6Starten Sie einen Webbrowser und geben Sie
http://cudy.net/ oder http://192.168.10.1/ in
die Adressleiste ein. Verwenden Sie admin
als Passwort, um sich anzumelden.
Log In
http://cudy.net/
English
admin
7Das folgende Fenster wird angezeigt. Befol-
gen Sie die schrittweisen Anweisungen zum
Einrichten der Internetverbindung.
Genieße das Internet!
Deutsch
5
Verdrahtet
Kabellos
Verbinden Sie Ihr Gerät über die SSID (Netzwerkname) und das
Kennwort auf der Unterseite des Routers mit dem WLAN des Routers.
Schließen Sie Ihren Computer an den
Router an (kabelgebunden oder kabellos).
Schalten Sie das WLAN Ihres Computers aus und verbinden Sie es
über ein Ethernet-Kabel mit dem LAN-Anschluss des Routers.
LED und Taste
6Avviare un browser Web e inserire
http://cudy.net/ o http://192.168.10.1/ nella
barra degli indirizzi. Usa admin per la pass-
word per accedere.
Log In
http://cudy.net/
English
admin
7Quindi verrà visualizzata la finestra di seguito,
seguire le istruzioni dettagliate per configurare
la connessione Internet.
Goditi Internet!
Cablata
Senza Fili
Collega il tuo dispositivo al Wi-Fi del router utilizzando l'SSID (nome
della rete) e la password stampati nella parte inferiore del router.
Collega il tuo computer al router (cablato
o wireless).
Turn off the Wi-Fi on your computer and connect it to router’s LAN
port via an Ethernet cable.
Italiano
5
Connect the power adapter to the router
and wait 1 minute until the system LED
changes from flashing to solid on (red or
blue) , which means the system startup is
completed.
Conecte el adaptador de alimentación al enrutador y espere 1 minuto
hasta que el LED del sistema cambie de parpadeante a encendido (rojo
o azul), lo que significa que el inicio del sistema se ha completado.
Connectez l'adaptateur secteur au routeur et attendez 1 minute
jusqu'à ce que le voyant du système passe de clignotant à fixe (rouge
ou bleu), ce qui signifie que le démarrage du système est terminé.
Conecte o adaptador de energia ao roteador e aguarde 1 minuto até
que o LED do sistema mude de piscando para sólido ligado (vermelho
ou azul), o que significa que a inicialização do sistema foi concluída.
Collegare l'alimentatore al router e attendere 1 minuto fino a quando il
LED di sistema passa da lampeggiante a acceso fisso (rosso o blu), il
che significa che l'avvio del sistema è completato.
Schließen Sie das Netzteil an den Router an und warten Sie 1 Minute,
bis die System-LED von blinkend auf dauerhaft leuchtet (rot oder blau).
Dies bedeutet, dass der Systemstart abgeschlossen ist.
4
WAN LAN1 LAN2 LAN3 WPS RESET POWER
LED and Button
Reset
Name Status Indication
WPS
Button Press and hold 2 seconds to reset the router to its
factory default settings.
Press and hold 1 second to enable the WPS function.
OFF
Flashing
ON
OFF
ON
OFF
ON
OFF
ON
Off
Flashing
ON
Off
Flashing
ON
Not powered on
System start-up process
System startup complete
Not connected to the Internet
Connected to the Internet
No connection at WAN port
WAN port has connection
LAN port is not connected
LAN port is connected
2.4GHz Wi-Fi off
WPS in process
2.4GHz Wi-Fi On
5GHz Wi-Fi off
WPS in progress
5GHz Wi-Fi On
LED e pulsante
Reset
Nome Stato Indicazione
WPS
Button Tenere premuto per 2 secondi per ripristinare le
impostazioni predefinite di fabbrica del router.
Tenere premuto per 1 secondo per abilitare la
funzione WPS.
OFF
Lampeggiante
ON
OFF
ON
OFF
ON
OFF
ON
OFF
Lampeggiante
ON
OFF
Lampeggiante
ON
Non acceso
Processo di avvio del sistema
Avvio del sistema completato
Non connesso a Internet
Connesso a Internet
Nessuna connessione alla porta WAN
La porta WAN ha una connessione
La porta LAN non è collegata
La porta LAN è collegata
Wi-Fi a 2,4 GHz disattivato
WPS in corso
Wi-Fi a 2,4 GHz attivo
Wi-Fi a 5 GHz disattivato
WPS in corso
Wi-Fi a 5 GHz attivo
Reset
Name Status Indication
WPS
Button Halten Sie 2 Sekunden gedrückt, um den Router auf
die Werkseinstellungen zurückzusetzen.
Halten Sie 1 Sekunde gedrückt, um die WPS-Funktion
zu aktivieren.
OFF
Blinken
ON
OFF
ON
OFF
ON
OFF
ON
OFF
Blinken
ON
OFF
Blinken
ON
Nicht eingeschaltet
Inbetriebnahme des Systems
Systemstart abgeschlossen
Nicht mit dem Internet verbunden
Mit dem Internet verbunden
Keine Verbindung am WAN-Port
WAN-Port hat Verbindung
LAN-Anschluss ist nicht verbunden
LAN-Anschluss ist angeschlossen
2,4 GHz Wi-Fi aus
WPS in Bearbeitung
2,4 GHz Wi-Fi Ein
5GHz Wi-Fi aus
WPS in Bearbeitung
5GHz Wi-Fi Ein
5GHz Wi-Fi: Cudy-XXXX-5G
2.4GHz Wi-Fi: Cudy-XXXX
Password: XXXXXXXX
5GHz Wi-Fi: Cudy-XXXX-5G
2.4GHz Wi-Fi: Cudy-XXXX
Password: XXXXXXXX
5GHz Wi-Fi: Cudy-XXXX-5G
2.4GHz Wi-Fi: Cudy-XXXX
Password: XXXXXXXX
Driver & Manual:
www.cudy.com/download
Website:
www.cudy.com
Email:
support@cudy.com
Support
For technical support, the user
guide and more information, please
visit:
https://www.cudy.com/support
NEED TECH HELP?

Quick Setup
Mode Timezone WAN Wireless Summary
Exit Next
Wireless Router
Opertion Mode
Wireless Access Point
Wireless Extender
WISP
45
3
2
1
Quick Setup
Mode Timezone WAN Wireless Summary
Exit Next
Wireless Router
Opertion Mode
Wireless Access Point
Wireless Extender
WISP
45
3
2
1
Quick Setup
Mode Timezone WAN Wireless Summary
Exit Next
Wireless Router
Opertion Mode
Wireless Access Point
Wireless Extender
WISP
45
3
2
1
5
Português
Com fio
Sem fios
Ligue o seu dispositivo ao Wi-Fi do router utilizando o SSID (nome da
rede) e a palavra-passe impressa na parte inferior do router.
Ligue o seu computador ao router (com
ou sem fios).
Desligue o Wi-Fi do seu computador e conecte-o à porta LAN do
router através de um cabo Ethernet.
6Lance um navegador web e introduza
http://cudy.net/ ou http://192.168.10.1/ na
barra de endereços. Utilize admin para obter
a palavra-passe para iniciar sessão.
Log In
http://cudy.net/
English
admin
7A janela abaixo vai aparecer, por favor siga
as instruções passo a passo para configurar a
ligação à Internet.
Aproveite a internet!
6Inicie un navegador web e ingrese
http://cudy.net/ o http://192.168.10.1/ en la
barra de direcciones. Use admin para con-
traseña para iniciar sesión.
Log In
http://cudy.net/
English
admin
7Luego, aparecerá una ventana emergente,
siga las instrucciones paso a paso para
configurar la conexión a Internet.
Disfruta de internet!
Cableado
Inalámbrico
Conecte su dispositivo al Wi-Fi del enrutador utilizando el SSID
(nombre de red) y la contraseña impresa en la parte inferior del
enrutador.
Conecte su computadora al enrutador
(con cable o inalámbrico).
Apague el Wi-Fi en su computadora y conéctelo al puerto LAN del
enrutador a través de un cable Ethernet.
Español
5
6Lancez un navigateur Web et entrez
http://cudy.net/ ou http://192.168.10.1/
dans la barre d'adresse. Utilisez admin pour
le mot de passe pour vous connecter.
Log In
http://cudy.net/
English
admin
7La fenêtre ci-dessous apparaîtra, veuillez
suivre les instructions étape par étape
pour configurer la connexion Internet.
Profitez d'Internet!
Wired
Wireless
Connect your device to the router’s Wi-Fi using the SSID (network
name) and Password printed on the bottom of the router.
Connect your computer to the router
(Wired or Wireless).
Turn off the Wi-Fi on your computer and connect it to router’s LAN
port via an Ethernet cable.
Français
5
810600161
LED y botón
Reset
Nombre Estado Indicación
WPS
Button
Mantenga presionado 2 segundos para restablecer el
enrutador a su configuración predeterminada de fábrica.
Mantenga presionado 1 segundo para habilitar la
función WPS.
OFF
Brillante
ON
OFF
ON
OFF
ON
OFF
ON
OFF
Brillante
ON
OFF
Brillante
ON
no encendido
Proceso de puesta en marcha del sistema
Inicio del sistema completo
No conectado a Internet
Conectado a Internet
Sin conexión en el puerto WAN
El puerto WAN tiene conexión
El puerto LAN no está conectado
El puerto LAN está conectado
Wifi de 2,4 GHz desactivado
WPS en proceso
Wi-Fi de 2,4 GHz activado
Wifi de 5 GHz desactivado
WPS en progreso
Wi-Fi de 5 GHz activado
Voyant et bouton
Reset
Nom Statut Indication
WPS
Button
Appuyez et maintenez enfoncé pendant 2 secondes pour
réinitialiser le routeur à ses paramètres d'usine par défaut.
Appuyez et maintenez 1 seconde pour activer la fonction
WPS.
OFF
Clignotant
ON
OFF
ON
OFF
ON
OFF
ON
OFF
Clignotant
ON
OFF
Clignotant
ON
Non alimenté
Processus de démarrage du système
Démarrage du système terminé
Non connecté à Internet
Connecté à Internet
Pas de connexion au port WAN
Le port WAN a une connexion
Le port LAN n'est pas connecté
Le port LAN est connecté
Wi-Fi 2,4GHz désactivé
WPS en cours
Wi-Fi 2,4GHz activé
Wi-Fi 5 GHz désactivé
WPS en cours
Wi-Fi 5GHz activé
LED e botão
Reset
Nome Estado Indicação
WPS
Button
Pressione e segure por 2 segundos para redefinir o
roteador para as configurações padrão de fábrica.
Pressione e segure por 1 segundo para habilitar a
função WPS.
OFF
Piscando
ON
OFF
ON
OFF
ON
OFF
ON
OFF
Piscando
ON
OFF
Piscando
ON
Não ligado
Processo de inicialização do sistema
Inicialização do sistema concluída
Não conectado à Internet
Conectado a internet
Sem conexão na porta WAN
A porta WAN tem conexão
A porta LAN não está conectada
A porta LAN está conectada
Wi-Fi de 2,4 GHz desativado
WPS em processo
Wi-Fi de 2,4 GHz ativado
Wi-Fi 5 GHz desativado
WPS em andamento
Wi-Fi 5 GHz ativado
EU Declaration of Conformity
1. English:
Cudy hereby declares that the device is in compliance with the
essential requirements and other relevant provisions of directive
2014/53/EU, directive 2011/65/EU, directive (EU) 2015/863.
The original EU declaration of conformity can be found at
http://www.cudy.com/ce.
2. Deutsch:
Cudy erklärt hiermit, dass das Gerät den grundlegenden Anforderun-
gen und anderen relevanten Bestimmungen der Richtlinie
2014/53/EU, der Richtlinie 2011/65/EU und der Richtlinie (EU)
2015/863 entspricht.
Die originale EU-Konformitätserklärung finden Sie unter
http://www.cudy.com/ce.
3. Español:
Por la presente, Cudy declara que el dispositivo cumple los requisitos
esenciales y otras disposiciones pertinentes de la directiva
2014/53/UE, la directiva 2011/65/UE, la directiva (UE) 2015/863.
La declaración de conformidad original de la UE se puede encontrar
en http://www.cudy.com/ce.
4. ltaliano:
Cudy dichiara che il dispositivo è conforme ai requisiti essenziali e alle
altre disposizioni pertinenti della direttiva 2014/53/UE, della direttiva
2011/65/UE e della direttiva (UE) 2015/863.
La dichiarazione di conformità originale dell'UE è disponibile
all'indirizzo http://www.cudy.com/ce.
5. Français:
Cudy déclare par la présente que le dispositif est conforme aux exigenc-
es essentielles et aux autres dispositions pertinentes de la directive
2014/53/UE, de la directive 2011/65/UE, de la directive (UE) 2015/863.
La déclaration de conformité originale de l'UE peut être consultée à
l'adresse suivante http://www.cudy.com/ce.
6.Ελληνικό:
Η Cudy δηλώνει ότι η συσκευή συμμορφώνεται με τις βασικές
απαιτήσεις και άλλες σχετικές διατάξεις της οδηγίας 2014/53/ΕΕ, της
οδηγίας 2011/65/ΕΕ, της οδηγίας (ΕΕ) 2015/863.
Η αρχική δήλωση συμμόρφωσης ΕΕ βρίσκεται στη διεύθυνση
http://www.cudy.com/ce.
7. Dutch:
Cudy verklaart hierbij dat het apparaat voldoet aan de essentiële eisen en
andere relevante bepalingen van Richtlijn 2014/53/EU, Richtlijn
2011/65/EU, Richtlijn (EU) 2015/863.
De originele EU-conformiteitsverklaring is te vinden op
http://www.cudy.com/ce.
8. Português:
Cudy declara que o dispositivo está em conformidade com os requisitos
essenciais e outras disposições relevantes da Diretiva 2014/53/UE,
diretiva 2011/65/UE, diretiva (UE) 2015/863.
A declaração original de conformidade da UE pode ser encontrada em
http://www.cudy.com/ce.
17. Hungarian language:
A Cudy ezúton kijelenti, hogy a készülék megfelel a 2014/53/EU irányelv,
a 2011/65/EU irányelv és az (EU) 2015/863 irányelv alapvető
követelményeinek és egyéb vonatkozó rendelkezéseinek.
Az eredeti EU-megfelelőségi nyilatkozat a következő címen érhető el
http://www.cudy.com/ce.
18. limba română:
Cudy declară prin prezenta că dispozitivul este în conformitate cu
cerințele esențiale și cu alte dispoziții relevante ale Directivei 2014/53/UE,
ale Directivei 2011/65/UE, ale Directivei (UE) 2015/863.
Declarația de conformitate originală a UE poate fi găsită la adresa
http://www.cudy.com/ce.
19. Български език:
С настоящото Cudy декларира, че устройството е в съответствие със
съществените изисквания и други съответни разпоредби на
Директива 2014/53/ЕС, Директива 2011/65/ЕС, Директива (ЕС)
2015/863.
Оригиналът на ЕС декларацията за съответствие може да бъде
намерен на адрес http://www.cudy.com/ce.
20. lietuvių kalba:
"Cudy" pareiškia, kad prietaisas atitinka esminius reikalavimus ir kitas
susijusias Direktyvos 2014/53/ES, Direktyvos 2011/65/ES, Direktyvos (ES)
2015/863 nuostatas.
ES atitikties deklaracijos originalą galima rasti adresu
http://www.cudy.com/ce.
WEEE
According to the EU Directive on Waste Electrical and Electronic
Equipment (WEEE - 2012/19 / EU), this product must not be disposed
of as normal household waste.
Instead, they should be returned to the place of purchase or taken to
a public collection point for recyclable waste. By ensuring this
product is disposed of correctly, you will help prevent potential
negative consequences for the environment and human health, which
could otherwise be caused by inappropriate waste handling of this
product. For more information, please contact your local authority or
the nearest collection point. Improper disposal of this type of waste
may result in penalties according to national regulations.
25. Eesti keel:
Cudy deklareerib käesolevaga, et seade vastab olulistele nõuetele ja
muudele direktiivi 2014/53/EL, direktiivi 2011/65/EL ja direktiivi (EL)
2015/863 asjakohastele sätetele.
ELi vastavusdeklaratsiooni originaal on kättesaadav aadressil
http://www.cudy.com/ce.
21. Українська Мова:
Цим Cudy заявляє, що пристрій відповідає основним вимогам та
іншим відповідним положенням директиви 2014/53/ЄС, директиви
2011/65/ЄС, директиви (ЄС) 2015/863.
Оригінал декларації про відповідність ЄС можна знайти за
посиланням http://www.cudy.com/ce.
22.Hrvatski:
Cudy ovime izjavljuje da je proizvod u skladu s bitnim zahtjevima i drugim
relevantnim odredbama Direktive 2014/53/EU, Direktive 2011/65/EU,
Direktive (EU) 2015/863.
Izvorna izjava EU-a o sukladnosti može se naći na
http://www.cudy.com/ce.
23. Slovenski jezik:
Podjetje Cudy izjavlja, da je pripomoček skladen z bistvenimi zahtevami in
drugimi ustreznimi določbami Direktive 2014/53/EU, Direktive
2011/65/EU in Direktive (EU) 2015/863.
Izvirna izjava EU o skladnosti je na voljo na http://www.cudy.com/ce.
24. latviešu valoda:
Ar šo Cudy paziņo, ka ierīce atbilst būtiskajām prasībām un citiem
attiecīgajiem direktīvas 2014/53/ES, direktīvas 2011/65/ES, direktīvas (ES)
2015/863 un direktīvas (ES) 2015/863 noteikumiem.
ES atbilstības deklarācijas oriģināls ir atrodams vietnē
http://www.cudy.com/ce.
9. Polski:
Cudy niniejszym oświadcza, że wyrób jest zgodny z zasadniczymi
wymaganiami i innymi odpowiednimi przepisami dyrektywy 2014/53/UE,
dyrektywy 2011/65/UE, dyrektywy (UE) 2015/863.
Oryginał deklaracji zgodności UE można znaleźć na stronie
http://www.cudy.com/ce.
10. Türkçe:
Cudy, cihazın 2014/53/EU sayılı direktif, 2011/65/EU sayılı direktif, (EU)
2015/863 sayılı direktifin temel gerekliliklerine ve diğer ilgili hükümlerine
uygun olduğunu beyan eder.
Orijinal AB uygunluk beyanı şu adreste bulunabilir:
http://www.cudy.com/ce.
11. Norsk:
Cudy erklærer herved at enheten er i samsvar med de grunnleggende
kravene og andre relevante bestemmelser i direktiv 2014/53/EU, direktiv
2011/65/EU, direktiv (EU) 2015/863.
Den opprinnelige EU-samsvarserklæringen finner du på
http://www.cudy.com/ce.
12. Dansk:
Cudy erklærer hermed, at udstyret er i overensstemmelse med de
væsentlige krav og andre relevante bestemmelser i direktiv 2014/53/EU,
direktiv 2011/65/EU, direktiv (EU) 2015/863.
Den originale EU-overensstemmelseserklæring findes på
http://www.cudy.com/ce.
13. Suomen Kieli:
Cudy vakuuttaa täten, että laite on direktiivin 2014/53/EU, direktiivin
2011/65/EU ja direktiivin (EU) 2015/863 olennaisten vaatimusten ja
muiden asiaankuuluvien säännösten mukainen.
Alkuperäinen EU-vaatimustenmukaisuusvakuutus löytyy osoitteesta
http://www.cudy.com/ce.
14. Svenska:
Cudy förklarar härmed att enheten överensstämmer med de väsentliga
kraven och andra relevanta bestämmelser i direktiv 2014/53/EU, direktiv
2011/65/EU, direktiv (EU) 2015/863.
Den ursprungliga EU-försäkran om överensstämmelse finns på
http://www.cudy.com/ce.
15. Čeština:
Cudy tímto prohlašuje, že prostředek je v souladu se základními
požadavky a dalšími příslušnými ustanoveními směrnice 2014/53/EU,
směrnice 2011/65/EU, směrnice (EU) 2015/863.
Originál EU prohlášení o shodě je k dispozici na adrese
http://www.cudy.com/ce.
16. Slovenčina:
Cudy týmto vyhlasuje, že zariadenie je v súlade so základnými
požiadavkami a ďalšími príslušnými ustanoveniami smernice 2014/53/EÚ,
smernice 2011/65/EÚ a smernice (EÚ) 2015/863.
Originál EÚ vyhlásenia o zhode možno nájsť na adrese
http://www.cudy.com/ce.
GNU General Public License Notice
The software code in this product was created by third parties and is licensed
under the GNU General Public License ("GPL"). If applicable, Cudy ("Cudy" in
this context refers to the Cudy entity offering respective software for download
or being in charge of the distribution of products that contain respective code)
makes the corresponding GPL source code available upon request via the
official website, either independently or with the assistance of third parties (such
as Shenzhen Cudy Technology Co., Ltd.).
For GPL-related questions, email support@cudy.com. In addition, Cudy offers a
GPL-Code-Centre under https://www.cudy.com/gplcodecenterdownload where
users can get the GPL source codes used in Cudy products for free. Please note,
that the GPL-Code-Centre is only provided as a courtesy to Cudy's customers
but may neither offer a full set of source codes used in all products nor always
provide the latest or actual version of such source codes.
The GPL code used in this product is subject to the copyrights of one or more
authors and is supplied WITHOUT ANY WARRANTY.
5GHz Wi-Fi: Cudy-XXXX-5G
2.4GHz Wi-Fi: Cudy-XXXX
Password: XXXXXXXX
5GHz Wi-Fi: Cudy-XXXX-5G
2.4GHz Wi-Fi: Cudy-XXXX
Password: XXXXXXXX
5GHz Wi-Fi: Cudy-XXXX-5G
2.4GHz Wi-Fi: Cudy-XXXX
Password: XXXXXXXX

FCC Caution:
This device complies with part 15 of the FCC Rules. Operation is subject to the following two conditions:(1) this device may not cause harmful interference, and (2) this device must accept any interference received, including interference that may cause
undesired operation.
Any changes or modifications not expressly approved by the party responsible for compliance could void the user's authority to operate the equipment.
NOTE: This equipment has been tested and found to comply with the limits for a Class B digital device, pursuant to Part 15 of the FCC Rules. These limits are designed to provide reasonable protection against harmful interference in a residential
installation. This equipment generates, uses and can radiate radio frequency energy and, if not installed and used in accordance with the instructions, may cause harmful interference to radio communications. However, there is no guarantee that
interference will not occur in a particular installation.
If this equipment does cause harmful interference to radio or television reception,which can be determined by turning the equipment off and on, the user is encouraged to try to correct the interference by one or more of the following measures:
-- Reorient or relocate the receiving antenna.
-- Increase the separation between the equipment and receiver.
-- Connect the equipment into an outlet on a circuit different
from that to which the receiver is connected.
-- Consult the dealer or an experienced radio/TV technician for help.
Radiation Exposure Statement
This equipment complies with FCC radiation exposure limits set forth for an uncontrolled environment. This equipment should be installed and operated with minimum distance 20cm between the radiator and your body.
-
 1
1
-
 2
2
-
 3
3


în alte limbi
- français: Cudy RT02 Guide d'installation
- English: Cudy RT02 Installation guide
- italiano: Cudy RT02 Guida d'installazione
- português: Cudy RT02 Guia de instalação