Neomounts FPMA-MOBILE1800 Manual de utilizare
- Tip
- Manual de utilizare

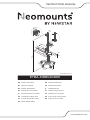
Ø 250
257
175
180
Ø 75
Ø 700
081
Ø 40
+90°+90°
-
90°
-
90°
0°
0°
321 117
56 120~208
449
475~730
214
0581
10°
25°
10°
25°
±80
°
±80
°
INSTRUCTION MANUAL
WWW.NEOMOUNTS.COM
FPMA-MOBILE1800
EN
NL
DE
FR
IT
ES
PT
DK
NO
SE
FI
PL
CS
SK
RO
Mobile workstation
Mobiele werkplek
Mobiler Arbeitsplatz
Station de travail mobile
Postazione di lavoro mobile
Estación de trabajo móvil
Estação de trabalho móvel
Mobil arbejdsstation
Mobil arbeidstasjon
Mobil arbetsstation
Mobiilityöasema
Mobilna stacja robocza
Mobilní pracovní stanice
Prenosná pracovná plocha
Stație de lucru mobilă
Measuring unit: mm

Assemble the base
Monteer de voet
Zusammenbauen des Fußes
Assemblez la base du pied
Montare la base
Montar la base
Montar a base
Złóż podstawę
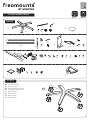
PARTS
EN
NL
DE
FR
IT
ES
PT
PL
FPMA-MOBILE1800
Tool
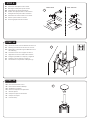
STEP 1
Screen size
VESA
Weight capacity
Tilt
Swivel
Rotate
Height
Depth
Gas spring
Curved screen compatible
Quick-release VESA
Top-x clamp
180° lock system
Handlebar
Crossbar
Cable management
Screen size
VESA
Weight capacity
Tilt
Swivel
Rotate
Height
Depth
Gas spring
Curved screen compatible
Quick-release VESA
Top-x clamp
180° lock system
Handlebar
Crossbar
Cable management
0-6 kg |
0-13,2 lbs
Screen size
VESA
Weight capacity
Tilt
Swivel
Rotate
Height
Depth
Gas spring
Curved screen compatible
Quick-release VESA
Top-x clamp
180° lock system
Handlebar
Crossbar
Cable management
Screen size
VESA
Weight capacity
Tilt
Swivel
Rotate
Height
Depth
Gas spring
Curved screen compatible
Quick-release VESA
Top-x clamp
180° lock system
Handlebar
Crossbar
Cable management
75x75 -
100x100 mm
A. B.
C. D.
E.
F. G.
A
(x1) (x1) (x1) (x3) (x2)
(x2)(x1)
(x1) set
(x1)
(x1)
(x4) (x5)
2 mm
(x1)
(x1) (x2) set
(x4)
(x1) (x2)
(x1) set
(x1) set (x2) (x2) (x1) (x1) (x1) (x2) (x2) (x1)
(x1) (x1) (x1) (x8) (x1) (x1)
(x3)
(x2)

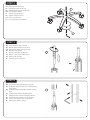
Attach the pole to the base
Bevestig de stang aan de voet
Befestigung der Stange an der Basis
Fixez le tube à la base
Attaccare il palo alla base
Adjunte el poste a la base
Anexe o poste à base
Przymocuj słupek do podstawy
Mount the upper side of the rod
Monteer de bovenzde van de stang
Montage der oberen Seite der Stange
Monter le haut du tube
Montare il lato superiore dell’asta
Montar la parte superior de la barra
Monte o topo da haste
Zamontuj górną stronę pręta
Connect the upper pole with the lower pole
Verbind het bovenste deel met het onderste deel
van de stang
Verbinden Sie den oberen Mast mit dem unteren
Mast
Enlez le tube supérieur au pôle inférieur
Collegare il palo superiore con il palo inferiore
Conecte el poste superior con el polo inferior
Ligue o poste superior com o polo inferior
Połącz górny słupek z dolnym
EN
NL
DE
FR
IT
ES
PT
PL
EN
NL
DE
FR
IT
ES
PT
PL
EN
NL
DE
FR
IT
ES
PT
PL
STEP 2
STEP 3
STEP 4
A
B
C
C

Assemble the PC holder and adjust depth if necessary
Monteer de PC-houder en pas de diepte zonodig aan
Anbringen des PC-Halters und Einstellungen der Tiefe
Réassemblez la grande plaque sur la petite plaque en
ajustant l’écartement en fonction de la largeur du PC et
insérrez les 2 bretelles sur la plaque
Assemblare il supporto PC e regolare la profondità se
necessario
Ensamble el soportedel ordenador y ajuste la profundidad
si es necesario
Monte o suporte do computador e ajuste a profundidade
se necessário
Złóż uchwyt do PC i w razie potrzeby dostosuj głębokość
Install the keyboard holder and mouse support and apply
the ergonomic foam
Installeer de toetsenbordhouder en muissteun en breng
het ergonomisch schuim aan
IInstallieren Sie den Tastaturhalter und die Maushalterung
und bringen Sie den ergonomischen Schaumstoff an
Installez le support de clavier et le support de souris et appli-
quez la mousse ergonomique
Installare il supporto per la tastiera e il supporto per il mouse
e applicare la schiuma ergonomica
Instale el soporte del teclado y el soporte del ratón y aplique
la espuma ergonómica
Instalar o suporte do teclado e o suporte do rato e aplicar
a espuma ergonómica
Zainstaluj uchwyt na klawiaturę i podpórkę na mysz oraz
nałóż piankę ergonomiczną
EN
NL
DE
FR
IT
ES
PT
PL
EN
NL
DE
FR
IT
ES
PT
PL
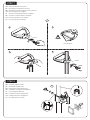
STEP 5
STEP 6
1
2
3
D
E

STEP 7
Attach the handle to the mount
Bevestig de handgreep aan de steun
Befestigen des Führungsholms an der Halterung
Fixez la poignée sur le support
Attaccare la maniglia della barra al supporto
Conecte la man a de la barra al soporte
Prenda a alça da barra ao suporte
Przymocuj rączkę do uchwytu
EN
NL
DE
FR
IT
ES
PT
PL
Tighten
G
Loosen
1
This side down
2
34
Install the adapter bracket
Bevestig de adapter steun
Montage die Halterungsschienen
Installation des supports d’adaptateur
Il montaggio del adattatore
Instalación de brazos adaptadores
Instalação de braços adaptadores
Zainstaluj ramiona uchwytu
EN
NL
DE
FR
IT
ES
PT
PL
STEP 8
F

Attach the screen onto the bracket and secure it
Bevestig het scherm aan de steun en zet vast
Befestigung und Sicherung des Bildschirmes an
die Halterung
Accrochez l’écran sur le support et xez-le
Appendere lo schermo sulla staffa e ssarlo
Cuelgue la pantalla en el soporte y asegúrela
Pendure a tela no suporte e prenda-a
Zawieś ekran na wsporniku i zabezpiecz go
Place the decorative covers
Plaats de decoratieve afdekkap
Abdeckung montieren
Placez les capuchons de protection
Metti le coperte
Coloque las tapas de la cubierta
Coloque as tampas
Umieść osłony
EN
NL
DE
FR
IT
ES
PT
PL
EN
NL
DE
FR
IT
ES
PT
PL
STEP 10
STEP 11
E
F
Attach the VESA plate to the monitor
Bevestig de VESA plaat op de monitor
VESA Platte am Monitor befestigen
Fixation de la plaque VESA sur le moniteur
Collegamento del piatto VESA al monitor
Colocación de la Placa VESA en el monitor
Colocar a placa VESA no monitor
Zamontuj płytki VESA do monitora
EN
NL
DE
FR
IT
ES
PT
PL
STEP 9
VESA 75x75 VESA 100x100
F


-
 1
1
-
 2
2
-
 3
3
-
 4
4
-
 5
5
-
 6
6
-
 7
7
-
 8
8


Neomounts FPMA-MOBILE1800 Manual de utilizare
- Tip
- Manual de utilizare
în alte limbi
Alte documente
-
Sanus SD115 Ghid de instalare
-
Sanus Systems SD103 Manual de utilizare
-
-
Newstar NM-D335BLACK 10-30�� Manualul proprietarului
-
Yamaha YTS-F500 Manual de utilizare
-
-
OmniMount WM4-L Manual de utilizare
-
Konig Electronic TVS-KN-FSB500 Manualul proprietarului
-
Konig Electronic TVS-KN-SPK100S Manual de utilizare