HOTPOINT/ARISTON PKL 641 IX/HA Manualul utilizatorului
- Tip
- Manualul utilizatorului

English
Operating Instructions
HOB
Contents
Operating Instructions,1
Warnings,2
Assistance,5
Description of the appliance,6
Installation,8
Start-up and use,12
Precautions and tips,12
Maintenance and care,13
Troubleshooting,13
PKL 641 IX/HA
Русскии
Руководство по эксплуатации
ВАРОЧНАЯ ПАНЕЛЬ
Українська
Інструкція по використанню
ВАРИЛЬНА ПОВЕРХНЯ
Қазақша
Пайдалану нұсқаулығы
ПЛИТА
Română
Instrucţiuni de utilizare
HOB
Sumar
Instrucţiuni de utilizare,1
Avertismente,3
Asistenţă,5
Descrierea aparatului,6
Instalarea,15
Pornirea şi folosirea,19
Precauţii şi sfaturi,19
Întreţinerea şi îngrijirea,20
Depanarea,20
Зміст
Інструкція по використанню,1
Попередження,3
Допомога,5
Опис приладу,6
Встановлення,22
Підключення й використання,26
Застереження й поради,26
Обслуговування та догляд,27
Пошук і усунення несправностей,28
Содержание
Руководство по эксплуатации,1
Предупреждения,4
Сервисное обслуживание,5
Описание изделия,6
Установка,29
Включение и эксплуатация,33
Предосторожности и рекомендации,33
Техническое обслуживание и уход,34
Неисправности и методы их устранения,35
Мазмұны
Пайдалану нұсқаулығы,1
Ескертулер,4
Көмек,5
Құрылғы сипаттамасы,7
Орнату,36
Қосу және пайдалану,40
Сақтандырулар мен кеңестер,40
Жөндеу және күтім,41
Ақаулықтарды жою,42

2
Avvertenze
ATTENZIONE: Questo apparecchio e le sue parti
accessibili diventano molto caldi durante l’uso.
Bisogna fare attenzione ed evitare di toccare gli
elementi riscaldanti. Tenere lontani i bambini inferiori
agli 8 anni se non continuamente sorvegliati. Il
presente apparecchio può essere utilizzato dai
bambini a partire dagli 8 anni e da persone con
ridotte capacità siche, sensoriali o mentali oppure
con mancanza di esperienza e di conoscenza se
si trovano sotto adeguata sorveglianza oppure se
sono stati istruiti circa l’uso dell’apparecchio in modo
sicuro e se si rendono conto dei pericoli correlati. I
bambini non devono giocare con l’apparecchio. Le
operazioni di pulizia e di manutenzione non devono
essere effettuate dai bambini senza sorveglianza.
ATTENZIONE: Lasciare un fornello incustodito con
grassi e olii può essere pericoloso e può provocare un
incendio. Non bisogna MAI tentare di spegnere una
amma/incendio con acqua, bensì bisogna spegnere
l’apparecchio e coprire la amma per esempio con
un coperchio o con una coperta ignifuga.
ATTENZIONE: Rischio di incendio: non lasciare
oggetti sulle superci di cottura.
Non utilizzare mai pulitori a vapore o ad alta pressione
per la pulizia dell’apparecchio.
Eliminare eventuali liquidi presenti sul coperchio
prima di aprirlo. Non chiudere il coperchio in vetro
(se presente) con i bruciatori gas o la piastra elettrica
ancora caldi.
L’apparecchio non è destinato a essere messo in
funzione per mezzo di un temporizzatore esterno
oppure di un sistema di comando a distanza
separato.
ATTENZIONE: l’uso di protezioni del piano
inappropriate può causare incidenti.
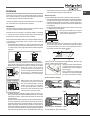
Warnings
WARNING: The appliance and its accessible parts
become hot during use. Care should be taken to
avoid touching heating elements. Children less than 8
years of age shall be kept away unless continuously
supervised. This appliance can be used by children
aged from 8 years and above and persons with
reduced physical, sensory or mental capabilities or
lack of experience and knowledge if they have been
given supervision or instruction concerning use of the
appliance in a safe way and understand the hazards
involved. Children shall not play with the appliance.
Cleaning and user maintenance shall not be made
by children without supervision.
WARNING: Unattended cooking on a hob with fat or
oil can be dangerous and may result in re. NEVER
try to extinguish a re with water, but switch off the
appliance and then cover ame e.g. with a lid or a
re blanket.
WARNING: Danger of re: do not store items on the
cooking surfaces.
Never use steam cleaners or pressure cleaners on
the appliance.
Remove any liquid from the lid before opening it. Do
not close the glass cover (if present) when the gas
burners or electric hotplates are still hot.
The appliance is not intended to be operated by
means of an external timer or separate remote
control system.
CAUTION: the use of inappropriate hob guards can
cause accidents.

3
Avertismente
ATENŢIE: Acest aparat şi părţile sale accesibile devin
foarte calde în timpul folosirii.Trebuie să ţi atenţi şi să
nu atingeţi elementele de încălzire.Îndepărtaţi copiii
sub 8 ani dacă nu sunt supravegheaţi continuu.Acest
aparat poate utilizat de copiii de peste 8 ani şi de
persoane cu capacităţi zice, senzoriale sau mentale
reduse sau fără experienţă şi cunoştinţe dacă se
află sub o supraveghere corespunzătoare sau
dacă au fost instruiţi cu privire la folosirea aparatului
în mod sigur şi dacă îşi dau seama de pericolele
corelate. Copiii nu trebuie să se joace cu aparatul.
Operaţiunile de curăţare şi de întreţinere nu trebuie
să e efectuate de copii fără supraveghere.
AVERTISMENT: Gătitul nesupravegheat pe o plită cu
grăsime sau ulei poate periculos şi poate lua foc.
Nu încercaţi NICIODATĂ să stingeţi focul cu apă, ci
opriţi aparatul şi apoi acoperiţi acăra, de exemplu,
cu un capac sau cu o pătură de incendiu.
AVERTISMENT: Pericol de incendiu: nu păstraţi
articole pe suprafeţele de gătit.
Nu folosiţi niciodată produse de curăţare cu aburi
sau sub presiune pe aparat.
Îndepărtaţi orice lichid de pe capac înainte de a-l
deschide. Nu închideţi capacul de sticlă (dacă există)
când arzătoarele pe gaz sau plitele electrice sunt
încă erbinţi.
Aparatul nu este conceput să funcţioneze prin
intermediul unui temporizator extern sau a unui
sistem separat de control la distanţă.
ATENŢIE: Utilizarea unor protecţii nepotrivite ale plitei
poate provoca accidente.
Попередження
УВАГА! Прилад і його доступні частини
нагріваються під час роботи. Будьте обережні й
не торкайтеся нагрівальних елементів. Діти до 8
років мають знаходитися від плити на безпечній
відстані або під безперервним наглядом з боку
дорослих. Цей прилад може використовуватися
дітьми у віці від 8 років і старше та особами
з обмеженими фізичними, сенсорними або
розумовими здібностями, або при відсутності
досвіду й знань, тільки якщо вони перебувають
під наглядом або проінструктовані з питань
безпечного використання приладу й розуміють
ризик, якому піддаються. Діти не повинні гратися
з приладом. Очищення та догляд за приладом
може виконуватися дітьми лише під безперервним
наглядом з боку дорослих
УВАГА! Готування їжі на плиті без догляду
з використанням жиру або олії може бути
небезпечним і призвести до загоряння. НІ В
ЯКОМУ РАЗІ не намагайтеся гасити пожежу
водою. Вимкніть прилад і потім накрийте полум’я,
наприклад, кришкою або протипожежною
ковдрою.
УВАГА! Небезпека пожежі: не складуйте речі на
варильній поверхні.
Для очищення приладу ніколи не користуйтеся
паровими пристроями або пристроями під тиском.
Перш ніж відкривати кришку, протріть її насухо.
Не закривайте скляну кришку (в разі її наявності),
коли газові або електричні конфорки ще гарячі.
Прилад не призначений для функціонування в
комбінації із зовнішнім таймером або окремою
системою дистанційного управління.
ЗАСТЕРЕЖЕННЯ: Використання невідповідного
захисту варильної поверхні може стати причиною
нещасного випадку.

4
Предупреждения
ВНИМАНИЕ: Данное изделие и его доступные
комплектующие сильно нагреваются в процессе
эксплуатации. Будьте осторожны и не касайтесь
нагревательных элементов. Не разрешайте
детям младше 8 лет приближаться к изделию
без контроля. Данное изделие может быть
использовано детьми старше 8 лет и лицами с
ограниченными физическими, сенсорными или
умственными способностями или без опыта и
знания о правилах использования изделия при
условии надлежащего контроля или обучения
безопасному использованию изделия с учетом
соответствующих рисков. Не разрешайте
детям играть с изделием. Не разрешайте детям
осуществлять чистку и уход за изделием без
контроля взрослых.
Никогда не используйте паровые чистящие
агрегаты или агрегаты под высоким давлением
для чистки изделия.
Удалите жидкость из крышки перед открытием.
Не закрывать стеклянную крышку (если имеется)
с газовыми горелками или электрическая плита
еще горячая.
ВНИМАНИЕ: Использование несоответствующих
план защиты может привести к несчастным
случаям.
Ескертулер
ЕСКЕРТУ: Құрылғы мен оның қол жететін
бөліктері жұмыс кезінде қызуы мүмкін. Қыздыру
элементтеріне тимеуге назар аударыңыз. 8-ге
толмаған балаларға үздіксіз бақылау болмаса,
құрылғыдан аулақ ұстау керек. Бұл құрылғыны
қауіпсіз түрде қолдану бойынша кеңес не нұсқау
берілген және ықтимал қауіп-қатерлерді түсінетін
жағдайда, оны 8-ге толған балалар мен дене,
сезіну немесе ой қабілеті төмен немесе тәжірибесі
мен білімі жеткіліксіз адамдар қолдана алады.
Балаларға құрылғымен ойнауға болмайды.
Балаларға бақылаусыз құрылғыны тазалауға
және оған қызмет көрсетуге болмайды.
ЕСКЕРТУ: Плитада майға тамақ пісірген кезде
бақылап тұрмау қауіпті болуы және өрт шығуға
әкелуі мүмкін. Өртті ЕШҚАШАН сумен өшіруші
болмаңыз, оның орнына құрылғыны өшіріп,
жалынды жабыңыз, мысалы қақпақпен немесе
өртенбейтін матамен.
ЕСКЕРТУ: Өрт қаупі бар: пісіру беттерінде
заттарды сақтамаңыз.
Құрылғыда ешқашан бу тазартқышты немесе
шаңсорғышты пайдаланбаңыз.
Қақпақты ашпас бұрын ондағы сұйықтықты
сүртіп алыңыз. Шыны қақпақты (бар болса) газ
оттықтары немесе электр плиталар әлі ыстық
болған кезде жаппаңыз.
Құрылғы сыртқы таймермен немесе бөлек
қашықтан басқару жүйесімен басқарылуға
арналмаған.
АБАЙ БОЛЫҢЫЗ: сәйкес келмейтін
конфоркалардың қорғану құралдарын пайдалану
жазатайым оқиғаларға себеп болуы мүмкін.

5
Assistenza
Comunicare:
• il tipo di anomalia
• il modello della macchina (Mod.)
• il numero di serie (S/N)
Queste ultime informazioni si trovano sulla targhetta caratteristiche posta
sull’apparecchio.
Non ricorrete mai a tecnici non autorizzati e rifiutate sempre
l’installazione di pezzi di ricambio non originali.
Assistenza Attiva 7 giorni su 7
Se nasce il bisogno di assistenza o manutenzione basta chiamare il Numero
Unico Nazionale 199.199.199* per essere messi subito in contatto con il Centro
Assistenza Tecnica più vicino al luogo da cui si chiama.
È attivo 7 giorni su 7, sabato e domenica compresi, e non lascia mai inascoltata
una richiesta.
Estensione di garanzia Airbag
Airbag è il servizio esclusivo creato da Ariston che integra e prolunga nel
tempo i contenuti della garanzia standard: con una modica cifra protegge
il cliente da ogni imprevisto riguardante l’assistenza e la manutenzione
dell’elettrodomestico. Per i 5 anni successivi alla data di acquisto il cliente
che aderisce al programma Airbag avrà diritto gratuitamente a:
• l’intervento entro 48 ore dalla chiamata;
• il contributo per spese di trasferta del Tecnico (diritto di chiamata);
• la manodopera;
• le parti di ricambio originali;
• il trasporto dell’elettrodomestico non riparabile in loco.
Inoltre, qualora l’elettrodomestico non sia riparabile la garanzia prevede
la sostituzione a prezzo agevolato in funzione dell’anzianità del prodotto.
* Al costo di 14,25 centesimi di Euro al minuto (iva inclusa) dal Lun. al Ven.
dalle 08:00 alle 18:30, il Sab. dalle 08:00 alle 13:00 e di 5,58 centesimi di
Euro al minuto (iva inclusa) dal Lun. al Ven. dalle 18:30 alle 08:00, il Sab. dalle
13:00 alle 08:00 e i giorni festivi, per chi chiama dal telefono sso.
Per chi chiama da radiomobile le tariffe sono legate al piano tariffario
dell’operatore telefonico utilizzato.
Le suddette tariffe potrebbero essere soggette a variazione da parte
dell’operatore telefonico; per maggiori informazioni consultare il sito www.
aristonchannel.com.
Assistance
Communicating:
• the type of problem encountered.
• appliance model (Mod.)
• serial number (S/N)
This information is found on the data plate located on the appliance and/or
on the packaging.
Asistenţă
Comunicaţi:
• tipul de anomalie
• modelul aparatului (Mod.)
• numărul de serie (S/N)
Această informaţie se aă pe plăcuţa cu date amplasată pe aparat şi/sau
pe ambalaj.
Допомога
Cлiд повiдомити:
• тип неисправнoсти
• модель приладу (Mod.)
• серійний номер (S/N)
Цю інформацію можна знайти на табличці з характеристиками, яка
розташована на холодильному відділенні внизу ліворуч.
Сервисное обслуживание
Перед тем как обратиться в Центр Технического Обслуживания:
• тип неисправности
• модель изделия (Мод.)
• номер тех. паспорта (серииныи №)
Эти данные вы наидете на паспортнои табличке, расположеннои на
изделии.
Көмек
Байланыс ақпараты:
• туындаған проблема түрі.
• құрылғының моделі (Мод.).
• сериялық нөмірі (С/н).
Бұл ақпарат құрылғыда орнатылған деректеме кестесінде немесе
орамадан табылуы мүмкін.

6
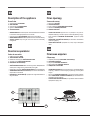
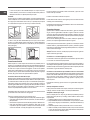
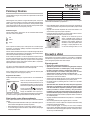
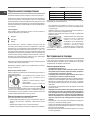
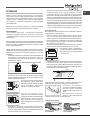
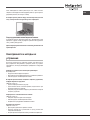
Description of the appliance
Overall view
1. Support Grid for COOKWARE
2. GAS BURNERS
3. Control Knobs for GAS BURNERS
4. Ignition for GAS BURNERS
5. SAFETY DEVICES
• GAS BURNERS differ in size and power. Use the diameter of the cookware
to choose the most appropriate burner to cook with.
• Control Knobs for GAS BURNERS adjust the size of the ame.
• GAS BURNER IGNITION enables a specic burner to be lit automatically.
• SAFETY DEVICE stops the gas flow if the flame is accidentally
extinguished.
Descrierea aparatului
Vedere de ansamblu
1. Grătar suport pentru VASE
2. ARZĂTOARELE DE GAZE
3. Butoane de control pentru ARZĂTOARE DE GAZE
4. Aprindere pentru ARZĂTOARE DE GAZE
5. DISPOZITIVE DE SIGURANŢĂ
• ARZĂTOARELE DE GAZE diferă ca mărime şi putere. Utilizaţi diametrul
vaselor pentru a alege cel mai potrivit arzător pentru gătit.
• Butoane de control pentru ARZĂTOARE DE GAZE pentru reglarea ăcării.
• APRINDEREA ARZĂTORULUI CU GAZ permite unui anumit arzător să
se aprindă în mod automat.
• DISPOZITIVUL DE SIGURANŢĂ opreşte uxul de gaz dacă acăra se
stinge accidental.
Опис приладу
Загальний вигляд
1. Решітка для ПОСУДУ
2. ГАЗОВІ КОНФОРКИ
3. Ручки управління ГАЗОВИМИ КОНФОРКАМИ
4. Запальник ГАЗОВИХ КОНФОРОК
5. ЗАХИСНІ ПРИСТРОЇ
• ГАЗОВІ КОНФОРКИ відрізняються за розміром й потужністю.
Обирайте конфорку, на який готувати, залежно від діаметру посуду.
• Ручки управління ГАЗОВИМИ КОНФОРКАМИ регулюють розмір
полум’я.
• ЗАПАЛЬНИК ГАЗОВОЇ КОНФОРКИ дає можливість автоматично
запалити конфорку.
• ЗАХИСНИЙ ПРИСТРІЙ перекриває газ, якщо полум’я випадково
гасне.
Описание изделия
Общии вид
1. Опорные решетки для КАСТРЮЛЬ И СКОВОРОД
2. ГАЗОВЫЕ КОНФОРКИ
3. Регуляторы ГАЗОВЫХ КОНФОРОК
4. Свеча зажигания ГАЗОВЫХ ГОРЕЛОК
5. ЗАЩИТНОЕ УСТРОЙСТВО
• ГАЗОВЫЕ КОНФОРКИ имеют разную мощность и размер. Выберите
конфорку, наиболее соответствующую диаметру используемой
посуды.
• Регуляторы ГАЗОВЫХ КОНФОРОК служат для регуляции пламени.
• Свеча ЗАЖИГАНИЯ ГАЗОВЫХ КОНФОРОК для автоматического
зажигания нужной конфорки.
• УСТРОЙСТВО БЕЗОПАСНОСТИ при случайном гашении пламени
перекрывает подачу газа.
1
3
2
5
4

7
Құрылғы сипаттамасы
Жалпы шолу
1. ЫДЫСТАРҒА арналған тіреуіш тор
2. ГАЗ ОТТЫҚТАРЫ
3. ГАЗ ОТТЫҚТАРЫНЫҢ басқару тұтқалары
4. ГАЗ ОТТЫҚТАРЫНЫҢ тұтату құралы
5. ҚАУІПСІЗДІК ҚҰРЫЛҒЫЛАРЫ
• ГАЗ ОТТЫҚТАРЫ өлшемі мен қуатына қарай әртүрлі болады. Тамақ
пісіру үшін тиісті оттықты ыдыстың диаметріне қарай таңдаңыз.
• ГАЗ ОТТЫҚТАРЫ басқару тұтқалары жалын қуатын.
• ГАЗ ОТТЫҒЫНЫҢ ТҰТАТУ ҚҰРАЛЫ белгілі бір оттықты автоматты
түрде жандыруға мүмкіндік береді.
• ҚАУІПСІЗДІК ҚҰРЫЛҒЫСЫ жалын байқаусыз өшірілсе, газ ағынын
тоқтатады.

8
GB
Installation
! Before operating your new appliance please read this instruction booklet
carefully. It contains important information for safe use, installation and care
of the appliance.
! Please keep these operating instructions for future reference. Pass them on
to possible new owners of the appliance.
Positioning
! Keep packaging material out of the reach of children. It can become a choking
or suffocation hazard (see Precautions and tips).
! The appliance must be installed by a qualied professional according to the
instructions provided. Incorrect installation may cause harm to people and
animals or may damage property.
! This unit may be installed and used only in permanently ventilated rooms
in accordance with current national regulations. The following requirements
must be observed:
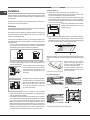
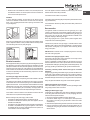
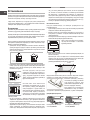
• The room must be equipped with an air extraction system that expels
any combustion fumes. This may consist of a hood or an electric fan that
automatically starts each time the appliance is switched on.
In a chimney stack or branched flue.
(exclusively for cooking appliances)
Directly to
the Outside
• The room must also allow proper air circulation, as air is needed for
combustion to occur normally. The ow of air must not be less than 2 m
3
/h
per kW of installed power.
The air circulation system may take air directly
from the outside by means of a pipe with an
inner cross section of at least 100 cm
2
; the
opening must not be vulnerable to any type
of blockages.
The system can also provide the air needed for
combustion indirectly, i.e. from adjacent rooms
tted with air circulation tubes as described
above. However, these rooms must not be
communal rooms, bedrooms or rooms that
may present a re hazard.
• Intensive and prolonged use of the appliance may necessitate
supplemental ventilation, e.g. opening a window or increasing the power
of the air intake system (if present).
• Liquid petroleum gas sinks to the oor as it is heavier than air. Therefore,
rooms containing LPG cylinders must also be equipped with vents to allow
gas to escape in the event of a leak. As a result LPG cylinders, whether
partially or completely full, must not be installed or stored in rooms or
storage areas that are below ground level (cellars, etc.). It is advisable to
keep only the cylinder being used in the room, positioned so that it is not
subject to heat produced by external sources (ovens, replaces, stoves,
etc. ) which could raise the temperature of the cylinder above 50°C.
A
Examples of
ventilation holes
for comburant air.
Enlarging the ventilation slot
between window and floor.
Adjacent
Room
Room to be
Vented
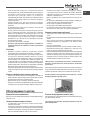
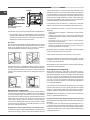
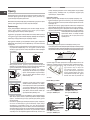
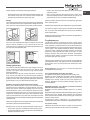
Fitting the appliance
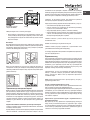
The following precautions must be taken when installing the hob:
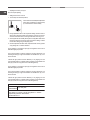
• Kitchen cabinets adjacent to the appliance and taller than the top of the
hob must be at least 200 mm from the edge of the hob.
• Hoods must be installed according to their relative installation instruction
manuals and at a minimum distance of 650 mm from the hob (see gure).
• Place the wall cabinets adjacent to the hood at a minimum height of 420
mm from the hob (see gure).
If the hob is installed beneath a wall cabinet,
the latter must be situated at a minimum of 700
mm above the hob.
• The installation cavity should have the dimensions indicated in the gure.
Fastening hooks are provided, allowing you to fasten the hob to tops that
are between 20 and 40 mm thick. To ensure the hob is securely fastened
to the top, we recommend you use all the hooks provided.
555 mm
55 mm
475 mm
Before the installation remove the grids and burners from the hob and turn it
upside down, making sure you don’t damage the thermocouples and spark
plugs.
Apply the seals that come with the
appliance along the outer edges of
the hob to prevent any passage of air,
humidity and water (see Figure).
For proper application make sure the
surfaces to be sealed are clean, dry and
free of any grease/oil.
Hook fastening diagram
Hooking position for top H=20mm Hooking position for top H=30mm
Front
Hooking position for top H=40mm Back
! Use the hooks contained in the “accessory pack”.
600mm min.
420mm min.
650mm min.

GB
9
• Where the hob is not installed over a built-in oven, a wooden panel must
be installed as insulation. This must be placed at a minimum distance of
20 mm from the lower part of the hob.
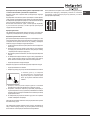
Ventilation
To ensure adequate ventilation, the back panel of the cabinet must be
removed. It is advisable to install the oven so that it rests on two strips of
wood, or on a completely at surface with an opening of at least 45 x 560
mm (see diagrams).
560 mm.
45 mm.
Where a hob is installed above an oven without a forced ventilation cooling
system, adequate ventilation must be provided inside the cabinet by means
of air holes through which air can pass (see gure).
Electrical connection
Hobs equipped with a three-pole power supply cable are designed to operate
with alternating current at the voltage and frequency indicated on the data
plate (this is located on the lower part of the appliance). The earth wire in the
cable has a green and yellow cover. If the appliance is to be installed above
a built-in electric oven, the electrical connection of the hob and the oven must
be carried out separately, both for electrical safety purposes and to make
extracting the oven easier.
Connecting the supply cable to the mains
Install a standardised plug corresponding to the load indicated on the data
plate.
The appliance must be directly connected to the mains using an omnipolar
circuit-breaker with a minimum contact opening of 3 mm installed between the
appliance and the mains. The circuit-breaker must be suitable for the charge
indicated and must comply with current electrical regulations (the earthing
wire must not be interrupted by the circuit-breaker). The supply cable must
not come into contact with surfaces with temperatures higher than 50°C.
! The installer must ensure that the correct electrical connection has been
made and that it is compliant with safety regulations.
Before connecting to the power supply, make sure that:
• the appliance is earthed and the plug is compliant with the law.
• the socket can withstand the maximum power of the appliance, which is
indicated on the data plate.
• the voltage is in the range between the values indicated on the data plate.
• the socket is compatible with the plug of the appliance. If the socket is
incompatible with the plug, ask an authorised technician to replace it. Do
not use extension cords or multiple sockets.
! Once the appliance has been installed, the power supply cable and the
electrical socket must be easily accessible.
! The cable must not be bent or compressed.
! The cable must be checked regularly and replaced by authorised technicians
only (see Assistance).
! The manufacturer declines any liability should these safety measures not
be observed.
Gas connection
The appliance should be connected to the main gas supply or to a gas
cylinder in compliance with current national regulations. Before carrying out
the connection, make sure the cooker is compatible with the gas supply you
wish to use. If this is not the case, follow the instructions indicated in the
paragraph “Adapting to different types of gas.”
When using liquid gas from a cylinder, install a pressure regulator which
complies with current national regulations.
! Check that the pressure of the gas supply is consistent with the values
indicated in Table 1 (“Burner and nozzle specications”). This will ensure the
safe operation and longevity of your appliance while maintaining efcient
energy consumption.
Attention! Before connection remove a transport plug from the connecting
hole of the cooker gas pipeline.
Connection with a rigid pipe (copper or steel)
! Connection to the gas system must be carried out in such a way as not to
place any strain of any kind on the appliance.
There is an adjustable L-shaped pipe tting on the appliance supply ramp
and this is tted with a seal in order to prevent leaks. The seal must always
be replaced after rotating the pipe tting (seal provided with appliance). The
gas supply pipe tting is a threaded 1/2 gas cylindrical male attachment.
Connecting a flexible jointless stainless steel pipe to a threaded
attachment
The gas supply pipe tting is a threaded 1/2 gas cylindrical male attachment.
These pipes must be installed so that they are never longer than 2000 mm
when fully extended. Once connection has been carried out, make sure that
the exible metal pipe does not touch any moving parts and is not compressed.
! Only use pipes and seals that comply with current national regulations.
Checking the tightness of the connection
! When the installation process is complete, check the pipe ttings for leaks
using a soapy solution. Never use a ame.
Adapting to different types of gas
To adapt the hob to a different type of gas other than default type (indicated
on the rating plate at the base of the hob or on the packaging), the burner
nozzles should be replaced as follows:
1. Remove the hob grids and slide the burners off their seats.
2. Unscrew the nozzles using a 7 mm socket spanner, and replace them
with nozzles for the new type of gas (see table 1 “Burner and nozzle
characteristics”).
3. Reassemble the parts following the above procedure in the reverse order.
4. Once this procedure is nished, replace the old rating sticker with one
indicating the new type of gas used. Sticker are available from any of our
Service Centres.

10
GB
• Adjusting the burners’ primary air
Does not require adjusting.
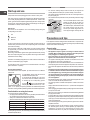
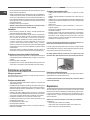
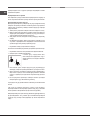
• Setting the burners to minimum
1. Turn the tap to the low ame position;
2. Remove the knob and adjust the adjustment
screw, which is positioned in or next to the tap
pin, until the ame is small but steady.
3. Having adjusted the ame to the required low setting, while the burner is
alight, quickly change the position of the knob from minimum to maximum
and vice versa several times, checking that the ame does not go out.
4. Some appliances have a safety device (thermocouple) tted. If the device
fails to work when the burners are set to the low ame setting, increase
this low ame setting using the adjusting screw.
5. Once the adjustment has been made, replace the seals on the by-passes
using sealing wax or a similar substance.
! If the appliance is connected to liquid gas, the regulation screw must be
fastened as tightly as possible.
! Once this procedure is nished, replace the old rating sticker with one
indicating the new type of gas used. Stickers are available from any of our
Service Centres.
! Should the gas pressure used be different (or vary slightly) from the
recommended pressure, a suitable pressure regulator must be tted to the
inlet pipe (in order to comply with current national regulations).
Electrical
connections
DATA PLATE
ECODESIGN
see data plate
This appliance conforms to the EU Regulation no. 66/2014
implementing Directive 2009/125/EC.
standard EN 30-2-1

GB
11
R
S
S
A
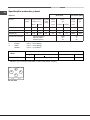
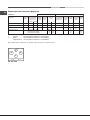
PKL 641 IX/HA
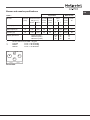
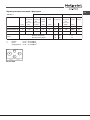
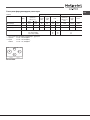
Ta
ble 1 Liquid Gas Natural Gas
Nominal (mbar)
Minimum (mbar)
Maximum (mbar)
37
25
45
28-30
20
35
20
17
25
Rapid (R)
Semi Rapid (S)
Auxiliary (A)
Supply pressures
Burner
Diameter
(mm)
Thermal Power
kW (p.c.s.*)
100
75
55
3.00
1.65
1.00
Nomin. Reduc.
0.70
0.40
0.40
By-pass
1/100
(mm)
39
28
28
Nozzle
1/100
(mm)
Flow*
g/h
***
86
64
50
Nozzle
1/100
(mm)
Flow*
l/h
132(H3)
96(Z)
79(6)
286
157
95
218
120
73
**
214
118
71
* At 15°C and 1013,25 mbar - dry gas
** Propane P.C.S. = 50.37 MJ/Kg
*** Butane P.C.S. = 49.47 MJ/Kg
Natural P.C.S. = 37.78 MJ/m
Burner and nozzle specifications
3

12
GB
Start-up and use
! The position of the corresponding gas burner is shown on every knob.
Gas cooker hobs are equipped with discrete power adjustment that allows
for accurately adjusting the ame to 5 different power levels. Thanks to this
system, gas hobs are also capable of guaranteeing the same cooking results
for each recipe, as the optimal power level for the desired type of cooking can
be identied in an easier, more accurate way.
Gas burners
Each burner can be adjusted to one of the following settings using the
corresponding control knob:
● Off
Maximum
Minimum
To light one of the burners, hold a lit match or lighter near the burner and, at
the same time, press down and turn the corresponding knob anti-clockwise
to the maximum setting.
Since the burner is tted with a safety device, the knob should be pressed
for approximately 2-3 seconds to allow the automatic device keeping the
ame alight to heat up.
When using models with an ignition button, light the desired burner pressing
down the corresponding knob as far as possible and turning it anticlockwise
towards the maximum setting.
! If a ame is accidentally extinguished, turn off the control knob and wait for
at least 1 minute before trying to relight it.
To switch off the burner, turn the knob in a clockwise direction until it stops
(when reaches the “●” position).
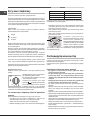
Discrete ame adjustment
The selected burner can be adjusted - by means of the knob - to 5 different
power levels.
To shift between levels, simply turn the knob
towards the desired power level.
A click signals the passage from one power
level to the other.The selected power level
is indicated by the corresponding symbol
(symbols ) and, on hobs equipped with
a display, by the LEDs that turn on (5 = max.
power; 1 = min. power). The system guarantees accurate ame adjustment
and uniform cooking results by facilitating selection of the desired power level.
Practical advice on using the burners
To ensure the burners operate efciently:
• Use appropriate cookware for each burner (see table) so that the ames
do not extend beyond the bottom of the cookware.
• Always use cookware with a at base and a cover.
• When the contents of the pan reach boiling point, turn the knob to minimum.
Rapid (R)
Semi Rapid (S)
Auxiliary (A)
Ø Cookware Diameter (cm)
24 - 26
16 - 20
10 - 14
Burner
To identify the type of burner, refer to the designs in the section entitled, “Burner
and Nozzle Specications”.
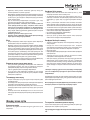
• For maximum stability, always make sure that the pan supports are
correctly tted and that each pan is placed centrally over the burner.
• Pan handles should be positioned in line with one of the support bars on
the pan support grid.
• Pan handle should be positioned so not to protrude beyond the front edge
of the hob.
The more variable aspect in terms of pan
stability can often be the pan itself, (or
the positioning of that pan during use).
Well balanced pans, with at bases that
are placed centrally over the burner,
with the pan handles aligned with one
of the support ngers obviously offer the
greatest stability.
Precautions and tips
! This appliance has been designed and manufactured in compliance with
international safety standards. The following warnings are provided for safety
reasons and must be read carefully.
General safety
• This is a class 3 built-in appliance.
• Gas appliances require regular air exchange to maintain efcient
operation. When installing the hob, follow the instructions provided
in the paragraph on “Positioning” the appliance.
• These instructions are only valid for the countries whose symbols
appear in the manual and on the serial number plate.
• The appliance was designed for domestic use inside the home and is
not intended for commercial or industrial use.
• The appliance must not be installed outdoors, even in covered areas. It is
extremely dangerous to leave the appliance exposed to rain and storms.
• Do not touch the appliance with bare feet or with wet or damp hands and
feet.
• The appliance must be used by adults only for the preparation of food,
in accordance with the instructions outlined in this booklet. Any other
use of the appliance (e.g. for heating the room) constitutes improper
use and is dangerous. The manufacturer may not be held liable for
any damage resulting from improper, incorrect and unreasonable
use of the appliance.
• Ensure that the power supply cables of other electrical appliances do not
come into contact with the hot parts of the oven.
• The openings used for ventilation and dispersion of heat must never be
covered.
• Always make sure the knobs are in the “●”/“○” position when the appliance
is not in use.
• When unplugging the appliance always pull the plug from the mains socket,
do not pull on the cable.
• Never carry out any cleaning or maintenance work without having detached
the plug from the mains.
• In case of malfunction, under no circumstances should you attempt to repair
the appliance yourself. Repairs carried out by inexperienced persons may
cause injury or further malfunctioning of the appliance. Contact a Service
Centre (see Assistance).
• Do not close the glass cover (if present) when the gas burners or electric
hotplates are still hot.
• The appliance should not be operated by people (including children)
with reduced physical, sensory or mental capacities, by inexperienced
individuals or by anyone who is not familiar with the product. These
individuals should, at the very least, be supervised by someone who

GB
13
assumes responsibility for their safety or receive preliminary instructions
relating to the operation of the appliance.
• Do not let children play with the appliance.
• The appliance is not intended to be operated by means of an external
timer or separate remote-control system.
Disposal
• When disposing of packaging material: observe local legislation so that
the packaging may be reused.
• The European Directive 2012/19/EU on Waste Electrical and
Electronic Equipment (WEEE), requires that old household electrical
appliances must not be disposed of in the normal unsorted municipal
waste stream. Old appliances must be collected separately in order
to optimise the recovery and recycling of the materials they contain
and reduce the impact on human health and the environment.
The crossed out “wheeled bin” symbol on the product reminds you of your
obligation, that when you dispose of the appliance it must be separately
collected.
Consumers should contact their local authority or retailer for information
concerning the correct disposal of their old appliance.
Respecting and conserving the environment
• Cook your food in closed pots or pans with well-tting lids and use as little
water as possible. Cooking with the lid off will greatly increase energy
consumption.
• Use purely at pots and pans.
• If you are cooking something that takes a long time, it’s worth using a
pressure cooker, which is twice as fast and saves a third of the energy.
Maintenance and care
Switching the appliance off
Disconnect your appliance from the electricity supply before carrying out
any work on it.
Cleaning the hob surface
• All the enamelled and glass parts should be cleaned with warm water and
neutral solution.
• Stainless steel surfaces may be stained by calcareous water or aggressive
detergents if left in contact for too long. Any food spills (water, sauce, coffee,
etc.) should be wiped away before they dry.
• Clean with warm water and neutral detergent, and then dry with a soft
cloth or chamois. Remove baked-on dirt with specic cleaners for stainless
steel surfaces.
• Clean stainless steel only with soft cloth or sponge.
• Do not use abrasive or corrosive products, chlorine-based cleaners or pan
scourers.
• Do not use steam cleaning appliances.
• Do not use ammable products.
• Do not leave acid or alkaline substances, such as vinegar, mustard, salt,
sugar or lemon juice on the hob.
Cleaning the hob parts
• Clean the enamelled and glass parts only with soft cloth or sponge.
• Grids, burner caps and burners can be removed to be cleaned.
• Clean them by hand with warm water and non-abrasive detergent,
removing any food residues and checking that none of the burner openings
is clogged.
• Rinse and dry.
• Ret burners and burner caps correctly in the respective housings.
• When replacing the grids, make sure that the panstand area is aligned
with the burner.
• Models equipped with electrical ignition plugs and safety device require
thorough cleaning of the plug end in order to ensure correct operation.
Check these items frequently, and if necessary, clean them with a damp
cloth. Any baked-on food should be removed with a toothpick or needle.
! To avoid damaging the electric ignition device, do not use it when the
burners are not in their housing.
! It is not necessary to remove the pan supports in order to clean the hob
surface. Thanks to the support system, simply lift and hold the pan supports
or rotate them until they rest against a rear support.
Do not place the hot grids on top of the glass cover (if applicable),
otherwise the rubber plugs on the glass may be damaged.
Gas tap maintenance
Over time, the taps may become jammed or difcult to turn. If this happens,
the tap must be replaced.
! This procedure must be performed by a qualied technician authorised
by the manufacturer.
Troubleshooting
It may happen that the appliance does not function properly or at all. Before
calling the service centre for assistance, check if anything can be done. First,
check to see that there are no interruptions in the gas and electrical supplies,
and, in particular, that the gas valves for the mains are open.
The burner does not light or the ame is not even around the burner.
Check whether:
• The gas holes on the burner are clogged.
• All the movable parts that make up the burner are mounted correctly.
• There are draughts near the appliance.
The ame dies in models with a safety device.
Check to make sure that:
• You pressed the knob all the way in.
• You keep the knob pressed in long enough to activate the safety device.
• The gas holes are not blocked in the area corresponding to the safety
device.
The burner does not remain lit when set to minimum.
Check to make sure that:
• The gas holes are not blocked.
• There are no draughts near the appliance.
• The minimum setting has been adjusted properly.

14
GB
The cookware is unstable.
Check to make sure that:
• The bottom of the cookware is perfectly at.
• The cookware is positioned correctly at the centre of the burner.
• The pan support grids have been positioned correctly.

15
RO
Instalarea
! Înainte de a pune în funcţiune noul dumneavoastră aparat, vă rugăm să
citiţi cu atenţie această carte. Conţine informaţii importante pentru folosirea
în condiţii de siguranţă, instalarea şi îngrijirea aparatului.
! Vă rugăm să păstraţi aceste instrucţiuni de folosire pentru a consultate în
viitor. Transmiteţi-le noilor proprietari posibili ai aparatului.
Amplasarea
! Nu lăsaţi materialul ambalajului la îndemâna copiilor. Acesta poate deveni
un pericol de sufocare (a se vedea Precauţii şi sfaturi).
! Aparatul trebuie să e instalat de un profesionist calicat în conformitate
cu instrucţiunile furnizate. Instalarea incorectă poate provoca vătămarea
persoanelor şi animalelor şi poate aduce daune proprietăţii.
! Acest aparat poate instalat şi utilizat numai în încăperi ventilate permanent,
în conformitate cu reglementările locale în vigoare. Trebuie îndeplinite
următoarele cerinţe:
• Camera trebuie să e echipată cu un sistem de extracţie a aerului care
evacuează orice gaze de combustie. Acesta poate consta dintr-o hotă sau
un ventilator electric care porneşte automat de ecare dată când aparatul
este pornit.
În cazul şemineelor sau coşurilor de fum ramificate
(special pentru plită)
Direct în exterior
• Camera trebuie să permită, de asemenea, circulatia corespunzătoare a
aerului, aerul ind necesar pentru ca arderea să aibă loc în mod normal.
Debitul de aer nu trebuie să e de mic de 2 m
3
/h pe kW de putere instalată.
Sistemul de circulaţie a aerului poate lua
aer direct din exterior prin intermediul unei
conducte cu o secţiune transversală interioară
de cel puţin 100 cm
2
; deschiderea nu trebuie
să e vulnerabilă pentru niciun tip de blocaje.
Sistemul poate furniza, de asemenea, aerul
necesar arderii în mod indirect, de exemplu
de la camere adiacente dotate cu tuburi de
circulare a aerului, astfel cum este descris
mai sus. Totuşi, aceste camere nu trebuie să
e camere comunale, dormitoare sau camere
care pot prezenta un pericol de incendiu.
• O utilizare intensivă şi prelungită a aparatului poate avea nevoie de o
aerisire suplimentară, de exemplu deschiderea unei ferestre, sau o aerisire
suplimentară mai ecace, mărind puterea de aspiraţie mecanică, dacă
acesta există deja.
• Gazul petrolier lichid curge spre podea pentru că este mai greu decât aerul.
De aceea, încăperile care conţin butelii GPL trebuie să e, de asemenea,
prevăzute cu oricii pentru a permite ieşirea gazelor, în cazul unei scurgeri.
Aşadar, buteliile GPL, indiferent dacă sunt parţial sau complet pline, nu
trebuie să e instalate sau depozitate în camere sau în zone de depozitare
care sunt sub nivelul solului (pivniţe etc). Este recomandabil să se păstreze
doar butelia care este utilizată în cameră, poziţionată astfel încât să nu e
A
Exemple de orificii de
ventilație pentru aerul
comburant.
Încăpere
adiacentă
Camera ce
trebuie ventilată
Mărirea distanţei
între uşă şi podea
supusă căldurii produse din surse externe (cuptoare, şeminee, sobe etc),
care ar putea ridica temperatura buteliei peste 50°C.
Montarea aparatului
Când se instalează plita, trebuie luate următoarele măsuri de precauţie:
• Dulapurile de bucătarie adiacente aparatului şi mai înalte decât partea de
sus a plitei trebuie să se ae la cel puţin 200 mm faţă de marginea plitei.
• Hotele trebuie să e instalate în conformitate cu manualele respective cu
instrucţiuni de instalare şi la o distanţă minimă de 650 mm faţă de plită (a
se vedea gura).
• Puneţi dulapurile de perete adiacente hotei la o înălţime minimă de 420
mm faţă de plită (a se vedea gura).
Dacă plita este instalată sub un dulap de
perete, acesta din urmă trebuie să e situat la
cel puţin 700 mm deasupra plitei.
• Cavitatea de instalare trebuie să aibă dimensiunile indicate în gură.
Sunt furnizate cârlige de xare, permiţându-vă să xaţi plita de blaturi
cu o grosime între 20 si 40 mm. Pentru o xare sigură a plitei de blat, vă
recomandăm să folosiţi toate cârligele din dotare.
555 mm
55 mm
475 mm
Înainte de instalare, scoateţi grătarele şi arzătoarele plitei şi răsturnaţi-o, ind
atenţi să nu deterioraţi termocuplele şi bujiile.
Aplicaţi garniturile din dotarea aparatului
pe marginile externe ale plitei, pentru a
împiedica trecerea aerului, umidităţii şi a
apei (vezi gura).
Pentru o aplicare corectă, asiguraţi-vă că
suprafeţele care urmează să e sigilate
sunt curate, uscate şi fără unsori/uleiuri.
Schema de xare a cârligelor
Poziţie cârlig pentru blat H=20mm Poziţie cârlig pentru blat H=30mm
Faţă
Poziţie cârlig pentru blat H=40mm Spate
! Folosiţi cârligele din „pachetul de accesorii“.
600mm min.
420mm min.
650mm min.

16
RO
• În cazul în care plita nu este instalată deasupra unui cuptor încorporat,
trebuie instalat un panou de lemn ca izolaţie. Acesta trebuie plasat la o
distanţă minimă de 20 mm faţă de partea de jos a plitei.
Ventilarea
Pentru a asigura o ventilaţie corespunzătoare, panoul din spate al dulapului
trebuie îndepărtat. Se recomandă instalarea cuptorului astfel încât acesta
să se sprijine pe două scânduri de lemn sau pe o suprafaţă complet plană
cu o deschidere de cel puţin 45 x 560 mm (a se vedea schemele).
560 mm.
45 mm.
În cazul în care plita este instalată deasupra unui cuptor, fără un sistem
de răcire cu ventilaţie forţată, trebuie să se asigure o ventilare adecvată în
interiorul dulapului prin intermediul unor oricii de aer prin care poate trece
aerul (vezi gura).
Conexiunea electrică
Plitele echipate cu un cablu tripolar de alimentare sunt proiectate pentru a
funcţiona cu curent alternativ la tensiunea şi frecvenţa indicate pe plăcuţa de
date (aceasta este situată în partea de jos a aparatului). Firul de împământare
din cablu are un capac de culoare verde şi galben. În cazul în care aparatul
trebuie să e instalat deasupra unui cuptor electric încorporat, conexiunea
electrică a plitei şi cuptorului trebuie efectuate separat, atât pentru siguranţa
electrică, cât şi pentru a face mai uşoară scoaterea cuptorului.
Conectarea cablului de alimentare la reţea
Montaţi un ştecher standard corespunzător sarcinii indicate pe plăcuţa de date.
Aparatul trebuie să e conectat direct la reţea utilizând un întrerupător unipolar
cu o deschidere între contacte de cel puţin 3 mm instalat între aparat şi reţea.
Întrerupătorul trebuie să e adecvat pentru sarcina indicată şi trebuie să
respecte reglementările electrice în vigoare (cablul de împământare nu trebuie
să e întrerupt de întrerupător). Cablul de alimentare nu trebuie să intre în
contact cu suprafeţe având temperatura mai mare de 50°C.
! Instalatorul trebuie să se asigure că s-a făcut conexiunea electrică corectă
şi că aceasta este conformă normelor de siguranţă.
Înainte de conectarea la sursa de curent, asiguraţi-vă că:
• aparatul este legat la pământ şi ştecherul corespunde prevederilor legale.
• priza poate rezista la puterea maximă a aparatului, care este indicată pe
plăcuţa de date.
• tensiunea este cuprinsă între valorile indicate pe plăcuţa cu datele tehnice.
• priza este compatibilă cu ştecherul aparatului. dacă priza nu este
compatibilă cu ştecherul aparatului, solicitaţi înlocuirea acestuia de către
un tehnician autorizat. nu folosiţi prelungitoare sau prize multiple.
! După ce aparatul a fost instalat, cablul de alimentare şi priza de curent
trebuie să e uşor accesibile.
! Cablul nu trebuie să e îndoit sau comprimat.
! Cablul trebuie să e vericat în mod regulat şi înlocuit numai de tehnicieni
autorizaţi (a se vedea Asistenţa).
! Producătorul îşi declină orice responsabilitate în cazul în care aceste măsuri
de siguranţă nu sunt respectate.
Conectarea la gaze
Aparatul trebuie conectat la reţeaua de alimentare cu gaze sau la butelia
de gaz, conform reglementărilor naţionale în vigoare. Înainte de a efectua
conexiunea, asiguraţi-vă că aragazul este compatibil cu gazele pe care doriţi
să le utilizaţi. Dacă nu este acest caz, urmaţi instrucţiunile indicate în paragraful
„Adaptarea la diferite tipuri de gaz“.
Atunci când se utilizează gaz lichid de la o butelie, instalaţi un regulator de
presiune, care respectă reglementările naţionale în vigoare.
! Vericaţi că presiunea de alimentare cu gaz este în concordanţă cu valorile
indicate în tabelul 1 („Specicaţiile arzătorului şi duzei“). Aceasta va garanta
funcţionarea în condiţii de siguranţă şi longevitatea aparatului dvs., menţinând
consumul ecient de energie.
Atenţie! Înainte de conectare, scoateţi dopul pentru transport din gaura de
cuplare a tubului de gaz al plitei
Conectarea cu o conductă rigidă (cupru sau oţel)
! Conectarea la sistemul de gaze trebuie să e realizată în aşa fel încât să
nu se creeze nicio solicitare asupra aparatului.
Pe rampa de alimentare a aparatului există un racord în formă de L reglabil, a
cărui etanşare este asigurată de o garnitură. Garnitura trebuie să e înlocuită
întotdeauna după rotirea racordului (garnitură furnizată cu aparatul). Racordul
de alimentare cu gaz este letat 1/2 cilindric tip tată.
Conectarea cu tub exibil din oţel inoxidabil continuu cu racord letat
Racordul de alimentare cu gaz este letat 1/2 cilindric tip tată. Aceste conducte
trebuie să e instalate astfel încât să nu e niciodată mai lungi de 2000 mm
atunci când sunt complet extinse. Odată ce conexiunea a fost efectuată,
asiguraşi-vă că tubul metalic exibil nu atinge piesele în mişcare şi că nu
este comprimat.
! Folosiţi doar conducte şi garnituri conforme cu reglementările naţionale în
vigoare.
Vericaţi etanşeitatea conexiunii
! Când procesul de instalare este complet, vericaţi că nu există scurgeri de
la tinguri, folosind o soluţie de săpun. Nu folosiţi niciodată acăra.
Adaptarea la diferite tipuri de gaz
Pentru a adapta plita la un alt tip de gaz decât tipul prestabilit (indicat pe
plăcuţa de la baza plitei sau pe ambalaj), duzele arzătorului trebuie să e
înlocuite astfel:
1. Îndepărtaţi grătarele plitei şi scoateţi arzătoarele din locaşurile lor.
2. Deşurubati duzele folosind o cheie tubulară de 7 mm şi înlocuiţi-le cu duze
pentru noul tip de gaz (a se vedea tabelul 1 „Caracteristicile arzătorului şi
duzelor“).
3. Reasamblaţi piesele urmând procedura de mai sus în ordine inversă.
4. Odată ce această procedură este terminată, înlocuiţi vechiul autocolant
cu unul care indică noul tip de gaz utilizat. Autocolantele sunt disponibile
la oricare din centrele noastre de service.

17
RO
• Reglarea aerului primar al arzătorului
Nu necesită reglare.
• Reglarea la minim a arzătoarelor
1. Rotiţi robinetul pe poziţia de acără scăzută.
2. Scoateţi butonul şi reglaţi şurubul de
ajustare, care este poziţionat în sau lângă tija
robinetului, până când acăra este mică, dar
stabilă.
3. După ce aţi ajustat ăcăra la setarea scăzută necesară, în timp ce arzătorul
este aprins, schimbaţi rapid poziţia butonului de la minim la maxim şi invers
de mai multe ori, vericând că acăra nu se stinge.
4. Anumite aparate au un dispozitiv de siguranţă (termocuplu) montat.
Dacă dispozitivul nu funcţionează atunci când arzătoarele sunt setate pe
acără joasă, măriţi această setare de acără joasă cu ajutorul şurubului
de reglare.
5. După ce a fost făcut ajustarea, înlocuiţi sigiliile de pe by-pass folosind
ceară de sigiliu sau o substanţă similară.
! Dacă aparatul este racordat la gaz lichid, şurubul de reglare trebuie să e
xat cât mai strâns posibil.
! Odată ce această procedură este terminată, înlocuiţi vechiul autocolant
cu unul care indică noul tip de gaz utilizat. Autocolantele sunt disponibile la
oricare din centrele noastre de service.
! În cazul în care presiunea gazului utilizat este diferită (sau variază uşor)
faţă de presiunea recomandată, un regulator de presiune adecvat trebuie să
e montat pe conducta de admisie (pentru a se conforma cu reglementările
naţionale în vigoare).
Conexiuni
electrice
PLĂCUŢA CU DATELE TEHNICE
a se vedea plăcuţa cu datele tehnice
Regulamentul UE nr. 66/2014 de integrare a Directivei
2009/125/CE.
regulamentul EN 30-2-1
ECODESIGN

18
RO
Tabelul 1 Gaz lichid Gaz natural (G20)
Nominală (mbar)
Minimă (mbar)
Maximă (mbar)
20
17
25
28-30
25
35
Rapid (R)
Semirapid (S)
Auxiliar (A)
Presiuni de furnizare
Arzător
Diametru
(mm)
Putere termică
kW (p.c.s.*)
100
75
55
3.10
1.75
1.05
Nomin. Redus.
0.80
0.45
0.45
By-pass
1/100
(mm)
39
28
28
Duză
1/100
Debit*
g/h
(mm) ***(G30)
86
64
50
Duză
1/100
Debit*
g/h
(mm)
132(H3)
96(Z)
79(6)
295
167
100
225
127
76
**(G31)
221
125
75
Specificaţiile arzătorului şi duzei
* La 15°C şi 1013,25 mbar - gaze uscate
** Propan P.C.S. = 50.37 MJ/Kg
*** Butan P.C.S. = 49.47 MJ/Kg
Natural P.C.S. = 37.78 MJ/m
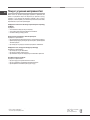
PKL 641 IX/HA
3
II2H3B/P
Secțiune de gaz
7,65 (556 g/h-G30) (546 g/h-G31)
Putere nominală (kW)Categorie
Model
Secțiune electrice
220-240V~ 50/60Hz
Tensiune și frecvență
(1)
Putere (W)
0,6
Valorile în g/h se referă la capacităţile cu Gaz Lichid (Butan, Propan).
(1)
R
S
S
A
PKL 641 IX/HA

19
RO
Pornirea şi folosirea
! Pozi
ţ
ia arzătorului de gaz corespunzător sau a plitei electrice* este indicat
pe ecare buton.
Plitele aragazului sunt prevăzute cu reglare discretă a puterii, care permite
reglarea cu precizie a ăcării la 5 nivele de putere diferite. Datorită acestui
sistem, plitele cu gaz pot garanta, de asemenea, aceleaşi rezultate la gătit
pentru ecare reţetă, întrucât nivelul optim de putere pentru tipul dorit de gătit
poate identicat într-un mod mai precis şi mai uşor.
Arzătoarele de gaze
Fiecare arzător poate reglat pentru una din următoarele setări folosind
butonul de control corespunzător:
● Off
Maxim
Minim
Pentru a aprinde un arzător, ţineţi un chibrit aprins sau o brichetă aproape
de arzător şi, în acelaşi timp, apăsaţi şi rotiţi butonul corespunzător în sens
antiorar la valoarea maximă.
Având în vedere că arzătorul este echipat cu un dispozitiv de siguranţă, butonul
trebuie apăsat pentru aproximativ 2-3 secunde pentru a permite dispozitivului
automat care ţine acăra aprinsă să se încălzească.
Unele modele sunt echipate cu un buton de aprindere încorporat în butonul
de control. Dacă acesta este cazul, este prezent aprinzătorul, dar nu butonul.
Pentru a aprinde un arzător, apăsaţi pur şi simplu butonul corespunzător
până la capăt şi apoi rotiţi-l în sens antiorar la setarea „Mare", menţinându-l
apăsat până când se aprinde arzătorul.
! În cazul în care acăra este stinsă accidental, opriţi butonul de control şi
aşteptaţi cel puţin 1 minut înainte de a încerca să îl reaprindeţi.
Pentru a stinge arzătorul, rotiţi butonul în sensul acelor de ceasornic până
când se opreşte (atunci când ajunge la poziţia “●”).
Reglarea discretă a ăcării
Arzătorul selectat poate reglat - cu ajutorul butonului - la 5 nivele diferite de
putere.
Pentru a comuta între niveluri, pur şi simplu
rotiţi butonul spre nivelul de putere dorit. Un clic
semnalează trecerea de la un nivel de putere la
altul.Nivelul de putere selectat este indicat de
simbolul (simbolurile ), corespunzător
(corespunzătoare) şi, pe plitele echipate cu
display, de LEDURILE care se aprind (5 =
putere max; 1 = putere min.). Sistemul garantează reglarea precisă a acării
şi rezultate uniforme la gătit uşurând selectarea nivelul de putere dorit.
Sfaturi practice pentru utilizarea arzătoarelor
Pentru a obţine randamentul maxim trebuie să luaţi în considerare următoarele
indicaţii:
• Utilizaţi recipiente adecvate ecărui arzător (a se vedea tabelul) pentru a
evita ca acăra să depăşească suprafaţa recipientelor;
• Utilizaţi întotdeauna recipiente cu fundul plat şi prevăzute cu capac;
• În momentul atingerii punctului de erbere, rotiţi selectorul până ajungeţi
în dreptul poziţiei minime.
Rapid (R)
Semirapid (S)
Auxiliar (A)
24 - 26
16 - 20
10 - 14
Arzător Ø Diametru Recipiente (cm)
Pentru identicarea tipului arzătorului, consultaţi gurile prezente în paragraful
“Caracteristici ale arzătoarelor şi injectoarelor”.
• Pentru stabilitate maximă, asiguraţi-vă că suporţii pentru recipientele de
coacere sunt poziţionaţi corect şi ecare recipient se aă în poziţie centrală
pe arzător.
• Asiguraţi-vă că mânerele recipientelor de coacere sunt aliniate cu una
dintre barele de sprijin ale suporţilor recipientelor.
• Poziţionaţi mânerele recipientelor de coacere astfel încât să nu iasă în
afară faţă de latura anterioară a planului de coacere.
Aspectul cel mai variabil din punct de
vedere al stabilităţii oalelor poate de
multe ori oala propriu-zisă (sau amplasarea
acesteia în timpul utilizării). Oalele bine
echilibrate, cu fundul plat, aşezate central
pe aragaz, cu torţile poziţionate la nivel
cu una dintre razele grilei oferă, în mod
evident, stabilitate maximă.
Precauţii şi sfaturi
! Acest aparat a fost proiectat şi fabricat în conformitate cu standardele
internaţionale de siguranţă. Următoarele avertismente sunt furnizate din
motive de siguranţă şi trebuie să e citite cu atenţie.
Siguranţa generală
• Acesta este un aparat încorporat clasa 3.
• Aparatele cu gaz necesită un schimb de aer regulat pentru a menţine
funcţionarea ecientă. La instalarea plitei, urmaţi instrucţiunile
furnizate în paragraful referitor la "Poziţionarea" aparatului.
• Aceste instrucţiuni sunt valabile numai pentru ţările ale căror
simboluri apar în manual şi pe placa cu numărul de serie.
• Aparatul a fost conceput pentru uz casnic în interiorul casei şi nu este
destinat uzului comercial sau industrial.
• Aparatul nu trebuie instalat în aer liber, nici chiar în zonele acoperite. Este
extrem de periculos să lăsaţi aparatul expus la ploaie şi furtuni.
• Nu atingeţi aparatul cu picioarele goale sau cu mâinile ori cu picioarele
ude sau umede.
• Aparatul trebuie să e utilizat de către adulţi doar pentru prepararea
alimentelor, în conformitate cu instrucţiunile prezentate în această
carte. Orice altă utilizare a aparatului (de exemplu, pentru încălzirea
camerei) constituie o utilizare incorectă şi este periculoasă.
Producătorul nu poate tras la răspundere pentru orice daune care
rezultă din utilizarea improprie, incorectă şi nerezonabilă a aparatului.
• Deschiderile utilizate pentru ventilarea şi dispersia căldurii nu trebuie să
e niciodată acoperite.
• Asiguraţi-vă întotdeauna că butoanele sunt în poziţia “●”/“○” când aparatul
nu este folosit.
• Când scoateţi aparatul din priză, trageţi de ştecher, nu de cablu.
• Nu efectuaţi nicio lucrare de curăţare sau întreţinere fără să deconectaţi
aparatul de la reţeaua de alimentare.
• În cazul funcţionării greşite, nu încercaţi, sub niciun motiv, să reparaţi
singuri aparatul. Reparaţiile efectuate de persoanele fără experienţă pot
cauza leziuni sau funcţionarea greşită a aparatului. Contactaţi un Centru
de service (a se vedea Asistenţă).

20
RO
• Nu închideţi capacul de sticlă (dacă există) când arzătoarele pe gaz sau
plitele electrice sunt încă erbinţi.
• Aparatul nu trebuie folosit de persoanele (inclusiv copiii) cu capacităţi zice,
mentale sau senzoriale reduse, de persoanele fără experienţă sau de
oricine care nu este familiarizat cu produsul. Aceste persoane trebuie, cel
puţin, să e supravegheate de o persoană care îşi asumă responsabilitatea
pentru siguranţa lor sau să primească instrucţiuni preliminare privind
funcţionarea aparatului.
• Nu lăsaţi copiii să se joace cu aparatul.
• Aparatul nu este destinat să e acţionat printr-un cronometru extern
sau printr-un sistem separat de control la distanţă.
Îndepărtare
• Pentru eliminarea materialelor de ambalaj: respectaţi legislaţia locală,
astfel încât ambalajele să poată reutilizate.
•
Directiva europeană 2012/19/EU privind deşeurile echipamentelor
electrice şi electronice (DEEE), prevede că aparatele electrocasnice
vechi nu trebuie să e eliminate în circuitul normal al deşeurilor
municipale nesortate. Aparatele vechi trebuie colectate separat pentru
a optimiza recuperarea şi reciclarea materialelor pe care le conţin
şi pentru a reduce impactul asupra sănătăţii umane şi a mediului.
Simbolul „tomberonului cu roţi“ barat de pe produs vă aminteşte obligaţia
dumneavoastră ca, atunci când aruncaţi aparatul, acesta trebuie să e
colectat separat.
Consumatorii trebuie să contacteze autorităţile locale sau agentul de
vânzare pentru informaţii privind eliminarea corectă a aparatelor vechi.
Protejarea şi respectarea mediului înconjurător
• Gătiţi alimentele în oale sau tigăi închise cu capace potrivite şi folosiţi cât
mai puţină apă este posibil. Gătitul fără capac va creşte cu mult consumul
energetic.
• Folosiţi oale şi tigăi cu bază plată.
• Dacă gătiţi ceva ce ia mult timp, merită să utilizaţi o oală sub presiune, care
este de două ori mai rapidă şi care economiseşte o treime din energie.
Întreţinerea şi îngrijirea
Stingerea aparatului
Deconectaţi aparatul de la alimentarea cu energie electrică înainte de a
efectua orice lucrare la acesta.
Curăţarea suprafeţei plitei
• Toate piesele emailate şi de sticlă trebuie curăţate cu o soluţie de apă
caldă şi detergent neutru.
• Suprafeţele din oţel inoxidabil se pot păta din cauza apei calcaroase sau
a detergenţilor agresivi, dacă rămân în contact cu acestea prea mult timp.
Resturile de mâncare căzute pe suprafaţă (apă, sos, cafea etc.) trebuie
şterse înainte de a se usca.
• Curăţaţi cu apă caldă şi detergent neutru, apoi uscaţi cu o cârpă moale
sau cu piele de căprioară. Îndepărtaţi resturile arse de mâncare cu ajutorul
unor produse de curăţare speciale pentru suprafeţe din oţel inoxidabil.
• Curăţaţi oţelul inoxidabil numai cu o cârpă sau un burete moale.
• Nu utilizaţi produse abrazive sau corozive, produse pe bază de clor sau
bureţi de sârmă pentru vase.
• Nu utilizaţi aparate de curăţat cu aburi.
• Nu folosiţi produse inamabile.
• Nu lăsaţi pe plită substanţe acide sau alcaline, cum ar oţet, muştar, sare,
zahăr sau suc de lămâie.
Curăţarea componentelor plitei
• Curăţaţi piesele emailate şi de sticlă numai cu o cârpă sau un burete
moale.
• Grătarele, capacele arzătoarelor şi arzătoarele pot scoase pentru a
curăţate.
• Curăţaţi-le manual, cu apă caldă şi detergent neabraziv, înlăturând cu grijă
toate resturile de mâncare şi vericând ca niciun oriciu al arzătorului să
nu e înfundat.
• Clătiţi şi uscaţi.
• Puneţi la loc arzătoarele şi capacele arzătoarelor, în mod corect, în
locaşurile respective.
• Când puneţi la loc grătarele, asiguraţi-vă că zona pe care se aşează oalele
este aliniată cu arzătorul.
• Modelele echipate cu şe pentru aprindere electrică şi cu dispozitiv de
siguranţă necesită o curăţare atentă a capătului şei pentru a asigura
funcţionarea corectă. Verificaţi frecvent aceste piese şi, dacă este
necesar, curăţaţi-le cu o cârpă umedă. Resturile arse de mâncare trebuie
îndepărtate cu o scobitoare sau cu un ac.
! Pentru a evita deteriorarea dispozitivului de aprindere electrică, nu-l
folosiţi atunci când arzătoarele nu sunt în locaşurile lor.
! Nu este necesar să scoateţi suportul pentru vase pentru a curăţa suprafaţa
plitei. Datorită sistemului de sprijin, ridicaţi şi ţineţi suporturile pentru vase sau
rotiţi-le până când se sprijină pe suportul din spate.
Nu aşezaţi grătarele erbinţi pe partea de sus a capacului de sticlă
(dacă este cazul), altfel dopurile de cauciuc de pe sticlă se pot deteriora.
Întreţinerea robinetului de gaz
De-a lungul timpului, robinetele se pot bloca sau pot greu de rotit. Dacă se
întâmplă acest lucru, robinetul trebuie înlocuit.
! Această procedură trebuie să e efectuată de un tehnician calicat
autorizat de producător.
Depanarea
Se poate întâmpla ca aparatul să nu funcţioneze corect sau deloc. Înainte
de a apela centrul de servicii de asistenţă, vericaţi dacă se poate face ceva.
În primul rând, vericaţi că nu există întreruperi în aprovizionarea cu gaz şi
energie electrică şi, în special, că supapele de gaz pentru alimentare de la
reţea sunt deschise.
Arzătorul nu se aprinde sau acăra nu este chiar în jurul arzătorului.
Vericaţi dacă:
• Găurile de gaz de pe arzător sunt înfundate.
• Toate piesele mobile care alcătuiesc arzătorul sunt montate corect.
• Există curenţi de aer în apropierea aparatului.
Pagina se încarcă...
Pagina se încarcă...
Pagina se încarcă...
Pagina se încarcă...
Pagina se încarcă...
Pagina se încarcă...
Pagina se încarcă...
Pagina se încarcă...
Pagina se încarcă...
Pagina se încarcă...
Pagina se încarcă...
Pagina se încarcă...
Pagina se încarcă...
Pagina se încarcă...
Pagina se încarcă...
Pagina se încarcă...
Pagina se încarcă...
Pagina se încarcă...
Pagina se încarcă...
Pagina se încarcă...
Pagina se încarcă...
Pagina se încarcă...
Pagina se încarcă...
Pagina se încarcă...
-
 1
1
-
 2
2
-
 3
3
-
 4
4
-
 5
5
-
 6
6
-
 7
7
-
 8
8
-
 9
9
-
 10
10
-
 11
11
-
 12
12
-
 13
13
-
 14
14
-
 15
15
-
 16
16
-
 17
17
-
 18
18
-
 19
19
-
 20
20
-
 21
21
-
 22
22
-
 23
23
-
 24
24
-
 25
25
-
 26
26
-
 27
27
-
 28
28
-
 29
29
-
 30
30
-
 31
31
-
 32
32
-
 33
33
-
 34
34
-
 35
35
-
 36
36
-
 37
37
-
 38
38
-
 39
39
-
 40
40
-
 41
41
-
 42
42
-
 43
43
-
 44
44


HOTPOINT/ARISTON PKL 641 IX/HA Manualul utilizatorului
- Tip
- Manualul utilizatorului
în alte limbi
Lucrări înrudite
-
HOTPOINT/ARISTON 642 PCN T/IX/HAR Manualul utilizatorului
-
-
HOTPOINT/ARISTON THC 642 W/IX/HA EE Manualul utilizatorului
-
-
-
-