Sony XS-160GS Instrucțiuni de utilizare
- Categorie
- Boxe auto
- Tip
- Instrucțiuni de utilizare

SONY.:
5-051-921-11(1
)
2-Way Speaker
Instructions
II
lnstructiuni
•;i•E
Mode
d'emploi
iii
Vejledning •
lnstrucciones -Ohjeet
Montageanleitung
iii
lnstruksjoner
lnstruktioner
II
Pokyny
Gebruiksaanwijzing H Hasznalati
utmutat6
I nstruc;oes • Navod
lstruzioni
per
l'uso •
IIIHCTPYKU,1/1
1/1
lnstrukcja obstugi •
06r,yiEc;
I
llllll
lllll
lllll
lllll
lllll lllll lllll
111111111111111111
©2023 Sony Corporation Printed in Vietnam * s a s 1 g 2 1 1 1 *
(1)
XS-160GS/XS-130GS
Made in Vie
tnam
https://www.sony.net
/

Dimensions
Dimensions
Dimensiones
Abmessungen
Dimensioner
Afmetingen
Dimensões
Dimensioni
Wymiary
Dimensiuni
Dimensioner
Mitat
Mål
Rozměry
Meretek
Rozmery
Размери
Διαστάσεις
Unit: mm (in)
Unité : mm (po)
Unidad: mm
Einheit: mm
Enhet: mm
Eenheid: mm
Unidade: mm
Unità: mm
Jednostka: mm
ɸ
Reference Point
Point de référence
Punto de referencia
Bezugspunkt
Referenspunkt
Referentiepunt
Ponto de Referência
Punto di riferimento
Punkt odniesienia
Punct de referinţă
Referencepunkt
Viitepiste
Referansepunkt
Referenční bod
Igazítási pont
Referenčný bod
Еталонна точка
Σημείο αναφοράς
ɹ
Reference Plane
Plan de référence
Plano de referencia
Bezugsebene
Referensplan
Referentievlak
Plano de Referência
Piano di riferimento
Płaszczyzna odniesienia
Plan de referinţă
Referenceplan
Viitetaso
Referanseplan
Referenční rovina
Rögzítési sík
Základná rovina
Еталонна равнина
Επίπεδο αναφοράς
ɺ
Reference Axis
Axe de référence
Eje de referencia
Bezugsachse
Referensaxel
Referentieas
Eixo de Referência
Asse di riferimento
Oś odniesienia
Axă de referinţă
Referenceakse
Viiteakseli
Referanseakse
Referenční osa
Középvonal
Referenčná os
Еталонна ос
Άξονας αναφοράς
Unitate: mm
Enhed: mm
Yksikkö: mm
Enhet: mm
Jednotka: mm
Mértékegység: mm
Jednotka: mm
Мерна единица: mm
Μονάδα: mm
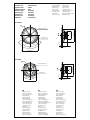
XS-160GS
P.C.D. ø 157 (61/4)
ø 166 (65/8)
45°
45°
ø 158 (61/4)
ɸ
ɺ
ɹ46.3
(17/8)
16
(21/32)
ø 127 (5)
ø 75 (3)
120°
XS-130GS
ø 130 (51/8)
P.C.D. ø 136 (53/8)
17
(11/16)
45.3
(113/16)
ø 114 (41/2)
ø 70 (27/8)
ɸ
ɹ
ɺ
45°
45°
ø 149 (57/8)

Notice for customers: the following information
is
only
applicable
to
equipment
sold in countries applying
EU
directives
This
product
has
been
manufactured
by
or
on
behalf
of
Sony
Corporation.
EU
Importer:
Sony Europe
BV
Inquiries
to
the
EU
Importer
or
related
to
product
compliance in
Europe should be
sent
to
the
manufacturer's authorized
representative, Sony Belgium,
bijkantoor
van Sony Europe
BV
,
Da
Vincilaan
7-D1
, 1930 Zaventem, Belgium.
:R:
Disposal
of
old
electrical & electronic equipment
(applicable in
the
European Union
and
other countries
with
separate collection systems)
-
This
symbol
on
the
product
or
on its packaging indicates
that
this
product
shall
not
be treated as
household
waste. Instead
it
shall
be
handed
over
to
the
appropriate
collection
point
for
the
recycling
of
electrical
and
electronic
equipment
By
ensuring
that
this
product
is
disposed
of
correctly,
you
will
help
to
prevent
potential negative
consequences
for
the
environment
and
human
health,
which
could
be caused
by
inappropriate waste
handling
of
this
product
The
recycling
of
materials
will
help
to
conserve natural resources. For
more
detailed
information
about
recycling
of
this product, please
contact
your
local
Ci
vic Office,
your
household
waste disposal
service
or
the
shop
where
you
purchased the
product
Precautions
•
Do
not
continuously use
the
speaker system beyond
the
peak
power
handling capacity.
•
Keep
recorded tapes, watches, and personal credit
cards using magnetic coding away from the speaker
system to protect
them
from damage caused
by
the
magnets in
the
speakers.
• Please note
the
following when installing the units;
otherwise malfunction
and/or
deterioration in sound
quality may result.
-Do
not
touch
the
diaphragms
and/or
speaker cones
by hand or
with
tools.
-Do
not
put
your fingers through
the
holes
of
the
frame.
-Do
not
drop foreign objects in
the
units.
•
Do
not
place this product close to medical devices.
-This product (including accessories) has magnet(s)
which
may
interfere
with
pacemakers, programmable
shunt valves
for
hydrocephalus treatment,
or
other
medical devices. Do
not
place
this
product close
to
persons
who
use such medical devices. Consult your
doctor before using this product
if
you use any such
medical device.
If
you
cannot find an appropriate
mounting
location,
consult your car dealer or your nearest Sony dealer
before mounting.
Specifications
XS-160GS
Speaker
Short-term
maximum
power*'
Rated
power
CTA
2031
RMS
Power
Rated impedance
Output
sound pressure level
Effective frequency range
Mass
Supplied accessories
XS-130GS
Speaker
Short-term
maximum
power
*'
Rated
power
CTA
2031
RMS
Power
Rated impedance
Output
sound pressure level
Effective frequency range
Mass
Supplied accessories
Coaxial 2 way:
Woofer 16.5
cm
(6
'h
in) cone
type
Tweeter 2.0
cm
(
13
/16
in
)
dome
type
250
w•
2
40
W*2
45W
4Q
89 dB ± 2
dB
(1 W, 1 m
)*'
45
Hz
-24
000
Hz*'
Woofer: Approx.
650
g (1
lb
7
oz
)
per
speaker
Parts
for
installation
Coaxial 2 way:
W
oofer
13
cm
(5
¼ in)
cone
type
Tweeter 2.0
cm
(
13
116
in
)
dome
type
230 W
*'
30W
*'
35
W
4Q
89 dB ± 2
dB
(1
W,
1
m)
*'
50
Hz
-24
000
Hz
*'
Woofer: Approx. 550 g (1
lb
3 oz)
per
speaker
Parts
for
installation
Design and specifications are subject
to
change
without
notice.
*1 "Short-term
maximum
power
"
may
also
be
referred
to
as
"Peak
Power".
*2 Testing Condition:
IEC
60268-5 (2003-05)
Before
mounting
A depth
of
at least 46.3
mm
(1
7/ s in)
for
XS-160GS
or
45.3
mm
(1
13
/
16
in)
for
XS-130GS
is
required
for
flush
mounting. Measure
the
depth
of
the
area where
you
are
to
mount
the
speaker, and ensure that
the
speaker is
not
obstructing any other components
of
the
car.
Keep
the
followings in mind when choosing a mounting location:
• Make sure that nothing
is
obstructing around the
mounting location
of
the
door
(front
or
rear)
or
the
rear
tray where you are to
mount
the speaker.
• A
hole
for
mounting
may
already
be
cut
out
of
the
inner
panel of
the
door (front or rear) or
the
rear tray.
In
this
case, you need to
modify
the
board only.
•
If
you
are to
mount
this speaker system in
the
door
(front or rear), make sure
that
the
speaker terminals,
frame or
magnet
do
not
interfere
with
any inner parts,
such as
the
window
mechanism in the door (when
you
open
or
close
the
window), etc.
Also make sure that
the
speaker grille does
not
touch
any inner fittings, such as
the
window
cranks,
door
handles, arm rests,
door
pockets, lamps or seats etc.
•
If
you
are
to
mount
this speaker system in
the
rear tray,
make sure that
the
speaker terminals, frame
or
magnet
do
not touch any inner parts of
the
car,
such
as
the
torsion bar springs (when
you
open
or
close the trunk
lid), etc.
Also make sure that
the
speaker grille does
not
touch
any inner fittings, such as seat belts, head rests, center
brake lights, inner covers
of
the
rear wipers, curtains
or
air purifiers, etc.

Parts
list/
Liste
des
pieces/
Lista
de
componentes I Teileliste /
Lista
over medfoljande delar / Onderdelenlijst /
Lista
de
pe~as
/
Elenco
dei componenti /
Spis
cz~sci
/
Lista
componentelor I Reservedelsliste / Osaluettelo /
Liste
over deler /
Seznam
soucasti
I Alkatreszjegyzek /
Zoznam
sucasti
/ Cn~CbK
Ha
l.laCT~Te
/
Katci:Aovoc;
avtaAAaKtlKWV
G) ®
XS-160GS XS-130GS
(!>
1
04
(x
2)
(x
2)
(x
8)

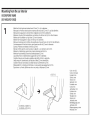
Mounting
from
the
car
interior
DOOR
(FRONT/REAR)
(XS-160GS/XS-130GS)
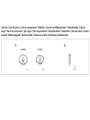
1 Mark
the
4
bolt
holes and make them 3.2
mm
(5
132
in) in diameter.
Marquez les 4 orifices des boulons
et
percez des trous
de
3,2
mm
(5h2
po)
de
diametre.
Marque los 4 agujeros de los tornillos y hagalos de 3,2
mm
de
diametro.
Markieren Sie
die
4 Schraubenlocher
und
bohren Sie Locher
mit
3,2
mm
Durchmesser.
Markera
de
4 bulthalen och
gor
dem
3,2
mm
i diameter.
Markeer de 4
boutgaten
en
boor
ze
met
3,2
mm
diameter.
Marque o local para os 4 oriffcios dos parafusos e fa~a
os
furos
com 3,2
mm
de
diametro.
Contrassegnare i
4fori
dei bulloni,
quindi
praticare fori di 3,2
mm
di
diametro.
Zaznacz 4
otwory
na wkr~ty o srednicy 3,2
mm.
Marcati orificiile pentru cele 4 ?uruburi
?i
gauriti cu un
diametru
de 3,2
mm.
Marker
de
4 bolthuller,
og
bor
dem
med
en
diameter pa 3,2
mm.
Merkitse 4 pultinreikaa ja
tee
niista halkaisijaltaan 3,2
mm.
Lag merker
for
de
4
bolthullene
og
gj0r
dem
3,2
mm
i diameter.
Oznacte 4 otvory pro srouby a zajistete,
aby
mefily
3,2
mm
v prumeru.
Jelolje
meg
a 4 csavarfuratot,
es
keszftse
el
6ket 3,2
mm
atmer6jure.
Oznacte 4 otvory na skrutky a vyvrtajte
otvory
s
priemerom
3,2
mm.
MapK111pa111Te
4-Te
OTBopa
3a
6omose
111
r111
pa3w111peTe
,o,o
,o,111aMeTbp
3,2 mm.
Iriµrn.llOTE
rn; 4
OTTE<;
l3LOWV
Km
KCTVTE
TL<;
OTTE<;
µE
6LaµETpo
3,2
mm.
XS~60GS:0128(5
1h )
XS-130GS:
0115(4
5/ e)
➔
0 3.2 (5h 2)
Unit:
mm
(in)
Unite:
mm (po)
Unidad:
mm
Einheit: mm
En
het:
mm
Eenheid:
mm
Unidade:
mm
Unita: mm
Jednostka: mm
Unitate: mm
En
h
ed
: mm
Yksikko:
mm
En
het:
mm
Jednotka: mm
Mertekegyse
g:
mm
Jednotka: mm
Me
pHa
e,o,
111
H111
L1
a: mm
Movaoa:
mm

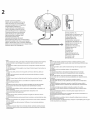
2
Speaker cord
(not
supplied)
Cordon de haut-parleur (non fourni)
Cable de altavoz (no suministrado)
Lautsprecherkabel (nicht mitgeliefert)
Hogtalarkabel (medfoljer ej)
Luidsprekerkabel (niet bijgeleverd)
Caba
do
altifalante (nao fornecido)
Cava del diffusore (non in dotazione)
Przew6d glosnikowy (nie zalqczony)
Cablu
de
difuzor (nu este furnizat)
H0jttalerledning (medf01ger ikke)
Kaiutinjohto (lisavaruste)
H0yttalerledning (ikke inkludert)
Reproduktorovy kabel (nenf soucastf balenf)
Hangsz6r6vezetek (nem resze a csomagnak)
Kabel k reproduktoru (nie
je
sucasfou dodavky)
Ka6en
Ha
sv1coKorosopmem1
(Hee
npeAOCTaseH)
KaAwBLO
riXEiou
(BEv
n:apEXETat)
• Note
When releasing
the
cables, push
down
on the catch firmly and release
them
ca
refull
y.
If
excessive force is used,
damage
to
the speaker
or
cable terminals may result.
* Remarque
En
relachant les cables, appuyez
fermement
sur la languette
et
relachez
doucement
les cables.
Si
vous
appliquez une force exageree,
vous
risquez
d'endommager
le haut-parleur
ou
les bornes
du
cable.
• Nota
Al liberar los cables, presione
en
el enganche con firmeza y libere los cables con
cuidado.
Si
utiliza una fuerza excesiva, es posible que los terminales del altavoz o el cable
resulten danados.
• Hinweis
Drucken
Sie
zum Liisen
der
Kabel
fest
auf
den Verschluss und ziehen
Sie
sie vorsichtig
heraus.
Wenn
Sie
zu stark drOcken, kann es
zu
Schaden am Lautsprecher
oder
an den
Kabelanschlussen kommen.
' Obs1
Nar kablarna lossas ska
du
trycka
ner
sparren
ordentligt
och Iossa
dem
forsiktigt.
Om
for
mycket kraft anvands kan hiigtalaren eller kabelkontakterna skadas.
• Opmerking
Om
de
kabels te verwijderen,
drukt
u stevig
op
de vergrendeling en verwijdert u de
kabels voorzichtig.
Als u te veel kracht
gebruikt
, is
het
mogelijk
dat
de
luidspreker
of
de
kabelaansluitingen beschadigd raken.
• Nota
Quando soltar os cabos, pressione para baixo
no
engate com firmeza e solte-os
cuidadosamente.
Se
utilizar
forc;a
excessiva, pode provocar danos
na
coluna
ou
nos terminais
dos
cabos.
• Nota
Quando viene rilasciato
ii
cavo, spingere con forza
ii
fermo verso ii basso e rilasciare ii
cavo con cautela.
Se
viene utilizzata una forza eccessiva, ii diffusore o ii cavo terminale potrebbero
da nnegg ia
rsi.
• Uwaga
Zwalniaj9c przewody
naleiy
mocno nacisn9c zatrzask i
ostroinie
zwolnic przewody.
Zastosowanie
zbyt
duiej
sily
moie
spowodowac uszkodzenie g!osnika lub zacisk6w
na
przewodach.
' Nota
Po
wer amplifier, etc.
Amplificateur de puissance, etc.
Amplificador de potencia, et
c.
End
verstarker usw.
Effektforstarkare etc.
Eindversterker, enzovoort.
Amplifi
c
ador
de potencia, et
c.
Amplificatore di potenza,
ecc.
Wzmacniacz mocy
itp
.
Amplificator de putere etc.
Effektforstcerker etc.
Vahvistin
jne
.
Forsterker osv.
Zesilov
ai'
atd.
Teljesftmenyer6sft6 stb.
Vykonovy zosilnovai' atd'.
YrnnsaTen
vi
AP,
EVLCTXUT~c;
K.An:.
Cand elibera\i cablurile, apasa\i ferm prinderea ~i elibera\i cablurile cu grija.
Daca
se
aplica o for\a excesiva, aceasta poate cauza deteriorarea difuzorului sau a
termina\iilor cablurilor.
• Bemaerk
Nar
du
frigor kabler, skal
du
trykke holdeanordningen fast ned
og
frigore
dem
forsigtigt.
For kraftigt
et
tryk
kan beskadige hojtaler- eller kabelstikkene.
• Huomautus
Kun kaapelit vapautetaan, paina salpaa kunnolla ja vapauta ne varovasti.
Jos
kaytetaan liikaa voimaa, kaiutin tai kaapeliliittimen voivat vahingoittua.
• Merknad
Nar
du
frigjor kablene, press
godt
ned pa lasen
og
frigjor
dem
forsiktig.
Hvis
du
bruker
for
mye
makt
kan dette skade
ho
yttaleren eller kabelterminalene.
* Pozniimka
Pii uvolnoviinf kabelu tlacte pevne na uchyt a uvolnete
je
opatrne.
Pii pouzitf piflis velke sfly
se
muze poskodit reproduktor nebo terminiily kabelu.
• Megjegyzes
A kiibelek kioldiisakor hatiirozottan nyomja le a riigzft6t es 6vatosan oldja ki.
Tul nagy er6 kifejtese eseten a hangsz6r6 vagy a k
ii
belkapcsok megserOlhetnek.
• Pozniimka
Pri
uvol'novanf kiiblov pevne zatlacte na ziipadku a opatrne ich uvofnite.
Pri
prflisnej sile m6ze
d6jst
k poskodeniu reproduktora alebo konektor
ov
kiibla.
• 3a6ene)l(Ka
KoraTO
ocso60)1(11asaTe
Ka6enHTe, HamcHeTe
1106pe
Ha11ony
x
saTKaTa
H
rn
ocso6op,eTe
BH1t1MaTenHo.
AKO
1!13nOJ13BaTe
npeKoMepHa
Cl/Illa
, e
Bb3MO)KHO
p,a
Bb3Hlt1K
H€
H€1t13npaBHOCT
Ha
BHCOKorosopHTensi
HnH
KneMme
Ha
Ka6ena.
• E~µEiwo~
'OTaV
arroouv6EETE Ta Ka.\w6La,
TTLEOTE
TO
y.\
woo[6L
orn9opa
rrp
oc;
Ta
KCITW
KOL
arroouv6EaTE
Ta
TipOOEKTLK6:.
Eav
XP~OLµOTTOlllOETE
UTTEpi30ALK~
Mvaµ~
,
EV6EXETQL
va
TTPOK
A~0E[
<;
~µLa
OTO
~X
ELO
~
OTOUs
aKp06EKTEs
TWV
Ka
AW6tWV.

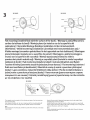
3
XS-160GS
XS-130GS
Flat
mounting
(installed
flush
with
the
surface
of
the
dash)
/
Montage
a
plat
(affleurant
a
la
surface
du
tableau
de
bord)
/
Montaje
piano
(se
instala
a
ras
de
la
superficie
del
salpicadero)
/
Versenkte
Montage
(bundige
Installation
mit
der
Armaturenbrett-
Oberflache)
I
lnfalld
montering
(installation
i
jamnhojd
med
instrumentbradans
yta)
/
Vlakke
montage
(verzonken
ge'installeerd
in
het
oppervlak
van
het
dashboard)/
Montagem
plana
(instala~ao
nivelada
com
a
superffcie
do
painel)
/
Montaggio
a
piatto
(montaggio
a
incasso
con
la
superficie
del
cruscotto)
/
Montaz
wpuszczany
(montaz
na
r6wni
z
powierzchnic1
deski
rozdzielczej)
/
Montaj
pe
suprafata
plana
(instalat
la
nivelul
suprafetei
tabloului
de
bord)
/
Flad
montering
(installeret
skjult
i
instrumentbr~ttets
overflade)
/
Tasainen
kiinnitys
(asennettu
tasaan
kojelaudan
pinnan
kanssa)
/
Flat
montering
(montere
i
flukt
med
overflaten
pa
dashbordet)
/
Montaz
do
roviny
(v
rovine
s
povrchem
prfstrojove
desky)
/
Lapos
szereles
(a
muszerfal
feluletevel
sfkba
ep1tve)
/
Plocha
montaz
(instalacia
v
jednej
rovine
s
povrchom
pr1strojovej
dosky)
/
PaeeH
MOHTa>K
(paeHo
MOHn1paHe
cnpSIMO
nOBbpXHOCTTa
Ha
naHena)
/
EninE6rJ
lOTt00EtrJCH)
(xwvEUl~
EyKatciCJtQCJr)
CJlO
L6LO
ETtlTtE60
µE
U)V
E1tl'1>CXVELQ
lOU
taµnA6)
XS-130GS
This speaker can be
made
to
fit
in almost any type
of
car
by
removing
the
mounting
tabs.
Use clippers or pliers, etc.
to
cut
or
snap
two
of
the
mounting
tabs
off
so that it
is
even
with
the
edge
of
the speaker frame as illustrated.
Note
After
removing the mounting tabs, handle the speaker frame with care,
as
the edges
may
be
sharp.
Acest difuzor poate fi adaptat la aproape orice
tip
de ma?ina, prin
i'ndepartarea clemelor de fixare.
Folosi\i foarfece sau cle?ti etc. pentru a taia sau pentru a rupe doua
dintre clemele de fixare, astfel i'ncat
sa
fie la acela?i nivel cu marginea
cadrului difuzorului, la fel
ca
i'n
imagine.
Nota
Dupa
ce
indeparta\i clemele de fix
are
, lua\i
cu
grija cadrul difuzorului, deoarece
marqinile
pot
fi
ascutite.


-
 1
1
-
 2
2
-
 3
3
-
 4
4
-
 5
5
-
 6
6
-
 7
7
-
 8
8
-
 9
9


Sony XS-160GS Instrucțiuni de utilizare
- Categorie
- Boxe auto
- Tip
- Instrucțiuni de utilizare
în alte limbi
- English: Sony XS-160GS Operating instructions