Laserliner BatteryCheck Manualul proprietarului
- Tip
- Manualul proprietarului

BatteryCheck
02
05
08
11
14
17
20
23
26
29
32
35
38
41
44
47
50
53
56
59
62
65
DE
GB
NL
DK
FR
ES
IT
PL
FI
PT
SE
NO
TR
RU
UA
CZ
EE
LV
LT
RO
BG
GR

02
1a
1b
2a 2b
3
DE
Lesen Sie die Bedienungsanleitung und das beiliegende Heft
„Garantie- und Zusatz hinweise“ vollständig. Befolgen Sie
die darin enthaltenen Anweisungen. Diese Unterlagen gut
aufbewahren.
!
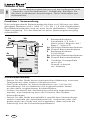
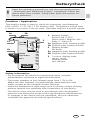
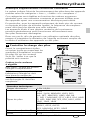
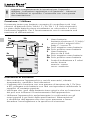
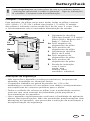
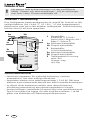
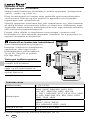
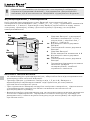
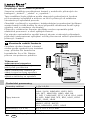
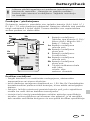
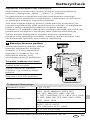
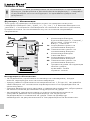
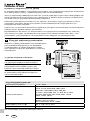
Funktion / Verwendung
Das vorliegendende Batterietestgerät dient zur Prüfung von allen
gängigen Batterien (AA / AAA / C / D / 9V / 1,5 Volt Knopfzellen).
Der Batteriezustandes wird an einer leicht ablesbaren, 3-farbigen
Skala angezeigt. Für den Betrieb ist keine Spannungsversorgung
erforderlich.
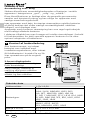
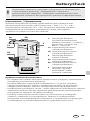
Batterieaufnahme:
Knopfzelle (1,5 Volt) /
Micro AAA / Mignon AA /
Baby C / Mono D
Minuspol Batterieaufnahme
Pluspol Batterieaufnahme
Batterieaufnahme:
9 Volt Block
Minuspol Batterieaufnahme
Pluspol Batterieaufnahme
3-farbige Anzeigeskala
grün: gut
orange: schwach
rot: ersetzen
1
1a
1b
2
2a
2b
3
Sicherheitshinweise
– Setzen Sie das Gerät keiner mechanischen Belastung, enormen
Temperaturen oder starken Vibrationen aus.
– Das Gerät arbeitet im Spannungsbereich von 1,5V bis 9V,
kontaktieren Sie nur Batterien mit entsprechenden Daten
an den dafür vorgesehenen Kontaktflächen.
– Achten Sie darauf das die Batterien polrichtig angeschlossen
werden, eine Verpolung kann die Funktion des Gerätes
beeinträchtigen.
– Setzen Sie das Gerät ausschließlich gemäß dem Verwendungs-
zweck innerhalb der Spezifikationen ein. Umbauten oder Ver-
änderungen am Gerät sind nicht gestattet, dabei erlischt die
Zulassung und die Sicherheitsspezifikation.

BatteryCheck
03
1
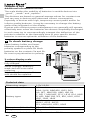
Technische Daten
Messbereiche 1,5V / 9,0V
Batterietypen
1,5V
AAA, SH16, MN2400, LR03, R03
AA, HP7, MN1500, UM3, LR6, R6
C, HP11, MN1400, SP11, LR14, R14, UM2
D, HP2, MN1399, SP2, R20, UM1, LR20
LR41, LR43, LR44
9,0V
6LR61, 6F22, 6LF22
PP3, MN1604, 6F22, 006P
Abmessungen (B x H x T) 67 x 110 x 32,5 mm
Gewicht 51 g
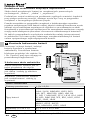
DE
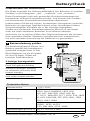
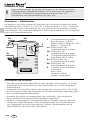
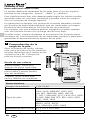
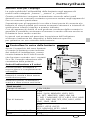
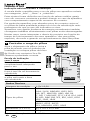
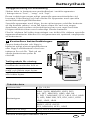
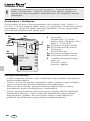
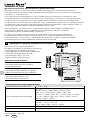
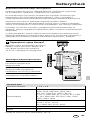
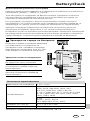
Batterieladung prüfen
Die Batterieaufnahme öffnen und
Batterie gemäß den Installations-
symbolen einlegen bzw. 9 Volt
Block-Batterien an die Kontakte
2a und 2b legen. Dabei auf
korrekte Polarität achten.
3-farbige Anzeigeskala
gut (grün): Batterie ist
noch voll gebrauchsfähig
schwach (orange): Batterie
ist schwach und muss bald
ersetzt werden
ersetzen (rot): Batterie ist leer
und sollte ersetzt werden
Zusatzhinweis zur Anwendung
Die Skala unterteilt die Gebrauchsfähigkeit von Batterien in mobilen
Geräten in die Kategorien „gut“, „schwach“ und „ersetzen“.
Diese Einteilungen sind nach generellen Durchschnittswerten bei
konstantem Verbrauch ermittelt worden, und können bei Geräten
mit besonderem Stromverbrauchsverhalten abweichen.
Insbesondere Geräte mit hohen, kurzzeitigen Stomspitzen und/oder
Batterien von geringer Qualität müssen unter Umständen frühere
Auswechselzyklen einhalten als in der Anzeige angegeben.
Geräte mit modernem Powermanagement können in der Regel
auch mit stark entleerten Batterien noch effektiv arbeiten.
Versuchen Sie in solchen Fällen den Zeigerauschlag auf die Laufzeit
Ihrer speziellen Geräte / Batterien entsprechend zu interpretieren,
um eine optimale Ausnutzung der Batterien zu garantieren.
Technische Änderungen vorbehalten. 08.14

04
DE
EU-Bestimmungen und Entsorgung
Das Gerät erfüllt alle erforderlichen Normen für
den freien Warenverkehr innerhalb der EU.
Dieses Produkt ist ein Elektrogerät und muss
nach der europäischen Richtlinie für Elektro-
und Elektronik-Altgeräte getrennt gesammelt und
entsorgt werden.
Weitere Sicherheits- und Zusatzhinweise unter:
www.laserliner.com/info

BatteryCheck
05
1a
1b
2a 2b
3
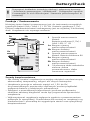
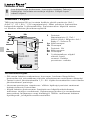
GB
Read the operating instructions and the enclosed brochure
„Guarantee and additional notices“ completely. Follow the
instructions they contain. Safely keep these documents for
future reference.
!
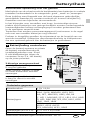
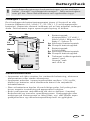
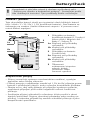
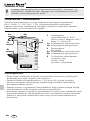
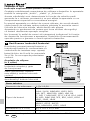
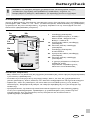
Function / Application
This battery tester is used to check all commonly used batteries
(AA / AAA / C / D / 9V / 1.5V button cells). The battery charge level
is shown on a clear 3-colour scale. Operates without a power supply.
Battery holder:
Button cell (1.5V) /
Micro AAA / Mignon AA /
Baby C / Mono D
Negative pole, battery holder
Positive pole, battery holder
Battery holder:
9V block
Negative pole, battery holder
Positive pole, battery holder
3-colour display scale
green: good
orange: weak
red: replace
1
1a
1b
2
2a
2b
3
Safety information
– Do not expose the device to mechanical stress, extreme
temperatures, moisture or significant vibration.
– The tester operates in the voltage range from 1.5V to 9V.
Make sure the inserted, correspondingly rated batteries only
make contact at the marked contact surfaces.
– Insert the batteries the right way round to ensure correct polarity;
polarity reversal can adversely affect operation of the device.
– The device must only be used in accordance with its intended
purpose and within the scope of the specifications. Modifications
or changes to the device are not permitted, this will otherwise
invalidate the approval and safety specifications.

06
Technical data
Measuring ranges 1,5V / 9,0V
Battery types
1,5V
AAA, SH16, MN2400, LR03, R03
AA, HP7, MN1500, UM3, LR6, R6
C, HP11, MN1400, SP11, LR14, R14, UM2
D, HP2, MN1399, SP2, R20, UM1, LR20
LR41, LR43, LR44
9,0V
6LR61, 6F22, 6LF22
PP3, MN1604, 6F22, 006P
Dimensions (W x H x D) 67 x 110 x 32,5 mm
Weight 51 g
1
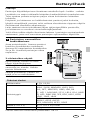
GB
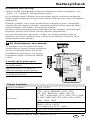
To check battery charge
Open battery holder and insert
batteries corresponding to the
polarity symbols or place 9V block
batteries on the contacts 2a and 2b.
Be sure to pay attention to polarity.
3-colour display scale
Good (green): battery
fully charged
Weak (orange): battery is
weak and will soon need
replacing
Replace (red): battery is at
and should be replaced
Additional information on use
The scale divides the usability of batteries in mobile devices into
„good“, „weak“ and „replace“.
The divisions are based on general average values for constant use
and can vary in devices with abnormal current consumption.
Especially in devices with high, temporary current peaks and/or for
inferior quality batteries, it may be necessary to change the battery
earlier than indicated on the display.
Devices with efficient power management can generally still operate
effectively even when the batteries are almost completely discharged.
In such cases try to correspondingly interpret the deflection of the
pointer in relation to the operating time of your specific device/
batteries to ensure optimum utilisation of the batteries.
Subject to technical changes without notice. 08.14

BatteryCheck
07
GB
Guarantee, product care and disposal
for the free movement of goods within the EU.
This product is an electric device and must be
collected separately for disposal according to
the European Directive on waste electrical and
electronic equipment.
Further safety and supplementary notices at:
www.laserliner.com/info

08
1a
1b
2a 2b
3
NL
Lees de bedieningshandleiding en de bijgevoegde brochure
‚Garantie- en aanvullende aanwijzingen‘ volledig door.
Volg de daarin beschreven aanwijzingen op. Bewaar deze
documentatie goed.
!
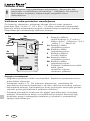
Functie / Toepassing
Het onderhavige batterijlaadtoestel is bedoeld voor de controle van
alle gangbare batterijen (AA / AAA / C / D / 9V / 1,5 volt knoop-
cellen). De batterijlaadtoestand wordt weergegeven op een goed af
te lezen, 3-kleurige schaal. Voor het gebruik is geen spanningsvoor-
ziening vereist.
Batterijhouder:
knoopcel (1,5 volt) /
micro AAA / mignon AA /
baby C / mono D
Minpool batterijhouder
Pluspool batterijhouder
Batterijhouder:
9 volt blok
Minpool batterijhouder
Pluspool batterijhouder
3-kleurige weergaveschaal
groen: goed
oranje: zwak
rood: vervangen
1
1a
1b
2
2a
2b
3
Veiligheidsinstructies
– Stel het apparaat niet bloot aan mechanische belasting, extreme
temperaturen, vocht of sterke trillingen.
– Het apparaat functioneert binnen het spanningsbereik van
1,5V tot 9V, plaats dus alleen batterijen met dienovereenkomstige
gegevens aan de daarvoor bestemde contactoppervlakken.
– Let bij het plaatsen van de batterijen op de correcte polariteit,
want een verkeerde polariteit kan de werking van het toestel
negatief beïnvloeden.
– Gebruik het apparaat uitsluitend doelmatig binnen de aangegeven
specificaties. Ombouwwerkzaamheden of veranderingen aan het
apparaat zijn niet toegestaan, hierdoor komen de goedkeuring en
de veiligheidsspecificatie te vervallen.

BatteryCheck
09
Technische gegevens
Meetbereiken 1,5V / 9,0V
Batterijtypes
1,5V
AAA, SH16, MN2400, LR03, R03
AA, HP7, MN1500, UM3, LR6, R6
C, HP11, MN1400, SP11, LR14, R14, UM2
D, HP2, MN1399, SP2, R20, UM1, LR20
LR41, LR43, LR44
9,0V
6LR61, 6F22, 6LF22
PP3, MN1604, 6F22, 006P
Afmetingen (B x H x D) 67 x 110 x 32,5 mm
Gewicht 51 g
1
NL
Batterijlading controleren
Open de batterij-opname en plaats
de batterij overeenkomstig de
installatiesymbolen resp. houd
9 volt-blokbatterijen tegen de
contacten 2a en 2 b. Let daarbij
op de juiste polariteit.
3-kleurige weergaveschaal
goed (groen): batterij
is nog vol geladen
zwak (oranje): batterij is zwak
en moet binnenkort worden
vervangen
vervangen (rood): batterij
is leeg en dient te worden
vervangen
Aanvullende opmerking voor het gebruik
Met behulp van de schaal wordt de bruikbaarheid van batterijen in mobiele
toestellen onderverdeeld in de categorieën ‚goed‘, ‚zwak‘ en ‚vervangen‘.
Deze indeling werd bepaald aan de hand algemeen gebruikelijke,
gemiddelde waarden bij constant verbruik en kunnen afwijken bij
toestellen met een bijzonder stroomverbruik.
In het bijzonder voor toestellen met hoge, kortstondige stroom-
pieken en/of batterijen van geringe kwaliteit moeten onder bepaalde
omstandigheden kortere vervangingscycli worden gehanteerd dan
in de weergave vermeld staat.
Toestellen met modern powermanagement functioneren in de regel
ook met zeer zwakke batterijen nog effectief.
Probeer in dergelijke gevallen de wijzerstand op de looptijd van uw
speciale toestellen / batterijen dienovereenkomstig te interpreteren
om een optimaal gebruik van de batterijen te garanderen.
Technische veranderingen voorbehouden. 08.14

10
NL
Garantie, onderhoud en afvoer
Het apparaat voldoet aan alle van toepassing
zijnde normen voor het vrije goederenverkeer
binnen de EU.
Dit product is een elektrisch apparaat en moet
volgens de Europese richtlijn voor oude elektrische
en elektronische apparatuur gescheiden verzameld
en afgevoerd worden.
Verdere veiligheids- en aanvullende instructies
onder: www.laserliner.com/info

BatteryCheck
11
1a
1b
2a 2b
3
DK
Læs betjeningsvejledningen og det vedlagte hæfte
„Garantioplysninger og supplerende anvisninger“ grundigt
igennem. Følg de heri indeholdte instrukser. Opbevar disse
dokumenter omhyggeligt.
!
Funktion / Anvendelse
Denne batteritester kan anvendes til kontrol af alle almindelige
batterier (AA / AAA / C / D / 9V / 1,5V knapcellebatterier).
Batteriets status vises på en let aflæsbar, 3-farvet skala.
Til driften kræves ingen ekstern strømforsyning.
Indsætning af batteri:
Knapcelle (1,5V) /
Micro AAA / Mignon AA /
Baby C / Mono D
Minuspol batterirum
Pluspol batterirum
Batterirum:
9V-blok
Minuspol batterirum
Pluspol batterirum
3-farvet displayskala
grøn: god
orange: svag
rød: udskift
1
1a
1b
2
2a
2b
3
Sikkerhedsanvisninger
– Undgå at udsætte apparatet for mekaniske belastninger,
meget høje temperaturer, fugt eller kraftige vibrationer.
– Apparatet arbejder i spændingsområdet fra 1,5V til 9V;
kun batterier med tilsvarende data må sluttes til de hertil
indrettede kontaktflader.
– Sørg for, at batterierne tilsluttes med korrekt polaritet,
da forkert polaritet kan forringe apparatets funktion.
– Apparatet må kun bruges til det tiltænkte anvendelsesformål
inden for de givne specifikationer. Ombygning eller ændring
af apparatet er ikke tilladt og vil medføre, at godkendelsen
og sikkerhedsspecifikationerne bortfalder.

12
1
Tekniske data
Måleområder 1,5V / 9,0V
Batterityper
1,5V
AAA, SH16, MN2400, LR03, R03
AA, HP7, MN1500, UM3, LR6, R6
C, HP11, MN1400, SP11, LR14, R14, UM2
D, HP2, MN1399, SP2, R20, UM1, LR20
LR41, LR43, LR44
9,0V
6LR61, 6F22, 6LF22
PP3, MN1604, 6F22, 006P
Mål (B x H x D) 67 x 110 x 32,5 mm
Vægt 51 g
DK
Kontrol af batteriladning
Åbn batterirummet, og indsæt
batteriet som indikeret med
installations symbolerne, eller indsæt
9V-blokbatterier i kontakt 2a og 2b.
Vær opmærksom på de angivne
poler.
3-farvet displayskala
god (grøn): Batteri er stadigt
fuldt anvendeligt
svag (orange): Batteriet er
svagt og skal snart udskiftes
udskift (rød): Batteriet er
aadet og bør udskiftes
Anmærkning vedr. brug
Skalaen klassificerer anvendelighedsgraden af batterier i mobile
apparater i kategorierne „god“, „svag“ og „udskift“.
Disse klassifikationer er fastlagt efter de generelle gennemsnits-
værdier ved konstant forbrug og kan afvige for apparater med
særlige strømforbrugsforhold.
Især apparater med høje, kortvarige strømspidser og/eller batterier
af dårlig kvalitet skal under særlige omstændigheder udskiftes
tidligere, end displayet viser.
Apparater med moderne strømstyring kan som regel også arbejde
med kraftigt afladede batterier.
I sådanne tilfælde kan man forsøge at fortolke viserudslaget i forhold
til funktionstiden for de(t) specielle apparat / batterier for at sikre
optimal udnyttelse af batterierne.
Tekniske forandringer forbeholdes. 08.14

BatteryCheck
13
DK
Garanti, produktpleje og bortskaffelse
Apparatet opfylder alle påkrævede standarder for
fri vareomsætning inden for EU.
Dette produkt er et elapparat og skal indsamles
og bortskaffes separat i henhold til EF-direktivet
for (brugte) elapparater.
Flere sikkerhedsanvisninger og supplerende tips på:
www.laserliner.com/info

14
1a
1b
2a 2b
3
FR
Lisez entièrement le mode d‘emploi et le carnet ci-joint
„Remarques supplémentaires et concernant la garantie“
ci-jointes. Suivez les instructions mentionnées ici.
Conservez ces informations en lieu sûr.
!
Fonction / Utilisation
Le testeur de piles présenté permet de contrôler toutes les piles
courantes (AA / AAA / C / D / 9V / piles boutons 1,5V). L’état de
charge de la pile est indiqué sur un cadran trois couleurs facile-
ment lisible. Aucune alimentation électrique externe n’est requise
pour le fonctionnement.
Compartiment à piles:
Pile bouton (1,5V) /
Micro AAA / Mignon AA /
Baby C / Mono D
Pôle moins du
compartiment à piles
Pôle plus du
compartiment à piles
Compartiment à piles:
Pile plate de 9 volts
Pôle moins du
compartiment à piles
Pôle plus du
compartiment à piles
Cadran trois couleurs
à aiguille
vert: bon
orange: faible
rouge: remplacer
1
1a
1b
2
2a
2b
3
Consignes de sécurité
– Ne pas soumettre l’appareil à une charge mécanique, ni à des
températures extrêmes ni à de l’humidité ou à des vibrations
importantes.
– L’appareil fonctionne dans une plage de courant de 1,5Và 9V,
ne connecter avec les surfaces de contact prévues que des piles
de caractéristiques adaptées.
– Installer les piles en respectant leur polarité, une inversion
de la polarité pouvant endommager l’appareil.
– Utiliser uniquement l’instrument pour l’emploi prévu dans le
cadre des spécifications. Des changements ou modifications
sur l’appareil ne sont pas permis, sinon l’autorisation et la
spécification de sécurité s’annulent.

BatteryCheck
15
Données techniques
Plages de mesure 1,5V / 9,0V
Types de piles
1,5V
AAA, SH16, MN2400, LR03, R03
AA, HP7, MN1500, UM3, LR6, R6
C, HP11, MN1400, SP11, LR14, R14, UM2
D, HP2, MN1399, SP2, R20, UM1, LR20
LR41, LR43, LR44
9,0V
6LR61, 6F22, 6LF22
PP3, MN1604, 6F22, 006P
Dimensions (L x H x P) 67 x 110 x 32,5 mm
Poids 51 g
1
FR
Contrôler la charge des piles
Ouvrir le compartiment à piles
et insérer la pile en respectant les
symboles d’installation ou placer
les piles 9V sur les contacts
2a et 2b. Veiller à ce que la
polarité soit correcte.
Cadran trois couleurs
à aiguille
bon (vert): La pile est encore
chargée complètement
faible (orange): La pile est
faiblement chargée et doit
être bientôt remplacée
remplacer (rouge): La pile
est déchargée et doit être
remplacée
Remarque supplémentaire concernant l’utilisation
Le cadran indique l’état de fonctionnement des piles dans des appareils
mobiles selon les catégories «bon», «faible» et «remplacer».
Ces catégories sont établies en fonction des valeurs moyennes
générales pour une utilisation constante et peuvent différer pour
des appareils ayant une consommation électrique particulière.
En particulier, pour les appareils présentant de brefs pics de courant
ou équipés de piles de moindre qualité, la fréquence de remplace-
ment doit être plus élevée que celle indiquée.
Les appareils dotés d’une gestion moderne de la puissance
peuvent généralement aussi fonctionner efficacement avec
des piles fortement déchargées.
Dans ces cas-là, afin de garantir une utilisation optimale des piles,
essayer d’interpréter la déviation de l’aiguille en tenant compte de
la durée d’utilisation des appareils ou des piles.
Sous réserve de modifications techniques. 08.14

16
FR
Garantie, entretien du produit et élimination
L‘appareil est conforme à toutes les normes nécessaires
pour la libre circulation des marchandises dans l‘Union
européenne.
Ce produit est un appareil électrique et doit donc faire
l‘objet d‘une collecte et d‘une mise au rebut sélectives
conformément à la directive européenne sur les anciens
appareils électriques et électroniques (directive DEEE).
Autres remarques complémentaires et consignes de
sécurité sur www.laserliner.com/info

BatteryCheck
17
1a
1b
2a 2b
3
ES
Lea atentamente las instrucciones de uso y el pliego
adjunto „Garantía e información complementaria“.
Siga las instrucciones indicadas en ellas. Guarde bien
esta documentación.
!
Función / Uso
El presente aparato sirve para probar todas las pilas estándar
(AA / AAA / C / D / 9V / botón de 1,5 voltios). El estado de la pila
se indica mediante una escala de 3 colores fácilmente legible.
Para el uso no se requiere alimentación de tensión.
Compartimento de pila:
pila de botón (1,5 voltios) /
Micro AAA / Mignon AA /
Baby C / Mono D
Compartimento de pila,
polo negativo
Compartimento de pila,
polo positivo
Compartimento de pila:
bloque de 9 voltios
Compartimento de pila,
polo negativo
Compartimento de pila,
polo positivo
Escala de tres colores
verde: buena
naranja: débil
rojo: cambiar
1
1a
1b
2
2a
2b
3
Indicaciones de seguridad
– No exponga el aparato a cargas mecánicas, temperaturas muy
elevadas, humedad o vibraciones fuertes.
– El aparato trabaja en un rango de tensión de 1,5V a 9V.
Conecte al aparato únicamente pilas con los datos correspondientes
en los puntos de contacto previstos.
– Preste atención a la correcta polaridad de las pilas, la colocación
incorrecta puede afectar al funcionamiento del aparato.
– Utilice el aparato únicamente para los usos previstos dentro de
las especificaciones. No está permitido realizar transformaciones
ni cambios en el aparato, en ese caso pierde su validez la
homologación y la especificación de seguridad.

18
Datos técnicos
Rangos de medición 1,5V / 9,0V
Tipos de pilas
1,5V
AAA, SH16, MN2400, LR03, R03
AA, HP7, MN1500, UM3, LR6, R6
C, HP11, MN1400, SP11, LR14, R14, UM2
D, HP2, MN1399, SP2, R20, UM1, LR20
LR41, LR43, LR44
9,0V
6LR61, 6F22, 6LF22
PP3, MN1604, 6F22, 006P
Dimensiones (An x Al x F) 67 x 110 x 32,5 mm
Peso 51 g
1
ES
Comprobación de la
carga de la pila
Abrir la sujeción de la pila, colocar
esta como se indica con los símbolos,
las pilas de bloque de 9 voltios en los
contactos 2a y 2b. Coloque las
pilas en el polo correcto.
Escala de tres colores
Buena (verde): la pila aún
dispone de plena capacidad
Débil (naranja): la carga de la
pila es débil y pronto tendrá
que ser cambiada
Cambiar (rojo): la pila está
vacía y debería ser cambiada
Nota adicional sobre el uso
La escala clasifica la capacidad de las pilas para el uso en equipos
móviles en las categorías „buena“, „débil“ y „cambiar“.
Esas clasificaciones han sido determinadas según los valores medios
generales para un consumo constante y pueden variar en equipos
con un consumo de energía especial.
En particular los equipos con puntas de corriente elevadas y breves
y/o las pilas de baja calidad tendrán que ser cambiadas con mayor
frecuencia de la indicada en función de las circunstancias.
Los equipos con una moderna gestión energética pueden trabajar
aún con eficacia incluso con la carga de pila muy baja.
En tales casos, intente interpretar el movimiento de la aguja según
el tiempo de funcionamiento de sus especiales equipos o pilas para
garantizar el aprovechamiento óptimo de las pilas.
Sujeto a modificaciones técnicas. 08.14

BatteryCheck
19
ES
Garantía, cuidado y eliminación
El aparato cumple todas las normas requeridas
para el libre tráfico de mercancías en la UE.
Se trata de un aparato eléctrico, por lo que debe ser
recogido y eliminado por separado conforme a la
directiva europea relativa a los aparatos eléctricos y
electrónicos usados.
Más información detallada y de seguridad en:
www.laserliner.com/info

20
1a
1b
2a 2b
3
IT
Leggere completamente le istruzioni per l‘opuscolo
allegato „Indicazioni aggiuntive e di garanzia“. Attenersi
alle indicazioni ivi riportate. Conservare con cura questa
documentazione.
!
Funzione / Utilizzo
Il presente tester per batterie consente di controllare tutti i tipi
comuni di batterie (AA / AAA / C / D / 9V / 1,5 Volt a bottone).
Lo stato della batteria viene visualizzato su una scala a 3 colori,
facilmente leggibile. Per il funzionamento non è necessaria una
tensione di alimentazione.
Vano batterie:
batteria a bottone (1,5 Volt) /
micro AAA / mignon AA /
baby C / mono D
Polo negativo vano batterie
Polo positivo vano batterie
Vano batterie:
blocco da 9 Volt
Polo negativo vano batterie
Polo positivo vano batterie
Scala di indicazione a 3 colori
verde: buona
arancio: scarsa
rosso: sostituire
1
1a
1b
2
2a
2b
3
Indicazioni di sicurezza
– Non sottoporre l‘apparecchio a carichi meccanici, elevate
temperature, umidità o forti vibrazioni.
– L‘apparecchio funziona con una gamma di tensione da 1,5V fino
a 9V; collegare solo batterie con dati corrispondenti utilizzando le
superfici di contatto previste.
– Verificare che i poli delle batterie siano giusti e che un‘inversione
dei poli non influenzi il funzionamento dell‘apparecchio.
– Utilizzare l‘apparecchio esclusivamente in conformità con gli
scopi previsti e nei limiti delle specificazioni. Manomissioni
o modifiche dell‘apparecchio non sono ammesse e fanno
decadere l‘omologazione e la specifica di sicurezza.
Pagina se încarcă...
Pagina se încarcă...
Pagina se încarcă...
Pagina se încarcă...
Pagina se încarcă...
Pagina se încarcă...
Pagina se încarcă...
Pagina se încarcă...
Pagina se încarcă...
Pagina se încarcă...
Pagina se încarcă...
Pagina se încarcă...
Pagina se încarcă...
Pagina se încarcă...
Pagina se încarcă...
Pagina se încarcă...
Pagina se încarcă...
Pagina se încarcă...
Pagina se încarcă...
Pagina se încarcă...
Pagina se încarcă...
Pagina se încarcă...
Pagina se încarcă...
Pagina se încarcă...
Pagina se încarcă...
Pagina se încarcă...
Pagina se încarcă...
Pagina se încarcă...
Pagina se încarcă...
Pagina se încarcă...
Pagina se încarcă...
Pagina se încarcă...
Pagina se încarcă...
Pagina se încarcă...
Pagina se încarcă...
Pagina se încarcă...
Pagina se încarcă...
Pagina se încarcă...
Pagina se încarcă...
Pagina se încarcă...
Pagina se încarcă...
Pagina se încarcă...
Pagina se încarcă...
Pagina se încarcă...
Pagina se încarcă...
Pagina se încarcă...
Pagina se încarcă...
Pagina se încarcă...
-
 1
1
-
 2
2
-
 3
3
-
 4
4
-
 5
5
-
 6
6
-
 7
7
-
 8
8
-
 9
9
-
 10
10
-
 11
11
-
 12
12
-
 13
13
-
 14
14
-
 15
15
-
 16
16
-
 17
17
-
 18
18
-
 19
19
-
 20
20
-
 21
21
-
 22
22
-
 23
23
-
 24
24
-
 25
25
-
 26
26
-
 27
27
-
 28
28
-
 29
29
-
 30
30
-
 31
31
-
 32
32
-
 33
33
-
 34
34
-
 35
35
-
 36
36
-
 37
37
-
 38
38
-
 39
39
-
 40
40
-
 41
41
-
 42
42
-
 43
43
-
 44
44
-
 45
45
-
 46
46
-
 47
47
-
 48
48
-
 49
49
-
 50
50
-
 51
51
-
 52
52
-
 53
53
-
 54
54
-
 55
55
-
 56
56
-
 57
57
-
 58
58
-
 59
59
-
 60
60
-
 61
61
-
 62
62
-
 63
63
-
 64
64
-
 65
65
-
 66
66
-
 67
67
-
 68
68


Laserliner BatteryCheck Manualul proprietarului
- Tip
- Manualul proprietarului
în alte limbi
Lucrări înrudite
Alte documente
-
Hama 00004634 Manual de utilizare
-
 Baby Annabell Magic Meal Manual de utilizare
-
Clatronic MC 2773 Manualul proprietarului
-
Philips PX840T/12 Ghid de inițiere rapidă
-
-
Uniross RC103476B Manualul proprietarului
-
ANSMANN 802828 Fișa cu date
-
-
-
