
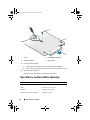
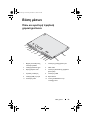
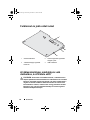
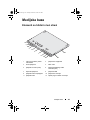
Dell™ Latitude™ XT2 Media Base
fc.fm Page 1 Wednesday, December 3, 2008 11:40 AM

book.book Page 2 Tuesday, December 2, 2008 1:03 PM

Dell™ Latitude™ XT2 Media Base
Model PR12S
book.book Page 1 Tuesday, December 2, 2008 1:03 PM

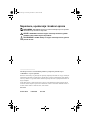
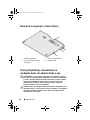
Notes, Cautions, and Warnings
NOTE: A NOTE indicates important information that helps you make better use of your
computer.
CAUTION: A CAUTION indicates either potential damage to hardware or loss of data
and tells you how to avoid the problem.
WARNING: A WARNING indicates a potential for property damage, personal injury,
or death.
____________________
Information in this document is subject to change without notice.
© 2008 Dell Inc. All rights reserved.
Reproduction of these materials in any manner whatsoever without the written permission of Dell Inc.
is strictly forbidden.
Trademarks used in this text: Dell, the DELL logo, and Latitude are trademarks of Dell Inc.; Microsoft and
Windows are registered trademarks of Microsoft Corporation in the United States and/or other countries.
Other trademarks and trade names may be used in this document to refer to either the entities claiming the
marks and names or their products. Dell Inc. disclaims any proprietary interest in trademarks and trade
names other than its own.
Model PR12S
November 2008 P/N H276N Rev. A00
book.book Page 2 Tuesday, December 2, 2008 1:03 PM

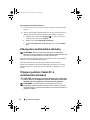
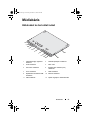
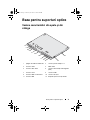
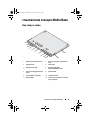
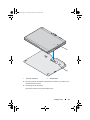
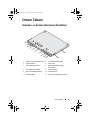
Media Base 3
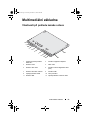
Media Base
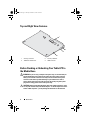
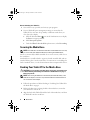
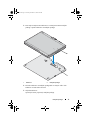
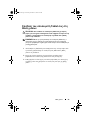
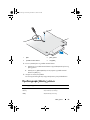
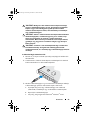
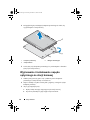
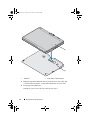
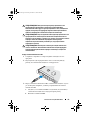
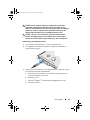
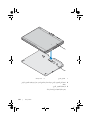
Back and Left View Features
1 Tablet-PC release lever 2 AC adapter connector
3 audio connector 4 IEEE 1394
5 VGA video connector 6 digital video interface (DVI) connector
7 serial connector 8 USB connector
9 powered USB connector 10 network connector
11 USB connector 12 optical drive in media bay
1
2
3
4
5
6
9
7
10
8
11
12
book.book Page 3 Tuesday, December 2, 2008 1:03 PM

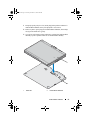
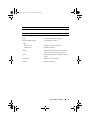
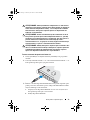
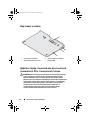
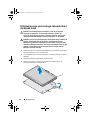
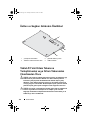
4 Media Base
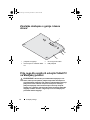
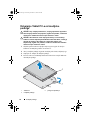
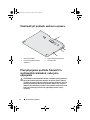
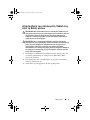
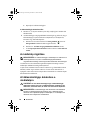
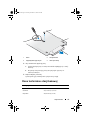
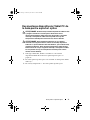
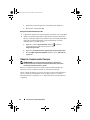
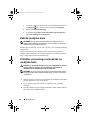
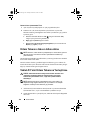
Top and Right View Features
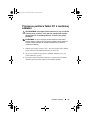
Before Docking or Undocking Your Tablet-PC to
the Media Base
WARNING: If you are using a multiple-outlet power strip, use caution when you
plug the AC adapter power cable into the power strip. Some power strips may
allow you to insert the connector incorrectly. Incorrect insertion of the power
connector could result in permanent damage to your media base as well as
electric shock and/or fire. Ensure that you insert the ground prong of the power
plug into the mating ground contact of the power strip.
CAUTION: Always use the Dell AC adapter that came with the media base. If you
use any other commercially available AC adapter—or the AC adapter from earlier
models of Dell computers—you may damage the media base or the Tablet-PC.
1 docking connector 2 security cable slot
3 Tablet-PC release lever 4 USB connector
4
3
2
1
book.book Page 4 Tuesday, December 2, 2008 1:03 PM

Media Base 5
CAUTION: When you disconnect the Dell AC adapter cable from the Tablet-PC or
media base, hold the connector, not the cable itself, and pull firmly but gently to
avoid damaging the cable. When you wrap the AC adapter cable, ensure that you
follow the angle of the connector on the AC adapter to avoid damaging the cable.
CAUTION: Use the Latitude™ XT2 media base with your Latitude XT2 only. If you
use a media base from earlier models of Dell computers you may damage the
media base or the Tablet-PC.
Before Docking Your Tablet-PC
1
Save and close any open files, and exit any open programs.
2
Connect the AC adapter to the AC adapter connector on the media base
and to an electrical outlet.
3
Before you dock your Tablet-PC to the media base for the
first time
,
the Tablet-PC operating system must have completed its setup process:
a
Ensure that the Tablet-PC is
not
connected (docked) to the media
base or to the battery slice.
b
Turn on the Tablet-PC.
c
Verify that the Microsoft
®
Windows
®
desktop appears.
d
Shut down the Tablet-PC
.
book.book Page 5 Tuesday, December 2, 2008 1:03 PM

6 Media Base
Before Undocking Your Tablet-PC
1
Save and close any open files, and exit any open programs.
2
Set your Tablet-PC power management settings to ensure that the
Tablet-PC does not enter sleep, standby, or hibernate mode when you
close (lower) the display:
a
Click the Windows
Power
icon
in the Notification area to display
the
Power
icon pop-up window.
b
Click
More power options
.
c
Under the
When I close the lid
drop-down menu, select
Do nothing.
Securing the Media Base
NOTE: If the Tablet-PC is docked to the media base and the media base is secured,
you cannot undock the Tablet-PC without first removing the antitheft device.
Attach a commercially available antitheft device to the security cable slot on
the media base.
Antitheft devices usually include a segment of metal-stranded cable with an
attached locking device and associated key. For instructions on installing this
kind of antitheft device, see the documentation that accompanied the device.
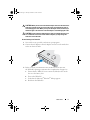
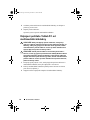
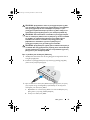
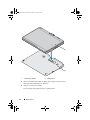
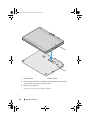
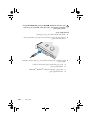
Docking Your Tablet-PC to the Media Base
CAUTION: If you are docking your Tablet-PC for the first time, complete the steps
in "Before Docking or Undocking Your Tablet-PC to the Media Base" on page 4,
before your proceed.
NOTE: After docking the Tablet-PC for the first time, the Tablet-PC battery or the
Tablet-PC AC adapter connection can power the media base if the media base is
not connected to an AC adapter.
1
Follow the procedures in "Before Docking or Undocking Your Tablet-PC to
the Media Base" on page 4.
2
If this is the first time it is being docked to the media base, ensure that
your Tablet-PC is turned off .
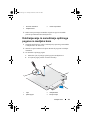
3
Align the back of the Tablet-PC with the back of the media base, and lower
the Tablet-PC onto the media base.
book.book Page 6 Tuesday, December 2, 2008 1:03 PM

Media Base 7
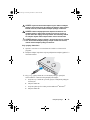
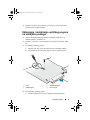
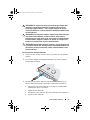
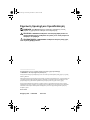
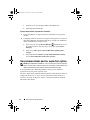
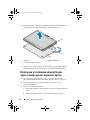
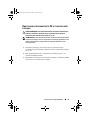
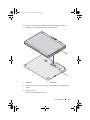
4
Press the Tablet-PC onto the media base until it clicks and the Tablet-PC
is firmly seated.
5
Turn on the Tablet-PC.
The operating system recognizes the media base.
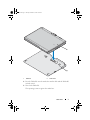
1 Tablet-PC 2 media base
1
2
book.book Page 7 Tuesday, December 2, 2008 1:03 PM

8 Media Base
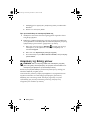
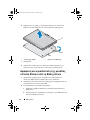
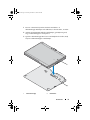
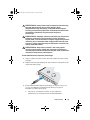
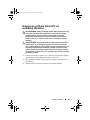
Undocking Your Tablet-PC From the Media Base
CAUTION: Never undock the Tablet-PC without first preparing the Tablet-PC for
undocking. If you undock before preparing the Tablet-PC, you will lose data and
the Tablet-PC may not recover normal operation for several minutes, if at all.
CAUTION: If the Tablet-PC does not have a charged battery in the battery bay, you
must shut down the Tablet-PC through the Windows Start menu and then undock
the Tablet-PC. If you undock the Tablet-PC without a battery before shutting it
down, you will lose data and the Tablet-PC may not recover normal operation for
several minutes, if at all.
1
Follow the procedures in "Before Docking or Undocking Your Tablet-PC to
the Media Base" on page 4.
2
If your media base is secured using an anti-theft device, unlock it.
3
Disconnect the AC adapter connector from the media base.
4
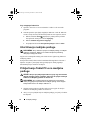
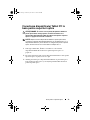
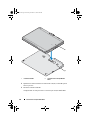
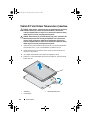
Pull the Tablet-PC release lever forward to release the Tablet-PC from the
media base.
5
Lift the back of the Tablet-PC up and slide the Tablet-PC out towards the
back of the media base.
1 Tablet-PC 2
release lever
3 media base
1
2
3
book.book Page 8 Tuesday, December 2, 2008 1:03 PM

Media Base 9
Removing and Installing the Optical Drive From
the Media Base
1
Undock the media base (see "Undocking Your Tablet-PC From the Media
Base" on page 8).
2
Save and close any open files or programs, and turn off the Tablet-PC.
3
To remove the optical drive:
a
Remove the screw that secures the optical drive to the media base.
b
Use your screwdriver to slide the drive out of the media bay.
4
To install the optical drive:
a
Insert the optical drive into the media bay on the media base.
b
Insert the securing screw that holds the optical drive in place.
5
Turn on the Tablet-PC.
The operating system automatically recognizes the new drive.
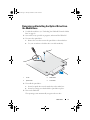
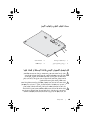
1 screw 2 media base
3 optical drive 4 screw hole
2
3
1
4
book.book Page 9 Tuesday, December 2, 2008 1:03 PM

10 Media Base
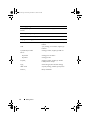
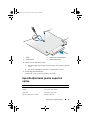
Media Base Specifications
Physical
Height 12.8 mm (0.50 inches)
Width 295.31 mm (11.63 inches)
Depth 222.56 mm (8.76 inches)
Weight (without optical drive) 0.488 kg (1.076 lb)
Storage
Optical Drive (optional) DVD-ROM/DVD+RW
Ports and Connectors
Network RJ-45 port for 10/100/1000 Mbits/second
Ethernet
USB three 4-pin USB-2.0 compliant connectors
Powered USB one 9-pin USB-2.0 compliant connector
Video
VGA connector
15-pin VGA connector
DVI connector
24-hole connector
Serial 9-pin connector; 16550C-compatible UART
with 16-byte buffer
Audio headphone/speaker (line-out) mini connector
IEEE 1394a 4-pin serial connector
Docking 100-pin connector
book.book Page 10 Tuesday, December 2, 2008 1:03 PM

Dell™ Latitude™ XT2 Medijska
podloga
Model PR12S
book.book Page 11 Tuesday, December 2, 2008 4:01 PM

Napomene, upozorenja i znakovi opreza
NAPOMENA: NAPOMENA ukazuje na važne informacije koje vam pomažu
da koristite svoje računalo na bolji način.
OPREZ: OBAVIJEST označava moguće oštećenje hardvera ili gubitak
podataka i otkriva kako izbjeći neki problem.
UPOZORENJE: OPREZ ukazuje na moguće oštećenje imovine, tjelesne
povrede ili smrt.
____________________
Informacije navedene u ovom dokumentu podložne su promjeni bez prethodne najave.
© 2008 Dell Inc. Sva prava pridržana.
Bilo kakvo umnožavanje ovog materijala bez pismenog dopuštenja tvrtke Dell Inc. strogo je zabranjeno.
Zaštitni znakovi korišteni u ovom tekstu: Dell, logotip DELL i Latitude su zaštitni znakovi tvrtke Dell Inc.;
Microsoft i Windows su registrirani zaštitni znakovi korporacije Microsoft u Sjedinjenim Državama i/ili
drugim zemljama.
Ostali zaštitni znakovi i zaštićeni nazivi koji se koriste u ovom dokumentu označavaju društva koji su
vlasnici tih znakova ili njihove proizvode. Tvrtka Dell Inc. odriče se bilo kakvih vlasničkih interesa za
navedene zaštitne znakove i zaštićene nazive, osim vlastitih.
Model PR12S
Studeni 2008. P/N H276N Rev. A00
book.book Page 12 Tuesday, December 2, 2008 4:01 PM

medijska podloga 13
medijska podloga
Značajke dostupne sa stražnje i lijeve
strane
1 Ručica kojom se oslobađa
Tablet PC
2 Priključak za AC adapter
3 audio priključak 4 IEEE 1394
5 VGA video priključak 6 priključak za digitalno videosučelje
(DVI)
7 serijski priključak 8 USB priključak
9 USB priključak pod naponom 10 mrežni priključak
11 USB priključak 12 optički pogon u udubljenju za medij
1
2
3
4
5
6
9
7
10
8
11
12
book.book Page 13 Tuesday, December 2, 2008 4:01 PM

14 medijska podloga
Značajke dostupne s gornje i desne
strane
Prije nego što spojite ili odvojite Tablet PC
na Medijskoj podlozi
UPOZORENJE: Ako koristite provodnik kabela napajanja s više
izlaza, budite oprezni prilikom priključivanja kabela AC adaptera u
provodnik kabela napajanja. Kod nekih provodnika kabela napajanja
priključak se može umetnuti neispravno. Neispravno umetanje
priključka napajanja može uzrokovati trajno oštećenje medijske
podloge, kao i električni udar i/ili požar. Zubac uzemljenja priključka
napajanja svakako umetnite u odgovarajući utor za uzemljenje na
provodniku kabela napajanja.
1 priključak za spajanje 2 utor za sigurnosni kabel
3 Ručica kojom se oslobađa Tablet
PC
4 USB priključak
4
3
2
1
book.book Page 14 Tuesday, December 2, 2008 4:01 PM

medijska podloga 15
OPREZ: Uvijek koristite Dell AC adapter koji ste dobili uz medijsku
podlogu. Ako koristite druge AC adaptere ili adaptere ranijih modela
Dellovih računala, možete oštetiti medijsku podlogu ili Tablet PC.
OPREZ: Prilikom odspajanja Dell AC adaptera od Tablet PC-a ili
medijske podloge, držite utikač (ne kabel) i izvucite ga čvrsto, ali
oprezno kako biste izbjegli oštećenje kabela. Kod namatanja kabela
AC adaptera slijedite utikač adaptera kako ne biste oštetili kabel.
OPREZ: Medijsku podlogu Latitude™ XT2 koristite samo uz Latitude
XT2. Ako koristite medijsku podlogu starijih modela Dell računala,
možete oštetiti medijsku podlogu ili Tablet PC.
Prije spajanja Tablet PC-a
1 Spremite i zatvorite sve otvorene datoteke i izađite iz svih otvorenih
programa.
2 Priključite adapter izmjenične struje na priključak na medijskoj podlozi i u
električnu utičnicu.
3 Prije prvog spajanja Tablet PC-a na medijsku podlogu, operacijski
sustav Tablet PC-a mora dovršiti postupak postavljanja:
a Provjerite nije li Tablet PC povezan (spojen) s medijskom podlogom
ili baterijom.
b Uključite Tablet PC.
c Provjerite prikazuje li se radna površina Microsoft
®
Windows
®
.
d Isključite Tablet PC.
book.book Page 15 Tuesday, December 2, 2008 4:01 PM

16 medijska podloga
Prije odspajanja Tablet PC-a
1 Spremite i zatvorite sve otvorene datoteke i izađite iz svih otvorenih
programa.
2 Odredite postavke upravljanja napajanjem Tablet PC-a tako da Tablet PC
ne uđe u stanje mirovanja ili hibernacije kada zatvorite (spustite) zaslon:
a Kliknite Windows ikonu Napajanje u području obavijesti kako
biste prikazali skočni prozor ikone Napajanje.
b Kliknite Dodatne mogućnosti napajanja.
c Na padajućem izborniku Kad spustim poklopac odaberite Ništa.
Učvršćivanje medijske podloge
NAPOMENA: Ako je Tablet PC spojen na medijsku podlogu, a medijska
podloga je učvršćena, Tablet PC ne možete odvojiti bez prethodnog
uklanjanja uređaja protiv krađe.
Spojite neki od dostupnih uređaja protiv krađe na utor sigurnosnog kabela na
medijskoj podlozi.
Protuprovalni uređaji obično sadrže komad metaliziranog kabela s lokotom i
ključem. Za upute o postavljanju takvog uređaja protiv krađe pogledajte
dokumentaciju koju ste dobili s uređajem.
Priključivanje Tablet PC-a na medijsku
podlogu
OPREZ: Ako prvi put priključujete Tablet PC, prije nego što nastavite
obavite postupke opisane u odjeljku "Prije nego što spojite ili odvojite
Tablet PC na Medijskoj podlozi" na stranici 14.
NAPOMENA: Ako medijska podloga nije priključena na AC adapter,
nakon prvog priključivanja Tablet PC-a medijsku podlogu može napajati
baterija Tablet PC-a ili AC adapter Tablet PC-a.
1 Slijedite upute navedene u odjeljku "Prije nego što spojite ili odvojite
Tablet PC na Medijskoj podlozi" na stranici 14.
2 Ako je ovo prvo priključivanje na medijsku podlogu, provjerite je li Tablet
PC isključen .
book.book Page 16 Tuesday, December 2, 2008 4:01 PM

medijska podloga 17
3 Poravnajte stražnju stranu Tablet PC-a sa stražnjom stranom medijske
podloge i spustite Tablet PC na medijsku podlogu.
4 Pritisnite Tablet PC na medijsku podlogu dok ne začujete "klik" i dok
Tablet PC ne bude dobro učvršćen.
5 Uključite Tablet PC.
Operacijski sustav prepoznaje medijsku podlogu.
1 Tablet PC 2 medijska podloga
1
2
book.book Page 17 Tuesday, December 2, 2008 4:01 PM

18 medijska podloga
Odvajanje Tablet PC-a od medijske
podloge
OPREZ: Prije odvajanja Tablet PC-a, uvijek ga prethodno pripremite.
Ako odvajanje obavite bez pripreme, izgubit ćete podatke, a Tablet PC
možda neće nekoliko minuta ili uopće nastaviti s radom.
OPREZ: Ako Tablet PC nema napunjenu bateriju u utoru bateriju,
Tablet PC morate isključiti putem Windows izbornika Start, a zatim ga
odvojiti od podloge. Ako Tablet PC odvojite bez baterije prije
isključivanja, izgubit ćete podatke, a Tablet PC možda neće nekoliko
minuta ili uopće nastaviti s radom.
1 Slijedite upute navedene u odjeljku "Prije nego što spojite ili odvojite
Tablet PC na Medijskoj podlozi" na stranici 14.
2 Ako je medijska podloga osigurana uređajem protiv krađe, otključajte ga.
3 Odspojite AC adapter od medijske podloge.
4 Povucite ručicu za oslobađanje Tablet PC-a kako biste odvojili Tablet PC
od medijske podloge.
1 Tablet PC 2 poluga za otpuštanje
3 medijska podloga
1
2
3
book.book Page 18 Tuesday, December 2, 2008 4:01 PM
Pagina se încarcă...
Pagina se încarcă...
Pagina se încarcă...
Pagina se încarcă...
Pagina se încarcă...
Pagina se încarcă...
Pagina se încarcă...
Pagina se încarcă...
Pagina se încarcă...
Pagina se încarcă...
Pagina se încarcă...
Pagina se încarcă...
Pagina se încarcă...
Pagina se încarcă...
Pagina se încarcă...
Pagina se încarcă...
Pagina se încarcă...
Pagina se încarcă...
Pagina se încarcă...
Pagina se încarcă...
Pagina se încarcă...
Pagina se încarcă...
Pagina se încarcă...
Pagina se încarcă...
Pagina se încarcă...
Pagina se încarcă...
Pagina se încarcă...
Pagina se încarcă...
Pagina se încarcă...
Pagina se încarcă...
Pagina se încarcă...
Pagina se încarcă...
Pagina se încarcă...
Pagina se încarcă...
Pagina se încarcă...
Pagina se încarcă...
Pagina se încarcă...
Pagina se încarcă...
Pagina se încarcă...
Pagina se încarcă...
Pagina se încarcă...
Pagina se încarcă...
Pagina se încarcă...
Pagina se încarcă...
Pagina se încarcă...
Pagina se încarcă...
Pagina se încarcă...
Pagina se încarcă...
Pagina se încarcă...
Pagina se încarcă...
Pagina se încarcă...
Pagina se încarcă...
Pagina se încarcă...
Pagina se încarcă...
Pagina se încarcă...
Pagina se încarcă...
Pagina se încarcă...
Pagina se încarcă...
Pagina se încarcă...
Pagina se încarcă...
Pagina se încarcă...
Pagina se încarcă...
Pagina se încarcă...
Pagina se încarcă...
Pagina se încarcă...
Pagina se încarcă...
Pagina se încarcă...
Pagina se încarcă...
Pagina se încarcă...
Pagina se încarcă...
Pagina se încarcă...
Pagina se încarcă...
Pagina se încarcă...
Pagina se încarcă...
Pagina se încarcă...
Pagina se încarcă...
Pagina se încarcă...
Pagina se încarcă...
Pagina se încarcă...
Pagina se încarcă...
Pagina se încarcă...
Pagina se încarcă...
Pagina se încarcă...
Pagina se încarcă...
Pagina se încarcă...
Pagina se încarcă...
Pagina se încarcă...
Pagina se încarcă...
Pagina se încarcă...
Pagina se încarcă...
Pagina se încarcă...
Pagina se încarcă...
Pagina se încarcă...
Pagina se încarcă...
Pagina se încarcă...
Pagina se încarcă...
Pagina se încarcă...
Pagina se încarcă...
Pagina se încarcă...
Pagina se încarcă...
Pagina se încarcă...
Pagina se încarcă...
Pagina se încarcă...
Pagina se încarcă...
Pagina se încarcă...
Pagina se încarcă...
Pagina se încarcă...
Pagina se încarcă...
Pagina se încarcă...
Pagina se încarcă...
Pagina se încarcă...
Pagina se încarcă...
Pagina se încarcă...
Pagina se încarcă...
Pagina se încarcă...
Pagina se încarcă...
Pagina se încarcă...
Pagina se încarcă...
-
 1
1
-
 2
2
-
 3
3
-
 4
4
-
 5
5
-
 6
6
-
 7
7
-
 8
8
-
 9
9
-
 10
10
-
 11
11
-
 12
12
-
 13
13
-
 14
14
-
 15
15
-
 16
16
-
 17
17
-
 18
18
-
 19
19
-
 20
20
-
 21
21
-
 22
22
-
 23
23
-
 24
24
-
 25
25
-
 26
26
-
 27
27
-
 28
28
-
 29
29
-
 30
30
-
 31
31
-
 32
32
-
 33
33
-
 34
34
-
 35
35
-
 36
36
-
 37
37
-
 38
38
-
 39
39
-
 40
40
-
 41
41
-
 42
42
-
 43
43
-
 44
44
-
 45
45
-
 46
46
-
 47
47
-
 48
48
-
 49
49
-
 50
50
-
 51
51
-
 52
52
-
 53
53
-
 54
54
-
 55
55
-
 56
56
-
 57
57
-
 58
58
-
 59
59
-
 60
60
-
 61
61
-
 62
62
-
 63
63
-
 64
64
-
 65
65
-
 66
66
-
 67
67
-
 68
68
-
 69
69
-
 70
70
-
 71
71
-
 72
72
-
 73
73
-
 74
74
-
 75
75
-
 76
76
-
 77
77
-
 78
78
-
 79
79
-
 80
80
-
 81
81
-
 82
82
-
 83
83
-
 84
84
-
 85
85
-
 86
86
-
 87
87
-
 88
88
-
 89
89
-
 90
90
-
 91
91
-
 92
92
-
 93
93
-
 94
94
-
 95
95
-
 96
96
-
 97
97
-
 98
98
-
 99
99
-
 100
100
-
 101
101
-
 102
102
-
 103
103
-
 104
104
-
 105
105
-
 106
106
-
 107
107
-
 108
108
-
 109
109
-
 110
110
-
 111
111
-
 112
112
-
 113
113
-
 114
114
-
 115
115
-
 116
116
-
 117
117
-
 118
118
-
 119
119
-
 120
120
-
 121
121
-
 122
122
-
 123
123
-
 124
124
-
 125
125
-
 126
126
-
 127
127
-
 128
128
-
 129
129
-
 130
130
-
 131
131
-
 132
132
-
 133
133
-
 134
134
-
 135
135
-
 136
136
-
 137
137
-
 138
138


