EINHELL TC-MG 250 CE Multifunction Tool Manual de utilizare
- Categorie
- Șlefuitoare cu putere
- Tip
- Manual de utilizare

TC-MG 250 CE
Art.-Nr.: 44.651.85 I.-Nr.: 21011
13
D Originalbetriebsanleitung
Multifunktionswerkzeug
GB Original operating instructions
Multifunction tool
F Instructions d’origine
Outil multifonction
I Istruzioni per l’uso originali
Utensile multifunzione
DK/ Original betjeningsvejledning
N Multifunktionsværktøj
S Original-bruksanvisning
Multifunktionsverktyg
CZ Originální návod k obsluze
Víceúčelové nářadí
SK Originálny návod na obsluhu
Multifunkčné náradie
NL Originele handleiding
Multifunctioneel gereedschap
E Manual de instrucciones original
Herramienta multifuncion
FIN Alkuperäiskäyttöohje
Monitoimityökalu
SLO Originalna navodila za uporabo
Večnamensko orodje
H Eredeti használati utasítás
Multifunkcionális szerszám
RO Instrucţiuni de utilizare originale
Unealtă multifuncţională
GR Πρωτότυπες Οδηγίες χρήσης
Πολυλειτουργικό εργαλείο
P Manual de instruções original
Ferramenta multifunções
HR/ Originalne upute za uporabu
BIH Višefunkcijski alat
RS Originalna uputstva za upotrebu
Višefunkcionalni alat
PL Instrukcją oryginalną
Urządzenie wielofunkcyjne
TR Orijinal Kullanma Talimatı
Çok Amaçlı Taşlama
EE Originaalkasutusjuhend
Multifunktsionaalne tööriist
Anl_TC_MG_250_CE_SPK13.indb 1Anl_TC_MG_250_CE_SPK13.indb 1 25.08.2022 13:35:5025.08.2022 13:35:50

- 2 -
Anl_TC_MG_250_CE_SPK13.indb 2Anl_TC_MG_250_CE_SPK13.indb 2 25.08.2022 13:36:0425.08.2022 13:36:04

- 3 -
1
2
13
3
4
7
9
2
6
10
9
8
57
54
1.
Anl_TC_MG_250_CE_SPK13.indb 3Anl_TC_MG_250_CE_SPK13.indb 3 25.08.2022 13:36:0525.08.2022 13:36:05

- 4 -
4 5
6
2.
5
CLICK
8
3
+-
7
1
0
1
912
3
87
4
Anl_TC_MG_250_CE_SPK13.indb 4Anl_TC_MG_250_CE_SPK13.indb 4 25.08.2022 13:36:1025.08.2022 13:36:10

D
- 5 -
Gefahr!
Beim Benutzen von Geräten müssen einige Si-
cherheitsvorkehrungen eingehalten werden, um
Verletzungen und Schäden zu verhindern. Lesen
Sie diese Bedienungsanleitung / Sicherheitshin-
weise deshalb sorgfältig durch. Bewahren Sie die-
se gut auf, damit Ihnen die Informationen jederzeit
zur Verfügung stehen. Falls Sie das Gerät an an-
dere Personen übergeben sollten, händigen Sie
diese Bedienungsanleitung / Sicherheitshinweise
bitte mit aus. Wir übernehmen keine Haftung für
Unfälle oder Schäden, die durch Nichtbeachten
dieser Anleitung und den Sicherheitshinweisen
entstehen.
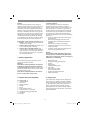
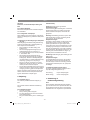
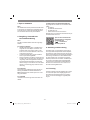
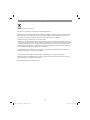
Erklärung der verwendeten Symbole
(siehe Bild 9)
1. Gefahr! - Zur Verringerung des Verletzungsri-
sikos Bedienungsanleitung lesen.
2. Vorsicht! Tragen Sie einen Gehörschutz.
Die Einwirkung von Lärm kann Gehörverlust
bewirken.
3. Vorsicht! Tragen Sie eine Staubschutz-
maske. Beim Bearbeiten von Holz und ande-
rer Materialien kann gesundheitsschädlicher
Staub entstehen. Asbesthaltiges Material darf
nicht bearbeitet werden!
1. Sicherheitshinweise
Die entsprechenden Sicherheitshinweise fi nden
Sie im beiliegenden Heftchen!
Warnung!
Lesen Sie alle Sicherheitshinweise, Anwei-
sungen, Bebilderungen und technischen
Daten, mit denen dieses Elektrowerkzeug
versehen ist. Versäumnisse bei der Einhaltung
der nachfolgenden Anweisungen können elekt-
rischen Schlag, Brand und/oder schwere Verlet-
zungen verursachen.
Bewahren Sie alle Sicherheitshinweise und
Anweisungen für die Zukunft auf.
2. Gerätebeschreibung und
Lieferumfang
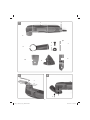
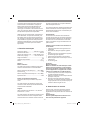
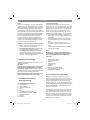
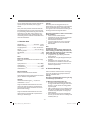
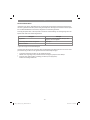
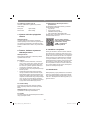
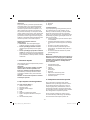
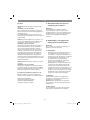
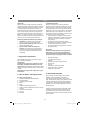
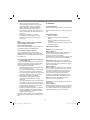
2.1 Gerätebeschreibung (Bild 1)
1. Ein-/ Ausschalter
2. Werkzeugaufnahme
3. Drehzahl-Regler
4. Scheibe
5. Schraube
6. Staubabsaugvorrichtung
7. Innensechskantschlüssel zum
Werkzeugwechsel
8. Dreieck-Schleifplatte
9. Sägeblatt
10. Schaber
2.2 Lieferumfang
Bitte überprüfen Sie die Vollständigkeit des Arti-
kels anhand des beschriebenen Lieferumfangs.
Bei Fehlteilen wenden Sie sich bitte spätestens
innerhalb von 5 Arbeitstagen nach Kauf des Arti-
kels unter Vorlage eines gültigen Kaufbeleges an
unser Service Center oder an die Verkaufstelle,
bei der Sie das Gerät erworben haben. Bitte
beachten Sie hierzu die Gewährleistungstabelle
in den Service-Informationen am Ende der An-
leitung.
• Öffnen Sie die Verpackung und nehmen Sie
das Gerät vorsichtig aus der Verpackung.
• Entfernen Sie das Verpackungsmaterial so-
wie Verpackungs-/ und Transportsicherungen
(falls vorhanden).
• Überprüfen Sie, ob der Lieferumfang vollstän-
dig ist.
• Kontrollieren Sie das Gerät und die Zubehör-
teile auf Transportschäden.
• Bewahren Sie die Verpackung nach Möglich-
keit bis zum Ablauf der Garantiezeit auf.
Gefahr!
Gerät und Verpackungsmaterial sind kein
Kinderspielzeug! Kinder dürfen nicht mit
Kunststoff beuteln, Folien und Kleinteilen
spielen! Es besteht Verschluckungs- und Er-
stickungsgefahr!
• Multifunktionswerkzeug
• Dreieck-Schleifplatte
• Schaber
• Innensechskantschlüssel
• Schleifpapier
• Sägeblatt
• Staubabsaugvorrichtung
• Originalbetriebsanleitung
• Sicherheitshinweise
Anl_TC_MG_250_CE_SPK13.indb 5Anl_TC_MG_250_CE_SPK13.indb 5 25.08.2022 13:36:1425.08.2022 13:36:14

D
- 6 -
3. Bestimmungsgemäße
Verwendung
Die Maschine ist zum Schleifen von Holz, Eisen,
Kunststoff und ähnlichen Werkstoff en unter Ver-
wendung des entsprechenden Schleifpapiers
bestimmt. Außerdem ist die Maschine bestimmt
zum Sägen von Holz, Kunststoff en, Metall und
ähnlichen Werkstoff en unter Verwendung des ent-
sprechenden Sägeblattes, sowie zum Abschaben
von geklebten Teppichböden, Spachtelmasse-
Rückständen, alten Lackierungen und ähnlichen
Anwendungen.
Die Maschine darf nur nach ihrer Bestimmung
verwendet werden. Jede weitere darüber hinaus-
gehende Verwendung ist nicht bestimmungsge-
mäß. Für daraus hervorgerufene Schäden oder
Verletzungen aller Art haftet der Benutzer/Bedie-
ner und nicht der Hersteller.
Bitte beachten Sie, dass unsere Geräte bestim-
mungsgemäß nicht für den gewerblichen, hand-
werklichen oder industriellen Einsatz konstruiert
wurden. Wir übernehmen keine Gewährleistung,
wenn das Gerät in Gewerbe-, Handwerks- oder
Industriebetrieben sowie bei gleichzusetzenden
Tätigkeiten eingesetzt wird.
4. Technische Daten
Netzspannung:........................220-240 V ~ 50 Hz
Leistungsaufnahme: ................................... 250 W
Leerlauf-Drehzahl:.................11000 - 20000 min-1
Schleiffl äche: ............................. 90 x 90 x 90 mm
Oszillationswinkel: .............................................3°
Schutzklasse: ................................................ II/
Gewicht: ...................................................... 1,2 kg
Gefahr!
Geräusch und Vibration
Die Geräusch- und Vibrationswerte wurden ent-
sprechend EN 62841 ermittelt.
Schalldruckpegel LpA ........................... 84,5 dB(A)
Unsicherheit KpA ............................................3 dB
Schallleistungspegel LWA ..................... 91,5 dB(A)
Unsicherheit KWA ........................................... 3 dB
Tragen Sie einen Gehörschutz.
Die Einwirkung von Lärm kann Gehörverlust be-
wirken.
Schwingungsgesamtwerte (Vektorsumme dreier
Richtungen) ermittelt entsprechend EN 62841.
Handgriff
Schwingungsemissionswert ah = 13,949 m/s2
Unsicherheit K = 1,5 m/s2
Die angegebenen Schwingungsgesamtwerte und
die angegebenen Geräuschemissionswerte sind
nach einem genormten Prüfverfahren gemessen
worden und können zum Vergleich eines Elektro-
werkzeugs mit einem anderen verwendet werden.
Die angegebenen Schwingungsgesamtwerte und
die angegebenen Geräuschemissionswerte kön-
nen auch zu einer vorläufi gen Einschätzung der
Belastung verwendet werden.
Warnung:
Die Schwingungs- und Geräuschemissionen kön-
nen während der tatsächlichen Benutzung des
Elektrowerkzeugs von den Angabewerten abwei-
chen, abhängig von der Art und Weise, in der das
Elektrowerkzeug verwendet wird, insbesondere,
welche Art von Werkstück bearbeitet wird.
Beschränken Sie die Geräuschentwicklung
und Vibration auf ein Minimum!
• Verwenden Sie nur einwandfreie Geräte.
• Warten und reinigen Sie das Gerät regelmä-
ßig.
• Passen Sie Ihre Arbeitsweise dem Gerät an.
• Überlasten Sie das Gerät nicht.
• Lassen Sie das Gerät gegebenenfalls über-
prüfen.
• Schalten Sie das Gerät aus, wenn es nicht
benutzt wird.
Vorsicht!
Restrisiken
Auch wenn Sie dieses Elektrowerkzeug
vorschriftsmäßig bedienen, bleiben immer
Restrisiken bestehen. Folgende Gefahren
können im Zusammenhang mit der Bauweise
und Ausführung dieses Elektrowerkzeuges
auftreten:
1. Lungenschäden, falls keine geeignete Staub-
schutzmaske getragen wird.
2. Gehörschäden, falls kein geeigneter Gehör-
schutz getragen wird.
Anl_TC_MG_250_CE_SPK13.indb 6Anl_TC_MG_250_CE_SPK13.indb 6 25.08.2022 13:36:1525.08.2022 13:36:15

D
- 7 -
3. Gesundheitsschäden, die aus Hand-Arm-
Schwingungen resultieren, falls das Gerät
über einen längeren Zeitraum verwendet wird
oder nicht ordnungsgemäß geführt und ge-
wartet wird.
5. Vor Inbetriebnahme
Überzeugen Sie sich vor dem Anschließen, dass
die Daten auf dem Typenschild mit den Netzdaten
übereinstimmen.
Warnung!
Ziehen Sie immer den Netzstecker, bevor Sie
Einstellungen am Gerät vornehmen.
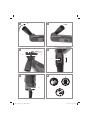
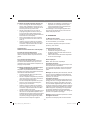
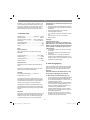
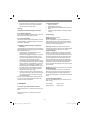
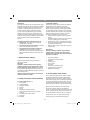
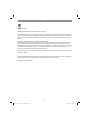
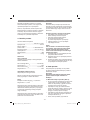
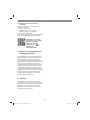
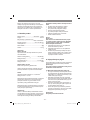
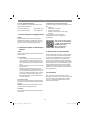
5.1 Einsatzwerkzeuge montieren (Bild 1/2)
• Für ein sicheres Montieren der Einsatzwerk-
zeuge sollten Sie das Multifunktionswerkzeug
so aufsetzen, dass der Ein-/Ausschalter (1)
nach unten und die Werkzeugaufnahme (2)
nach oben zeigt.
• Setzen Sie das Einsatzwerkzeug (z.B. Drei-
eck-Schleifplatte oder Sägeblatt) so auf die
Werkzeugaufnahme (2), dass die Stifte der
Werkzeugaufnahme (2) in die Aussparungen
des Einsatzwerkzeuges passen.
• Befestigen Sie das Einsatzwerkzeug mit der
mitgelieferten Schraube (5) und ziehen Sie
die Schraube mit dem Innensechskantschlüs-
sel (7) gut fest.
• Achten Sie darauf, dass die Scheibe (4) als
Unterlegscheibe für die Schraube (5) ver-
wendet wird (siehe Bild 2). Dabei muss die
Wölbung der Scheibe nach oben zeigen.
Warnung!
Prüfen Sie das Einsatzwerkzeug auf festen
Sitz!
5.2 Dreieck-Schleifplatte
Mit der Dreieck-Schleifplatte kann die Maschine
als Dreieckschleifer verwendet werden.
5.2.1 Schleifpapierbefestigung
Problemloser Wechsel mittels Klettverschluss.
Achten Sie auf Übereinstimmung der Absauglö-
cher des Schleifpapiers und der Schleifplatte.
5.3 Staubabsaugung für Schleifplatte
montieren (Bild 3/4)
Die Staubabsaugung verhindert größere Ver-
schmutzung, hohe Staubbelastung in der Atem-
luft und erleichtert die Entsorgung.
• Bringen Sie das Gerät in eine sichere Lage
wie in 5.1 beschrieben.
• Setzen Sie die Staubabsaugvorrichtung (6)
so auf die Werkzeugaufnahme (2), wie in Bild
3 gezeigt.
• Drehen Sie die Staubsaugvorrichtung (6) wie
in Bild 4, bis diese einrastet.
• Setzen Sie anschließend die Dreieck-Schleif-
platte (8) so auf die Staubabsaugverrichtung
(6) und die Werkzeugaufnahme (2), dass die
Stifte der Werkzeugaufnahme (2) in die Aus-
sparung der Dreieck-Schleifplatte (8) passen
und befestigen Sie diese wie in Bild 5 gezeigt.
• Achten Sie darauf, dass die Scheibe (4) als
Unterlegscheibe für die Schraube (5) ver-
wendet wird (siehe Bild 2). Dabei muss die
Wölbung der Scheibe nach oben zeigen.
• Schließen Sie eine Absauganlage oder einen
Staubsauger an ihr Gerät an (siehe Bild 6).
Sie erreichen damit eine optimale Absaugung
von Stäuben und Spänen vom Werkstück.
Die Vorteile: Sie schonen sowohl das Gerät, als
auch Ihre eigene Gesundheit. Ihr Arbeitsbereich
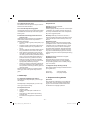
bleibt außerdem sauber und sicher.
6. Bedienung
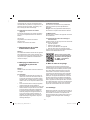
6.1 Ein-/Ausschalten (Bild 7)
Zum Einschalten des Gerätes muss der Schalter
(1) nach vorne geschoben werden.
Zum Ausschalten des Gerätes muss der Schalter
(1) nach hinten geschoben werden.
6.2 Arbeitshinweise
• Gerät einschalten.
• Vom Körper weg arbeiten.
• Hände niemals vor den unmittelbaren Ar-
beitsbereich führen.
• Nur einwandfreie und unbeschädigte Einsatz-
werkzeuge verwenden.
Anl_TC_MG_250_CE_SPK13.indb 7Anl_TC_MG_250_CE_SPK13.indb 7 25.08.2022 13:36:1625.08.2022 13:36:16

D
- 8 -
Einsatzwerkzeuge
Sägen: Sägen von Holz und Kunststoff .
Arbeitshinweise:
Achten Sie beim Sägen auf Fremdkörper im Ma-
terial und entfernen Sie diese ggf.. Im Tauchsäge-
verfahren dürfen nur weiche Materialien wie Holz
oder Gipskartonplatten bearbeitet werden.
Schleifen: Flächenschleifen an Rändern, in
Ecken oder schwer zugänglichen Bereichen. Je
nach Schleifblatt zum Schleifen von Holz, Farbe,
Lack, usw.
Arbeitshinweise:
Das Gerät ist besonders leistungsfähig beim
Schleifen von schwer zugänglichen Ecken und
Kanten. Zum Schleifen von Profi len und Hohl-
kehlen kann auch allein mit der Spitze oder einer
Kante der Schleifplatte gearbeitet werden. Ent-
sprechend dem zu bearbeitenden Material und
dem gewünschten Abtrag der Oberfl äche sind
unterschiedliche Schleifpapiere verfügbar. Die
Abtragleistung wird im wesentlichen durch die
Wahl des Schleifblattes und dosiertes Andrücken
des Schleiftellers bestimmt.
Schaben: Abschaben von alten Lackierungen
oder Klebstoff en.
Arbeitshinweise:
Das Einsatzwerkzeug an die abzutragende Stelle
heranführen. Mit fl achem Anstellwinkel und gerin-
gem Anpressdruck beginnen. Bei zu hohem An-
pressdruck kann der Untergrund (z.B. Holz, Putz)
beschädigt werden.
6.3 Drehzahl-Regler (Bild 8)
Durch Drehen des Drehzahlreglers (3) können
Sie die Drehzahl vorwählen.
Plus-Richtung: höhere Drehzahl
Minus-Richtung: niedrigere Drehzahl
7. Austausch der
Netzanschlussleitung
Gefahr!
Wenn die Netzanschlussleitung dieses Gerätes
beschädigt wird, muss sie durch den Hersteller
oder seinen Kundendienst oder eine ähnlich qua-
lifi zierte Person ersetzt werden, um Gefährdun-
gen zu vermeiden.
8. Reinigung, Wartung und
Ersatzteilbestellung
Gefahr!
Ziehen Sie vor allen Reinigungsarbeiten den
Netzstecker.
8.1 Reinigung
• Halten Sie Schutzvorrichtungen, Luftschlitze
und Motorengehäuse so staub- und schmutz-
frei wie möglich. Reiben Sie das Gerät mit
einem sauberen Tuch ab oder blasen Sie es
mit Druckluft bei niedrigem Druck aus.
• Wir empfehlen, dass Sie das Gerät direkt
nach jeder Benutzung reinigen.
• Reinigen Sie das Gerät regelmäßig mit einem
feuchten Tuch und etwas Schmierseife. Ver-
wenden Sie keine Reinigungs- oder Lösungs-
mittel; diese könnten die Kunststoffteile des
Gerätes angreifen. Achten Sie darauf, dass
kein Wasser in das Geräteinnere gelangen
kann. Das Eindringen von Wasser in ein Elek-
trogerät erhöht das Risiko eines elektrischen
Schlages.
8.2 Kohlebürsten
Bei übermäßiger Funkenbildung lassen Sie die
Kohlebürsten durch eine Elektrofachkraft über-
prüfen.
Gefahr! Die Kohlebürsten dürfen nur von einer
Elektrofachkraft ausgewechselt werden.
8.3 Wartung
Im Geräteinneren befi nden sich keine weiteren zu
wartenden Teile.
8.4 Ersatzteil- und Zubehörbestellung:
Bei der Ersatzteilbestellung sollten folgende An-
gaben gemacht werden:
• Typ des Gerätes
• Artikelnummer des Gerätes
• Ident-Nummer des Gerätes
• Ersatzteilnummer des erforderlichen Ersatz-
teils
Aktuelle Preise und Infos fi nden Sie unter
www.Einhell-Service.com
Tipp! Für ein gutes Arbeits-
ergebnis empfehlen wir
hochwertiges Zubehör von
! www.kwb.eu
welcome@kwb.eu
Anl_TC_MG_250_CE_SPK13.indb 8Anl_TC_MG_250_CE_SPK13.indb 8 25.08.2022 13:36:1625.08.2022 13:36:16

D
- 9 -
9. Entsorgung und
Wiederverwertung
Das Gerät befi ndet sich in einer Verpackung um
Transportschäden zu verhindern. Diese Verpa-
ckung ist Rohstoff und ist somit wieder verwend-
bar oder kann dem Rohstoff kreislauf zurückge-
führt werden. Das Gerät und dessen Zubehör
bestehen aus verschiedenen Materialien, wie
z.B. Metall und Kunststoff e. Defekte Geräte ge-
hören nicht in den Hausmüll. Zur fachgerechten
Entsorgung sollte das Gerät an einer geeigneten
Sammelstellen abgegeben werden. Wenn Ihnen
keine Sammelstelle bekannt ist, sollten Sie bei
der Gemeindeverwaltung nachfragen.
10. Lagerung
Lagern Sie das Gerät und dessen Zubehör an
einem dunklen, trockenen und frostfreiem Ort. Die
optimale Lagertemperatur liegt zwischen 5 und
30 ˚C. Bewahren Sie das Elektrowerkzeug in der
Originalverpackung auf.
Nur für EU-Länder
Werfen Sie Elektrowerkzeuge nicht in den Haus-
müll!
Gemäß europäischer Richtlinie 2012/19/EU über
Elektro- und Elektronik-Altgeräte und Umsetzung
in nationales Recht müssen verbrauchte Elektro-
werkzeuge getrennt gesammelt werden und einer
umweltgerechten Wiederverwertung zugeführt
werden.
Recycling-Alternative zur Rücksendeauff orde-
rung:
Der Eigentümer des Elektrogerätes ist alternativ
anstelle Rücksendung zur Mitwirkung bei der
sachgerechten Verwertung im Falle der Eigen-
tumsaufgabe verpfl ichtet. Das Altgerät kann
hierfür auch einer Rücknahmestelle überlassen
werden, die eine Beseitigung im Sinne der nati-
onalen Kreislaufwirtschafts- und Abfallgesetze
durchführt. Nicht betroff en sind den Altgeräten
beigefügte Zubehörteile und Hilfsmittel ohne
Elektrobestandteile.
Bitte beachten Sie bei der Entsorgung, dass Ak-
kus und Leuchtmittel (z. B. Glühbirne) dem Gerät
entnommen werden.
Der Nachdruck oder sonstige Vervielfältigung von
Dokumentation und Begleitpapieren der Produk-
te, auch auszugsweise, ist nur mit ausdrücklicher
Zustimmung der Einhell Germany AG zulässig.
Technische Änderungen vorbehalten
Anl_TC_MG_250_CE_SPK13.indb 9Anl_TC_MG_250_CE_SPK13.indb 9 25.08.2022 13:36:1725.08.2022 13:36:17

D
- 10 -
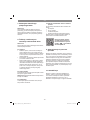
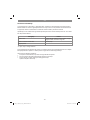
Service-Informationen
Wir unterhalten in allen Ländern, welche in der Garantieurkunde benannt sind, kompetente Service-
Partner, deren Kontakte Sie der Garantieurkunde entnehmen. Diese stehen Ihnen für alle Service-
Belange wie Reparatur, Ersatzteil- und Verschleißteil-Versorgung oder den Bezug von Verbrauchsmate-
rialien zur Verfügung.
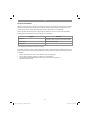
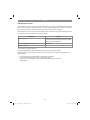
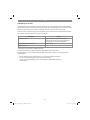
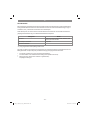
Es ist zu beachten, dass bei diesem Produkt folgende Teile einem gebrauchsgemäßen oder natürlichen
Verschleiß unterliegen bzw. folgende Teile als Verbrauchsmaterialien benötigt werden.
Kategorie Beispiel
Verschleißteile* Kohlebürsten, Dreieck-Schleifplatte, Schaber,
HSS-Sägeblatt, Diamant-Sägeblatt
Verbrauchsmaterial/ Verbrauchsteile* Schleifpapier
Fehlteile
* nicht zwingend im Lieferumfang enthalten!
Bei Mängel oder Fehlern bitten wir Sie, den Fehlerfall im Internet unter www.Einhell-Service.com anzu-
melden. Bitte achten Sie auf eine genaue Fehlerbeschreibung und beantworten Sie dazu in jedem Fall
folgende Fragen:
• Hat das Gerät bereits einmal funktioniert oder war es von Anfang an defekt?
• Ist Ihnen vor dem Auftreten des Defektes etwas aufgefallen (Symptom vor Defekt)?
• Welche Fehlfunktion weist das Gerät Ihrer Meinung nach auf (Hauptsymptom)?
Beschreiben Sie diese Fehlfunktion.
Anl_TC_MG_250_CE_SPK13.indb 10Anl_TC_MG_250_CE_SPK13.indb 10 25.08.2022 13:36:1725.08.2022 13:36:17

D
- 11 -
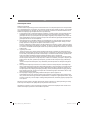
Garantieurkunde
Sehr geehrte Kundin, sehr geehrter Kunde,
unsere Produkte unterliegen einer strengen Qualitätskontrolle. Sollte dieses Gerät dennoch einmal nicht
einwandfrei funktionieren, bedauern wir dies sehr und bitten Sie, sich an unseren Servicedienst unter
der auf dieser Garantiekarte angegebenen Adresse zu wenden. Gerne stehen wir Ihnen auch telefo-
nisch über die angegebene Servicerufnummer zur Verfügung. Für die Geltendmachung von Garantiean-
sprüchen gilt folgendes:
1. Diese Garantiebedingungen richten sich ausschließlich an Verbraucher, d. h. natürliche Personen,
die dieses Produkt weder im Rahmen ihrer gewerblichen noch anderen selbständigen Tätigkeit
nutzen wollen. Diese Garantiebedingungen regeln zusätzliche Garantieleistungen, die der u. g.
Hersteller zusätzlich zur gesetzlichen Gewährleistung Käufern seiner Neugeräte verspricht. Ihre
gesetzlichen Gewährleistungsansprüche werden von dieser Garantie nicht berührt. Unsere Garan-
tieleistung ist für Sie kostenlos.
2. Die Garantieleistung erstreckt sich ausschließlich auf Mängel an einem von Ihnen erworbenen neu-
en Gerät des u. g. Herstellers, die auf einem Material- oder Herstellungsfehler beruhen und ist nach
unserer Wahl auf die Behebung solcher Mängel am Gerät oder den Austausch des Gerätes be-
schränkt. Bitte beachten Sie, dass unsere Geräte bestimmungsgemäß nicht für den gewerblichen,
handwerklichen oder berufl ichen Einsatz konstruiert wurden. Ein Garantievertrag kommt daher nicht
zustande, wenn das Gerät innerhalb der Garantiezeit in Gewerbe-, Handwerks- oder Industriebe-
trieben verwendet wurde oder einer gleichzusetzenden Beanspruchung ausgesetzt war.
3. Von unserer Garantie ausgenommen sind:
- Schäden am Gerät, die durch Nichtbeachtung der Montageanleitung oder aufgrund nicht fach-
gerechter Installation, Nichtbeachtung der Gebrauchsanleitung (wie durch z.B. Anschluss an eine
falsche Netzspannung oder Stromart) oder Nichtbeachtung der Wartungs- und Sicherheitsbestim-
mungen oder durch Aussetzen des Geräts an anomale Umweltbedingungen oder durch mangelnde
Pfl ege und Wartung entstanden sind.
- Schäden am Gerät, die durch missbräuchliche oder unsachgemäße Anwendungen (wie z.B. Über-
lastung des Gerätes oder Verwendung von nicht zugelassenen Einsatzwerkzeugen oder Zubehör),
Eindringen von Fremdkörpern in das Gerät (wie z.B. Sand, Steine oder Staub, Transportschäden),
Gewaltanwendung oder Fremdeinwirkungen (wie z. B. Schäden durch Herunterfallen) entstanden
sind.
- Schäden am Gerät oder an Teilen des Geräts, die auf einen gebrauchsgemäßen, üblichen oder
sonstigen natürlichen Verschleiß zurückzuführen sind.
4. Die Garantiezeit beträgt 24 Monate und beginnt mit dem Kaufdatum des Gerätes. Garantieansprü-
che sind vor Ablauf der Garantiezeit innerhalb von zwei Wochen, nachdem Sie den Defekt erkannt
haben, geltend zu machen. Die Geltendmachung von Garantieansprüchen nach Ablauf der Ga-
rantiezeit ist ausgeschlossen. Die Reparatur oder der Austausch des Gerätes führt weder zu einer
Verlängerung der Garantiezeit noch wird eine neue Garantiezeit durch diese Leistung für das Gerät
oder für etwaige eingebaute Ersatzteile in Gang gesetzt. Dies gilt auch bei Einsatz eines Vor-Ort-
Services.
5. Für die Geltendmachung Ihres Garantieanspruches melden Sie bitte das defekte Gerät an unter:
www.Einhell-Service.com. Halten Sie bitte den Kaufbeleg oder andere Nachweise Ihres Kaufs des
Neugeräts bereit. Geräte, die ohne entsprechende Nachweise oder ohne Typenschild eingesendet
werden, sind von der Garantieleistung aufgrund mangelnder Zuordnungsmöglichkeit ausgeschlos-
sen. Ist der Defekt des Gerätes von unserer Garantieleistung erfasst, erhalten Sie umgehend ein
repariertes oder neues Gerät zurück.
Selbstverständlich beheben wir gegen Erstattung der Kosten auch gerne Defekte am Gerät, die vom
Garantieumfang nicht oder nicht mehr erfasst sind. Dazu senden Sie das Gerät bitte an unsere Service-
adresse.
Für Verschleiß-, Verbrauchs- und Fehlteile verweisen wir auf die Einschränkungen dieser Garantie ge-
mäß den Service-Informationen dieser Bedienungsanleitung.
Einhell Service · Eschenstraße 6 · 94405 Landau/Isar (Deutschland)
Anl_TC_MG_250_CE_SPK13.indb 11Anl_TC_MG_250_CE_SPK13.indb 11 25.08.2022 13:36:1825.08.2022 13:36:18

D
- 12 -
wir haben das Ziel, alles dafür zu tun, damit Sie mit Einhell all Ihre Projekte möglich machen können. Aus diesem
Grund ist Service bei uns gelebter Anspruch: mit über 20 Jahren Erfahrung und mehr als 120 kompetenten und
persönlichen Ansprechpartnern hat es sich der Einhell Service auf die Fahnen geschrieben, Sie bei allen Fragen
zu Ihrem Produkt zu unterstützen. Dazu gehört ein beratendes Technikerteam, bis zu 10 Jahre Ersatzteilverfüg-
barkeit, 24 Stunden Versandservice, eine leistungsfähige Reparatur-Organisation und ein fl ächendeckendes
Service-Partnernetz.
Über unser Onlineportal www.Einhell-Service.com sind viele unserer verfügbaren Services jetzt noch
schneller und einfacher für Sie erreichbar – rund um die Uhr, sieben Tage die Woche.
Einhell Service
Eschenstraße 6
94405 Landau an der Isar
Telefon: 09951 - 959 2000
Telefax: 09951 - 959 1700
Sehr geehrte Kundin,
sehr geehrter Kunde,
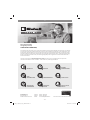
LIEBE MÖGLICHMACHER,
Einhell-Service.com
>>>
ERSATZTEILE
PREIS-
INFORMATIONEN VERFÜGBARKEITEN
PRODUKT-
INFORMATIONEN
TRACK & TRACE
REPARATUR-
SERVICE SERVICE-STELLEN
VOR ORT
GARANTIEVER-
LÄNGERUNGEN
ZUBEHÖR
Anl_TC_MG_250_CE_SPK13.indb 12Anl_TC_MG_250_CE_SPK13.indb 12 25.08.2022 13:36:1825.08.2022 13:36:18

GB
- 13 -
Danger!
When using the equipment, a few safety pre-
cautions must be observed to avoid injuries and
damage. Please read the complete operating
instructions and safety regulations with due care.
Keep this manual in a safe place, so that the in-
formation is available at all times. If you give the
equipment to any other person, hand over these
operating instructions and safety regulations as
well. We cannot accept any liability for damage
or accidents which arise due to a failure to follow
these instructions and the safety instructions.
Explanation of the symbols used (see Fig. 9)
1. Danger! - Read the operating instructions to
reduce the risk of injury.
2. Caution! Wear ear-muff s. The impact of noi-
se can cause damage to hearing.
3. Caution! Wear a breathing mask. Dust
which is injurious to health can be generated
when working on wood and other materials.
Never use the device to work on any materi-
als containing asbestos!
1. Safety regulations
The corresponding safety information can be
found in the enclosed booklet.
Warning!
Read all the safety information, instructions,
illustrations and technical data provided on
or with this power tool. Failure to adhere to the
following instructions may result in electric shock,
fi re and/or serious injury.
Keep all the safety information and instruc-
tions in a safe place for future use.
2. Layout and items supplied
2.1 Layout (Fig. 1)
1. ON/OFF switch
2. Tool chuck
3. Speed controller
4. Washer
5. Screw
6. Dust extraction device
7. Hexagon key for tool changes
8. Triangular sanding/grinding plate
9. Saw blade
10. Scraper
2.2 Items supplied
Please check that the article is complete as
specifi ed in the scope of delivery. If parts are
missing, please contact our service center or the
sales outlet where you made your purchase at
the latest within 5 working days after purchasing
the product and upon presentation of a valid bill
of purchase. Also, refer to the warranty table in
the service information at the end of the operating
instructions.
• Open the packaging and take out the equip-
ment with care.
• Remove the packaging material and any
packaging and/or transportation braces (if
available).
• Check to see if all items are supplied.
• Inspect the equipment and accessories for
transport damage.
• If possible, please keep the packaging until
the end of the guarantee period.
Danger!
The equipment and packaging material are
not toys. Do not let children play with plastic
bags, foils or small parts. There is a danger of
swallowing or suff ocating!
• Multifunction tool
• Triangular sanding/grinding plate
• Scraper
• Hexagon key
• Sanding/grinding paper
• Saw blade
• Dust extraction adapter
• Dust extraction device
• Original operating instructions
• Safety instructions
3. Proper use
The equipment is designed for the sanding/grin-
ding of wood, iron, plastic and similar materials
using the appropriate abrasive paper. Furthermo-
re, the equipment is intended for sawing wood,
plastic, metal and similar materials using the
appropriate blade, as well as scraping off glued
carpets, fi lling compound residues, old paint and
similar applications.
Anl_TC_MG_250_CE_SPK13.indb 13Anl_TC_MG_250_CE_SPK13.indb 13 25.08.2022 13:36:4025.08.2022 13:36:40

GB
- 14 -
The equipment is to be used only for its prescri-
bed purpose. Any other use is deemed to be a
case of misuse. The user / operator and not the
manufacturer will be liable for any damage or inju-
ries of any kind caused as a result of this.
Please note that our equipment has not been de-
signed for use in commercial, trade or industrial
applications. Our warranty will be voided if the
machine is used in commercial, trade or industrial
businesses or for equivalent purposes.
4. Technical data
Mains voltage: .........................220-240 V~ 50 Hz
Power input: .............................................. 250 W
Idling speed: ............................ 11000-20000 rpm
Sanding/grinding area: .............. 90 x 90 x 90 mm
Oscillation angle: ..............................................3°
Protection class: ...........................................II /
Weight: .......................................................1.2 kg
Danger!
Sound and vibration
Sound and vibration values were measured in
accordance with EN 62841.
LpA sound pressure level ..................... 84.5 dB(A)
KpA uncertainty ............................................. 3 dB
LWA sound power level ........................ 91.5 dB(A)
KWA uncertainty .............................................3 dB
Wear ear-muff s.
The impact of noise can cause damage to hea-
ring.
Total vibration values (vector sum of three direc-
tions) determined in accordance with EN 62841.
Handle
Vibration emission value ah = 13.949 m/s2
K uncertainty = 1.5 m/s2
The stated vibration emission levels and stated
noise emission values were measured in ac-
cordance with a set of standardized criteria and
can be used to compare one power tool with
another.
The stated vibration emission levels and stated
noise emission values can also be used to make
an initial assessment of exposure.
Warning:
The vibration and noise emission levels may vary
from the level specifi ed during actual use, depen-
ding on the way in which the power tool is used,
especially the type of workpiece it is used for.
Keep the noise emissions and vibrations to a
minimum.
• Only use appliances which are in perfect wor-
king order.
• Service and clean the appliance regularly.
• Adapt your working style to suit the appliance.
• Do not overload the appliance.
• Have the appliance serviced whenever ne-
cessary.
• Switch the appliance off when it is not in use.
Caution!
Residual risks
Even if you use this electric power tool in
accordance with instructions, certain resi-
dual risks cannot be rules out. The following
hazards may arise in connection with the
equipment’s construction and layout:
1. Lung damage if no suitable protective dust
mask is used.
2. Damage to hearing if no suitable ear protec-
tion is used.
3. Health damage caused by hand-arm vib-
rations if the equipment is used over a pro-
longed period or is not properly guided and
maintained.
5. Before starting the equipment
Before you connect the equipment to the mains
supply make sure that the data on the rating plate
are identical to the mains data.
Warning!
Always pull the power plug before making
adjustments to the equipment.
5.1 Fitting the plug-in tools (Figures 1/2)
• To fit the plug-in tools safely you should hold
the multifunction tool so that the ON/OFF
switch (1) points down and the tool mounting
(2) faces up.
• Place the plug-in tool (e.g. the triangular
grinding/sanding plate or Saw blade) on the
tool mounting (2) so that the pins of the tool
mounting (2) fit into the recesses in the plug-
in tool.
Anl_TC_MG_250_CE_SPK13.indb 14Anl_TC_MG_250_CE_SPK13.indb 14 25.08.2022 13:36:4125.08.2022 13:36:41

GB
- 15 -
• Secure the plug-in tool using the supplied
screw (5) and tighten the screw securely with
the Hexagon key (7).
• Make sure that the washer (4) is used for the
screw (5) (see Figure 2). The camber on the
washer must face upwards.
Warning!
Check that the plug-in tool is secure.
5.2 Triangular sanding/grinding plate
Fit the triangular sanding/grinding plate to use the
equipment as a delta sander/grinder.
5.2.1 Fastening the sanding/grinding paper
The Velcro fastener enables easy changing of
sanding/grinding paper. Make sure that the va-
cuum extraction holes on the sanding/grinding
paper and the sanding/grinding disk are aligned.
5.3 Fitting the dust extraction device for the
grinding/sanding plate (Fig. 3/4)
The dust extraction system prevents the accumu-
lation of dirt and high dust loads in the air, and it
makes it easier to dispose of the dust.
• Place the equipment in a stable position as
shown in 5.1.
• Fit the dust extraction device (6) with the tool
mounting (2) positioned as shown in Figure 3.
• Turn the dust extraction device (6) as shown
in Fig. 4 until it latches in place.
• Make sure that the washer (4) is used for the
screw (5) (see Figure 2). The camber on the
washer must face upwards.
• Place the triangular grinding/sanding plate
on the dust extraction device (6) and the
tool mounting (2) so that the pins of the tool
mounting (2) fit into the recesses of the trian-
gular grinding/sanding plate (8), then fasten
as shown in Fig. 6.
• Connect your tool to an extraction unit or va-
cuum cleaner. This will provide excellent ext-
raction of chips and dust from the workpiece.
The benefi ts are that you will protect both the
equipment and your own health. Your work area
will also be clean and safe.
6. Operation
6.1 Switching on/off (Fig. 7)
Slide the switch (1) forwards to switch on the
equipment.
Slide the switch (1) to the rear to switch off the
equipment.
6.2 Practical tips
• Switch on the equipment.
• Work away from the body.
• Never move your hands into the direct vicinity
of the work area.
• Use only plug-in tools which are in good wor-
king order and undamaged.
Plug-in tools
Sawing: Sawing wood and plastic.
Notes on working practice:
When sawing, watch out for foreign bodies in the
workpiece and remove these if necessary. Plunge
cutting is allowed only in soft materials such as
wood or plasterboard.
Sanding/grinding: Surface sanding/grinding at
edges, in corners or hard-to-reach areas. Depen-
ding on choice of sanding/grinding paper for the
sanding/grinding of wood, paint, lacquer, etc.
Notes on working practice:
This equipment off ers particularly high perfor-
mance for the sanding/grinding of hard-to-reach
corners and edges. To sand/grind profi les and
channels you can also work with just the tip or
the edge of the sanding/grinding disk. Various
sanding/grinding papers are available, specially
designed for the diff erent types of material you
may be working on and the amount you wish to
remove from the surface. The amount removed
will depend largely on the choice of sanding/grin-
ding paper and pressure applied to the sanding/
grinding disk.
Scraping: Scraping off old paint or adhesives.
Notes on working practice:
Move the plug-in tool against the area you want to
remove. Begin with a fl at angle of incidence and
little pressure. The surface (e.g. wood, plaster)
may be damaged if too much pressure is used.
Anl_TC_MG_250_CE_SPK13.indb 15Anl_TC_MG_250_CE_SPK13.indb 15 25.08.2022 13:36:4125.08.2022 13:36:41

GB
- 16 -
6.3 Speed control (Fig. 8)
You can select the speed by turning the speed
controller (3).
Plus direction: Higher speed
Minus direction: Lower speed
7. Replacing the power cable
Danger!
If the power cable for this equipment is damaged,
it must be replaced by the manufacturer or its
after-sales service or similarly trained personnel
to avoid danger.
8. Cleaning, maintenance and
ordering of spare parts
Danger!
Always pull out the mains power plug before star-
ting any cleaning work.
8.1 Cleaning
• Keep all safety devices, air vents and the
motor housing free of dirt and dust as far as
possible. Wipe the equipment with a clean
cloth or blow it with compressed air at low
pressure.
• We recommend that you clean the device
immediately each time you have finished
using it.
• Clean the equipment regularly with a moist
cloth and some soft soap. Do not use
cleaning agents or solvents; these could at-
tack the plastic parts of the equipment. Ensu-
re that no water can seep into the device. The
ingress of water into an electric tool increases
the risk of an electric shock.
8.2 Carbon brushes
In case of excessive sparking, have the carbon
brushes checked only by a qualifi ed electrician.
Danger! The carbon brushes should not be rep
laced by anyone but a qualifi ed electrician.
8.3 Maintenance
There are no parts inside the equipment which
require additional maintenance.
8.4 Ordering spare parts and accessories
Please provide the following information when
ordering spare parts:
• Type of unit
• Article number of the unit
• ID number of the unit
• Spare part number of the required spare part
For our latest prices and information please go to
www.Einhell-Service.com
Tip! For good results we
recommend high-quality ac-
cessories from !
www.kwb.eu
welcome@kwb.eu
9. Disposal and recycling
The equipment is supplied in packaging to pre-
vent it from being damaged in transit. The raw
materials in this packaging can be reused or
recycled. The equipment and its accessories are
made of various types of material, such as metal
and plastic. Never place defective equipment in
your household refuse. The equipment should
be taken to a suitable collection center for proper
disposal. If you do not know the whereabouts of
such a collection point, you should ask in your
local council offi ces.
10. Storage
Store the equipment and accessories in a dark
and dry place at above freezing temperature.
The ideal storage temperature is between 5 and
30 °C. Store the electric tool in its original pa-
ckaging.
Anl_TC_MG_250_CE_SPK13.indb 16Anl_TC_MG_250_CE_SPK13.indb 16 25.08.2022 13:36:4225.08.2022 13:36:42

GB
- 17 -
For EU countries only
Never place any electric power tools in your household refuse.
To comply with European Directive 2012/19/EC concerning old electric and electronic equipment and
its implementation in national laws, old electric power tools have to be separated from other waste and
disposed of in an environment-friendly fashion, e.g. by taking to a recycling depot.
Recycling alternative to the return request:
As an alternative to returning the equipment to the manufacturer, the owner of the electrical equipment
must make sure that the equipment is properly disposed of if he no longer wants to keep the equipment.
The old equipment can be returned to a suitable collection point that will dispose of the equipment in
accordance with the national recycling and waste disposal regulations. This does not apply to any ac-
cessories or aids without electrical components supplied with the old equipment.
Please note that batteries and lamps (e.g. light bulbs) must be removed from the tool before it is dispo-
sed of.
The reprinting or reproduction by any other means, in whole or in part, of documentation and papers ac-
companying products is permitted only with the express consent of the Einhell Germany AG.
Subject to technical changes
Anl_TC_MG_250_CE_SPK13.indb 17Anl_TC_MG_250_CE_SPK13.indb 17 25.08.2022 13:36:4325.08.2022 13:36:43

GB
- 18 -
Service information
We have competent service partners in all countries named on the guarantee certifi cate whose contact
details can also be found on the guarantee certifi cate. These partners will help you with all service re-
quests such as repairs, spare and wearing part orders or the purchase of consumables.
Please note that the following parts of this product are subject to normal or natural wear and that the
following parts are therefore also required for use as consumables.
Category Example
Wear parts* Carbon brushes, Triangular sanding/grinding pla-
te,Scraper, HSS saw blade, Diamond saw blade
Consumables* Grinding/sanding paper
Missing parts
* Not necessarily included in the scope of delivery!
In the eff ect of defects or faults, please register the problem on the internet at www.Einhell-Service.com.
Please ensure that you provide a precise description of the problem and answer the following questions
in all cases:
• Did the equipment work at all or was it defective from the beginning?
• Did you notice anything (symptom or defect) prior to the failure?
• What malfunction does the equipment have in your opinion (main symptom)?
Describe this malfunction.
Anl_TC_MG_250_CE_SPK13.indb 18Anl_TC_MG_250_CE_SPK13.indb 18 25.08.2022 13:36:4325.08.2022 13:36:43

GB
- 19 -
Warranty certifi cate
Dear Customer,
All of our products undergo strict quality checks to ensure that they reach you in perfect condition. In the
unlikely event that your device develops a fault, please contact our service department at the address
shown on this guarantee card. You can also contact us by telephone using the service number shown.
Please note the following terms under which guarantee claims can be made:
1. These guarantee terms apply to consumers only, i.e. natural persons intending to use this product
neither for their commercial activities nor for any other self-employed activities. These warranty
terms regulate additional warranty services, which the manufacturer mentioned below promises to
buyers of its new products in addition to their statutory rights of guarantee. Your statutory guarantee
claims are not aff ected by this guarantee. Our guarantee is free of charge to you.
2. The warranty services cover only defects due to material or manufacturing faults on a product which
you have bought from the manufacturer mentioned below and are limited to either the rectifi cation of
said defects on the product or the replacement of the product, whichever we prefer.
Please note that our devices are not designed for use in commercial, trade or professional applica-
tions. A guarantee contract will not be created if the device has been used by commercial, trade or
industrial business or has been exposed to similar stresses during the guarantee period.
3. The following are not covered by our guarantee:
- Damage to the device caused by a failure to follow the assembly instructions or due to incorrect
installation, a failure to follow the operating instructions (for example connecting it to an incorrect
mains voltage or current type) or a failure to follow the maintenance and safety instructions or by ex-
posing the device to abnormal environmental conditions or by lack of care and maintenance.
- Damage to the device caused by abuse or incorrect use (for example overloading the device or the
use or unapproved tools or accessories), ingress of foreign bodies into the device (such as sand,
stones or dust, transport damage), the use of force or damage caused by external forces (for ex-
ample by dropping it).
- Damage to the device or parts of the device caused by normal or natural wear or tear or by normal
use of the device.
4. The guarantee is valid for a period of 24 months starting from the purchase date of the device. Gu-
arantee claims should be submitted before the end of the guarantee period within two weeks of the
defect being noticed. No guarantee claims will be accepted after the end of the guarantee period.
The original guarantee period remains applicable to the device even if repairs are carried out or
parts are replaced. In such cases, the work performed or parts fi tted will not result in an extension
of the guarantee period, and no new guarantee will become active for the work performed or parts
fi tted. This also applies if an on-site service is used.
5. To make a claim under the guarantee, please register the defective device at:
www.Einhell-Service.com. Please keep your bill of purchase or other proof of purchase for the new
device. Devices that are returned without proof of purchase or without a rating plate shall not be
covered by the guarantee, because appropriate identifi cation will not be possible. If the defect is co-
vered by our guarantee, then the item in question will either be repaired immediately and returned to
you or we will send you a new replacement.
Of course, we are also happy off er a chargeable repair service for any defects which are not covered by
the scope of this guarantee or for units which are no longer covered. To take advantage of this service,
please send the device to our service address.
Also refer to the restrictions of this warranty concerning wear parts, consumables and missing parts as
set out in the service information in these operating instructions.
Anl_TC_MG_250_CE_SPK13.indb 19Anl_TC_MG_250_CE_SPK13.indb 19 25.08.2022 13:36:4425.08.2022 13:36:44

F
- 20 -
Danger !
Lors de l’utilisation d’appareils, il faut respecter
certaines mesures de sécurité afi n d’éviter des
blessures et dommages. Veuillez donc lire atten-
tivement ce mode d’emploi/ces consignes de
sécurité. Veillez à le conserver en bon état pour
pouvoir accéder aux informations à tout moment.
Si l’appareil doit être remis à d’autres personnes,
veillez à leur remettre aussi ce mode d’emploi/
ces consignes de sécurité. Nous déclinons toute
responsabilité pour les accidents et dommages
dus au non-respect de ce mode d’emploi et des
consignes de sécurité.
Explication des symboles utilisés
(voir fi gure 9)
1. Danger! - Lisez ce mode d’emploi pour dimi-
nuer le risque de blessures.
2. Prudence! Portez une protection de
l’ouïe. L’exposition au bruit peut entraîner
une perte de l’ouïe.
3. Prudence! Portez un masque anti-pous-
sière. Lors de travaux sur su bois et autres
matériaux, de la poussière nuisible à la santé
peut être dégagée. Ne travaillez pas sur du
matériau contenant de l’amiante !
1. Consignes de sécurité
Vous trouverez les consignes de sécurité corres-
pondantes dans le cahier en annexe.
Avertissement !
Veuillez lire toutes les consignes de sécurité,
instructions, illustrations et caractéristiques
techniques de cet outil électrique. Toute omis-
sion lors du respect des instructions ci-après peut
entraîner des décharges électriques, un incendie
et/ou de graves blessures.
Conservez toutes les consignes de sécurité
et toutes les instructions pour l’avenir.
2. Description de l’appareil et
volume de livraison
2.1 Description de l’appareil (fi gure 1)
1. Interrupteur marche/arrêt
2. Porte-outil
3. Régulateur de vitesse de rotation
4. Rondelle
5. Vis
6. Dispositif d’aspiration de poussière
7. Clé à six pans pour le changement d‘outil
8. Patin de ponçage triangulaire
9. Lame de scie
10. Racloir
2.2 Volume de livraison
Veuillez contrôler si l‘article est complet à l‘aide
de la description du volume de livraison. S‘il
manque des pièces, adressez-vous dans un délai
de 5 jours maximum après votre achat à notre
service après-vente ou au magasin où vous avez
acheté l‘appareil muni d‘une preuve d‘achat vala-
ble. Veuillez consulter pour cela le tableau des
garanties dans les informations service après-
vente à la fi n du mode d‘emploi.
• Ouvrez l’emballage et prenez l’appareil en le
sortant avec précaution de l’emballage.
• Retirez le matériel d’emballage tout comme
les sécurités d’emballage et de transport (s’il
y en a).
• Vérifiez si la livraison est bien complète.
• Contrôlez si l’appareil et ses accessoires ne
sont pas endommagés par le transport.
• Conservez l’emballage autant que possible
jusqu’à la fin de la période de garantie.
Danger !
L’appareil et le matériel d’emballage ne sont
pas des jouets ! Il est interdit de laisser des
enfants jouer avec des sacs et des fi lms en
plastique et avec des pièces de petite taille.
Ils risquent de les avaler et de s’étouff er !
• Outil multifonctions
• Patin de ponçage triangulaire
• Racloir
• Clé à six pans creux
• papier abrasif
• Lame de scie
• Dispositif d’aspiration de poussière
• Mode d’emploi d’origine
• Consignes de sécurité
3. Utilisation conforme à
l’aff ectation
La machine est destinée à poncer le bois, rectifi er
le fer, les matières plastiques et autres matériaux
du même type sous réserve d‘utiliser le papier
abrasif adapté. De plus, cette machine sert à
scier le bois, les matières plastiques, le métal et
matériaux similaires à l‘aide de la lame de scie
correspondante et est conçue pour racler des
moquettes, des résidus de mastic, d‘anciennes
peintures et des applications similaires.
Anl_TC_MG_250_CE_SPK13.indb 20Anl_TC_MG_250_CE_SPK13.indb 20 25.08.2022 13:36:4425.08.2022 13:36:44
Pagina se încarcă...
Pagina se încarcă...
Pagina se încarcă...
Pagina se încarcă...
Pagina se încarcă...
Pagina se încarcă...
Pagina se încarcă...
Pagina se încarcă...
Pagina se încarcă...
Pagina se încarcă...
Pagina se încarcă...
Pagina se încarcă...
Pagina se încarcă...
Pagina se încarcă...
Pagina se încarcă...
Pagina se încarcă...
Pagina se încarcă...
Pagina se încarcă...
Pagina se încarcă...
Pagina se încarcă...
Pagina se încarcă...
Pagina se încarcă...
Pagina se încarcă...
Pagina se încarcă...
Pagina se încarcă...
Pagina se încarcă...
Pagina se încarcă...
Pagina se încarcă...
Pagina se încarcă...
Pagina se încarcă...
Pagina se încarcă...
Pagina se încarcă...
Pagina se încarcă...
Pagina se încarcă...
Pagina se încarcă...
Pagina se încarcă...
Pagina se încarcă...
Pagina se încarcă...
Pagina se încarcă...
Pagina se încarcă...
Pagina se încarcă...
Pagina se încarcă...
Pagina se încarcă...
Pagina se încarcă...
Pagina se încarcă...
Pagina se încarcă...
Pagina se încarcă...
Pagina se încarcă...
Pagina se încarcă...
Pagina se încarcă...
Pagina se încarcă...
Pagina se încarcă...
Pagina se încarcă...
Pagina se încarcă...
Pagina se încarcă...
Pagina se încarcă...
Pagina se încarcă...
Pagina se încarcă...
Pagina se încarcă...
Pagina se încarcă...
Pagina se încarcă...
Pagina se încarcă...
Pagina se încarcă...
Pagina se încarcă...
Pagina se încarcă...
Pagina se încarcă...
Pagina se încarcă...
Pagina se încarcă...
Pagina se încarcă...
Pagina se încarcă...
Pagina se încarcă...
Pagina se încarcă...
Pagina se încarcă...
Pagina se încarcă...
Pagina se încarcă...
Pagina se încarcă...
Pagina se încarcă...
Pagina se încarcă...
Pagina se încarcă...
Pagina se încarcă...
Pagina se încarcă...
Pagina se încarcă...
Pagina se încarcă...
Pagina se încarcă...
Pagina se încarcă...
Pagina se încarcă...
Pagina se încarcă...
Pagina se încarcă...
Pagina se încarcă...
Pagina se încarcă...
Pagina se încarcă...
Pagina se încarcă...
Pagina se încarcă...
Pagina se încarcă...
Pagina se încarcă...
Pagina se încarcă...
Pagina se încarcă...
Pagina se încarcă...
Pagina se încarcă...
Pagina se încarcă...
Pagina se încarcă...
Pagina se încarcă...
Pagina se încarcă...
Pagina se încarcă...
Pagina se încarcă...
Pagina se încarcă...
Pagina se încarcă...
Pagina se încarcă...
Pagina se încarcă...
Pagina se încarcă...
Pagina se încarcă...
Pagina se încarcă...
Pagina se încarcă...
Pagina se încarcă...
Pagina se încarcă...
Pagina se încarcă...
Pagina se încarcă...
Pagina se încarcă...
Pagina se încarcă...
Pagina se încarcă...
Pagina se încarcă...
Pagina se încarcă...
Pagina se încarcă...
Pagina se încarcă...
Pagina se încarcă...
Pagina se încarcă...
Pagina se încarcă...
Pagina se încarcă...
Pagina se încarcă...
Pagina se încarcă...
Pagina se încarcă...
Pagina se încarcă...
Pagina se încarcă...
Pagina se încarcă...
Pagina se încarcă...
Pagina se încarcă...
-
 1
1
-
 2
2
-
 3
3
-
 4
4
-
 5
5
-
 6
6
-
 7
7
-
 8
8
-
 9
9
-
 10
10
-
 11
11
-
 12
12
-
 13
13
-
 14
14
-
 15
15
-
 16
16
-
 17
17
-
 18
18
-
 19
19
-
 20
20
-
 21
21
-
 22
22
-
 23
23
-
 24
24
-
 25
25
-
 26
26
-
 27
27
-
 28
28
-
 29
29
-
 30
30
-
 31
31
-
 32
32
-
 33
33
-
 34
34
-
 35
35
-
 36
36
-
 37
37
-
 38
38
-
 39
39
-
 40
40
-
 41
41
-
 42
42
-
 43
43
-
 44
44
-
 45
45
-
 46
46
-
 47
47
-
 48
48
-
 49
49
-
 50
50
-
 51
51
-
 52
52
-
 53
53
-
 54
54
-
 55
55
-
 56
56
-
 57
57
-
 58
58
-
 59
59
-
 60
60
-
 61
61
-
 62
62
-
 63
63
-
 64
64
-
 65
65
-
 66
66
-
 67
67
-
 68
68
-
 69
69
-
 70
70
-
 71
71
-
 72
72
-
 73
73
-
 74
74
-
 75
75
-
 76
76
-
 77
77
-
 78
78
-
 79
79
-
 80
80
-
 81
81
-
 82
82
-
 83
83
-
 84
84
-
 85
85
-
 86
86
-
 87
87
-
 88
88
-
 89
89
-
 90
90
-
 91
91
-
 92
92
-
 93
93
-
 94
94
-
 95
95
-
 96
96
-
 97
97
-
 98
98
-
 99
99
-
 100
100
-
 101
101
-
 102
102
-
 103
103
-
 104
104
-
 105
105
-
 106
106
-
 107
107
-
 108
108
-
 109
109
-
 110
110
-
 111
111
-
 112
112
-
 113
113
-
 114
114
-
 115
115
-
 116
116
-
 117
117
-
 118
118
-
 119
119
-
 120
120
-
 121
121
-
 122
122
-
 123
123
-
 124
124
-
 125
125
-
 126
126
-
 127
127
-
 128
128
-
 129
129
-
 130
130
-
 131
131
-
 132
132
-
 133
133
-
 134
134
-
 135
135
-
 136
136
-
 137
137
-
 138
138
-
 139
139
-
 140
140
-
 141
141
-
 142
142
-
 143
143
-
 144
144
-
 145
145
-
 146
146
-
 147
147
-
 148
148
-
 149
149
-
 150
150
-
 151
151
-
 152
152
-
 153
153
-
 154
154
-
 155
155
-
 156
156


EINHELL TC-MG 250 CE Multifunction Tool Manual de utilizare
- Categorie
- Șlefuitoare cu putere
- Tip
- Manual de utilizare
în alte limbi
Lucrări înrudite
-
Einhell Expert Plus VARRITO Manual de utilizare
-
-
EINHELL TC-MG 220/1 E Manual de utilizare
-
-
EINHELL TC-DS 20 E Manual de utilizare
-
-
EINHELL TE-MG 200 CE Manual de utilizare
-
-
-