Philips GC4862/30 Manual de utilizare
- Categorie
- Fiare de călcat
- Tip
- Manual de utilizare
Acest manual este potrivit și pentru

4239 001 00113
GC4800 series
User manual
Ръководство за потребителя
Příručka pro uživatele
Kasutusjuhend
Korisnički priručnik
Felhasználói kézikönyv
Пайдаланушы нұсқаулығы
Vartotojo vadovas
Lietotāja rokasgrāmata
Instrukcja obsługi
Manual de utilizare
Руководство пользователя
Návod na použitie
Uporabniški priročnik
Kullanım kılavuzu
Посібник користувача

1

GC4800 series
ENGLISH 6
БЪЛГАРСКИ 18
ČEŠTINA 30
EESTI 42
HRVATSKI 54
MAGYAR 66
ҚАЗАҚША 78
LIETUVIŠKAI 90
LATVIEŠU 101
POLSKI 113
ROMÂNĂ 125
РУССКИЙ 137
SLOVENSKY 149
SLOVENŠČINA 161
TÜRKÇE 173
УКРАЇНСЬКА 185

6
Introduction
Congratulations on your purchase and welcome to Philips!
To fully benet from the support that Philips offers, register
your product at www.philips.com/welcome.
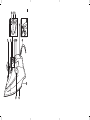
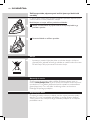
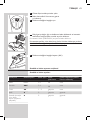
General description (Fig. 1)
1 Spray nozzle
2 Filling opening
3 Spray button
4 Steam control
5 Steam boost button
6 Ionic DeepSteam button (GC4880, GC4875, GC4870 only)
7 Ionic DeepSteam light (GC4880, GC4875, GC4870 only)
8 Temperature dial
9 Amber temperature light (all types)/red auto-off light GC4891/
GC4890/GC4880/GC4875/ GC4870/GC4865/GC4860/GC4856/
GC4855/GC4852/GC4851/ GC4850 only).
10 Mains cord
11 Type plate
12 Soleplate
13 Calc-Clean button
Not shown: Heat-resistant protective cover (GC4880 only)
Not shown: lling cup
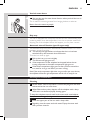
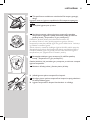
Important
Read this user manual carefully before you use the
appliance and save it for future reference.
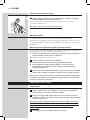
Danger
- Never immerse the iron in water.
Warning
- Check if the voltage indicated on the type plate
corresponds to the local mains voltage before you
connect the appliance.
- Do not use the appliance if the plug, the mains cord
or the appliance itself shows visible damage, or if the
appliance has been dropped or leaks.
- If the mains cord is damaged, you must have it
replaced by Philips, a service centre authorised by
Philips or similarly qualied persons in order to avoid
a hazard.
- Never leave the appliance unattended when it is
connected to the mains.
ENGLISH

- This appliance is not intended for use by persons
(including children) with reduced physical, sensory
or mental capabilities, or lack of experience and
knowledge, unless they have been given supervision
or instruction concerning use of the appliance by a
person responsible for their safety.
- Children should be supervised to ensure that they
do not play with the appliance.
- Do not let the mains cord come into contact with
the hot soleplate of the iron.
Caution
- Only connect the appliance to an earthed wall socket.
- Check the mains cord regularly for possible damage.
- The soleplate of the iron can become extremely hot
and may cause burns if touched.
- When you have nished ironing, when you clean the
appliance, when you ll or empty the water tank and
also when you leave the iron even for a short while:
set the steam control to position 0, put the iron on
its heel and remove the mains plug from the wall
socket.
- Always place and use the iron on a stable, level and
horizontal surface.
- Do not put perfume, vinegar, starch, descaling agents,
ironing aids or other chemicals in the water tank.
- This appliance is intended for household use only.
Electromagnetic elds (EMF)
This Philips appliance complies with all standards regarding electromagnetic
elds (EMF). If handled properly and according to the instructions in this
user manual, the appliance is safe to use based on scientic evidence
available today.
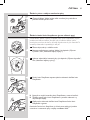
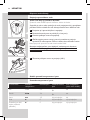
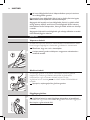
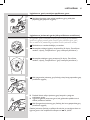
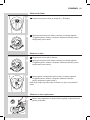
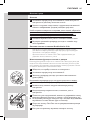
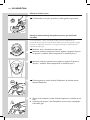
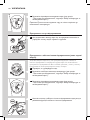
Before rst use
1 Remove any sticker, protective foil or plastic from the soleplate.
2 Rinseanddrythellingcup.
ENGLISH 7

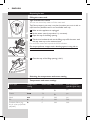
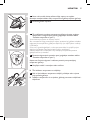
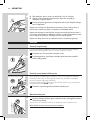
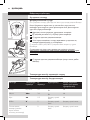
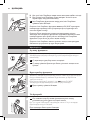
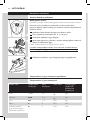
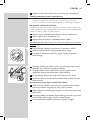
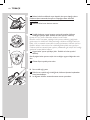
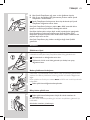
Preparing for use
Filling the water tank
Type of water to be used
You can use normal tap water to ll the water tank.
Tip: If the tap water in your area is very hard, we advise you to mix it with an
equal amount of distilled water. Do not use distilled water only.
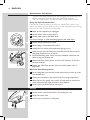
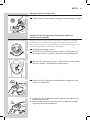
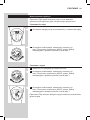
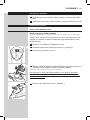
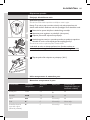
1 Makesuretheapplianceisunplugged.
2 Set the steam control to position 0 (= no steam).
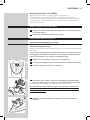
3 Openthecapofthellingopening.
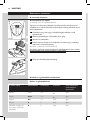
4 Tilttheironbackwardsandusethellingcuptollthewatertank
withtapwateruptothemaximumlevel.
Do not ll the water tank beyond the MAX indication.
Donotputperfume,vinegar,starch,descalingagents,ironingaidsor
other chemicals in the water tank.
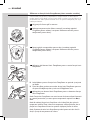
5 Closethecapofthellingopening(‘click’).
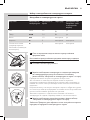
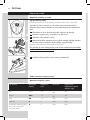
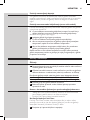
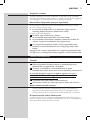
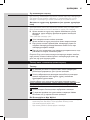
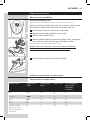
Selecting the temperature and steam setting
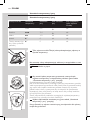
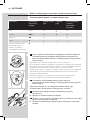
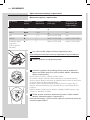
Temperature and steam settings
Fabric type Temperature
setting
Steamsetting Steam boost Ionic DeepSteam
(specictypesonly)
Linen MAX 5-6
\
yes
Cotton 3 3-4
\
yes
Wool 2 1-2 N.A. yes
Silk 1 0 N.A. N.A.
Synthetic fabrics (e.g.
acrylic, nylon, polyamide,
polyester)
1 0 N.A. N.A.
ENGLISH8

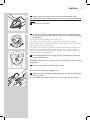
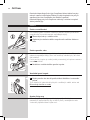
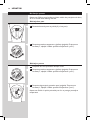
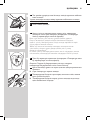
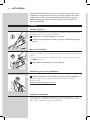
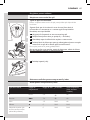
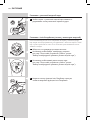
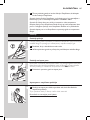
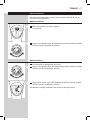
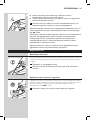
1 Specictypesonly:removetheheat-resistantprotectivecover.
Donotleavetheheat-resistantprotectivecoveronthesoleplateduring
ironing.
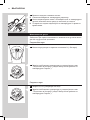
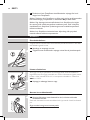
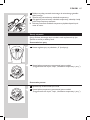
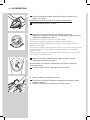
2 Puttheirononitsheel.
3 Tosettherequiredironingtemperature,turnthetemperaturedial
totheappropriateposition(seethe‘Temperatureandsteamsettings’
table above).
Check the laundry care label for the fabric type.
If you do not know what kind or kinds of fabric an article is made of,
determine the right ironing temperature by ironing a part that is not visible
when you wear or use the article.
Silk, woollen and synthetic materials: iron the reverse side of the fabric to
prevent shiny patches. To prevent stains, do not use the spray function.
Start ironing the articles that require the lowest ironing temperature, such
as those made of synthetic bres.
4 Settheappropriatesteamsetting(seethe‘Temperatureandsteam
settings’tableabove).
Note: Make sure that the steam setting you select is suitable for the set ironing
temperature.
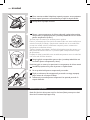
5 Putthemainspluginanearthedwallsocket.
, Theambertemperaturelightgoeson.
6 Whentheambertemperaturelighthasgoneout,waitawhilebefore
youstartironing.
, Thetemperaturelightgoesonfromtimetotimeduringironing.
ENGLISH 9

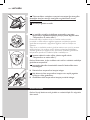
Using the appliance
Note: The iron may give off some smoke when you use it for the rst time.
This ceases after a short while.
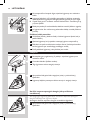
Ironing without steam
1 Set the steam control to position 0 (= no steam).
2 Settherequiredironingtemperature(seechapter‘Preparingforuse’,
section‘Selectingthetemperatureandsteamsetting’).
Steam ironing
1 Makesurethatthereiswaterinthewatertank.
2 Settherequiredironingtemperature(seechapter‘Preparingforuse’,
section‘Selectingthetemperatureandsteamsetting’).
3 Settheappropriatesteamsetting(seechapter‘Preparingforuse’,
section‘Selectingthetemperatureandsteamsetting’).
Note: The iron starts to produce steam as soon as it reaches the set
temperature.
ENGLISH10

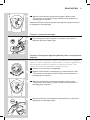
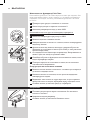
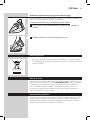
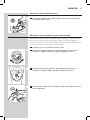
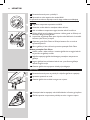
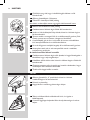
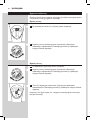
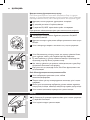
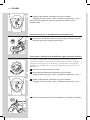
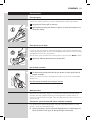
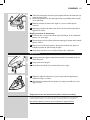
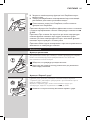
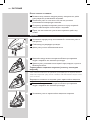
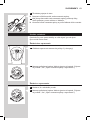
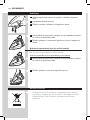
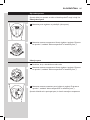
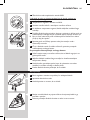
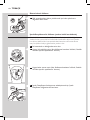
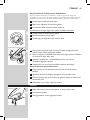
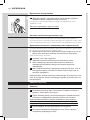
Steam ironing with extra steam
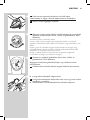
1 Forextrasteamduringironing,pressandholdthesteamboost
button.
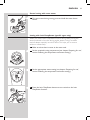
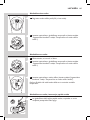
Ironing with Ionic DeepSteam (specic types only)
When you use the Ionic DeepSteam function during steam ironing, the
steam produced is ner than during regular steam ironing. Fine steam
reaches deeper, especially into thick fabrics. This helps you to remove
stubborn creases easily.
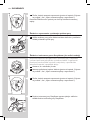
1 Makesurethatthereiswaterinthewatertank.
2 Settherequiredironingtemperature(seechapter‘Preparingforuse’,
section‘Selectingthetemperatureandsteamsetting’).
3 Settheappropriatesteamsetting(seechapter‘Preparingforuse’,
section‘Selectingthetemperatureandsteamsetting’).
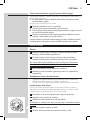
4 PresstheIonicDeepSteambuttononcetoswitchontheIonic
DeepSteamfunction.
ENGLISH 11

, TheblueIonicDeepSteamlightgoesonandyouhearahumming
sound.
, TheironnowproducesIonicDeepSteamtohelpyouremoveeven
thetoughestcreases.
5 PresstheIonicDeepSteambuttonagaintoswitchofftheIonic
DeepSteamfunction.
Note: The Ionic DeepSteam function is only effective when it is used in
combination with a steam setting and a temperature setting between 2 and
MAX.
Note: Do not use the Ionic DeepSteam function when you iron without steam
and/or at low temperature settings. However, ironing at low temperatures
without steam with the Ionic DeepSteam function switched on will not damage
the iron.
Note: The Ionic DeepSteam output may vary from time to time, depending on
the ironing temperature.
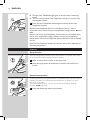
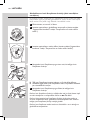
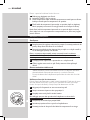
Features
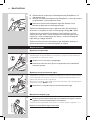
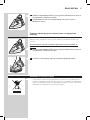
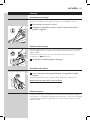
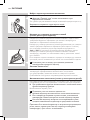
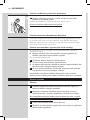
Spray function
You can use the spray function at any temperature to moisten the article
to be ironed. This helps remove stubborn creases.
1 Makesurethatthereiswaterinthewatertank.
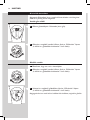
2 Pressthespraybuttonseveraltimestomoistenthearticletobe
ironed.
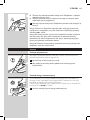
Steam boost function
A steam boost from the special Steam Tip soleplate helps remove stubborn
creases. The steam boost enhances the distribution of steam into every
part of your garment.
The steam boost function can only be used at temperature settings
between 3 and MAX.
1 Pressandreleasethesteamboostbutton.
ENGLISH12

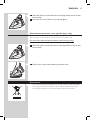
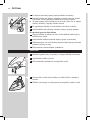
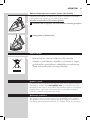
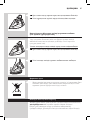
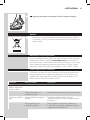
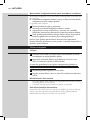
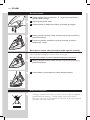
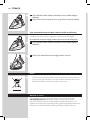
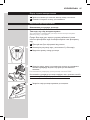
Vertical steam boost
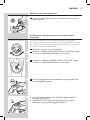
1 Youcanalsousethesteamboostfunctionwhenyouholdtheironin
vertical position.
This is useful for removing creases from hanging clothes, curtains etc.
Never direct the steam at people.
Drip stop
This iron is equipped with a drip-stop function: the iron automatically stops
producing steam when the temperature is too low, to prevent water from
dripping out of the soleplate. When this happens, you may hear a sound.
Automatic shut-off function (specic types only)
The automatic shut-off function automatically switches off the iron if it has
not been moved for a while.
, Theredauto-offlightashestoindicatethattheironhasbeen
switchedoffbytheautomaticshut-offfunction.
To let the iron heat up again:
1 Pickuptheironormoveitslightly.
, Theredauto-offlightgoesout.
, Ifthetemperatureofthesoleplatehasdroppedbelowtheset
ironingtemperature,theambertemperaturelightgoeson.
2 Iftheambertemperaturelightgoesonafteryouhavemovedthe
iron,waitforittogooutbeforeyoustartironing.
Note: If the amber temperature light does not go on after you move the iron,
the soleplate still has the right temperature and the iron is ready for use.
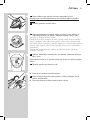
Cleaning and maintenance
Cleaning
1 Setthesteamcontroltoposition0,removetheplugfromthewall
socket and let the iron cool down.
2 Wipeakesandanyotherdepositsoffthesoleplatewithadamp
clothandanon-abrasive(liquid)cleaningagent.
To keep the soleplate smooth, avoid hard contact with metal objects.
Neveruseascouringpad,vinegarorotherchemicalstocleanthe
soleplate.
3 Cleantheupperpartoftheironwithadampcloth.
4 Regularlyrinsethewatertankwithwater.Emptythewatertank
afteryouhaverinsedit.
ENGLISH 13

Double-Active Calc System
- The Anti-Calc tablet prevents scale from clogging the steam vents. This
tablet is constantly active and does not need to be replaced.
- The Calc-Clean function removes the scale particles from the iron.
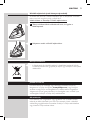
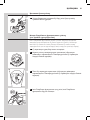
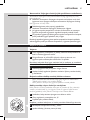
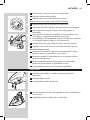
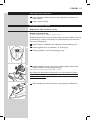
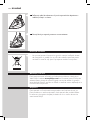
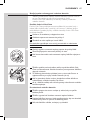
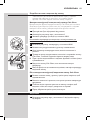
Using the Calc-Clean function
Use the Calc-Clean function once every two weeks. If the water in your
area is very hard (i.e. when akes come out of the soleplate during ironing),
use the Calc-Clean function more frequently.
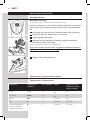
1 Makesuretheapplianceisunplugged.
2 Set the steam control to position 0.
3 Fill the water tank to the MAX level.
Donotputvinegarorotherdescalingagentsinthewatertank.
4 SetthetemperaturedialtoMAX.
5 Putthepluginanearthedwallsocket.
6 Unplugtheironwhenthetemperaturelightgoesout.
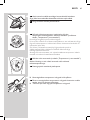
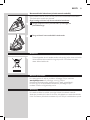
7 Holdtheironoverthesink,pressandholdtheCalc-Cleanbutton
andgentlyshaketheirontoandfro.
, Steamandboilingwatercomeoutofthesoleplate.Impuritiesand
akes(ifany)areushedout.
8 ReleasetheCalc-Cleanbuttonassoonasallthewaterinthetank
hasbeenusedup.
9 RepeattheCalc-Cleanprocessiftheironstillcontainsalotof
impurities.
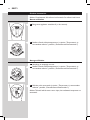
After the Calc-Clean process
1 Puttheplugbackintothewallsocketandlettheironheatuptolet
the soleplate dry.
2 Unplugtheironwhenithasreachedthesetironingtemperature.
3 Movethehotirongentlyoverapieceofusedclothtoremoveany
water stains that may have formed on the soleplate.
4 Lettheironcooldownbeforeyoustoreit.
Storage
1 Setthesteamcontroltoposition0andunplugtheiron.
2 Emptythewatertank.
3 Let the iron cool down in a safe place.
ENGLISH14

4 Windthemainscordaroundthecordstoragefacilityandxitwith
the cord clip.
5 Store the iron on its heel in a dry and safe place.
Heat-resistant protective cover (specic types only)
You can store the iron on the heat-resistant protective cover immediately
after ironing. It is not necessary to let the iron cool down rst.
Donotusetheheat-resistantprotectivecoverduringironing.
1 Windthemainscordaroundthecordstoragefacilityandxitwith
the cord clip.
2 Puttheironontheheat-resistantprotectivecover.
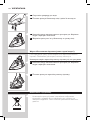
Environment
- Do not throw away the appliance with the normal household waste
at the end of its life, but hand it in at an ofcial collection point for
recycling. By doing this, you help to preserve the environment.
ENGLISH 15

Guarantee and service
If you need information or if you have a problem, please visit the Philips
website at www.philips.com or contact the Philips Consumer Care
Centre in your country (you nd its phone number in the worldwide
guarantee leaet). If there is no Consumer Care Centre in your country,
go to your local Philips dealer.
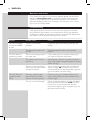
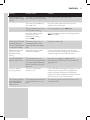
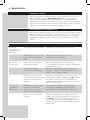
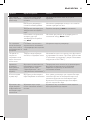
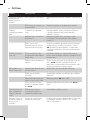
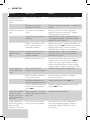
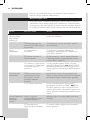
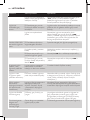
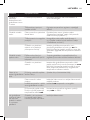
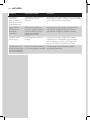
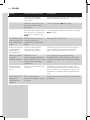
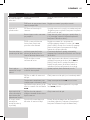
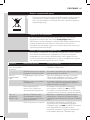
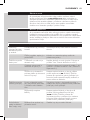
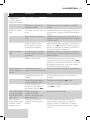
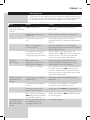
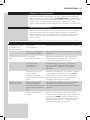
Troubleshooting
If the appliance does not work or does not work properly, rst check
the list below. If the problem is not mentioned in this list, the appliance
probably has a defect. In that case we advise you to take the appliance to
your dealer or to an authorised Philips service centre.
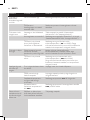
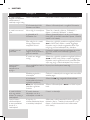
Problem Possiblecause Solution
The iron is plugged
in, but the soleplate
is cold.
There is a connection
problem.
Check the mains cord, the plug and the wall
socket.
The temperature dial is set
to MIN.
Set the temperature dial to the required
position.
The iron does not
produce any steam.
There is not enough water in
the water tank.
Fill the water tank (see chapter ‘Preparing for
use’, section ‘Filling the water tank’).
The steam control is set to
position 0.
Set the steam control to a position between 1
and 6 (see chapter ‘Using the appliance’, section
‘Steam ironing’).
The iron is not hot enough
and/or the drip-stop function
has been activated.
Set an ironing temperature that is suitable for
steam ironing ( 2 to MAX). Put the iron on
its heel and wait until the temperature light has
gone out before you start ironing.
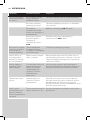
The iron does not
produce a steam
boost.
You have used the steam
boost function too often
within a very short period.
Continue ironing in horizontal position and
wait a while before you use the steam boost
function again.
The iron is not hot enough. Set an ironing temperature at which the steam
boost function can be used ( 3 to MAX).
Put the iron on its heel and wait until the
temperature light has gone out before you use
the steam boost function.
ENGLISH16

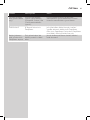
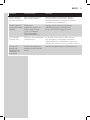
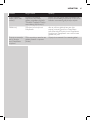
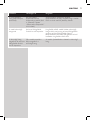
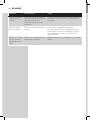
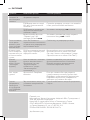
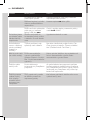
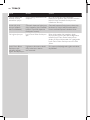
Problem Possiblecause Solution
Water droplets drip
onto the fabric during
ironing.
You have not closed the cap
of the lling opening properly.
Press the cap until you hear a click.
You have put an additive in
the water tank.
Rinse the water tank and do not put any
additive in the water tank.
The set temperature is too
low for steam ironing.
Set a temperature of or 2 higher.
You have used the steam
boost function at a
temperature setting
below 3.
Set the temperature dial to a setting between
3 and MAX.
Water drips from the
soleplate after the
iron has cooled down
or has been stored.
You have put the iron in
horizontal position with
water still left in the water
tank.
Empty the water tank.
Flakes and impurities
come out of the
soleplate during
ironing.
Hard water forms akes
inside the soleplate.
Use the Calc-Clean function one or more
times (see chapter ‘Cleaning and maintenance’,
section ‘Using the Calc-Clean function’).
The red light ashes
(specic types only).
The automatic shut-off
function has switched off the
iron (see chapter ‘Features’,
section ‘Automatic shut-off
function’).
Move the iron slightly to deactivate the
automatic shut-off function. The red auto-off
light goes out.
The iron makes a
humming sound.
The Ionic DeepSteam
function is on.
If you hear the humming sound when you iron
without steam, press the Ionic DeepSteam
button to switch off the Ionic DeepSteam
function. The Ionic DeepSteam function has no
effect when you iron without steam.
The humming sound
stops, although the
Ionic DeepSteam
function is on.
The sound stopped because
you placed the iron on its
heel.
The humming sound resumes as soon as you
continue to iron.
ENGLISH 17

18
Въведение
Поздравления за вашата покупка и добре дошли във Philips! За
да се възползвате изцяло от предлаганата от Philips поддръжка,
регистрирайте продукта си на адрес www.philips.com/welcome.
Общо описание (фиг. 1)
1 Дюза за пръскане
2 Отвор за пълнене
3 Бутон за пръскане
4 Регулиране на парата
5 Бутон за допълнителна пара
6 Бутон за йонизирана пара (само за GC4880, GC4875, GC4870)
7 Светлинен индикатор за йонизирана пара (само за GC4880,
GC4875, GC4870)
8 Температурен регулатор
9 Кехлибарен температурен индикатор (всички модели)/червен
индикатор за автоматично изключване (само за GC4891, GC4890,
GC4880, GC4875, GC4870, GC4865, GC4860, GC4856, GC4855,
GC4852, GC4851, GC4850).
10 Захранващ кабел
11 Табелка с данни
12 Гладеща повърхност
13 Бутон Calc-Clean за почистване на накип
Не е показан: Термоустойчив предпазен капак (само за GC4880)
Не е показана: чашка за пълнене
Важно
Преди да използвате уреда, прочетете внимателно
това ръководство за потребителя и го запазете за
справка в бъдеще.
Опасност
- Никога не потапяйте ютията във вода.
Предупреждение
- Преди да включите уреда в контакта, проверете
дали напрежението, отбелязано на табелката на
уреда, отговаря на това на местната електрическа
мрежа.
- Не използвайте уреда, ако щепселът,
захранващият кабел или самият уред имат видими
повреди, както и ако уредът е падал или тече.
- Ако захранващият кабел се повреди, той
трябва да бъде подменен от представител или
упълномощен сервиз на Philips или лица с подобна
квалификация, за да се избегне опасност.
БЪЛГАРСКИ

- Никога не оставяйте уреда без наблюдение,
когато е включен.
- Този уред не е предназначен за ползване
от хора с физичиска, сетивна или умствена
недостатъчност, а също и от лица без опит и
познания, вкл. деца, ако са оставени без надзор
и не са инструктирани от страна на отговарящо
за тяхната безопасност лице относно начина на
използване на уреда.
- Наглеждайте децата, за да не си играят с уреда.
- Не допускайте захранващият кабел да се допира
до горещата гладеща повърхност на ютията.
Внимание
- Включвайте уреда само в заземен електрически
контакт.
- Проверявайте редовно за евентуални повреди на
захранващия кабел.
- Гладещата плоча на ютията може да се нагорещи
много и да причини изгаряне при докосване.
- Когато сте свършили с гладенето, когато
почиствате уреда, когато пълните или изпразвате
резервоара за вода, а също и когато оставяте
ютията дори за момент: поставете регулатора на
парата в положение 0, поставете ютията върху
петата й и изключете щепсела от контакта.
- Винаги поставяйте и използвайте ютията върху
хоризонтална, равна и стабилна повърхност.
- Не сипвайте във водния резервоар парфюм,
оцет, кола, препарати за отстраняване на накип,
помощни препарати за гладене или други
химикали.
- Този уред е предназначен само за битови цели.
Електромагнитни излъчвания (EMF)
Този уред Philips е в съответствие с всички стандарти по отношение
на електромагнитните излъчвания (EMF). Ако се употребява правилно
и съобразно инструкциите в това ръководство за потребителя, уредът
е безопасен за използване според наличните досега научни факти.
БЪЛГАРСКИ 19

Преди първата употреба
1 Свалетевсякаквилепенки,защитнофолиоилипластмасиот
гладещатаповърхност.
2 Изплакнетеиподсушетечашкатазапълнене.
Подготовка за употреба
Наливане на вода в резервоара
Тип вода, който да се използва
За пълнене на водния резервоар можете да използвате нормална
чешмяна вода.
Съвет: Ако чешмяната вода във вашия район е много твърда,
препоръчваме ви да я смесите с равно количество дестилирана вода.
Не използвайте само дестилирана вода.
1 Проверетедалиуредътеизключенотконтакта.
2 Нагласетерегулаторанапаратавположение0(=безпара).
3 Отворетекапачкатанаотворазапълнене.
4 Наклонетеютиятанастраниисчашкатазапълнененалейтевода
отчешматаврезервоаразаводадомаксималнотониво.
Не пълнете водния резервоар над знака MAX.
Несипвайтевъвводниярезервоарпарфюм,оцет,кола,препарати
заотстраняваненанакип,помощнипрепаратизагладенеилидруги
химикали.
5 Затворетекапачкатанаотворазапълнене(съсщракване).
БЪЛГАРСКИ20

Избор на настройката на температурата и парата
Настройки на температурата и парата
Видтъкан Настройкана
температурата
Настройкана
парата
Паренудар Йонизиранапара
DeepSteam(само
заопределени
модели)
Лен MAX 5-6
\
да
Памук 3 3-4
\
да
Вълна 2 1-2 няма данни да
Коприна 1 0 няма данни няма данни
Синтетични тъкани
(например акрилни,
найлонови, полиамидни,
полиестерни)
1 0 няма данни няма данни
1 Самозаопределенимодели:махнететермоустойчивия
предпазенкапак.
Неоставяйтетермоустойчивияпредпазенкапаквърхугладещата
повърхностповременагладене.
2 Поставетеютиятавърхупетатай.
3 Задайтенеобходимататемпературанагладенечреззавъртане
натемпературниярегулаторвсъответнотоположение
(вижтетаблица“Настройкинатемпературатаипарата”по-горе).
Проверете етикета за пране на дрехата за вида тъкан.
Ако не знаете от какъв вид или видове тъкани е изделието,
определете правилната температура за гладене чрез изглаждане на
някаква част, която няма да се вижда, когато носите или използвате
изделието.
Коприна, вълнени и синтетични материи: гладете от обратната страна
на плата, за да избегнете образуване на лъскави петна. За да избегнете
петната, не използвайте функцията за пръскане.
Започнете гладенето с изделия, които изискват най-ниската
температура на гладене, например такива от синтетични влакна.
4 Задайтенеобходиматанастройканапарата(вижтетаблица
“Настройкинатемпературатаипарата”по-горе).
Забележка: Проверете дали избраната от вас настройка на парата е
подходяща за зададената температура на гладене.
БЪЛГАРСКИ 21

5 Включетещепселавзаземенконтакт.
, Светвакехлибаренияттемпературениндикатор.
6 Когатоиндикаторнаталампаскехлибаренцвятзатемпературата
изгасне,изчакайтемалко,предидазапочнетедагладите.
, Повременагладенеиндикаторътзатемпературатаотвремена
времесветва.
Използване на уреда
Забележка: При първото използване от ютията може да излезе малко
дим. Не след дълго той ще изчезне.
Гладене без пара
1 Нагласетерегулаторанапаратавположение0(=безпара).
2 Задайтенеобходимататемпературанагладене(вижтеглава
“Подготовказаупотреба”,раздел“Изборнанастройкатана
температуратаипарата”).
Гладене с пара
1 Уверетесе,чеврезервоараимавода.
2 Задайтенеобходимататемпературанагладене(вижтеглава
“Подготовказаупотреба”,раздел“Изборнанастройкатана
температуратаипарата”).
БЪЛГАРСКИ22
Pagina se încarcă...
Pagina se încarcă...
Pagina se încarcă...
Pagina se încarcă...
Pagina se încarcă...
Pagina se încarcă...
Pagina se încarcă...
Pagina se încarcă...
Pagina se încarcă...
Pagina se încarcă...
Pagina se încarcă...
Pagina se încarcă...
Pagina se încarcă...
Pagina se încarcă...
Pagina se încarcă...
Pagina se încarcă...
Pagina se încarcă...
Pagina se încarcă...
Pagina se încarcă...
Pagina se încarcă...
Pagina se încarcă...
Pagina se încarcă...
Pagina se încarcă...
Pagina se încarcă...
Pagina se încarcă...
Pagina se încarcă...
Pagina se încarcă...
Pagina se încarcă...
Pagina se încarcă...
Pagina se încarcă...
Pagina se încarcă...
Pagina se încarcă...
Pagina se încarcă...
Pagina se încarcă...
Pagina se încarcă...
Pagina se încarcă...
Pagina se încarcă...
Pagina se încarcă...
Pagina se încarcă...
Pagina se încarcă...
Pagina se încarcă...
Pagina se încarcă...
Pagina se încarcă...
Pagina se încarcă...
Pagina se încarcă...
Pagina se încarcă...
Pagina se încarcă...
Pagina se încarcă...
Pagina se încarcă...
Pagina se încarcă...
Pagina se încarcă...
Pagina se încarcă...
Pagina se încarcă...
Pagina se încarcă...
Pagina se încarcă...
Pagina se încarcă...
Pagina se încarcă...
Pagina se încarcă...
Pagina se încarcă...
Pagina se încarcă...
Pagina se încarcă...
Pagina se încarcă...
Pagina se încarcă...
Pagina se încarcă...
Pagina se încarcă...
Pagina se încarcă...
Pagina se încarcă...
Pagina se încarcă...
Pagina se încarcă...
Pagina se încarcă...
Pagina se încarcă...
Pagina se încarcă...
Pagina se încarcă...
Pagina se încarcă...
Pagina se încarcă...
Pagina se încarcă...
Pagina se încarcă...
Pagina se încarcă...
Pagina se încarcă...
Pagina se încarcă...
Pagina se încarcă...
Pagina se încarcă...
Pagina se încarcă...
Pagina se încarcă...
Pagina se încarcă...
Pagina se încarcă...
Pagina se încarcă...
Pagina se încarcă...
Pagina se încarcă...
Pagina se încarcă...
Pagina se încarcă...
Pagina se încarcă...
Pagina se încarcă...
Pagina se încarcă...
Pagina se încarcă...
Pagina se încarcă...
Pagina se încarcă...
Pagina se încarcă...
Pagina se încarcă...
Pagina se încarcă...
Pagina se încarcă...
Pagina se încarcă...
Pagina se încarcă...
Pagina se încarcă...
Pagina se încarcă...
Pagina se încarcă...
Pagina se încarcă...
Pagina se încarcă...
Pagina se încarcă...
Pagina se încarcă...
Pagina se încarcă...
Pagina se încarcă...
Pagina se încarcă...
Pagina se încarcă...
Pagina se încarcă...
Pagina se încarcă...
Pagina se încarcă...
Pagina se încarcă...
Pagina se încarcă...
Pagina se încarcă...
Pagina se încarcă...
Pagina se încarcă...
Pagina se încarcă...
Pagina se încarcă...
Pagina se încarcă...
Pagina se încarcă...
Pagina se încarcă...
Pagina se încarcă...
Pagina se încarcă...
Pagina se încarcă...
Pagina se încarcă...
Pagina se încarcă...
Pagina se încarcă...
Pagina se încarcă...
Pagina se încarcă...
Pagina se încarcă...
Pagina se încarcă...
Pagina se încarcă...
Pagina se încarcă...
Pagina se încarcă...
Pagina se încarcă...
Pagina se încarcă...
Pagina se încarcă...
Pagina se încarcă...
Pagina se încarcă...
Pagina se încarcă...
Pagina se încarcă...
Pagina se încarcă...
Pagina se încarcă...
Pagina se încarcă...
Pagina se încarcă...
Pagina se încarcă...
Pagina se încarcă...
Pagina se încarcă...
Pagina se încarcă...
Pagina se încarcă...
Pagina se încarcă...
Pagina se încarcă...
Pagina se încarcă...
Pagina se încarcă...
Pagina se încarcă...
Pagina se încarcă...
Pagina se încarcă...
Pagina se încarcă...
Pagina se încarcă...
Pagina se încarcă...
Pagina se încarcă...
Pagina se încarcă...
Pagina se încarcă...
Pagina se încarcă...
Pagina se încarcă...
Pagina se încarcă...
Pagina se încarcă...
Pagina se încarcă...
-
 1
1
-
 2
2
-
 3
3
-
 4
4
-
 5
5
-
 6
6
-
 7
7
-
 8
8
-
 9
9
-
 10
10
-
 11
11
-
 12
12
-
 13
13
-
 14
14
-
 15
15
-
 16
16
-
 17
17
-
 18
18
-
 19
19
-
 20
20
-
 21
21
-
 22
22
-
 23
23
-
 24
24
-
 25
25
-
 26
26
-
 27
27
-
 28
28
-
 29
29
-
 30
30
-
 31
31
-
 32
32
-
 33
33
-
 34
34
-
 35
35
-
 36
36
-
 37
37
-
 38
38
-
 39
39
-
 40
40
-
 41
41
-
 42
42
-
 43
43
-
 44
44
-
 45
45
-
 46
46
-
 47
47
-
 48
48
-
 49
49
-
 50
50
-
 51
51
-
 52
52
-
 53
53
-
 54
54
-
 55
55
-
 56
56
-
 57
57
-
 58
58
-
 59
59
-
 60
60
-
 61
61
-
 62
62
-
 63
63
-
 64
64
-
 65
65
-
 66
66
-
 67
67
-
 68
68
-
 69
69
-
 70
70
-
 71
71
-
 72
72
-
 73
73
-
 74
74
-
 75
75
-
 76
76
-
 77
77
-
 78
78
-
 79
79
-
 80
80
-
 81
81
-
 82
82
-
 83
83
-
 84
84
-
 85
85
-
 86
86
-
 87
87
-
 88
88
-
 89
89
-
 90
90
-
 91
91
-
 92
92
-
 93
93
-
 94
94
-
 95
95
-
 96
96
-
 97
97
-
 98
98
-
 99
99
-
 100
100
-
 101
101
-
 102
102
-
 103
103
-
 104
104
-
 105
105
-
 106
106
-
 107
107
-
 108
108
-
 109
109
-
 110
110
-
 111
111
-
 112
112
-
 113
113
-
 114
114
-
 115
115
-
 116
116
-
 117
117
-
 118
118
-
 119
119
-
 120
120
-
 121
121
-
 122
122
-
 123
123
-
 124
124
-
 125
125
-
 126
126
-
 127
127
-
 128
128
-
 129
129
-
 130
130
-
 131
131
-
 132
132
-
 133
133
-
 134
134
-
 135
135
-
 136
136
-
 137
137
-
 138
138
-
 139
139
-
 140
140
-
 141
141
-
 142
142
-
 143
143
-
 144
144
-
 145
145
-
 146
146
-
 147
147
-
 148
148
-
 149
149
-
 150
150
-
 151
151
-
 152
152
-
 153
153
-
 154
154
-
 155
155
-
 156
156
-
 157
157
-
 158
158
-
 159
159
-
 160
160
-
 161
161
-
 162
162
-
 163
163
-
 164
164
-
 165
165
-
 166
166
-
 167
167
-
 168
168
-
 169
169
-
 170
170
-
 171
171
-
 172
172
-
 173
173
-
 174
174
-
 175
175
-
 176
176
-
 177
177
-
 178
178
-
 179
179
-
 180
180
-
 181
181
-
 182
182
-
 183
183
-
 184
184
-
 185
185
-
 186
186
-
 187
187
-
 188
188
-
 189
189
-
 190
190
-
 191
191
-
 192
192
-
 193
193
-
 194
194


Philips GC4862/30 Manual de utilizare
- Categorie
- Fiare de călcat
- Tip
- Manual de utilizare
- Acest manual este potrivit și pentru
în alte limbi
- Türkçe: Philips GC4862/30 Kullanım kılavuzu
- slovenčina: Philips GC4862/30 Používateľská príručka
Lucrări înrudite
-
Philips GC4855/22 Manual de utilizare
-
Philips GC4875/02 Manual de utilizare
-
Philips GC3109/02 Manual de utilizare
-
Philips GC4872/60 Informații importante
-
Philips GC3332/02 Manual de utilizare
-
-
Philips GC4310/02 Manual de utilizare
-
Philips GC4730/02 Manual de utilizare
-
Philips GC4610/02 Manual de utilizare
-