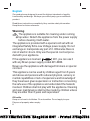
Braun BT 5010 Manual de utilizare
- Categorie
- Aparate de tuns
- Tip
- Manual de utilizare
Acest manual este potrivit și pentru

www.braun.com
Type 5417, 5418
B
e
a
r
d
T
r
i
m
m
e
r
B
T
5
0
9
0
BT 5090
BT 5070
BT 5050
BT 5030
BT 5010
91063080/V II-16
91063080_BT_5090-5010_CEEMEA_S1.indd 191063080_BT_5090-5010_CEEMEA_S1.indd 1 11.07.16 10:0611.07.16 10:06
Stapled booklet, 105 x 148 mm, 92 pages (incl. 8 pages cover),
2/2c = cyan + black
CSS APPROVED Effective Date 5Aug2016 GMT - Printed 27Sep2016 Page 1 of 91

English 6
Français 11
Polski 16
âesk˘ 22
Slovensk˘ 27
Magyar 32
Hrvatski 37
Slovenski 43
Türkçe 49
Română (RO/MD) 56
Български 62
êÛÒÒÍËÈ 67
ì͇ªÌҸ͇ 74
88
Braun GmbH
Frankfurter Straße 145
61476 Kronberg/Germany
www.braun.com
UK/FR/PL/CZ/SK/HU/HR/SI/TR/
RO/MD/BG/RU/UA/Arab
Braun Infolines
UK 0800 783 7010
IE 1 800 509 448
FR 0 800 944 802
(service & appel
gratuits)
BE 0 800 14 592
PL 801 127 286
801 1 BRAUN
CZ 221 804 335
SK 02/5710 1135
HU (06-1) 451-1256
HR 091 66 01 777
SI 080 2822
TR 0 800 261 63 65
RO 021.224.30.35
RU 8 800 200 20 20
UA 0 800 505 000
HK 2926 2300
(Jebsen Consumer
Service Centre)
ZA 0860 112 188
(Sharecall charged at
local rates)
www.service.braun.com
91063080_BT_5090-5010_CEEMEA_S2.indd 191063080_BT_5090-5010_CEEMEA_S2.indd 1 11.07.16 10:0711.07.16 10:07
CSS APPROVED Effective Date 5Aug2016 GMT - Printed 27Sep2016 Page 2 of 91

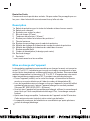
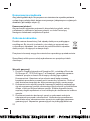
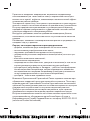
4
1b
1c
9
1a
2
1h
(BT5090/5070)
8h
(BT5050/5030/5010)
3
4
8a
8
5
1c
6a
6b
BT5090
BT5090
BT5070
BT5090
BT5070
BT5090
B
e
a
r
d
T
r
i
m
m
e
r
B
T
5
0
9
0
7
1
0
•
9
•
8
•
7
•
6
•
5
•
4
•
3
•
2
•
1
2
0
m
m
1
0
BT5090/5070/5050
1
0
•
9
•
8
•
7
•
6
•
5
•
4
•
3
•
2
•
1
1
0
•
9
•
8
•
7
•
6
•
5
•
4
•
a
6c
91063080_BT_5090-5010_CEEMEA_S4.indd 191063080_BT_5090-5010_CEEMEA_S4.indd 1 11.07.16 10:1211.07.16 10:12
CSS APPROVED Effective Date 5Aug2016 GMT - Printed 27Sep2016 Page 3 of 91

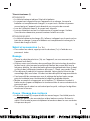
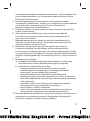
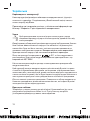
5
b
c
e
h i
f
g
d
91063080_BT_5090-5010_CEEMEA_S5.indd 191063080_BT_5090-5010_CEEMEA_S5.indd 1 11.07.16 10:1311.07.16 10:13
CSS APPROVED Effective Date 5Aug2016 GMT - Printed 27Sep2016 Page 4 of 91

6
Our products are designed to meet the highest standards of quality,
functionality and design. We hope you entirely enjoy your new Braun
product.
Read these instructions completely, they contain safety information.
Keep them for future reference.
Warning
The appliance is suitable for cleaning under running
tap water. Detach the appliance from the power supply
before cleaning it with water.
The appliance is provided with a special cord set with an
integrated Safety Extra Low Voltage power supply. Do not
exchange or manipulate any part of it. Otherwise there is
risk of electric shock. Only use the special cord set provi-
ded with your appliance.
If the appliance is marked 491, you can use it
with any Braun power supply coded 491-XXXX.
Never use the appliance with damaged trimmers or special
cord set.
This appliance can be used by children aged from 8 years
and above and persons with reduced physical, sensory or
mental capabilities or lack of experience and knowledge if
they have been given supervision or instruction concerning
the safe use of the appliance and understand the hazards
involved. Children shall not play with the appliance. Cleaning
and user maintenance shall not be made by children unless
they are older than 8 years and supervised.
Oil bottle
Keep out of reach of children. Do not swallow. Do not apply to eyes.
Dispose of properly when empty.
English
91063080_BT_5090-5010_CEEMEA_S6-92.indd 691063080_BT_5090-5010_CEEMEA_S6-92.indd 6 11.07.16 10:1311.07.16 10:13
CSS APPROVED Effective Date 5Aug2016 GMT - Printed 27Sep2016 Page 5 of 91

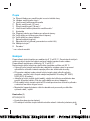
7
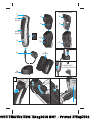
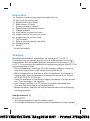
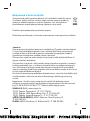
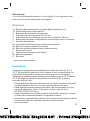
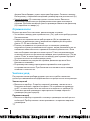
Description
1a Precision comb for trimming beard and short hair
1b Hair comb for cutting hair *
1c Release buttons for comb
2 Wide trimmer (32 mm)
3 Precision trimmer (16 mm) *
4 Release button precision trimmer *
5 Charge Indicator
6a Lock switch for precision comb
6b Length selector for precision comb
6c Length selector for hair comb
7 On/off switch
8 Special cord set (design can differ)
8a Charging stand *
9 Pouch *
* not with all models
Charging
Recommended ambient temperature for charging is 5 °C to 35 °C.
The battery may not charge properly or at all under extreme low or high
temperatures. Recommended ambient temperature for trimming is 15 °C
to 35 °C. Do not expose the appliance to temperatures higher than 50 °C for
extended periods of time.
• Place the appliance (switched off) in the charging stand or connect it
directly to an electrical outlet via the special cord set (8).
• When charging for the first time or when the appliance is not used for
a few months, leave the appliance to charge continuously for 4 hours
(BT 5050/5030/5010: 8 hours).
• Once the appliance is completely charged, discharge it through normal
use. Then recharge to full capacity.
• A full charge provides up to 50 minutes of cordless operating time.
This may vary according to your beard growth.
• Maximum battery capacity will only be reached after several charging/
discharging cycles.
Charge Indicator (5)
BT 5090/5070
• The charge indicator shows the battery status.
• The charge indicator blinks green when the appliance is being charged.
91063080_BT_5090-5010_CEEMEA_S6-92.indd 791063080_BT_5090-5010_CEEMEA_S6-92.indd 7 11.07.16 10:1311.07.16 10:13
CSS APPROVED Effective Date 5Aug2016 GMT - Printed 27Sep2016 Page 6 of 91

8
When the battery is fully charged, the charge indicator shines permanently
green provided the appliance is connected to an electrical outlet.
• During cordless use the charge indicator blinks green.
• The charge indicator flashes red when the battery is running low.
You should be able to finish your current trimming sequence.
BT 5050/5030/5010
• The charge indicator (5) shows that the appliance is being charged.
When the battery is fully charged, the charge indicator turns off.
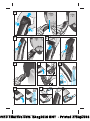
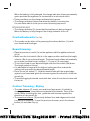
Comb attachments (1a, 1b)
• The combs can be taken off by pressing the release buttons (1c) with
your thumb and forefinger.
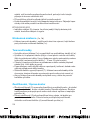
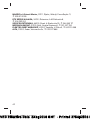
Beard trimming
• Place the precision comb (1a) on the appliance with the appliance turned
off (a).
• Make sure the lock switch (6a) is in the upper position and turn the length
selector (6b) to your desired length. The beard comb slides automatically
up or down (possible lenght settings 1 - 10 mm in 0,5 mm steps).
• To lock the comb at your desired length slide the lock switch (6a) down.
The length selector is fixed.
• It is advisable to begin with the highest setting and then reduce the
setting until you reach the desired beard length.
• Press the on/off switch (7). Hold the beard comb with the angled edge
against your beard and guide the trimmer against the direction of the hair
growth (a).
• To avoid clogging the beard comb with hair, clean it from time to time with
the brush.
Contour Trimming / Styling
• The wide trimmer (2) evenly cuts and trims large areas. It is ideal for
shaping sideburns, moustaches and partial short beards. Take off the
comb. While stretching the skin, guide the wide trimmer against the
direction of hair growth (b).
• The precision trimmer (3) precisely defines lines and edges and is ideal
for precise contouring. To use the precision trimmer, press the release
button (4) and slide it up (c).
91063080_BT_5090-5010_CEEMEA_S6-92.indd 891063080_BT_5090-5010_CEEMEA_S6-92.indd 8 11.07.16 10:1311.07.16 10:13
CSS APPROVED Effective Date 5Aug2016 GMT - Printed 27Sep2016 Page 7 of 91

9
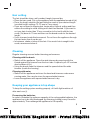
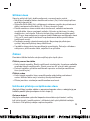
Hair cutting
The hair should be clean, well combed, tangle-free and dry.
• Place the hair comb (1b) on the appliance with the appliance turned off (d).
• Press the length selector (6c) and slide the comb to your desired length
(possible length settings 10 - 20 mm in 2 mm steps).
• If you are not used to clipping hair, begin with a highest setting and then
reduce the setting to avoid cutting more hair than desired. If you want to
cut your hair shorter than 10 mm, we advise to first cut it with the hair
comb (1b) down to 10 mm and then use the beard comb for the desired
length.
• Use a slow and controlled movement. Do not force the appliance through
the hair faster than it can be cut.
• In between, shake or blow off the hair. If too much hair is caught in the
comb, remove and clean it.
Cleaning
Regular cleaning ensures better trimming performance.
Cleaning with the brush
• Switch off the appliance. Open the wide trimmer by pressing with the
thumb against the trimmer from the front side. It opens by ca. 45° and can
also be taken off (h).
• Using the brush clean the trimmers and the space behind the wide
trimmer (inside the housing).
Cleaning with water
• Switch off the appliance and rinse the head and trimmers under warm
running water. You can also rinse the opened wide trimmer.
• Leave the appliance with opened wide trimmer to dry.
Keeping your appliance in top shape
To keep the cutting system working properly, oil it with light machine oil
after each use (i).
Preserving the batteries
In order to maintain the optimum capacity of the rechargeable batteries, the
appliance has to be fully discharged (by trimming/cutting) every 6 months
approximately. Then recharge the appliance to full capacity.
91063080_BT_5090-5010_CEEMEA_S6-92.indd 991063080_BT_5090-5010_CEEMEA_S6-92.indd 9 11.07.16 10:1311.07.16 10:13
CSS APPROVED Effective Date 5Aug2016 GMT - Printed 27Sep2016 Page 8 of 91

10
Environmental notice
Product contains batteries and/or recyclable electric waste.
For environment protection do not dispose of in household waste,
but for recycling take to electric waste collection points provided in
your country.
Subject to change without notice.
For electric specifications, see printing on the special cord set.
Guarantee
We grant a 2 year guarantee on the product commencing on the date of
purchase. Within the guarantee period we will eliminate any defects in the
appliance resulting from faults in materials or workmanship, free of charge
either by repairing or replacing the complete appliance at our discretion.
This guarantee extends to every country where this appliance is supplied by
Braun or its appointed distributor.
This guarantee does not cover: damage due to improper use, normal wear
or use as well as defects that have a negligible effect on the value or
operation of the appliance.
The guarantee becomes void if repairs are undertaken by unauthorised
persons and if original Braun parts are not used.
To obtain service within the guarantee period, hand in or send the complete
appliance with your sales receipt to an authorised Braun Customer Service
Centre (address information available online at www.service.braun.com).
For UK only:
This guarantee in no way affects your rights under statutory law.
91063080_BT_5090-5010_CEEMEA_S6-92.indd 1091063080_BT_5090-5010_CEEMEA_S6-92.indd 10 11.07.16 10:1311.07.16 10:13
CSS APPROVED Effective Date 5Aug2016 GMT - Printed 27Sep2016 Page 9 of 91

11
Français
Nos produits sont conçus pour satisfaire aux plus hautes exigences en
matière de qualité, fonctionnalité et design. Nous espérons que vous serez
pleinement satisfait de votre nouveau rasoir Braun.
Lisez l’intégralité des instructions d’utilisation, elles contiennent des
informations de sécurité. Conservez ce document pour le consulter
également ultérieurement.
Attention
L’appareil peut être nettoyé à l’eau du robinet.
Débranchez l’appareil de la prise électrique avant de
le nettoyer à l’eau.
Cet appareil est équipé d’un cordon d’alimentation avec un
adaptateur basse tension intégré. Ne modifiez ni ne mani-
pulez aucun de ses composants afin d’éviter tout risque
d’électrocution. Utilisez uniquement le cordon d’alimenta-
tion fourni avec votre rasoir.
Si l’appareil porte la référence 491, vous pouvez
l’utiliser avec n’importe quel alimentation marquée 491-XXXX.
Ne jamais utiliser cet appareil si les tondeuses ou le cordon
d’alimentation sont endommagés.
Cet appareil peut être utilisé par des enfants de 8 ans et
plus et par des personnes dont les capacités physiques,
sensorielles ou mentales sont réduites, ou des personnes
dénuées d’expérience ou de connaissance, si elles ont pu
bénéficier, par l’intermédiaire d’une personne responsable
de leur sécurité, d’une surveillance ou d’instructions préa-
lables concernant l’utilisation de l’appareil en toute sécu-
rité et les dangers encourus. Les enfants ne doivent pas
jouer avec l’appareil. Le nettoyage et l’entretien ne doivent
pas être faits par des enfants, à moins qu’ils ne soient âgés
de plus de 8 ans et qu’ils ne soient sous surveillance.
91063080_BT_5090-5010_CEEMEA_S6-92.indd 1191063080_BT_5090-5010_CEEMEA_S6-92.indd 11 11.07.16 10:1311.07.16 10:13
CSS APPROVED Effective Date 5Aug2016 GMT - Printed 27Sep2016 Page 10 of 91

12
Bouteille d’huile
Conservez hors de portée des enfants. Ne pas avaler. Ne pas appliquer sur
les yeux. Jeter la bouteille correctement lorsqu’elle est vide.
Description
1a Sabot de précision pour la tonte de la barbe et des cheveux courts
1b Sabot pour cheveux *
1c Boutons pour retirer le sabot
2 Bloc de coupe (32 mm)
3 Tondeuse de précision (16 mm) *
4 Bouton pour retirer la tondeuse de précision *
5 Témoin lumineux
6a Bouton de verrouillage pour le sabot de précision
6b Molette de réglage de la hauteur de coupe du sabot de précision
6c Molette de réglage de la hauteur du sabot des cheveux
7 Bouton marche/arrêt
8 Cordon d’alimentation (le design peut varier)
8a Socle de charge *
9 Pochette *
* non fournie avec tous les modèles
Mise en charge de l’appareil
La température ambiante recommandée pour charger le rasoir est comprise
entre 5 °C et 35 °C. La batterie peut ne pas se charger correctement ou pas
du tout à des températures extrêmement basses ou élevées. Recommended
ambient temperature for trimming is 15 °C to 35 °C.
N’exposez pas votre rasoir
à des températures supérieures à 50 °C pendant une période prolongée.
• Posez l’appareil (arrêté) sur le socle de charge, ou branchez-le directe-
ment sur une prise électrique à l’aide du cordon d’alimentation (8).
• Lors de la première mise en charge ou lorsque l’appareil n’a pas été utilisé
pendant plusieurs mois, laissez l’appareil charger en continu pendant
4 heures (BT 5050/5030/5010 : 8 heures).
• Une fois que l’appareil est complètement chargé, utilisez-le normalement
jusqu’à ce qu’il soit complètement déchargé. Puis, le recharger complè-
tement.
• Après une charge complète, l’autonomie de l’appareil est de 50 minutes.
Cette autonomie varie toutefois selon votre type de barbe.
• La capacité maximum de la batterie ne sera atteinte qu’après plusieurs
cycles de charge/décharge.
91063080_BT_5090-5010_CEEMEA_S6-92.indd 1291063080_BT_5090-5010_CEEMEA_S6-92.indd 12 11.07.16 10:1311.07.16 10:13
CSS APPROVED Effective Date 5Aug2016 GMT - Printed 27Sep2016 Page 11 of 91

13
Témoin lumineux (5)
BT 5090/5070
• Le témoin lumineux indique l’état de la batterie.
• Le voyant vert clignote lorsque l’appareil est en charge. Lorsque la
batterie est complètement chargée, le voyant vert s’éclaire en perma-
nence tant que l’appareil reste branché sur une prise de courant.
• Lors de l’utilisation sans fil, la voyant vert clignote.
• Lorsque la batterie est en fin d’autonomie un voyant rouge s’éclaire.
Vous devriez néanmoins pouvoir terminer la taille en cours.
BT 5050/5030/5010
• Le témoin lumineux de charge (5) s’allume, indiquant que le rasoir est en
train de se charger. Lorsque la batterie est complètement rechargée, le
témoin de charge s’éteint.
Sabot et accessoires (1a, 1b)
• Pour retirer les sabots, appuyez sur les boutons (1c) à l’aide de vos
pouces et index.
Rasage
• Placez le sabot de précision (1a) sur l’appareil, en vous assurant que
l’appareil soit éteint.
• Assurez-vous que le bouton de verrouillage (6a) est mis dans la position
la plus haute, puis tournez la molette de hauteur de coupe (6b) vers la
longueur désirée. Le sabot de barbe glisse automatiquement vers le haut
ou vers le bas (différentes hauteurs de coupe 1-10mm, par pas de 2 mm).
• Pour bloquer le sabot à la longueur désirée, faites glisser le bouton de
verrouillage (6a) vers le bas. Le sabot est alors bloqué à la longueur désirée.
• Il est conseillé de commencer avec le réglage de la plus haute coupe,
puis de le réduire jusqu’à atteindre la longueur de barbe désirée.
• Mettre en marche en appuyant sur le bouton (7). Maintenir le sabot à
barbe contre la peau et déplacer la tondeuse dans le sens contraire de la
pousse du poil.
• Pour éviter que le sabot ne soit saturé par les poils, nettoyez-le régulière-
ment avec la brosse.
Coupe / Rasage des contours
• Le bloc de coupe (2) coupe et taille les zones larges. Il est idéal pour la
coupe des pattes, des moustaches et des barbes courtes. Enlevez le
sabot. Puis tendre la peau et déplacez la tondeuse dans le sens contraire
à la pousse du poil.
91063080_BT_5090-5010_CEEMEA_S6-92.indd 1391063080_BT_5090-5010_CEEMEA_S6-92.indd 13 11.07.16 10:1311.07.16 10:13
CSS APPROVED Effective Date 5Aug2016 GMT - Printed 27Sep2016 Page 12 of 91

14
• La tondeuse de précision (3) délimite précisément les lignes et les bords
et est idéale pour la précision des contours. Pour utiliser la tondeuse de
précision, appuyez sur le bouton (4) et faites-la coulisser vers le haut (c).
Coupe de cheveux
Les cheveux doivent être propres, bien peignés, démêlés et secs.
• Appareil arrêté, placer le sabot pour cheveux (1b).
• Appuyez sur la molette de hauteur de coupe (6c) et faites la coulisser
vers le haut (différentes hauteurs de coupe 10 - 20mm, par pas de 2 mm).
• Si vous n’êtes pas habitué à couper vos cheveux, commencez par un
réglage de la plus haute coupe, puis diminuer le ensuite pour éviter de
couper plus que ce que vous ne le souhaiteriez. Si vous voulez couper
vos cheveux plus courts que 10 mm, nous vous conseillons de couper
d’abord avec le sabot pour cheveux (1b) réglage 10 mm, puis d’utiliser le
sabot à barbe pour obtenir la longueur désirée.
• Déplacez la tondeuse en la faisant glisser lentement tout en contrôlant
le geste. Ne pas forcer l’appareil à couper plus vite que ce qui lui est
possible de faire.
• De temps en temps, secouez ou soufflez sur le sabot pour évacuer les
cheveux. Si trop de cheveux s’accumulent dans le sabot, retirez-le et
videz-le.
Nettoyage
Un nettoyage régulier garantit une performance de rasage optimale.
Nettoyage à la brosse
• Arrêtez l’appareil. Repoussez avec votre pouce le bloc de coupe pour le
dégrafer. Il s’ouvre à 45° et peut être également retiré (h).
• Utilisez la brosse pour nettoyer les tondeuses ainsi que l’arrière du bloc
de coupe (et l’espace entre le boîtier).
Nettoyage à l’eau
• Arrêtez l’appareil puis rincez la tête et les tondeuses à l’eau chaude
courante. Vous pouvez également rincer la tondeuse large lorsqu’elle
est sortie.
• Laissez sécher l’appareil avec le bloc de coupe ouvert pour un meilleur
séchage.
Gardez votre appareil en bon état
Pour assurer le bon fonctionnement du système de coupe, appliquez une
goutte d’huile après chaque utilisation (i).
91063080_BT_5090-5010_CEEMEA_S6-92.indd 1491063080_BT_5090-5010_CEEMEA_S6-92.indd 14 11.07.16 10:1311.07.16 10:13
CSS APPROVED Effective Date 5Aug2016 GMT - Printed 27Sep2016 Page 13 of 91

15
Entretien des batteries
Afin de conserver la capacité maximum des batteries rechargeables,
l’appareil doit être complètement déchargé en utilisation (rasage/taille)
environ tous les 6 mois. Puis, rechargez-le à sa pleine capacité.
Remarque environnementale
Dans l’intérêt de la protection de l’environnement, ne jetez pas
l’appareil en fin de vie avec les déchets ménagers. Vous pouvez le
déposer dans un Centre Service agrée Braun ou dans l’un des points
de collecte adapté.
Sujet à toute modification sans préavis.
Pour les spécifications électriques, veuillez vous reporter aux indications
situées sur le câble d’alimentation.
Garantie
Nous accordons une garantie de 2 ans sur ce produit, à partir de la date
d’achat.
Pendant la durée de la garantie, Braun prendra gratuitement à sa charge la
réparation des vices de fabrication ou de matière en se réservant le droit de
décider si certaines pièces doivent être réparées ou si l’appareil lui-même
doit être échangé.
Cette garantie s’étend à tous les pays où cet appareil est commercialisé par
Braun ou son distributeur exclusif.
Cette garantie ne couvre pas : les dommages occasionnés par une utilisation
inadéquate, l’usure normale ainsi que les défauts d’usures qui ont un effet
négligeable sur la valeur ou l’utilisation de l’appareil. Cette garantie devient
caduque si des réparations ont été effectuées par des personnes non
agréées par Braun et si des pièces de rechange ne provenant pas de Braun
ont été utilisées.
Pour toute réclamation intervenant pendant la période de garantie, retournez
ou rapportez l’appareil ainsi que l’attestation de garantie à votre revendeur
ou à un Centre Service Agréé Braun.
Veuillez vous référer à www.service.braun.com ou appeler le 0 800 944 802
(service consommateurs – service & appel gratuits) pour connaître le
Centre Service Agréé Braun le plus proche de chez vous.
Clause spéciale pour la France
Outre la garantie contractuelle exposée ci-dessus, nos clients bénéficient de
la garantie légale des vices cachés prévue aux articles 1641 et suivants du
Code civil.
91063080_BT_5090-5010_CEEMEA_S6-92.indd 1591063080_BT_5090-5010_CEEMEA_S6-92.indd 15 11.07.16 10:1311.07.16 10:13
CSS APPROVED Effective Date 5Aug2016 GMT - Printed 27Sep2016 Page 14 of 91

16
Nasze produkty zostały zaprojektowane po to, aby spełniać najwyższe
standardy jakości, funkcjonalności oraz designu. Mamy nadzieję, ze
użytkowanie naszego nowego produktu sprawi Ci wiele radości i satysfakcji.
Prosimy uważnie przeczytać instrukcję przed zastosowaniem urządzenia,
zawiera informacje na temat bezpieczeństwa. Prosimy zachować instrukcję
do skorzystania w przyszłości.
Uwaga
Urządzenie jest przystosowane do czyszczenia pod
bieżącą wodą. Przed umyciem należy wyjąć wtyczkę
z gniazdka sieciowego.
Twoja golarka jest wyposażona w specjalny przewód z
wbudowanym zasilaczem obniżającym napięcie. Nie próbuj
wymieniać ani manipulować przy jakiejkolwiek części golarki.
W przeciwnym razie narażasz się na ryzyko porażenia
prądem. Używaj golarki tylko z specjalny przewodem
zasilającym dostarczonym wraz z urządzeniem.
Jeśli urządzenie jest oznakowane 491 można go
używać z dowolnym zasilaczem marki Braun oznaczonym
kodem 491-XXXX.
Nigdy nie używaj urządzenia, które jest uszkodzone lub ma
zniszczony kabel zasilający.
To urządzenie może być używane przez dzieci w wieku od
lat 8, a także przez osoby o ograniczonych zdolnościach
fizycznych, sensorycznych lub umysłowych oraz osoby
niemające wystarczającego doświadczenia ani wiedzy, o ile
są nadzorowane albo zostały poinstruowane w zakresie
bezpiecznego użytkowania tego urządzenia oraz świadome
istniejących zagrożeń. Nie wolno zezwalać dzieciom na
zabawę urządzeniem. Czyszczenie i konserwacja urządzenia
nie może być wykonana przez dzieci chyba że są one
starsze niż 8 lat i nadzorowane.
Polski
91063080_BT_5090-5010_CEEMEA_S6-92.indd 1691063080_BT_5090-5010_CEEMEA_S6-92.indd 16 11.07.16 10:1311.07.16 10:13
CSS APPROVED Effective Date 5Aug2016 GMT - Printed 27Sep2016 Page 15 of 91

17
Butelka oleju
Chronić przed dziećmi. Nie połykać. Zużyte opakowanie zutylizować
zgodnie z obowiązującymi przepisami.
Opis
1a Nasadka z grzebieniem do precyzyjnego przycinania brody
i krótkich włosów
1b Nasadka z grzebieniem do przycinania włosów *
1c Przycisk zwalniający nasadkę z grzebieniem *
2 Szeroki trymer (32 mm)
3 Precyzyjny trymer (16 mm) *
4 Przycisk zwalniający precyzyjny trymer *
5 Wskaźnik ładowania
6a Przełącznik blokady dla nasadki do precyzyjnego przycinania
6b Regulator długości dla nasadki precyzyjnej
6c Regulator długości dla nasadki do przycinania włosów
7 Włącznik/wyłącznik
8 Specjalny przewód zasilający
8a Podstawka ładująca *
9 Etui *
* nie dla wszstkich modeli
Ładowanie
Zalecana temperatura otoczenia podczas ładowania wynosi 5–35 °C.
Akumulator może nie naładować się prawidłowo lub wcale się nie naładować
w skrajnie niskich lub wysokich temperaturach. Zalecana temperatura
otoczenia dla prawidłowej pracy urządzenia. Nie należy pozostawiać
urządzenia na dłuższy okres czasu w temperaturze powyżej 50 °C.
• W czasie ładowania urządzenie musi być wyłączone i podłączone
specjalny przewód zasilający (8) do gniazdka elektrycznego.
• Przed pierwszym goleniem lub gdy urządzenie nie było używane przez kilka
miesięcy, należy podłączyć golarkę do ciągłego ładowania na 4 godziny
(BT 5050/5030/5010: 8 godziny).
• Gdy golarka jest całkowicie naładowana, należy rozładować baterię
poprzez normalne użytkowanie. Wówczas naładuje się ona ponownie do
pełna.
• Urządzenie w pełni naładowane może pracować bezprzewodowo do
50 minut w zależności od rodzaju i długości zarostu.
• Maksymalna wydajność baterii może zostać osiągnięta po kilku cyklach
ładowania / rozładowania baterii.
91063080_BT_5090-5010_CEEMEA_S6-92.indd 1791063080_BT_5090-5010_CEEMEA_S6-92.indd 17 11.07.16 10:1311.07.16 10:13
CSS APPROVED Effective Date 5Aug2016 GMT - Printed 27Sep2016 Page 16 of 91

18
Wskaźnik ładowania (5)
BT 5090/5070
• Wskaźnik pokazuje poziom naładowania baterii.
• Pulsujący na zielono wskaźnik ładowania informuje, że golarka jest
w trakcie ładowania. Kiedy bateria jest w pełni naładowana, wskaźnik
ładowania świeci ciągłym zielonym światłem, pod warunkiem, że
urządzenie jest podłączone do gniazdka.
• W czasie gdy urządzenie nie jest podłączone do prądu wskaźnik ładownia
miga na zielono.
• Migający czerwony wskaźnik oznacza, że bateria jest na wyczerpaniu
jednak powinna wystarczyć do momentu zakończenia golenia.
BT 5050/5030/5010
• Wskaźnik ładowania (5) pokazuje, że urządzenie jest w trakcie ładowania.
Gdy bateria jest w pełni naładowana, wskaźnik ładowania zgaśnie.
Nasadki z grzebieniem (1a, 1b)
• Nasadka z grzebieniem może być zdjęta za pomocą naciśnięcia przycisku
zwalniającego (1c).
Przycinanie brody
• Na wyłączone (a) urządzenie nałóż nasadkę z grzebieniem do precyzyjnego
przycinania brody i krótkich włosów (1a).
• Upewnij się, że przełącznik blokady dla nasadki do precyzyjnego
przycinania jest w górnej pozycji i przekręć regulator długości dla nasadki
precyzyjnej ustawiając pożądaną długość przycinania. Grzebień nasadki
przesuwa się automatycznie w górę/ w dół (możliwe ustawienia długość
1 - 10 mm w odstępach 0,5 mm).
• Aby zablokować grzebień na żądanej długości przesuń przełącznik
blokady (6a) w dół.
• Wskazane jest, aby rozpocząć golenie od najwyższego ustawienia, a
następnie stopniowo je redukować aż do pożądanej długości brody.
• Naciśnij przycisk włącz/wyłącz (7). Trzymaj grzebień równolegle do
krawędzi brody i przesuwaj trymer w kierunku przeciwnym do wzrostu
włosów (a).
• Aby uniknąć zatkania zarostem nasadki z grzebieniem, czyść ją od czasu
do czasu za pomocą szczoteczki.
Golenie konturów twarzy / Stylizacja
• Szeroki trymer (2) dokładnie przycina zarost dużych partii skóry.
Nadaje idealny kształt bakom, wąsom i krótkiemu zarostowi brody.
91063080_BT_5090-5010_CEEMEA_S6-92.indd 1891063080_BT_5090-5010_CEEMEA_S6-92.indd 18 11.07.16 10:1311.07.16 10:13
CSS APPROVED Effective Date 5Aug2016 GMT - Printed 27Sep2016 Page 17 of 91

19
Zdejmij nasadkę, a następnie delikatnie naciągając skórę przesuwaj
trymer w kierunku przeciwnym do wzrostu włosów (b).
• Precyzyjny trymer (3) dokładnie i precyzyjnie modeluje linie i krawędzie,
nadając zarostowi idealny kontur. Aby uruchomić precyzyjny trymer,
naciśnij przycisk zwalniający (4) i rozpocznij golenie (c).
Przycinanie włosków
Włosy powinny być czyste, przeczesane, niesplątane i suche.
• Umieść nasadkę z grzebieniem (1b) na urządzeniu, gdy jest ono
wyłączone (d).
• Naciśnij regulator długości (6c) i przesuń grzebień do żądanej długości
(możliwa długość Ustawienia 10 - 20 mm, w odstępach 2 mm).
• Jeżeli nie masz wprawy w przycinaniu włosków, rozpocznij od wyższego
ustawienia, a następnie stopniowe redukuj je, aby uniknąć przycinania
tych włosków, których nie chcesz usunąć. Jeżeli chcesz skrócić włosy
krócej niż 10 mmm, radzimy najpierw przyciąć je za pomocą nasadki z
grzebieniem do przycinania włosków (1b) do długości 10 mm,
a następnie użyć nasadki do cięcia brody, aby osiągnąć pożądaną
długość.
• Przesuwaj urządzenie po skórze powolnymi i kontrolowanymi ruchami.
Nie przeciążaj urządzenia tnąc włosy szybciej niż jest to możliwe.
• Podczas golenia potrząsaj urządzeniem, co jakiś czas, aby usunąć pozo-
stałości włosów. Jeśli w nakładce znajduje się zbyt duża ilość zarostu,
zdejmij ją i dokładnie oczyść.
Czyszczenie
Regularne czyszczenie zapewnia lepsze rezultaty golenia.
Czyszczenie za pomocą szczoteczki
• Wyłącz urządzenie. Otwórz szeroki trymer, naciskając kciukiem i
wysuwając go do przodu. Możesz otworzyć trymer pod kątem 45°, albo
całkowicie go zdjąć (h).
• Używając szczoteczki wyczyść dokładnie trymer oraz wewnętrzną stronę
głowicy.
Czyszczenie pod wodą
• Wyłącz urządzenie i wypłucz głowicę i trymer pod ciepła bieżącą wodą.
Możesz także wypłukać otwarty trymer.
• Pozostaw urządzenie z otwartym szerokim trymerem do wyschnięcia.
91063080_BT_5090-5010_CEEMEA_S6-92.indd 1991063080_BT_5090-5010_CEEMEA_S6-92.indd 19 11.07.16 10:1311.07.16 10:13
CSS APPROVED Effective Date 5Aug2016 GMT - Printed 27Sep2016 Page 18 of 91

20
Konserwacja urządzenia
Aby jakoÊç golenia by∏a utrzymywana na niezmiennie wysokim poziomie
system tnàcy nale˝y oliwiç olejem maszynowym (za∏àczonym w wybranych
modelach) po ka˝dym u˝yciu (i).
Konserwacja baterii
Aby zachować optymalna pojemność akumulatorów golarki, należy
rozładować je całkowicie (poprzez golenie) co około 6 miesięcy.
Następnie naładować urządzenie do pełna.
Ochrona środowiska
Produkt zawiera akumulatory i/lub odpady elektryczne podlegające
recyklingowi. By chronić środowisko, nie należy go wyrzucać wraz
z normalnymi odpadami, lecz zanosić do punktów zbiórki odpadów
elektrycznych, dostępnych w danym kraju.
Powyższe informacje mogą ulec zmianie bez uprzedniego powiadomienia.
Specyfikacje elektryczne zostały wydrukowane na specjalnym kablu
sieciowym.
Warunki gwarancji
1. Procter & Gamble International Operation SA, z siedzibą w Route de
St-Georges 47, 1213 Petit Lancy 1 w Szwajcarii, gwarantuje sprawne
działanie sprzętu w okresie 24 miesięcy od daty jego wydania
Konsumentowi. Ujawnione w tym okresie wady będą usuwane
bezpłatnie przez autoryzowany punkt serwisowy, w terminie 14 dni od
daty dostarczenia sprzętu do autoryzowanego punktu serwisowego.
2. Konsument może wysłać sprzęt do naprawy do najbliżej znajdującego
się autoryzowanego punktu serwisowego lub skorzystać z pośrednictwa
sklepu, w którym dokonał zakupu sprzętu. W takim wypadku termin
naprawy ulegnie wydłużeniu o czas niezbędny do dostarczenia i odbioru
sprzętu.
3. Konsument powinien dostarczyć sprzęt w opakowaniu należycie
zabezpieczonym przed uszkodzeniem. Uszkodzenia spowodowane
niedostatecznym zabezpieczeniem sprzętu nie podlegają naprawom
gwarancyjnym. Naprawom gwarancyjnym nie podlegają także inne
91063080_BT_5090-5010_CEEMEA_S6-92.indd 2091063080_BT_5090-5010_CEEMEA_S6-92.indd 20 11.07.16 10:1311.07.16 10:13
CSS APPROVED Effective Date 5Aug2016 GMT - Printed 27Sep2016 Page 19 of 91

21
uszkodzenia powstałe w następstwie okoliczności, za które Gwarant nie
ponosi odpowiedzialności, w szczególności zawinione przez Pocztę
Polską lub firmy kurierskie.
4. Niniejsza gwarancja jest ważna jedynie z dokumentem zakupu i
obowiązuje w każdym kraju, w którym, to urządzenie jest rozprowadzane
przez jednostkę organizacyjną firmy Procter & Gamble lub
upoważnionego przez nią dystrybutora.
5. Dokument zakupu musi być opatrzony datą i numerem oraz określać
nazwę i model sprzętu.
6. Okres gwarancji przedłuża się o czas od zgłoszenia wady lub
uszkodzenia do naprawy sprzętu i zwrotnego postawienia go do
dyspozycji Konsumenta.
7. Naprawa gwarancyjna nie obejmuje czynności przewidzianych w
instrukcji, do wykonania których, Konsument zobowiązany jest we
własnym zakresie i na własny koszt.
8. Ewentualne oczyszczenie sprzętu dokonywane jest na koszt
Konsumenta według cennika danego autoryzowanego punktu
serwisowego i nie będzie traktowane jako naprawa gwarancyjna, chyba,
że oczyszczenie jest niezbędne do usunięcia wady w ramach świadczeń
objętych niniejszą gwarancją i nie stanowi czynności, o których mowa w
p. 7.
9. Gwarancją nie są objęte:
a) mechaniczne uszkodzenia sprzętu spowodowane w czasie jego
użytkowania lub w czasie dostarczania sprzętu do naprawy;
b) uszkodzenia i wady wynikłe na skutek:
– używania sprzętu do celów innych niż osobisty użytek;
– niewłaściwego lub niezgodnego z instrukcją użytkowania,
konserwacji, przechowywania lub instalacji;
– używania niewłaściwych materiałów eksploatacyjnych;
– napraw dokonywanych przez nieuprawnione osoby; stwierdzenie
faktu takiej naprawy lub samowolnego otwarcia sprzętu powoduje
utratę gwarancji;
– przeróbek, zmian konstrukcyjnych lub używania do napraw
nieoryginalnych części zamiennych firmy Braun;
– części szklane, żarówki oświetlenia;
– ostrza i folie do golarek, wymienne końcówki do szczoteczek
elektrycznych i irygatorów oraz materiały eksploatacyjne.
10. Niniejsza gwarancja na sprzedany towar konsumpcyjny nie wyłącza, nie
ogranicza ani nie zawiesza uprawnień Kupującego wynikających z
przepisów o rękojmi za wady rzeczy sprzedanej.
91063080_BT_5090-5010_CEEMEA_S6-92.indd 2191063080_BT_5090-5010_CEEMEA_S6-92.indd 21 11.07.16 10:1311.07.16 10:13
CSS APPROVED Effective Date 5Aug2016 GMT - Printed 27Sep2016 Page 20 of 91
Pagina se încarcă...
Pagina se încarcă...
Pagina se încarcă...
Pagina se încarcă...
Pagina se încarcă...
Pagina se încarcă...
Pagina se încarcă...
Pagina se încarcă...
Pagina se încarcă...
Pagina se încarcă...
Pagina se încarcă...
Pagina se încarcă...
Pagina se încarcă...
Pagina se încarcă...
Pagina se încarcă...
Pagina se încarcă...
Pagina se încarcă...
Pagina se încarcă...
Pagina se încarcă...
Pagina se încarcă...
Pagina se încarcă...
Pagina se încarcă...
Pagina se încarcă...
Pagina se încarcă...
Pagina se încarcă...
Pagina se încarcă...
Pagina se încarcă...
Pagina se încarcă...
Pagina se încarcă...
Pagina se încarcă...
Pagina se încarcă...
Pagina se încarcă...
Pagina se încarcă...
Pagina se încarcă...
Pagina se încarcă...
Pagina se încarcă...
Pagina se încarcă...
Pagina se încarcă...
Pagina se încarcă...
Pagina se încarcă...
Pagina se încarcă...
Pagina se încarcă...
Pagina se încarcă...
Pagina se încarcă...
Pagina se încarcă...
Pagina se încarcă...
Pagina se încarcă...
Pagina se încarcă...
Pagina se încarcă...
Pagina se încarcă...
Pagina se încarcă...
Pagina se încarcă...
Pagina se încarcă...
Pagina se încarcă...
Pagina se încarcă...
Pagina se încarcă...
Pagina se încarcă...
Pagina se încarcă...
Pagina se încarcă...
Pagina se încarcă...
Pagina se încarcă...
Pagina se încarcă...
Pagina se încarcă...
Pagina se încarcă...
Pagina se încarcă...
Pagina se încarcă...
Pagina se încarcă...
-
 1
1
-
 2
2
-
 3
3
-
 4
4
-
 5
5
-
 6
6
-
 7
7
-
 8
8
-
 9
9
-
 10
10
-
 11
11
-
 12
12
-
 13
13
-
 14
14
-
 15
15
-
 16
16
-
 17
17
-
 18
18
-
 19
19
-
 20
20
-
 21
21
-
 22
22
-
 23
23
-
 24
24
-
 25
25
-
 26
26
-
 27
27
-
 28
28
-
 29
29
-
 30
30
-
 31
31
-
 32
32
-
 33
33
-
 34
34
-
 35
35
-
 36
36
-
 37
37
-
 38
38
-
 39
39
-
 40
40
-
 41
41
-
 42
42
-
 43
43
-
 44
44
-
 45
45
-
 46
46
-
 47
47
-
 48
48
-
 49
49
-
 50
50
-
 51
51
-
 52
52
-
 53
53
-
 54
54
-
 55
55
-
 56
56
-
 57
57
-
 58
58
-
 59
59
-
 60
60
-
 61
61
-
 62
62
-
 63
63
-
 64
64
-
 65
65
-
 66
66
-
 67
67
-
 68
68
-
 69
69
-
 70
70
-
 71
71
-
 72
72
-
 73
73
-
 74
74
-
 75
75
-
 76
76
-
 77
77
-
 78
78
-
 79
79
-
 80
80
-
 81
81
-
 82
82
-
 83
83
-
 84
84
-
 85
85
-
 86
86
-
 87
87


Braun BT 5010 Manual de utilizare
- Categorie
- Aparate de tuns
- Tip
- Manual de utilizare
- Acest manual este potrivit și pentru
în alte limbi
- Türkçe: Braun BT 5010 Kullanım kılavuzu
- slovenčina: Braun BT 5010 Používateľská príručka
Lucrări înrudite
-
Braun BT7050 Beard trimmer, Series 7 Manual de utilizare
-
Braun HC5010 Manual de utilizare
-
-
-
-
-
-
-
-