Philips HQ8170/16 Manual de utilizare
- Categorie
- Aparate de bărbierit
- Tip
- Manual de utilizare
Acest manual este potrivit și pentru

HQ8170
ENGLISH 4
16
30
42
54
66
79
92
104
116
129
141
155
167
179
191

4
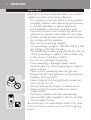
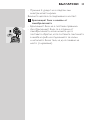
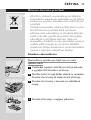
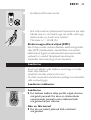
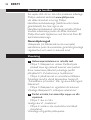
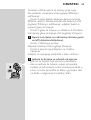
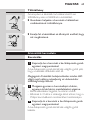
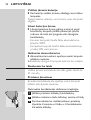
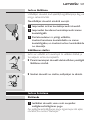
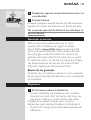
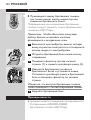
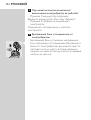
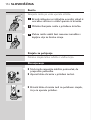
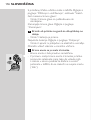
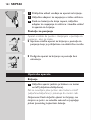
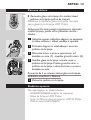
Important
Read this user manual carefully before you use the
appliance and save it for future reference.
This appliance is not intended for use by persons
(including children) with reduced physical, sensory
or mental capabilities, or lack of experience
and knowledge, unless they have been given
supervision or instruction concerning use of the
appliance by a person responsible for their safety.
Children should be supervised to ensure that they
do not play with the appliance.
Only use the powerplug supplied.
The powerplug transforms 100-240 volts to a safe
low voltage of less than 24 volts.
The powerplug contains a transformer. Do not cut
off the powerplug to replace it with another plug,
as this causes a hazardous situation.
Do not use a damaged powerplug.
If the powerplug is damaged, always have it
replaced with one of the original type in order to
avoid a hazard.
Make sure the powerplug does not get wet.
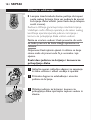
Charge and store the appliance at a temperature
between 15°C and 35°C.
Never immerse the charging stand in water nor
rinse it under the tap.
Do not recharge the shaver in a closed pouch.
Always unplug the shaver before you clean it
under the tap.
The shaver complies with the internationally
approved IEC safety regulations and can be safely
cleaned under the tap.
Be careful with hot water. Always check if the water
is not too hot, to prevent your hands from getting
burnt.
-
-
-
-
-
-
-
-
-
-
-
-
-
ENGLISH

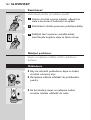
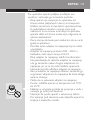
This washable shaver is not suitable for shaving in
the shower.
Do not immerse the shaver in water.
Water may leak from the socket at the bottom
of the appliance, when you rinse it. This is normal
and not dangerous because all electronics are
enclosed in a sealed shell inside the shaver.
Noiselevel: Lc= 60 dB(A)
This Philips appliance complies with all standards
regarding electromagnetic elds (EMF). If handled
properly and according to the instructions in this
user manual, the appliance is safe to use based on
scientic evidence available today.
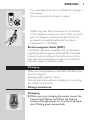
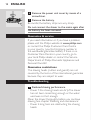
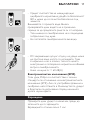
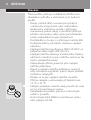
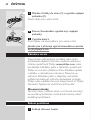
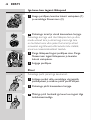
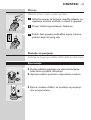
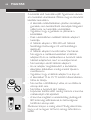
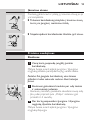
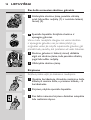
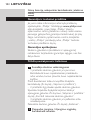
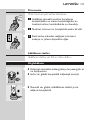
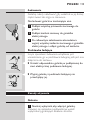
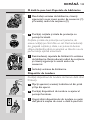
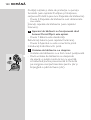
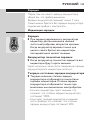
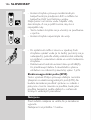
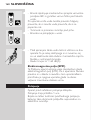
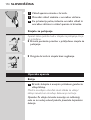
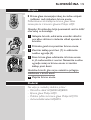
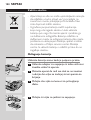
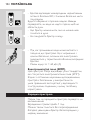
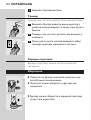
Charging
Make sure the appliance is switched off before you
start to charge it.
Charging takes approx. 1 hour.
You can also shave without charging by connecting
the shaver to the mains.
Charging
When you start charging the empty shaver, the
bottom light ashes red. When the battery
contains enough power for one shave, all lights
start ashing green sequentially.
-
-
-
-
,
ENGLISH 5

When the battery has been fully charged, all
green lights are on.
A few hours after charging, all lights go out.
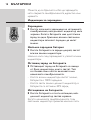
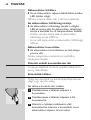
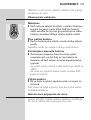
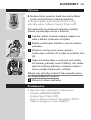
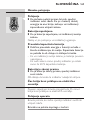
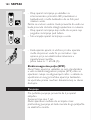
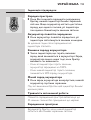
Remaining battery capacity
The amount of power left in the battery is
indicated by the number of lights that are on.
The battery capacity is only shown when you
switch the shaver on or off.
When all lights burn green, the battery is 100%
charged.
When the bottom light burns green, 20% of the
battery capacity is left.
Battery running low
When the battery is running low, the bottom
light turns red.
When you switch off the shaver, this light
ashesblinks a few times.
A fully charged shaver has a cordless shaving time of
up to 55 minutes.
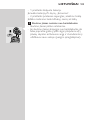
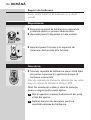
Charging the appliance
Charge the shaver when the bottom light burns or
ashes red.
Do not recharge the shaver in a closed pouch.
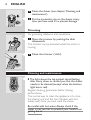
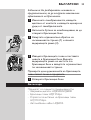
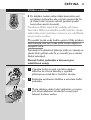
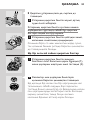
1 Put the appliance plug in the shaver.
2 Put the powerplug in the wall socket.
3 Remove the powerplug from the wall socket
and pull the appliance plug out of the shaver
when the battery has been fully charged.
,
,
-
-
,
ENGLISH6

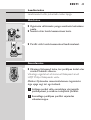
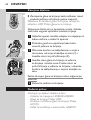
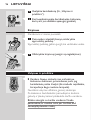
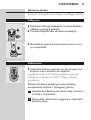
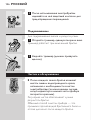
You can also charge the appliance by placing it in the
charging stand, if provided.
Place the shaver properly in the plugged-in
charging stand.
Lift the shaver from the stand without tilting it.
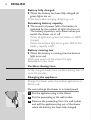
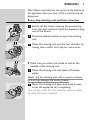
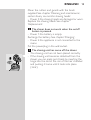
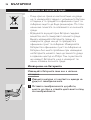
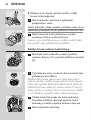
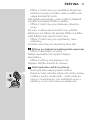
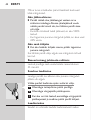
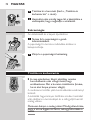
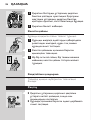
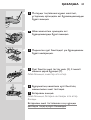
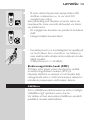
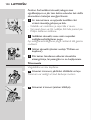
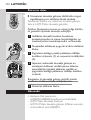
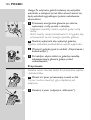
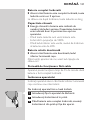
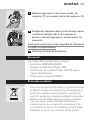
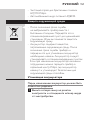
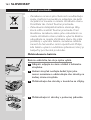
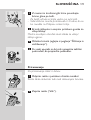
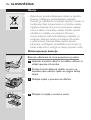
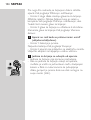
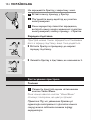
1 Switch the shaver on by pressing the on/off
button once.
The blue light ring around the on/off button goes on
to indicate that the motor is running.
Note: When you switch the shaver on, all lights go on
and then the remaining battery capacity is shown for a
few seconds.
2 Move the shaving heads quickly over your skin,
making both straight and circular movements.
Shaving on a dry face gives the best results.
Your skin may need 2 or 3 weeks to get
accustomed to the Philips shaving system.
3 Switch the shaver off by pressing the on/off
button once.
The blue light ring around the on/off button goes
out.
,
,
-
-
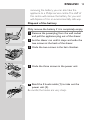
ENGLISH 7

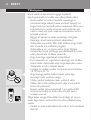
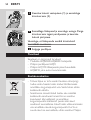
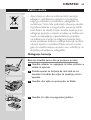
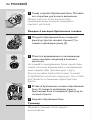
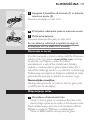
4 Clean the shaver (see chapter ‘Cleaning and
maintenance’).
5 Put the protection cap on the shaver every
time you have used it, to prevent damage.
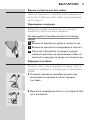
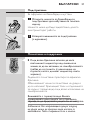
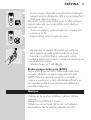
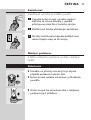
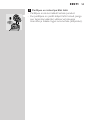
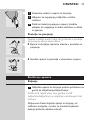
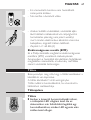
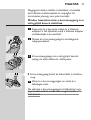
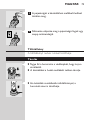
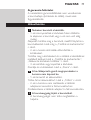
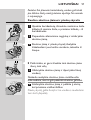
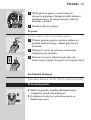
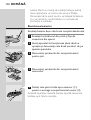
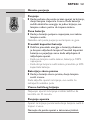
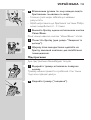
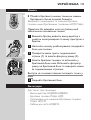
For grooming sideburns and moustache.
1 Open the trimmer by pushing the slide
downwards.
The trimmer can be activated while the motor is
running.
2 Close the trimmer (‘click’).
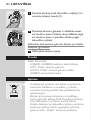
The light above the tap symbol starts ashing
after every shave to remind you that the shaver
needs to be cleaned (except when the bottom
light burns red).
Regular cleaning guarantees better shaving
performance.
The normal way to clean the appliance is to rinse
the shaving unit and the hair chamber with hot
water every time you have used the shaver.
Be careful with hot water. Always check if the
water is not too hot, to prevent your hands from
getting burnt.
,
ENGLISH8

Note: Water may leak from the socket at the bottom of
the appliance when you rinse it. This is normal and not
dangerous.
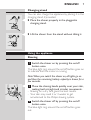
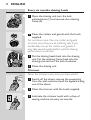
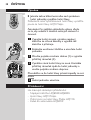
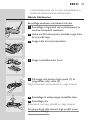
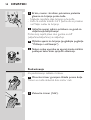
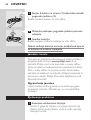
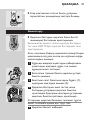
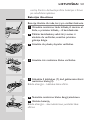
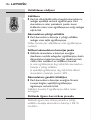
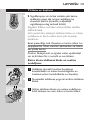
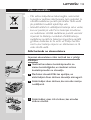
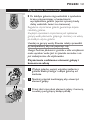
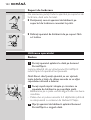
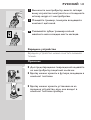
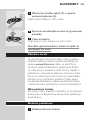
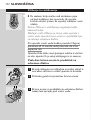
1 Switch off the shaver, remove the powerplug
from the wall socket and pull the appliance plug
out of the shaver.
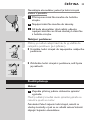
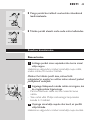
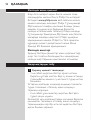
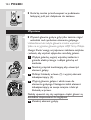
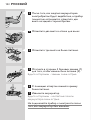
2 Press the release button to open the shaving
unit.
3 Clean the shaving unit and the hair chamber by
rinsing them under a hot tap for some time.
Make sure you clean the inside as well as the
outside of the shaving unit.
4 Close the shaving unit and shake off excess
water.
Never dry the shaving unit with a towel or tissue,
as this may damage the shaving heads.
5 Open the shaving unit again and leave it open
to let the appliance dry completely.
You can also clean the hair chamber without water
by using the brush supplied.
,
ENGLISH 9

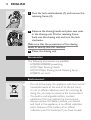
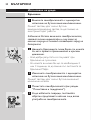
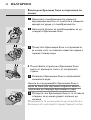
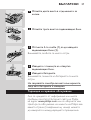
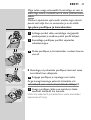
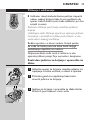
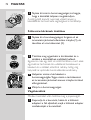
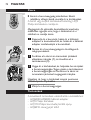
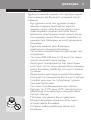
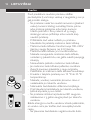
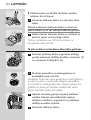
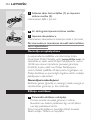
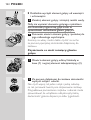
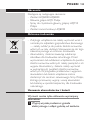
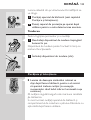
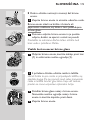
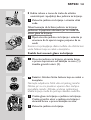
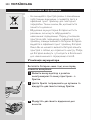
1 Open the shaving unit, turn the lock
anticlockwise (1) and remove the retaining
frame (2).
2 Clean the cutters and guards with the brush
supplied.
Do not clean more than one cutter and guard
at a time, since they are all matching sets. If you
accidentally mix up the cutters and guards, it
may take several weeks before optimal shaving
performance is restored.
3 Put the shaving heads back into the shaving
unit. Put the retaining frame back into the
shaving unit and turn the lock clockwise.
4 Close the shaving unit.
Clean the trimmer every time you have used it.
1 Switch off the shaver, remove the powerplug
from the wall socket and pull the appliance plug
out of the shaver.
2 Clean the trimmer with the brush supplied.
3 Lubricate the trimmer teeth with a drop of
sewing machine oil every six months.
ENGLISH10

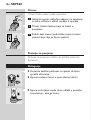
You can clean the charging stand with a moist cloth.
Storage
Put the protection cap on the shaver to prevent
damage.
The appliance can be stored in the pouch
supplied.
The shaver can be stored in the charging stand,
if provided.
Replacement
Replace the shaving heads as soon as the light
above the shaving unit symbol starts ashing.
Replace damaged or worn shaving heads with HQ9
Philips shaving heads only.
Note: Do not mix up the cutters and the guards to
guarantee optimal shaving performance.
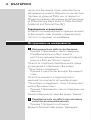
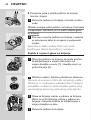
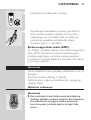
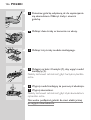
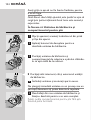
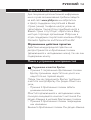
1 Switch the shaver off, remove the powerplug
from the wall socket and pull the appliance plug
out of the shaver.
2 Press the release button to open the shaving
unit.
,
,
,
,
ENGLISH 11

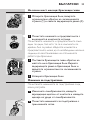
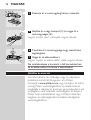
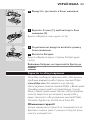
3 Turn the lock anticlockwise (1) and remove the
retaining frame (2).
4 Remove the shaving heads and place new ones
in the shaving unit. Put the retaining frame
back into the shaving unit and turn the lock
clockwise.
Make sure that the projections of the shaving
heads t exactly into the recesses.
5 Close the shaving unit.
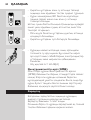
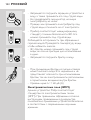
The following accessories are available:
HQ8500/HQ8000 powerplug.
HQ9 Philips Shaving Heads.
HQ110 Philips Shaving Head Cleaning Spray.
HQ8010 car cord.
Do not throw away the appliance with the normal
household waste at the end of its life, but hand
it in at an ofcial collection point for recycling. By
doing this, you help to preserve the environment.
The built-in rechargeable battery contains
substances that may pollute the environment.
Always remove the battery before you discard
and hand in the appliance at an ofcial collection
point. Dispose of the battery at an ofcial
collection point for batteries. If you have trouble
-
-
-
-
-
-
ENGLISH12

removing the battery, you can also take the
appliance to a Philips service centre. The staff of
this centre will remove the battery for you and
will dispose of it in an environmentally safe way.
Only remove the battery if it is completely empty.
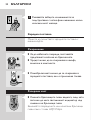
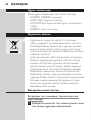
1 Remove the powerplug from the wall socket
and pull the appliance plug out of the shaver.
2 Let the shaver run until it stops and undo the
two screws at the back of the shaver.
3 Undo the two screws in the hair chamber.
4 Undo the three screws in the power unit.
5 Bend the 4 hooks aside (1) to take out the
power unit (2).
Be careful, the hooks are very sharp.
ENGLISH 13

6 Remove the power unit cover by means of a
screwdriver.
7 Remove the battery.
Be careful, the battery strips are very sharp.
Do not connect the shaver to the mains again after
the battery has been removed.
If you need information or if you have a problem,
please visit the Philips website at www.philips.com
or contact the Philips Customer Care Centre
in your country (you nd its phone number in
the worldwide guarantee leaet). If there is no
Customer Care Centre in your country, go to
your local Philips dealer or contact the Service
Department of Philips Domestic Appliances and
Personal Care BV.
The shaving heads (cutters and guards) are not
covered by the terms of the international guarantee
because they are subject to wear.
1
Reduced shaving performance.
Cause 1: the shaving heads are dirty.The shaver
has not been rinsed long enough or the water
used was not hot enough.
Clean the shaver thoroughly before you continue
shaving. See chapter ‘Cleaning and maintenance’.
Cause 2: long hairs are obstructing the shaving
heads.
-
-
ENGLISH14

Clean the cutters and guards with the brush
supplied. See chapter ‘Cleaning and maintenance’,
section ‘Every six months: shaving heads’.
Cause 3: the shaving heads are damaged or worn.
Replace the shaving heads. See chapter
‘Replacement’.
2 The shaver does not work when the on/off
button is pressed.
Cause 1: the battery is empty.
Recharge the battery. See chapter ‘Charging’.
Cause 2: the appliance is not connected to the
mains.
Put the powerplug in the wall socket.
3 The shaving unit has come off the shaver.
The shaving unit has not been placed correctly.
If the shaving unit becomes detached from the
shaver, you can easily put it back by inserting the
hinge into the slot in the rim of the hair chamber
and pushing it home until it locks into place
(‘click’).
-
-
-
-
-
ENGLISH 15

16
Преди да използвате уреда, прочетете
внимателно това ръководство за експлоатация и
го запазете за справка в бъдеще.
Този уред не е предназначен за ползване от
хора (включително деца) с намалени физически
усещания или умствени недъзи или без опит и
познания, ако са оставени без наблюдение и не
са инструктирани от страна на отговарящо за
тяхната безопасност лице относно начина на
използване на уреда.
Наглеждайте децата, за да не си играят с уреда.
Използвайте само доставения с комплекта
щепсел.
Щепселът трансформира 100-240 волта до
безопасно ниско напрежение под 24 волта.
В захранващия щепсел има трансформатор. Не
отрязвайте щепсела, за да го замените с друг,
защото това ще доведе до опасна ситуация.
Не използвайте повреден щепсел.
Ако захранващият щепсел се повреди, винаги
трябва да осигурявате замяната му с такъв от
оригиналния тип, за да се избегне опасност.
Внимавайте щепселът да не се мокри.
Зареждайте и съхранявайте уреда при
температура между 15°C и 35°C.
Никога не потапяйте зарядната поставка във
вода и не я плакнете с течаща вода.
Не зареждайте самобръсначката в затворен
калъф.
Винаги изваждайте щепсела на
самобръсначката от контакта, преди да я
миете с течаща вода.
-
-
-
-
-
-
-
-
-
-
-
-

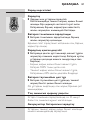
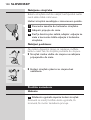
Уредът съответства на международно
одобрената нормативна уредба за безопасност
IEC и може да се почиства безопасно под
чешмата.
Внимавайте с горещата вода. Винаги
проверявайте дали водата не е прекалено
гореща, за да предпазите ръцете си от изгаряне.
Тази миеща се самобръсначка не е подходяща
за бръснене под душа.
Не потапяйте самобръсначката във вода.
От захранващия куплунг отдолу на уреда може
да протече вода, когато го изплаквате. Това
е нормално и не е опасно, тъй като цялата
електроника е затворена в херметична обвивка
вътре в самобръсначката.
Ниво на шума: Lc = 60 dB(A)
Този уред Philips е в съответствие с всички
стандарти по отношение на електромагнитните
излъчвания (EMF). Ако се употребява правилно и
съобразно напътствията в Ръководството, уредът
е безопасен за използване според наличните
досега научни факти.
Проверете дали уредът е изключен, преди да
започнете да го зареждате.
Зареждането отнема около 1 час.
-
-
-
-
-
17

Можете да се бръснете и без да зареждате,
като свържете самобръсначката директно към
мрежата.
Когато започнете зареждане на изтощената
самобръсначка, най-долният индикатор мига
червено. Когато батерията има достатъчен
заряд за едно бръснене, всички светлинни
индикатори започват поредно да мигат
зелено.
Когато батерията се зареди докрай, светят
всички зелени индикатори.
Няколко часа след зареждането угасват всички
индикатори.
Оставащият заряд на батерията се вижда
от броя индикатори, които светят. Той
се показва само когато включвате или
изключвате самобръсначката.
Когато всички индикатори светят зелено,
батерията е 100% заредена.
Когато свети зелено долният индикатор, в
батерията са останали 20% заряд.
Когато батерията е почти изтощена, най-
долният индикатор светва червено.
Когато изключвате самобръсначката, този
светлинен индикатор примигва няколко пъти.
,
,
,
-
-
,
18

Напълно заредената самобръсначка може да се
използва за бръснене без кабел в продължение
на 55 минути.
Заредете самобръсначката, когато долният
индикатор свети или мига червено.
Не зареждайте самобръсначката в затворен
калъф.
1 Включете щекера на уреда в гнездото му.
2 Включете щепсела за захранване в контакт.
3 След като батерията се зареди докрай,
извадете щепсела на захранващия кабел от
контакта и щекера на уреда от гнездото му.
Можете също така да зареждате уреда, като го
сложите в зарядната поставка, ако е приложена
такава.
Сложете правилно самобръсначката във
включената в мрежов контакт зарядна
поставка.
Вдигнете самобръсначката от поставката, без
да я накланяте.
,
,
19

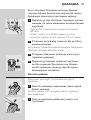
1 Включете самобръсначката с еднократно
натискане на бутона включено/изключено.
Синият светещ кръг около бутона
включено/изключено светва, за да покаже, че
електромоторът работи.
Забележка: Когато включите самобръсначката,
светват всички индикатори и след това за
няколко секунди се показва оставащият заряд на
батерията.
2 Движете бръснещите глави бързо по кожата
си, като правите праволинейни и кръгови
движения.
Най-добри резултати се получават при
бръснене на суха кожа.
На кожата ви може би ще са необходими 2
или 3 седмици, за да свикне със системата за
бръснене Philips.
3 Изключете самобръсначката с еднократно
натискане на бутона включено/изключено.
Синият светещ кръг около бутона включено/
изключено изгасва.
4 Почистете самобръсначката (вж. раздел
“Почистване и поддръжка”).
5 За да избегнете повреди, поставяйте
обратно предпазната капачка след всяка
употреба на самобръсначката.
-
-
20

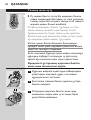
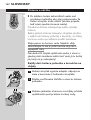
За оформяне на бакенбарди и мустаци.
1 Отворете ножчето за бакенбарди за
подстригване чрез избутване на плъзгача
надолу.
Ножчето може да бъде задействано, докато
електромоторът работи.
2 Затворете машинката за подстригване
(с щракване).
След всяко бръснене започва да мига
светлинният индикатор над символа на
чешма, за да ви напомни, че самобръсначката
трябва да се почисти (с изключение на
случаите, когато долният индикатор свети
червено).
Редовното почистване гарантира по-ефикасно
бръснене.
Обикновеният начин за почистване на уреда е
да се изплакват бръснещият блок и отделението
за косми с гореща вода след всяко използване на
самобръсначката.
Внимавайте с горещата вода. Винаги
проверявайте дали водата не е прекалено
гореща, за да предпазите ръцете си от изгаряне.
Забележка: От захранващия куплунг отдолу
на уреда може да протече вода, когато го
изплаквате. Това е нормално и не е опасно.
,
21

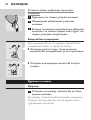
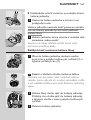
1 Изключете самобръсначката, извадете
зареждащия щепсел от контакта и извадете
щекера на уреда от самобръсначката.
2 Натиснете бутона за освобождаване, за да
отворите бръснещия блок.
3 Почистете бръснещия блок и отделението
за косми, като ги плакнете известно време с
гореща течаща вода.
Почиствайте старателно бръснещия блок
както от външната, така и от вътрешната
страна.
4 Затворете бръснещия блок и изтръскайте
излишната вода.
Никога не подсушавайте бръснещия блок с
кърпа за баня или хартиени салфетки, защото
това може да повреди бръснещите глави.
5 Отворете пак бръснещия блок и го оставете
отворен, за да може уредът напълно да
изсъхне.
Отделението за косми можете да почиствате и
без вода, като използвате предоставената четка.
,
22
Pagina se încarcă...
Pagina se încarcă...
Pagina se încarcă...
Pagina se încarcă...
Pagina se încarcă...
Pagina se încarcă...
Pagina se încarcă...
Pagina se încarcă...
Pagina se încarcă...
Pagina se încarcă...
Pagina se încarcă...
Pagina se încarcă...
Pagina se încarcă...
Pagina se încarcă...
Pagina se încarcă...
Pagina se încarcă...
Pagina se încarcă...
Pagina se încarcă...
Pagina se încarcă...
Pagina se încarcă...
Pagina se încarcă...
Pagina se încarcă...
Pagina se încarcă...
Pagina se încarcă...
Pagina se încarcă...
Pagina se încarcă...
Pagina se încarcă...
Pagina se încarcă...
Pagina se încarcă...
Pagina se încarcă...
Pagina se încarcă...
Pagina se încarcă...
Pagina se încarcă...
Pagina se încarcă...
Pagina se încarcă...
Pagina se încarcă...
Pagina se încarcă...
Pagina se încarcă...
Pagina se încarcă...
Pagina se încarcă...
Pagina se încarcă...
Pagina se încarcă...
Pagina se încarcă...
Pagina se încarcă...
Pagina se încarcă...
Pagina se încarcă...
Pagina se încarcă...
Pagina se încarcă...
Pagina se încarcă...
Pagina se încarcă...
Pagina se încarcă...
Pagina se încarcă...
Pagina se încarcă...
Pagina se încarcă...
Pagina se încarcă...
Pagina se încarcă...
Pagina se încarcă...
Pagina se încarcă...
Pagina se încarcă...
Pagina se încarcă...
Pagina se încarcă...
Pagina se încarcă...
Pagina se încarcă...
Pagina se încarcă...
Pagina se încarcă...
Pagina se încarcă...
Pagina se încarcă...
Pagina se încarcă...
Pagina se încarcă...
Pagina se încarcă...
Pagina se încarcă...
Pagina se încarcă...
Pagina se încarcă...
Pagina se încarcă...
Pagina se încarcă...
Pagina se încarcă...
Pagina se încarcă...
Pagina se încarcă...
Pagina se încarcă...
Pagina se încarcă...
Pagina se încarcă...
Pagina se încarcă...
Pagina se încarcă...
Pagina se încarcă...
Pagina se încarcă...
Pagina se încarcă...
Pagina se încarcă...
Pagina se încarcă...
Pagina se încarcă...
Pagina se încarcă...
Pagina se încarcă...
Pagina se încarcă...
Pagina se încarcă...
Pagina se încarcă...
Pagina se încarcă...
Pagina se încarcă...
Pagina se încarcă...
Pagina se încarcă...
Pagina se încarcă...
Pagina se încarcă...
Pagina se încarcă...
Pagina se încarcă...
Pagina se încarcă...
Pagina se încarcă...
Pagina se încarcă...
Pagina se încarcă...
Pagina se încarcă...
Pagina se încarcă...
Pagina se încarcă...
Pagina se încarcă...
Pagina se încarcă...
Pagina se încarcă...
Pagina se încarcă...
Pagina se încarcă...
Pagina se încarcă...
Pagina se încarcă...
Pagina se încarcă...
Pagina se încarcă...
Pagina se încarcă...
Pagina se încarcă...
Pagina se încarcă...
Pagina se încarcă...
Pagina se încarcă...
Pagina se încarcă...
Pagina se încarcă...
Pagina se încarcă...
Pagina se încarcă...
Pagina se încarcă...
Pagina se încarcă...
Pagina se încarcă...
Pagina se încarcă...
Pagina se încarcă...
Pagina se încarcă...
Pagina se încarcă...
Pagina se încarcă...
Pagina se încarcă...
Pagina se încarcă...
Pagina se încarcă...
Pagina se încarcă...
Pagina se încarcă...
Pagina se încarcă...
Pagina se încarcă...
Pagina se încarcă...
Pagina se încarcă...
Pagina se încarcă...
Pagina se încarcă...
Pagina se încarcă...
Pagina se încarcă...
Pagina se încarcă...
Pagina se încarcă...
Pagina se încarcă...
Pagina se încarcă...
Pagina se încarcă...
Pagina se încarcă...
Pagina se încarcă...
Pagina se încarcă...
Pagina se încarcă...
Pagina se încarcă...
Pagina se încarcă...
Pagina se încarcă...
Pagina se încarcă...
Pagina se încarcă...
Pagina se încarcă...
Pagina se încarcă...
Pagina se încarcă...
Pagina se încarcă...
Pagina se încarcă...
Pagina se încarcă...
Pagina se încarcă...
Pagina se încarcă...
Pagina se încarcă...
Pagina se încarcă...
Pagina se încarcă...
Pagina se încarcă...
Pagina se încarcă...
Pagina se încarcă...
Pagina se încarcă...
Pagina se încarcă...
Pagina se încarcă...
Pagina se încarcă...
-
 1
1
-
 2
2
-
 3
3
-
 4
4
-
 5
5
-
 6
6
-
 7
7
-
 8
8
-
 9
9
-
 10
10
-
 11
11
-
 12
12
-
 13
13
-
 14
14
-
 15
15
-
 16
16
-
 17
17
-
 18
18
-
 19
19
-
 20
20
-
 21
21
-
 22
22
-
 23
23
-
 24
24
-
 25
25
-
 26
26
-
 27
27
-
 28
28
-
 29
29
-
 30
30
-
 31
31
-
 32
32
-
 33
33
-
 34
34
-
 35
35
-
 36
36
-
 37
37
-
 38
38
-
 39
39
-
 40
40
-
 41
41
-
 42
42
-
 43
43
-
 44
44
-
 45
45
-
 46
46
-
 47
47
-
 48
48
-
 49
49
-
 50
50
-
 51
51
-
 52
52
-
 53
53
-
 54
54
-
 55
55
-
 56
56
-
 57
57
-
 58
58
-
 59
59
-
 60
60
-
 61
61
-
 62
62
-
 63
63
-
 64
64
-
 65
65
-
 66
66
-
 67
67
-
 68
68
-
 69
69
-
 70
70
-
 71
71
-
 72
72
-
 73
73
-
 74
74
-
 75
75
-
 76
76
-
 77
77
-
 78
78
-
 79
79
-
 80
80
-
 81
81
-
 82
82
-
 83
83
-
 84
84
-
 85
85
-
 86
86
-
 87
87
-
 88
88
-
 89
89
-
 90
90
-
 91
91
-
 92
92
-
 93
93
-
 94
94
-
 95
95
-
 96
96
-
 97
97
-
 98
98
-
 99
99
-
 100
100
-
 101
101
-
 102
102
-
 103
103
-
 104
104
-
 105
105
-
 106
106
-
 107
107
-
 108
108
-
 109
109
-
 110
110
-
 111
111
-
 112
112
-
 113
113
-
 114
114
-
 115
115
-
 116
116
-
 117
117
-
 118
118
-
 119
119
-
 120
120
-
 121
121
-
 122
122
-
 123
123
-
 124
124
-
 125
125
-
 126
126
-
 127
127
-
 128
128
-
 129
129
-
 130
130
-
 131
131
-
 132
132
-
 133
133
-
 134
134
-
 135
135
-
 136
136
-
 137
137
-
 138
138
-
 139
139
-
 140
140
-
 141
141
-
 142
142
-
 143
143
-
 144
144
-
 145
145
-
 146
146
-
 147
147
-
 148
148
-
 149
149
-
 150
150
-
 151
151
-
 152
152
-
 153
153
-
 154
154
-
 155
155
-
 156
156
-
 157
157
-
 158
158
-
 159
159
-
 160
160
-
 161
161
-
 162
162
-
 163
163
-
 164
164
-
 165
165
-
 166
166
-
 167
167
-
 168
168
-
 169
169
-
 170
170
-
 171
171
-
 172
172
-
 173
173
-
 174
174
-
 175
175
-
 176
176
-
 177
177
-
 178
178
-
 179
179
-
 180
180
-
 181
181
-
 182
182
-
 183
183
-
 184
184
-
 185
185
-
 186
186
-
 187
187
-
 188
188
-
 189
189
-
 190
190
-
 191
191
-
 192
192
-
 193
193
-
 194
194
-
 195
195
-
 196
196
-
 197
197
-
 198
198
-
 199
199
-
 200
200


Philips HQ8170/16 Manual de utilizare
- Categorie
- Aparate de bărbierit
- Tip
- Manual de utilizare
- Acest manual este potrivit și pentru
în alte limbi
- slovenčina: Philips HQ8170/16 Používateľská príručka
- eesti: Philips HQ8170/16 Kasutusjuhend
Lucrări înrudite
-
Philips HQ8150/16 Manual de utilizare
-
Philips HQ9080/16 Manual de utilizare
-
Philips HQ8100/16 Manual de utilizare
-
HQ 9160 Manual de utilizare
-
Philips HQ9190CC Manual de utilizare
-
Norelco HQ7340 Manual de utilizare
-
-
Philips HQ7140/16 Manual de utilizare
-
Philips HQ9020/16 Manual de utilizare
-
Philips HQ9140/16 Manual de utilizare