Microlife BP W1 Basic Manual de utilizare
- Categorie
- Unități de tensiune arterială
- Tip
- Manual de utilizare

Microlife BP W1 Basic
IB BP W1 Basic E-V10 4720
Revision Date: 2020-11-17
Microlife AG
Espenstrasse 139
9443 Widnau / Switzerland
www.microlife.com
EN 1
RU 12
BG 24
RO 36
CZ 46
SK 56
SL 66
SR 76
HU 86
HR 96

Microlife BP W1 Basic
18
2
5
6
1
15
11
14
17 16 13
12
10
7
8
9
3
4
BP W1 BasicGuarantee Card
Name of Purchaser / Ф.И.О. покупателя / Име на купувача /
Numele cumpărătorului / Jméno kupujícího / Meno zákazníka / Ime
in priimek kupca / Ime i prezime kupca / Vásárló neve /
Ime i prezime kupca
Serial Number / Серийный номер / Сериен номер / Număr de
serie / Výrobní číslo / Výrobné číslo / Serijska števika / Serijski broj /
Sorozatszám / Serijski broj
Date of Purchase / Дата покупки / Дата на закупуване / Data
cumpărării / Datum nákupu / Dátum kúpy / Datum nakupa / Datum
kupovine / Vásárlás dátuma / Datum kupovine
Specialist Dealer / Специализированный дилер /
Специалист
дистрибутор / Distribuitor de spe-cialitate / Specializovaný dealer /
Špecializovaný predajca / Spezializirani trgovec / Ovlašćeni diler /
Forgalmazó / Ovlašteni prodavač

1BP W1 Basic
EN
Display
Read the instructions carefully before using this device.
Intended use:
This oscillometric blood pressure monitor is intended for measuring
non-invasive blood pressure in people aged 12 years or older.
Dear Customer,
Your new
Microlife
blood pressure monitor is a reliable medical device
for taking measurements on the wrist. It is simple to use, accurate and
comes highly recommended for blood pressure monitoring in your
home. This device was developed in collaboration with physicians and
clinical tests prove its measurement accuracy to be very high.*
If you have any questions, problems or want to order spare parts
please contact your local Microlife-Customer Service. Your dealer or
pharmacy will be able to give you the address of the Microlife dealer
in your country. Alternatively, visit the internet at www.microlife.com
where you will find a wealth of invaluable information on our products.
Stay healthy – Microlife AG!
* This device uses the same measuring algorithm as the award
winning BP W100 model tested according to the British and Irish
Hypertension Society (BIHS) protocol.
Microlife BP W1 Basic
EN
1
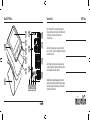
ON/OFF button
2
Display
3
Battery Compartment
4
Cuff
5
M-button (memory)
6
Time Button
7
Systolic Value
8
Diastolic Value
9
Pulse Rate
AT
Date/Time
AK
Traffic Light Indicator
AL
Stored Value
AM
Irregular Heartbeat (IHB) Symbol
AN
Pulse Indicator
AO
Battery Display
AP
Arm Movement Indicator
AQ
Cuff Check Indicator
AR
LED Positioning Indicator

2
Table of Contents
1. Important Facts about Blood Pressure and Self-Measure-
ment
• How do I evaluate my blood pressure?
2. Using the Device for the First Time
• Inserting the batteries
• Setting the date and time
3. Taking a Blood Pressure Measurement
4. Appearance of the Irregular Heartbeat (IHB) Symbol
5. Traffic Light Indicator in the Display
6. Data Memory
• Viewing the stored values
• Memory full
• Clearing all values
• How not to store a reading
7. Battery Indicator and Battery change
• Low battery
• Flat battery – replacement
• Which batteries and which procedure?
• Using rechargeable batteries
8. Error Messages
9. Safety, Care, Accuracy Test and Disposal
• Safety and protection
•Device care
• Cleaning the cuff
• Accuracy test
•Disposal
10. Guarantee
11. Technical Specifications
Guarantee Card (see Back Cover)
Type BF applied part
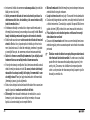
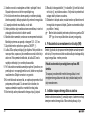
1. Important Facts about Blood Pressure and Self-
Measurement
Blood pressure
is the pressure of the blood flowing in the arteries
generated by the pumping of the heart. Two values, the
systolic
(upper) value and the
diastolic
(lower) value, are always measured.
The device indicates the pulse rate (the number of times the heart
beats in a minute).
Keep dry

3BP W1 Basic
EN
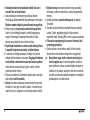
Permanently high blood pressure values can damage your
health and must be treated by your doctor!
Always discuss your values with your doctor and tell him/her if you
have noticed anything unusual or feel unsure. Never rely on
single blood pressure readings.
There are several causes of excessively high blood pressure
values. Your doctor will explain them in more detail and offer
treatment where appropriate. Besides medication, weight loss
and exercise can also lower your blood pressure.
Under no circumstances should you alter the dosages of
drugs or initiate a treatment without consulting your doctor.
Depending on physical exertion and condition, blood pressure is
subject to wide fluctuations as the day progresses. You should
therefore take your measurements in the same quiet condi-
tions and when you feel relaxed! Take at least two readings
every time (in the morning and in the evening) and average the
measurements.
It is quite normal for two measurements taken in quick succession
to produce significantly different results.
Deviations between measurements taken by your doctor or in the
pharmacy and those taken at home are quite normal, as these
situations are completely different.
Several measurements
provide much more reliable information
about your blood pressure than just one single measurement.
Leave a small break of at least 15 seconds between two
measurements.
If you suffer from a cardiac arrhythmia consult with your doctor
before using the device. See also chapter «Appearance of the
Irregular Heartbeat (IHB) Symbol» of this user manual.
The pulse display is not suitable for checking the frequency
of heart pacemakers!
If you are pregnant, you should monitor your blood pressure
regularly as it can change drastically during this time.
A number of factors can affect the accuracy of measure-
ments taken on the wrist. In some cases, the result may
differ from the measurement taken on the upper arm. We
therefore advise you to compare these values with those
produced by the upper arm measurement and discuss them
with your doctor.

4
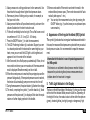
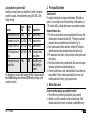
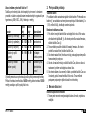
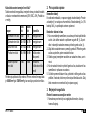
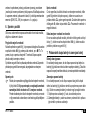
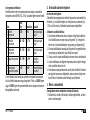
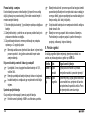
How do I evaluate my blood pressure?
The higher value is the one that determines the evaluation. Example:
a blood pressure value of 140/80 mmHg or a value of 130/90 mmHg
indicates «blood pressure too high».
2. Using the Device for the First Time
Inserting the batteries
After you have unpacked your device, first insert the batteries. The
battery compartment
3
is at the top of the device. Insert the batteries
(
2
x 1.5 V, size
AAA
), thereby observing the indicated polarity.
Setting the date and time
1. After the new batteries are fitted, the year number flashes in the
display. You can set the year by pressing the M-button 5. To
confirm and then set the month, press the time button 6.
2. Press the M-button to set the month. Press the time button to
confirm and then set the day.
3. Follow the instructions above to set the day, hour and minutes.
4. Once you have set the minutes and pressed the time button, the
date and time are set and the time is displayed.
5. If you want to change the date and time, press and hold the time
button down for approx. 3 seconds until the year number starts to
flash. Now you can enter the new values as described above.
3. Taking a Blood Pressure Measurement
Checklist for taking a reliable measurement
1. Avoid activity, eating or smoking immediately before the measurement.
2. Sit down on a back-supported chair and relax for 5 minutes. Keep
the feet flat on the floor and do not cross your legs.
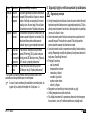
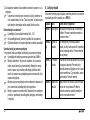
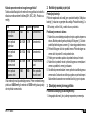
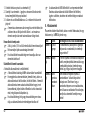
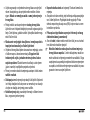
Table for classifying home blood pressure values in adults in accordance
with the international Guidelines (ESH, ESC, JSH). Data in mmHg.
Range Systolic Diastolic Recommendation
1. blood pressure
normal
< 120 < 74 Self-check
2. blood pressure
optimum
120 - 129 74 - 79 Self-check
3. blood pressure
elevated
130 - 134 80 - 84 Self-check
4. blood pressure too
high
135 - 159 85 - 99 Seek medical
advice
5. blood pressure
dangerously high
≥ 160 ≥ 100 Urgently seek
medical advice!

5BP W1 Basic
EN
3. Always measure in a sitting position and on the same wrist. Use
the wrist which usually shows higher blood pressure values.
4. Remove any items of clothing and your watch, for example, so
that your wrist is free.
5. Always ensure that the cuff is positioned correctly, as shown in the
pictures illustrated on the short instruction card.
6. Fit the cuff comfortably but not too tight. The cuff will cover a wrist
circumference of 13.5 - 21.5 cm (5.25 - 8.5 inches).
7. Press the ON/OFF button 1 to start the measurement.
8. The LED Positioning Indicator AR is activated. Support your arm
in a relaxed position with the device at the same height as your
heart, move your arm until the LED light is at its brightest and
appears to be in the center of the indicator.
9. After 5 seconds, the cuff will pump up automatically. Relax, do not
move and do not tense your arm muscles until the measurement
result is displayed. Breathe normally and do not talk.
10.When the correct pressure is reached, the pumping stops and the
pressure falls gradually. If the required pressure was not reached,
the device will automatically pump some more air into the cuff.
11.During the measurement, the pulse indicator
AN
flashes in the display.
12.The result, comprising the systolic 7 and the diastolic 8 blood
pressure and the pulse rate 9 is displayed. Note also the expla-
nations on further display symbols in this booklet.
13.Remove and switch off the monitor and enter the result in the
enclosed blood pressure pass. (The monitor does switch off auto-
matically after approx. 1 min.).
You can stop the measurement at any time by pressing the
ON/OFF button (e.g. if you feel uneasy or an unpleasant pres-
sure sensation).
4. Appearance of the Irregular Heartbeat (IHB) Symbol
This symbol AM indicates that an irregular heartbeat was detected. In
this case, the measured blood pressure may deviate from your actual
blood pressure values. It is recommended to repeat the measure-
ment.
5. Traffic Light Indicator in the Display
The bars on the left-hand edge of the display AK show you the range
within which the indicated blood pressure value lies. Depending on
the height of the bar, the readout value is either within the optimum
(green), elevated (yellow), too high (orange) or dangerously high
Information for the doctor in case of repeated appearance of
the IHB symbol:
This device is an oscillometric blood pressure monitor that also
measures the pulse during blood pressure measurement and
indicates when the heart rate is irregular.

6
(red) range. The classification corresponds to the 4 ranges in the
table as defined by the international guidelines (ESH, ESC, JSH), as
described in «Section 1.».
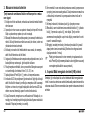
6. Data Memory
At the end of each measurement, this device automatically stores the
result, including date and time.
Viewing the stored values
Press the M-button
5
briefly, when the device is switched off. The
display first shows «
M
»
AL
and then a value, e.g. «
M 17
». This means
that there are 17 values in the memory. The device then switches to the
last stored result.
Pressing the M-button again displays the previous value. Pressing the M-
button repeatedly enables you to move from one stored value to another.
Memory full
Pay attention that the maximum memory capacity of 60 memo-
ries is not exceeded.
When the 60 memory is full, the oldest
value is automatically overwritten with the 61st value.
Values should be evaluated by a doctor before the memory
capacity is reached – otherwise data will be lost.
Clearing all values
If you are sure that you want to permanently remove all stored
values, hold down the M-button (the device must have been switched
off beforehand) until «CL» appears and then release the button. To
permanently clear the memory, press the M-button while «CL» is
flashing. Individual values cannot be cleared.
How not to store a reading
As soon as the reading is displayed press and hold the ON/OFF
button 1 until «M» AL is flashing. Confirm to delete the reading by
pressing the M-button 5.
7. Battery Indicator and Battery change
Low battery
When the batteries are approximately ¾ empty the battery symbol AO
will flash as soon as the device is switched on (partly filled battery
displayed). Although the device will continue to measure reliably, you
should obtain replacement batteries.
Flat battery – replacement
When the batteries are flat, the battery symbol AO will flash as soon
as the device is switched on (flat battery displayed). You cannot take
any further measurements and must replace the batteries.
1. Open the battery compartment 3 by pulling off the cap.
2. Replace the batteries – ensure correct polarity as shown by the
symbols in the compartment.
3. To set date and time, follow the procedure described in «Section 2.».
The memory retains all values although date and time must be
reset – the year number therefore flashes automatically after
the batteries are replaced.

7BP W1 Basic
EN
Which batteries and which procedure?
Use 2 new, long-life 1.5 V, size AAA alkaline batteries.
Do not use batteries beyond their date of expiry.
Remove batteries if the device is not going to be used for a
prolonged period.
Using rechargeable batteries
You can also operate this device using rechargeable batteries.
Only use «NiMH» type reusable batteries.
Batteries must be removed and recharged when the flat
battery symbol appears. They should not remain inside the
device as they may become damaged (total discharge as a
result of low use of the device, even when switched off).
Always remove the rechargeable batteries if you do not intend
to use the device for a week or more.
Batteries cannot be charged in the blood pressure monitor.
Recharge batteries in an external charger and observe the
information regarding charging, care and durability.
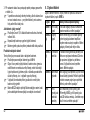
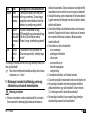
8. Error Messages
If an error occurs during the measurement, the measurement is inter-
rupted and an error message, e.g. «ERR 3», is displayed.
* Please immediately consult your doctor, if this or any other problem
occurs repeatedly.
If you think the results are unusual, please read through the
information in «Section 1.» carefully.
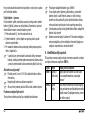
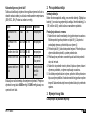
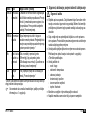
Error Description Potential cause and remedy
«
ERR 1
» Signal too
weak
The pulse signals on the cuff are too weak. Re-
position the cuff and repeat the measurement.*
«
ERR 2
»
AP
Error signal During the measurement, error signals were
detected by the cuff, caused for instance by
movement or muscle tension. Repeat the
measurement, keeping your arm still.
«
ERR 3
»
AQ
No pres-
sure in the
cuff
An adequate pressure cannot be generated
in the cuff. A leak may have occurred. Check
that the cuff is correctly connected and is not
too loose. Replace the batteries if necessary.
Repeat the measurement.
«
ERR 5
» Abnormal
result
The measuring signals are inaccurate and no
result can therefore be displayed. Read through
the checklist for performing reliable measure-
ments and then repeat the measurement.*
«
HI
» Pulse or cuff
pressure too
high
The pressure in the cuff is too high (over
299 mmHg) OR the pulse is too high (over
200 beats per minute). Relax for 5 minutes
and repeat the measurement.*
«
LO
» Pulse too
low
The pulse is too low (less than 40 beats per
minute). Repeat the measurement.*
Error Description Potential cause and remedy

8
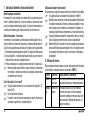
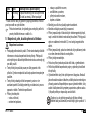
9. Safety, Care, Accuracy Test and Disposal
Safety and protection
Follow instructions for use. This document provides important
product operation and safety information regarding this device.
Please read this document thoroughly before using the device and
keep for future reference.
This device may only be used for the purposes described in these
instructions. The manufacturer cannot be held liable for damage
caused by incorrect application.
This device comprises sensitive components and must be treated
with caution. Observe the storage and operating conditions
described in the «Technical Specifications» section.
Protect it from:
- water and moisture
- extreme temperatures
- impact and dropping
- contamination and dust
- direct sunlight
- heat and cold
The cuffs are sensitive and must be handled with care.
Only pump up the cuff once fitted.
Do not use this device close to strong electromagnetic fields such
as mobile telephones or radio installations. Keep a minimum
distance of 3.3 m from such devices when using this device.
Do not use this device if you think it is damaged or notice anything
unusual.
Never open this device.
If the device is not going to be used for a prolonged period the
batteries should be removed.
Read the additional safety information provided within the individual
sections of this instruction manual.
The measurement results given by this device is not a diagnosis.
It is not replacing the need for the consultation of a physician,
especially if not matching the patient’s symptoms. Do not rely on
the measurement result only, always consider other potentially
occurring symptoms and the patient’s feedback. Calling a doctor
or an ambulance is advised if needed.
Ensure that children do not use this device unsupervised; some
parts are small enough to be swallowed. Be aware of the risk of
strangulation in case this device is supplied with cables or tubes.
Device care
Clean the device only with a soft, dry cloth.
Cleaning the cuff
Carefully remove any marks on the cuff with a damp cloth and mild
detergent.

9BP W1 Basic
EN
Accuracy test
We recommend this device is tested for accuracy every 2 years or
after mechanical impact (e.g. being dropped). Please contact your
local Microlife-Service to arrange the test (see foreword).
Disposal
Batteries and electronic devices must be disposed of in accordance
with the locally applicable regulations, not with domestic waste.
10.Guarantee
This device is covered by a 5 year guarantee from the date of
purchase. During this guarantee period, at our discretion, Microlife
will repair or replace the defective product free of charge.
Opening or altering the device invalidates the guarantee.
The following items are excluded from the guarantee:
Transport costs and risks of transport.
Damage caused by incorrect application or non-compliance with
the instructions for use.
Damage caused by leaking batteries.
Damage caused by accident or misuse.
Packaging/storage material and instructions for use.
Regular checks and maintenance (calibration).
Accessories and wearing parts: Battery.
The cuff is covered by a functional guarantee (bladder tightness) for
2 years.
Should guarantee service be required, please contact the dealer
from where the product was purchased, or your local Microlife
service. You may contact your local Microlife service through our
website:
www.microlife.com/support
Compensation is limited to the value of the product. The guarantee
will be granted if the complete product is returned with the original
invoice. Repair or replacement within guarantee does not prolong or
renew the guarantee period. The legal claims and rights of
consumers are not limited by this guarantee.
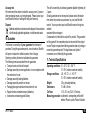
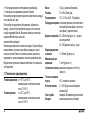
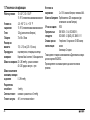
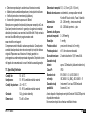
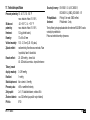
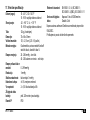
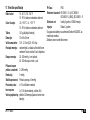
11.Technical Specifications
Operating conditions: 10 - 40 °C / 50 - 104 °F
15 - 95 % relative maximum humidity
Storage conditions: -20 - +55 °C / -4 - +131 °F
15 - 95 % relative maximum humidity
Weight: 124
g (including batteries)
Dimensions: 73 x 66 x 38
mm
Cuff size: 13.5 - 21.5 cm (5.25 - 8.5 inches)
Measuring procedure:
oscillometric, corresponding to Korotkoff
method: Phase I systolic, Phase V diastolic

10
This device complies with the requirements of the Medical Device
Directive 93/42/EEC.
Technical alterations reserved.
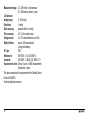
Measurement range: 20 - 280 mmHg – blood pressure
40 - 200 beats per minute – pulse
Cuff pressure
display range: 0 - 299 mmHg
Resolution: 1 mmHg
Static accuracy: pressure within ± 3 mmHg
Pulse accuracy: ± 5 % of the readout value
Voltage source: 2 x 1.5 V alkaline batteries; size AAA
Battery lifetime: approx. 320 measurements
(using new batteries)
IP Class: IP20
Reference to
standards:
EN 1060-1 /-3 /-4; IEC 60601-1;
IEC 60601-1-2 (EMC); IEC 60601-1-11
Expected service life: Device: 5 years or 10000 measurements
Accessories: 2 years

11BP W1 Basic
EN

12
Дисплей
Перед использованием прибора внимательно прочтите
данное руководство.
Предназначение:
Этот осциллометрический тонометр предназначен для неинва-
зивного измерения артериального давления у людей в возрасте
12 лет и старше.
Уважаемый покупатель,
Ваш новый тонометр Microlife является надежным медицинским
прибором для выполнения измерений на запястье. Он прост в
использовании, точен и настоятельно рекомендован для изме-
рения артериального давл
ения в домашних условиях. Прибор
был разработан в сотрудничестве с врачами, а клинические
тесты подтвердили высокую точность его измерений.*
При возникновении вопросов, проблем или для заказа запасных
частей, пожалуйста, обращайтесь в местный сервисный центр
Microlife. Ваш дилер или аптека могут предоставить Вам адрес
дилера Microlife в Вашей стране. В качестве альтернативы,
посетите в Ин
тернете страницу www.microlife.com, где Вы
сможете найти ряд полезных сведений по нашему изделию.
Будьте здоровы – Microlife AG!
Microlife BP W1 Basic
RU
1
Кнопка ВКЛ/ВЫКЛ
2
Дисплей
3
Отсек для батарей
4
Манжета
5
Кнопка M (Память)
6
Кнопка Time (Время)
7
Систолическое давление
8
Диастолическое давление
9
Частота пульса
AT
Дата/Время
AK
Индикатор уровня давления
AL
Сохраненное значение
AM
Символ IHB - обнаружения нерегулярного сердцебиения
AN
Индикатор пульса
AO
Индикатор разряда батарей
AP
Индикатор движения руки
AQ
Индикатор правильности надевания манжеты
AR
Светодиодный индикатор положения

13BP W1 Basic
RU
* В этом приборе используется такой же алгоритм изме-
рения, как и в приборе BP W100, отмеченном наградой
Британского Общества Гипертензии (BIHS) и протестиро-
ванным согласно протокола общества.
Оглавление
1. Важная информация об артериальном давлении и
самостоятельное измерение
• Как определить артериальное давление?
2. Использование прибора в первый раз
• Установка батарей
• Установка даты и времени
3. Выполнение измерений артериального давления
4. Вид символа - IHB (обнаружение нерегулярного
сердцебиения)
5. Индикатор уровня давления «Светофор»
6. Память
• Просмотр сохраненных величин
• Заполнение памяти
• Удаление всех значений
• Как отменить сохранение результата
7. Инд
икатор разряда батарей и их замена
• Батареи почти разряжены
• Замена разряженных батарей
• Элементы питания и процедура замены
• Использование аккумуляторов
8. Сообщения об ошибках
9. Техника безопасности, уход, проверка точности и
утилизация
• Техника безопасности и защита
• Уход за прибором
• Очистка манжеты
• Проверка точности
• Утилизация
10. Гарантия
11. Технические характеристики
Гарантийный талон (см. на обратной стороне)
Изделие типа BF
Хранить в сухом месте

14
1. Важная информация об артериальном давлении и
самостоятельное измерение
Артериальное давление
- это давление крови, подаваемой
сердцем в артерии. Всегда измеряются два значения, систоличе-
ское (верхнее) давление и диастолическое (нижнее) давление.
Кроме того, прибор показывает частоту пульса (число ударов
сердца в минуту).
Постоянно повышенное артериальное давление может
нанести ущерб Вашему здоровью, и в этом случае Вам
необходимо обратиться к врачу!
Всегда сообщайте врачу о Вашем давлении и сообщайте ему/
ей, если Вы заметили что-нибудь необычное или чувствуете
неуверенность. Никогда не полагайте
сь на результат
однократного измерения артериального давления.
Существует несколько причин
возникновения высокого
артериального давления
. Ваш лечащий врач расскажет о них
более подробно и предложит подходящее лечение. Кроме
приема лекарственных средств, снижение веса и физические
нагрузки помогут снизить артериальное давление.
Ни при каких обстоятельствах не меняйте дозировку
лекарств и не занимайтесь самолечением без консуль-
тации вашего лечащего врача.
В зависимости от физических нагрузок и состояния, арте-
риальное давление подвержено знaчитeльным колебаниям в
течение дня. Поэтому каждый раз процедура измерений
должна проводиться в спокойных условиях и когда Вы
не ч
увствуете напряжения! Потребуется не менее двух
измерений (каждое утро и каждый вечер) для определения
среднего значения измерений.
Совершенно нормально, если при двух измерениях подряд
полученные результаты будут отличаться друг от друга.
Расхождения
между результатами измерений, полученными
врачом или в аптеке, и результатами, полученными в домашних
условиях, также являются вполне нормальными, поскольку ситу-
ации, в которых проводятся измерения, совершенно различны.
Несколько измерений обеспечивают гораздо более
надежную информацию об артериальном давлении, чем одно
измерение.
Сделайте небольшой перерыв, по крайней мере, в
15 секунд между двумя измерениями.
Если вы страдаете сердечной аритмией, проконсультируй-
тесь с врачом перед использованием устройства. См. также
главу «Появление символа - IHB (обнаружение нерегуляр-
ного сердцебиения)» данного руководства пользователя.
Показания пуль
са не пригодны для использования в
качестве контроля частоты кардиостимулятора!
Во время беременности следует тщательно следить за арте-
риальным давлением, поскольку на протяжении этого
периода оно может существенно меняться!

15BP W1 Basic
RU
При измерении артериального давления на запястье
на точность измерений может влиять ряд факторов. В
некоторых случаях результат может отличаться от изме-
рений на плече. Рекомендуется сравнить эти значения с
результатами, полученными при измерениях на плече, и
проконсультироваться с врачом.
Как определить артериальное давление
Оценка давления определяется по наивысшему значению.
Например: давление 140/
80 mm Hg (мм рт.ст.) и давление 130/
90 mm Hg (мм рт.ст.) оба оцениваются как «артериальное
давление очень высокое».
2. Использование прибора в первый раз
Установка батарей
После того, как Вы вынули прибор из упаковки, прежде всего,
вставьте батареи. Отсек для батарей 3 расположен на верхней
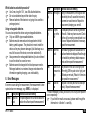
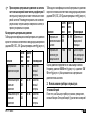
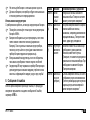
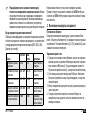
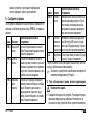
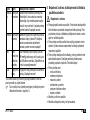
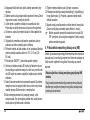
Таблица для классификации значений артериального давления
взрослого человека в соответствии с международными рекомен-
дациями ESH, ESC, JSH. Данные приведены в mmHg (мм рт.ст.)
Диапазон
Систо-
личе-
ское
Диасто-
личе-
ское Рекомендация
1. артериальное
давление в норме
< 120 < 74 Самостоя-
тельный
контроль
2. оптимальное арте-
риальное
давление
120 -
129
74 - 79 Самостоя-
тельный
контроль
3. повышенное арте-
риальное
давление
130 -
134
80 - 84 Самостоя-
тельный
контроль
4. артериальное
давление слишком
высокое
135 -
159
85 - 99 Обратитесь за
медицинской
помощью
5. артериальное
давление угро-
жающе высокое
≥ 160 ≥ 100 Срочно обрати-
тесь за медицин-
ской помощью!
Таблица для классификации значений артериального давления
взрослого человека в соответствии с международными рекомен-
дациями ESH, ESC, JSH. Данные приведены в mmHg (мм рт.ст.)
Диапазон
Систо-
личе-
ское
Диасто-
личе-
ское Рекомендация

16
части прибора. Вставьте батареи (2 х тип AAA 1.5В), соблюдая
полярность.
Установка даты и времени
1. После установки новых батарей на дисплее замигает числовое
значение года. Год устанавливается нажатием кнопки M
5
. Для
того, чтобы подтвердить введенное значение и затем установить
месяц, нажмите кнопку Time (Время)
6
.
2. Теперь можно установить месяц нажатием кнопки M. Для того,
чтобы подтвердить введенное значение и затем установить
день, нажмите кнопку Time (Время).
3. Следуя вышеприведенным инструкциям, установите день, час
и минуты.
4. После установки минут и нажатия кнопки Time (Время) на экране
появятся дата и время.
5. Для изменения даты и времени нажмите и удерживайте кнопку
Time (Время) приб
лизительно в течение 3 секунд, пока не
начнет мигать год. После этого можно ввести новые значения,
как это описано выше.
3. Выполнение измерений артериального давления
Рекомендации для получения надежных результатов изме-
рений
1. Избегайте физической активности, не ешьте и не курите непо-
средственно перед измерением.
2. Присядьте на стул со спинкой на пять минут и расслабьтесь.
Поставьте ноги на пол ровно и не скрещивайте их.
3. Всегда проводите измерения на том же запястье в положении
сидя. Используйте запястье, которое обычно п
оказывает
более высокие значения артериального давления.
4. Снимите одежду и, например, часы, для того, чтобы освободить
запястье.
5. Убедитесь, что используется манжета правильного размера
(маркировка на манжете).
6. Удобно наложите манжету, но не слишком туго. Манжета
рассчитана на запястье обхватом от 13,5 - 21,5 см (5,25 - 8,5
дюймов).
7. Нажмите кнопку ВКЛ/ВЫКЛ 1 для начала измерения.
8. Светодиодный индикатор положения AR активирован. Распо-
ложите свою руку в расслабленном положении с прибором на
одной высоте с лин
ией сердца, передвигайте вашу руку до
тех пор, пока светодиодный луч не станет самым ярким и не
расположится по центру светодиодного индикатора.
9. Спустя 5 секунд будет произведена автоматическая накачка
манжеты. Расслабьтесь, не двигайтесь и не напрягайте руку
до тех пор, пока не отобразится результат измерения.
Дышите нормально и не разговаривайте.
10.Если измерение успешно завершено, подкачка прекращается и
происходит постепенный сброс давления. Если требуемое

17BP W1 Basic
RU
давление не достигнуто, прибор автоматически произведет
дополнительное нагнетание воздуха в манжету.
11.Во время измерения, индикатор пульса
AN
мигает на дисплее.
12.Затем отображается результат, состоящий из систолического
7 и диастолического 8 артериального давления, а также
пульса 9. См. также пояснения по другим показаниям
дисплея в этой инструкции.
13.Снимите манжету и выключите тонометр, занесите результат
в приложенную карточку артериального давления. (Тонометр
автоматически отключается приблизительно через 1 минуту).
Вы можете остановить измерение в любой момент нажа-
тием кнопки ВКЛ/ВЫКЛ (например, если Вы испытываете
неудобство или неприятное ощущение от нагнетаемого
давления).
4. Появление символа - IHB (обнаружение нерегу-
лярного сердцебиения)
Этот символ AM указывает на то, что было обнаружено нерегу-
лярное сердцебиение. В этом случае измеренное артериальное
давление может отличаться от фактического значения артери-
ального давления. Рекомендуется повторить измерение.
5. Индикатор уровня давления «Светофор»
Полоски на левом краю дисплея
AK
показывают диапазон, в котором
лежит результат артериального давления. В зависимости от высоты
расположения считываемого значения в полоске оно является: опти-
мальным (зеленым), повышенным (желтым), слишком высоким
(оранжевым), угрожающе высоким (красным). Классификация соот-
ветствует
4
диапазонам в таблице согласно международным реко-
мендациям
ESH, ESC, JSH
, как описано в «Разделе 1.».
6. Память
По окончании измерения прибор автоматически сохраняет
каждый результат, включая дату и время.
Просмотр сохраненных величин
Коротко нажмите кнопку M
5
при выключенном приборе. Сначала
на дисплее покажется знак «
M
»
AL
и затем значение, например
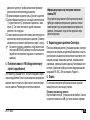
Информация для врача при повторном появлении
символа IHB:
Это устройство представляет собой осциллометрический
прибор для измерения артериального давления, который
также измеряет пульс во время измерения артериального
давления, и показывает, когда частота сердечных сокра-
щений нерегулярна.

18
«
M 17
». Это означает, что в памяти находятся 17 значений. Затем
прибор переключается на последний сохраненный результат.
Повторное нажатие кнопки M отображает предыдущее значение.
Многократное нажатие кнопки M позволяет переключаться между
сохраненными значениями.
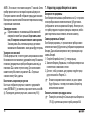
Заполнение памяти
Обратите внимание, что максимальный объем памяти в 60
измерений не может быть превышен.
Когда память запол-
нена, 61 измерение записывается вместо самого раннего.
Значения должны быть отслежены врачом до достижения
максимального объема памяти – иначе данные будут потеряны.
Удаление всех значений
Если Вы уверены в том, что хотите удалить все хранимые значения
без возможности восстановления, удерживайте кнопку M в нажатом
положении (предварительно прибор необходимо выключить) до
появления «
CL
» и затем отпустите кнопку. Для очистки памяти
нажмите кнопку M в момент, когда мигает «
CL
». Отдельные
значения не могут быть удалены.
Как отменить сохранение результата
Как только отобразится результат, нажмите и удерживайте
кнопкy ВКЛ/ВЫКЛ 1 до момента, когда начнет мигать знак «M»
AL. Подтвердите удаление результата, нажав кнопку M 5.
7. Индикатор разряда батарей и их замена
Батареи почти разряжены
Если батареи использованы приблизительно на ¾, то при вклю-
чении прибора символ элементов питания AO будет мигать
(отображается частично заряженная батарея). Несмотря на то,
что прибор продолжит надежно проводить измерения, необхо-
димо подготовить новые элементы питания на замену.
Замена разряженных батарей
Если батареи разряжены, то при включении прибора символ
элементов питания AO бу
дет мигать (отображается разряженная
батарея). Дальнейшие измерения не могут производиться до
замены батарей.
1. Откройте батарейный отсек 3, оттянув крышку.
2. Замените батареи, убедившись, что соблюдена полярность в
соответствии с символами в отсеке.
3. Для того, чтобы установить дату и время, следуйте проце-
дуре, описанной в «Разделе 2.».
В памяти сохраняются все значения, но дата и время
будут сброшены – поэтому после замены батарей год
автоматически замигает.
Элементы питания и процедура замены
Пожалуйста, используйте 2 новые щелочные батареи на
1,5V (В) с длительным сроком службы размера AAA.
Pagina se încarcă...
Pagina se încarcă...
Pagina se încarcă...
Pagina se încarcă...
Pagina se încarcă...
Pagina se încarcă...
Pagina se încarcă...
Pagina se încarcă...
Pagina se încarcă...
Pagina se încarcă...
Pagina se încarcă...
Pagina se încarcă...
Pagina se încarcă...
Pagina se încarcă...
Pagina se încarcă...
Pagina se încarcă...
Pagina se încarcă...
Pagina se încarcă...
Pagina se încarcă...
Pagina se încarcă...
Pagina se încarcă...
Pagina se încarcă...
Pagina se încarcă...
Pagina se încarcă...
Pagina se încarcă...
Pagina se încarcă...
Pagina se încarcă...
Pagina se încarcă...
Pagina se încarcă...
Pagina se încarcă...
Pagina se încarcă...
Pagina se încarcă...
Pagina se încarcă...
Pagina se încarcă...
Pagina se încarcă...
Pagina se încarcă...
Pagina se încarcă...
Pagina se încarcă...
Pagina se încarcă...
Pagina se încarcă...
Pagina se încarcă...
Pagina se încarcă...
Pagina se încarcă...
Pagina se încarcă...
Pagina se încarcă...
Pagina se încarcă...
Pagina se încarcă...
Pagina se încarcă...
Pagina se încarcă...
Pagina se încarcă...
Pagina se încarcă...
Pagina se încarcă...
Pagina se încarcă...
Pagina se încarcă...
Pagina se încarcă...
Pagina se încarcă...
Pagina se încarcă...
Pagina se încarcă...
Pagina se încarcă...
Pagina se încarcă...
Pagina se încarcă...
Pagina se încarcă...
Pagina se încarcă...
Pagina se încarcă...
Pagina se încarcă...
Pagina se încarcă...
Pagina se încarcă...
Pagina se încarcă...
Pagina se încarcă...
Pagina se încarcă...
Pagina se încarcă...
Pagina se încarcă...
Pagina se încarcă...
Pagina se încarcă...
Pagina se încarcă...
Pagina se încarcă...
Pagina se încarcă...
Pagina se încarcă...
Pagina se încarcă...
Pagina se încarcă...
Pagina se încarcă...
Pagina se încarcă...
Pagina se încarcă...
Pagina se încarcă...
Pagina se încarcă...
Pagina se încarcă...
Pagina se încarcă...
-
 1
1
-
 2
2
-
 3
3
-
 4
4
-
 5
5
-
 6
6
-
 7
7
-
 8
8
-
 9
9
-
 10
10
-
 11
11
-
 12
12
-
 13
13
-
 14
14
-
 15
15
-
 16
16
-
 17
17
-
 18
18
-
 19
19
-
 20
20
-
 21
21
-
 22
22
-
 23
23
-
 24
24
-
 25
25
-
 26
26
-
 27
27
-
 28
28
-
 29
29
-
 30
30
-
 31
31
-
 32
32
-
 33
33
-
 34
34
-
 35
35
-
 36
36
-
 37
37
-
 38
38
-
 39
39
-
 40
40
-
 41
41
-
 42
42
-
 43
43
-
 44
44
-
 45
45
-
 46
46
-
 47
47
-
 48
48
-
 49
49
-
 50
50
-
 51
51
-
 52
52
-
 53
53
-
 54
54
-
 55
55
-
 56
56
-
 57
57
-
 58
58
-
 59
59
-
 60
60
-
 61
61
-
 62
62
-
 63
63
-
 64
64
-
 65
65
-
 66
66
-
 67
67
-
 68
68
-
 69
69
-
 70
70
-
 71
71
-
 72
72
-
 73
73
-
 74
74
-
 75
75
-
 76
76
-
 77
77
-
 78
78
-
 79
79
-
 80
80
-
 81
81
-
 82
82
-
 83
83
-
 84
84
-
 85
85
-
 86
86
-
 87
87
-
 88
88
-
 89
89
-
 90
90
-
 91
91
-
 92
92
-
 93
93
-
 94
94
-
 95
95
-
 96
96
-
 97
97
-
 98
98
-
 99
99
-
 100
100
-
 101
101
-
 102
102
-
 103
103
-
 104
104
-
 105
105
-
 106
106
-
 107
107


Microlife BP W1 Basic Manual de utilizare
- Categorie
- Unități de tensiune arterială
- Tip
- Manual de utilizare
în alte limbi
- slovenčina: Microlife BP W1 Basic Používateľská príručka
Lucrări înrudite
-
Microlife BP W1 Basic Manual de utilizare
-
Microlife BP A2 BASIC Manual de utilizare
-
-
Microlife BP N2 Easy Manual de utilizare
-
Microlife BP W3 Comfort Manual de utilizare
-
-
Microlife BP A1 Easy Manual de utilizare
-
-
Microlife BP A3 Plus Manual de utilizare
-