
YT-250
YT-250
#
CHROMATIC TUNER
u
u
r
r
e
q
t
o
i
o y
y
u
q
q
r
q w
w
u
r
y
w
q
u
i
o
t
e
t
q

435→436→437→438→439→440→441→442→443→444→445→446
■ COMPONENTS
YT-250
YT-250
FCC INFORMATION (U.S.A.)
1.IMPORTANT NOTICE: DO NOT MODIFY THIS UNIT!
This product, when installed as indicated in the instructions contained in this manual,
meets FCC requirements. Modifications not expressly approved by Yamaha may void
your authority, granted by the FCC, to use the product.
2.IMPORTANT: When connecting this product to accessories and/or another product
use only high quality shielded cables. Cable/s supplied with this product MUST be used.
Follow all installation instructions. Failure to follow instructions could void your FCC
authorization to use this product in the USA.
3.NOTE: This product has been tested and found to comply with the requirements listed
in FCC Regulations, Part 15 for Class ”B” digital devices. Compliance with these re-
quirements provides a reasonable level of assurance that your use of this product in a
residential environment will not result in harmful interference with other electronic de-
vices. This equipment generates/uses radio frequencies and, if not installed and used
according to the instructions found in the users manual, may cause interference harmful
to the operation of other electronic devices. Compliance with FCC regulations does not
guarantee that interference will not occur in all installations. If this product is found to
be the source of interference, which can be determined by turning the unit ”OFF” and
”ON”, please try to eliminate the problem by using one of the following measures:
Relocate either this product or the device that is being affected by the interference.
Utilize power outlets that are on different branch (circuit breaker or fuse) circuits or
install AC line filter/s.
In the case of radio or TV interference, relocate/reorient the antenna. If the antenna
lead-in is 300 ohm ribbon lead, change the lead-in to co-axial type cable.
If these corrective measures do not produce satisfactory results, please contact the
local retailer authorized to distribute this type of product. If you can not locate the
appropriate, please contact Yamaha Corporation of America, Electronic Service Divi-
sion, 6600 Orangethorpe Ave, Buena Park, CA 90620
The above statements apply ONLY to those products distributed by Yamaha
Corporations of America or its subsidiaries.
OWNER’S MANUAL
Thank you for purchasing the YAMAHA YT-250 Chromatic Auto
Tuner.
Please read this manual thoroughly and keep it in a safe place for
future reference.
CHROMATIC TUNER
■ PRECAUTIONS
◆ To prevent damage, do not use the tuner in the following locations:
• places where the unit will be in direct sunlight;
• places subject to temperature and humidity extremes;
• places that are sandy or dusty.
◆ To power the tuner, use only a 6F22 or 006P 9V dry cell battery.
◆ For maximum battery life, always be sure the tuner is turned OFF when not in
use.
◆ If an exhausted battery is left in the unit for an extended period of time, it may
leak and cause malfunctioning of the unit. When the battery becomes
exhausted, always remove it and replace it as soon as possible.
◆ Do not subject the tuner to strong physical shock or vibration. Do not use
excessive force on any of the controls.
◆ Never use solvents such as benzene or thinner to clean the tuner. Wipe clean
with a soft, dry cloth.
◆ After reading the owner's manual, keep it in a safe place for future reference.
Never dispose of used batteries by burning them.
Also make sure to keep batteries away from children.
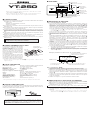
■ BATTERY REPLACEMENT
When battery power runs down, the
LCD indicator will grow dim.
Continued use of the tuner may result in
inaccurate operation. Replace the
battery with a new one (6F22 or 006P
9V dry cell battery) as soon as possible.
The battery compartment is in the rear
of the tuner. Remove the old battery
and replace it with a new one of the
same type. Be careful to connect the
battery in the correct polarity.
Battery cover
Bottom side
6F22 or 006P 9V
dry cell battery
* Always turn the POWER switch u to “OFF” before changing the battery.
■ SPECIFICATIONS
Indicators : Liquid crystal display, Tuning guides
Tuning Notes : C, D, E, F, G, A, B, #
Note Setting Range : A0 (27Hz) – C8 (4186Hz)
Accuracy : ±1 cent
In Pitch Accuracy : ±3 cent
Standard Pitch Setting Range : A4=435 – 446Hz (1Hz steps)
Input : INPUT (6
monaural), microphone
Output : OUTPUT (6
monaural)
Power Source : 9V dry cell battery (006P or 6F22)
Battery Life : Approximately 50 hrs. (AUTO mode)
Dimensions (W x H x D) : 118 x 63 x 24.5 mm (4.6" x 2.5" x 1.0")
Weight (including battery) : 130 g (4.6 oz)
Accessory : 9V dry cell battery (6F22) x 1
* Specifications and external appearance are subject to change without notice.
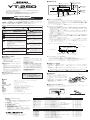
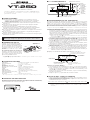
■ TILT SLIT
The tuner can be tilted back by using the slit in the rear panel. Insert a coin or
similar flat object into the slit and tilt back as shown in the diagram below.
w Tuning guide
q LCD indicator
e MODE switch
r PITCH switch
t NOTE switch
y Built-in microphone
u POWER
switch
i OUTPUT
jack
■ TUNING PROCEDURES
Two tuning modes are available for tuning. The Auto (AUTO) mode automatically
selects the closest note name to the pitch received by the tuner and indicates
whether the pitch is high or low. The Manual (MANL.) mode allows the user to
manually select the note to be tuned. Press the MODE e switch to select the
desired tuning mode. The selected mode, AUTO or MANL., is displayed on the
lower left hand corner of the LCD display q.
* Pressing the NOTE t switch while in the Auto mode also switches the tuner to the
Manual mode.
● Auto Tuning : AUTO
1. To tune electric or electronic instruments, use a cable to connect the
instrument directly to the tuner’s INPUT o jack. (Connecting the OUTPUT i
jack to an amp allows the amp to receive the instrument’s signal whether the
tuner’s power is on or off. However, it might result in added noise to the line
so you should switch the tuner’s power off during performance.)
* The built-in microphone y will not operate when a cable is connected to the
tuner’s INPUT o jack.
To tune acoustic instruments, use the tuner’s built-in microphone and play the
note as close to the tuner as possible during step 4.
2. Turn the POWER u switch ON.
The standard pitch (factory preset A4=440Hz) will flash on the LCD indicator
q for about 2 seconds. After that, the tuner will automatically enter the Auto
tuning mode (AUTO will appear on the display q).
3. Use the PITCH switch r to change the standard pitch (refer to the “Setting
the Standard Pitch” section below).
4. Play a note on the instrument (only play 1 note at a time). Use the note name
indicated on the display q, the needle and tuning guide w as a reference
while tuning the instrument.
4-1. First, approximately tune the instrument so that the indicator for the
appropriate note name flashes.
4-2. Next, tune until the needle rests in the middle and the green LED of the
tuning guide w lights.
o INPUT
jack
● Manual Tuning : MANL.
1. Carry out the same settings as described in steps 1-3 in the AUTO tuning
section.
2. Continue to press the NOTE t switch until the desired note name flashes.
The tuner is now in the manual mode and “MANL.” appears on the display
q.
3. As in step 4 of the AUTO tuning section, pluck the string to be tuned. Proceed
to tune the string.
4. Repeat steps 2 and 3 to tune the other strings.
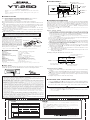
Example) Using the AUTO mode to tune an “E”.
Select the AUTO
mode.
The note name of the string
to be tuned flashes.
When this LED lights,
the string is tuned.
Standard Pitch is
displayed.
Tune until needle comes to
rest in the center.
■ SETTING THE STANDARD PITCH
1. Turn the POWER switch u ON. The pitch is set to 440 Hz (flashing display).
2. Continuously press the PITCH switch r until the desired standard pitch (435
– 446Hz) is selected.
3. When the PITCH switch r has not been pressed for about 2 seconds, the
tuner will automatically return to the tuning mode.
* When the POWER switch u is turned OFF, the standard pitch setting will be
reset to A=440Hz.
THIS DIGITAL APPARATUS DOES NOT EXCEED THE “CLASS B” LIMITS FOR RADIO
NOISE EMISSIONS FROM DIGITAL APPARATUS SET OUT IN THE RADIO INTERFER-
ENCE REGULATION OF THE CANADIAN DEPARTMENT OF COMMUNICATIONS.

MODE D’EMPLOI
Nous vous remercions d’avoir porté votre choix sur l’accordeur
chromatique YAMAHA YT-250.
Nous vous prions de lire attentivement ce mode d’emploi et de le
conserver en lieu sûr pour vous y reporter ultérieurement.
■ PRECAUTIONS
◆ Afin de ne pas endommager l’accordeur, évitez de l’utiliser dans des endroits
répondant aux conditions suivantes :
• plein soleil
• humidité ou températures excessives.
• sable ou poussière
◆ Pour alimenter l’accordeur, utilisez exclusivement une pile sèche 6F22 ou
006P de 9 Volts.
◆ Pour garantir une longévité maximale des piles, mettez toujours l’accordeur
hors tension lorsque vous ne l’utilisez pas.
◆ Les piles épuisées qui restent dans l’accordeur pendant une longue période,
peuvent fuir et provoquer des anomalies de fonctionnement. Lorsque les
piles présentent des signes de décharge, remplacez-les dans le délai le plus
bref.
◆ L’accordeur ne doit pas subir de chocs ni de vibrations importants. Ne le
manipulez jamais avec une force excessive.
◆ N’utilisez jamais de solvants tels que de la benzine ou du diluant pour
nettoyer l’accordeur. Essuyez-le avec un chiffon doux et sec.
◆ Après avoir lu ce mode d’emploi, conservez-le en lieu sûr pour vous y reporter
ultérieurement.
Ne jetez jamais les piles au feu et conservez-les
toujours hors de portée des enfants.
■ FENTE D’INCLINAISON
L’accordeur peut être maintenu incliné en utilisant la fente du panneau arrière.
Introduire une pièce de monnaie, ou autre objet plat similaire, dans la fente et
incliner l’accordeur de la manière illustrée.
Pile 6F22 ou 006P
de 9 Volts
■ REMPLACEMENT DE LA PILE
Lorsque la puissance de la pile devient
insuffisante, l’afficheur à cristaux
liquides s’assombrit.
Le fait de continuer à utiliser l’accordeur
dans ces conditions risque de ne pas
permettre de fournir une indication
précise. Remplacer la pile par une pile
sèche neuve (6F22 ou 006P 9 V) dans
les meilleurs délais.
Le logement de la pile est situé au dos
de l’accordeur. Retirer la pile usée et
la remplacer par une pile neuve du
même type. Faire très attention de pla-
cer la pile en respectant les polarités.
Dos de
l’accordeur
Couvercle du
logement des piles
■ FICHE TECHNIQUE
Indicateurs et témoins : Afficheur à cristaux liquides, guide d’accord
(à 3 diodes électroluminescentes)
Notes d’accord : C, D, E, F, G, A, B, #
Plage de réglage de note : A0 (27Hz) - C8 (4186Hz)
Précision : ± 1 centième
Précision de hauteur : ± 3 centièmes
Plage de réglage de hauteur standard
: A4=435 - 446Hz (par incréments d’1 Hz)
Entrée : INPUT (6 monaurale), microphone
Sortie : OUTPUT (6 monaurale)
Source d’alimentation : Pile sèche de 9V (006P ou 6F22)
Autonomie des piles : 50 heures environ. (Mode AUTO)
Dimensions (L x H x P) : 118 x 63 x 24,5 mm
Poids (piles incluses) : 130 g
Accessoires : Pile sèche de 9V (6F22) x 1
* Les spécifications et l’aspect externe peuvent être modifiés sans aucun avis.
■ RÉGLAGE DE LA HAUTEUR STANDARD
1. Mettre l’accordeur sous tension avec l’interrupteur d’alimentation POWER
u. La hauteur est calée sur 440 Hz (l’afficheur clignote).
2. Maintenir le commutateur PITCH r enfoncé jusqu’à ce que la hauteur
standard désirée soit otenue (435 – 446 Hz).
■ MÉTHODES D’ACCORD
● Accord automatique : AUTO
1. Pour accorder des instruments électriques ou électroniques, utilisez un
câble pour raccorder directement l’instrument à la prise INPUT o de
l’accordeur. (En raccordant la prise de sortie OUTPUT i à un
amplificateur, ceci permet à l’amplificateur de recevoir les signaux de
l’instrument, que l’accordeur soit sous tension ou non. Cependant, il faut
savoir que cela peut rajouter du bruit à la ligne de sorte qu’il est préférable
de couper l’alimentation de l’accordeur pendant une interprétation.)
* Le microphone incorporé y ne fonctionnera pas si un câble est raccordé à la
prise INPUT o de l’accordeur.
Pour accorder des instruments acoustiques, utilisez le microphone
incorporé de l’accordeur et jouez la note le plus près possible de
l’accordeur au cours de l’étape 4.
2. Mettez l’accordeur sous tension avec l’interrupteur d’alimentation POWER
u.
La hauteur standard du son (dont le préréglage a été fait sur A = 440 Hz en
usine) apparaîtra en clignotant dans l’afficheur à cristaux liquides q
pendant 2 secondes environ. Ensuite, l’accordeur se commutera
automatiquement en mode d’accord automatique (AUTO apparaîtra dans
l’afficheur à cristaux liquides q).
3. Utilisez le commutateur PITCH r pour changer la hauteur standard
(reportez-vous à la description intitulée “Réglage de la hauteur standard”
ci-après.)
4. Jouez une note sur l’instrument (ne jouez qu’une note à la fois.) Utilisez en
même temps le nom de la note qui est indiqué dans l’afficheur q, la
position de l’aiguille et le guide d’accord w comme moyen de référence
tout en accordant l’instrument.
4-1. Accordez tout d’abord l’instrument de façon globale et faites en sorte que
l’indicateur du nom de note appropriée clignote.
4-2. Ensuite, accordez l’instrument jusqu’à ce que l’aiguille se stabilise en
position intermédiaire et que la diode électroluminescente verte du guide
d’accord w s’allume.
Accorder jusqu’à ce que l’aiguille se
stabilise en position centrale.
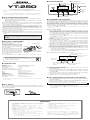
■ ORGANES
u Interrupteur
d’alimentation
POWER
r Commutateur de hauteur PITCH
y Microphone incorporé
w Guide d’accord
q Afficheur à cristaux
liquides
3. Si le commutateur PITCH r est laissé ainsi sans être enfoncé pendant 2
secondes environ, l’accordeur reviendra automatiquement en mode
d’accord.
* Lorsque l’alimentation de l’accordeur est coupée avec l’interrupteur
d’alimentation POWER u, la hauteur standard est ramenée sur A = 440 Hz.
● Accord manuel : MANL.
1. Effectuez les mêmes réglages que ceux qui sont décrits aux étapes 1 à 3
ci-dessus du passage consacré à l’accord réalisé en mode AUTO.
2. Maintenir le commutateur NOTE t enfoncé jusqu’à ce que le nom de la note
que vous voulez obtenir clignote. L’accordeur se trouve maintenant en mode
d’accord manuel et l’indication “MANL.” apparaît dans l’afficheur à cristaux
liquides q.
3. Comme au cours de l’étape 4 du passage consacré au procédé d’accord en
mode AUTO, pincez la corde qui doit être accordée. Faites en sorte que la
corde soit accordée.
4. Refaites les étapes 2 et 3 pour accorder les autres cordes.
La corde est accordée dès que la
diode électroluminescente s’allume.
Exemple) Comment accorder la note “E” en mode AUTO.
Le nom de la note de la corde
à accorder clignote.
Choisir le mode
AUTO.
La hauteur
standard est
affichée.
i Mini-prise de
sortie OUTPUT
o Mini-prise
d’entrée INPUT
t Commutateur de note NOTE
e Commutateur de mode MODE
* Toujours mettre l’interrupteur POWER u sur la position “OFF” avant de
remplacer la pile.
LE PRESENT APPAREIL NUMERIQUE N'EMET PAS DE BRUITS
RADIOELECTRIQUES DEPASSANT LES LIMITES APPLICABLES AUX
APPAREILS NUMERIQUES DE LA "CLASSE B" PRESCRITES DANS LE
REGLEMENT SUR LE BROUILLAGE RADIOELECTRIQUE EDICTE PAR LE
MINISTERE DES COMMUNICATIONS DU CANADA.
435→436→437→438→439→440→441→442→443→444→445→446
YT-250
YT-250
ACCORDEUR CHROMATIQUE

BEDIENUNGSANLEITUNG
Vielen Dank für den Kauf des chromatischen Stimmgeräts
YT-250 von Yamaha.
Lesen Sie diese Anleitung bitte aufmerksam durch, und
bewahren Sie sie dann zur späteren Bezugnahme gut auf.
■ VORSICHTSMASSREGELN
◆ Verwenden Sie das Stimmgerät nicht an Orten, wo es den folgenden
schädlichen Einflüssen ausgesetzt ist:
• Direktes Sonnenlicht
• Extreme Temperatur- und Luftfeuchtigkeitswerte
• Sand und Staub
◆ Verwenden Sie als Stromquelle ausschließlich 9V-Trockenbatteriezellen vom
Typ 6F22 oder 006P.
◆ Schalten Sie das Stimmgerät nach Gebrauch stets aus, um die Batterien zu
schonen.
◆ Wenn verbrauchte Batterien längere Zeit im Gerät verbleiben, können sie
auslaufen und Schäden verursachen. Wenn die Batterien schwächer
werden, sollten Sie sie daher entnehmen und so bald wie möglich durch neue
ersetzen.
◆ Schützen Sie das Stimmgerät vor starken Schlägen und Erschütterungen.
Wenden Sie beim Betätigen der Bedienelemente nicht zu viel Kraft auf.
◆ Verwenden Sie zum Säubern des Stimmgeräts keine Lösungsmittel wie
Benzin oder Verdünner. Entfernen Sie Staub und Schmutz mit einem
weichen, trockenen Tuch.
◆ Bewahren Sie diese Anleitung nach dem Durchlesen gut auf.
Achten Sie bitte auf korrekte Entsorgung verbrauchter
Batterien. Batterien dürfen nicht verbrannt werden!
Achten Sie bitte auch darauf, daß Batterien nicht in
Kinderhände geraten.
Bescheinigung des Importeurs
Hiermit wird bescheinigt, daß der / die / das
CHROMATIC TUNER Typ : YT-250
(Gerät, Typ, Bezeichnung)
in Übereinstimmung mit den Bestimmungen der
VERFÜGUNG 1046/84
(Amtsblattverfügung)
funkentstört ist.
Der Deutschen Bundespost wurde das Inverkehrbringen dieses Gerätes
angezeigt und die Berechtigung zur Überprüfung der Serie auf
Einhaltung der Bestimmungen eingeräumt.
YAMAHA Europa GmbH
Name des Importeurs
■ KIPPSCHLITZ
Das YT-250 weist einen Schlitz auf der Rückseite auf, wodurch es nach hinten
gekippt werden kann. Eine Münze o.ä. in den Schlitz einführen und das Gerät
nach hinten kippen, wie gezeigt.
Unterseite
Batteriefachdeckel
Batterie 6F22
oder 006P, 9V
■ BATTERIEWECHSEL
Wenn die Batterie erschöpft ist, sind die
Anzeigen des Flüssigkristall-Displays
schwächer als gewöhnlich.
Falls das Stimmgerät in diesem
Zustand weiterbenutzt wird, kann es
ungenau arbeiten. Ersetzen Sie die
Batterie (9-V-Trockenbatterie vom Typ
6F22 oder 006P) daher so bald wie
möglich durch eine neue.
Das Batteriefach befindet sich auf der
Rückseite. Die alte Batterie durch eine
neue des gleichen Typs austauschen.
Beim Anschließen der Batterie auf kor-
rekte Polung achten.
■ TECHNISCHE DATEN
Anzeigen : Flüssigkristall-Display, Stimmanzeigen
(3 LEDs)
Stimmtöne : C, D, E, F, G, A, B, #
Noteneinstellbereich : A0 (27Hz) bis C8 (4186Hz)
Präzision : ±1 cent
Tonhöhengenauigkeit : ±3 cent
Standardtonhöhen-Einstellbereich
: A4=435 bis 446Hz (in Schritten zu 1 Hz)
Eingänge : INPUT-Buchse (6 mm, mono), Mikrofon
Ausgang : OUTPUT-Buchse (6 mm, mono)
Stromversorgung : 9V dry cell battery (006P or 6F22)
Batterie-Lebensdauer : ca. 50 Studen (AUTO-Betrieb)
Abmessungen (B x H x T) : 118 x 63 x 24.5 mm
Gewicht (einschließlich Batterien)
: 130 g
Zubehör : 9V Batterie (6F22) x 1
* Änderungen an Daten und Design vorbehalten.
■ EINSTELLEN DER BEZUGSTONHÖHE
1. Stellen Sie den POWER-Schalter u auf ON. Die Tonhöhe ist auf 440 Hz
voreingestellt (Blinkanzeige).
2. Drücken Sie den PITCH-Schalter r, bis die gewünschte Bezugstonhöhe
(435 bis 446 Hz) angezeigt wird.
■ STIMMVORGANG
Das Instrument kann auf zwei unterschiedliche Weisen gestimmt werden. Beim
automatischen Stimmen (AUTO) sucht das Stimmgerät selbst den Stimmton,
dem der vom Stimmgerät empfangene Ton am nächsten kommt, und zeigt an,
ob die Tonhöhe über oder unter der des Stimmtons liegt. Beim manuellen
Stimmen (MANL.) können Sie den jeweiligen Stimmton selbst wählen. Wählen
Sie mit dem MODE-Schalter e den gewünschten Modus. Der gewählte Modus
(AUTO oder MANL.) wird in der linken unteren Ecke des Displays q angezeigt.
* Im AUTO-Modus wird auch beim Drücken des NOTE-Schalters t auf MANL.
umgeschaltet.
● Automatisches Stimmen: AUTO
1. Zum Stimmen eines elektrischen oder elektronischen Instruments
schließen Sie dieses über ein Kabel direkt an die INPUT-Buchse o des
Stimmgeräts an. (An der OUTPUT-Buchse i kann ein Verstärker
angeschlossen werden; das Tonsignal des Instruments wird bei
eingeschaltetem als auch bei ausgeschaltetem Stimmgerät an den
Verstärker weitergeleitet. Während einer Darbietung sollte das Stimmgerät
jedoch ausgeschaltet bleiben, um Rauscheinstreuungen zu vermeiden.)
* Beim Beschalten der INPUT-Buchse o wird das eingebaute Mikrofon y
deaktiviert.
Zum Stimmen eines akustischen Instruments halten Sie dieses beim Spielen
des Tons in Schritt 4 so nahe wie möglich an das Mikrofon.
2. Schalten Sie das Stimmgerät mit dem POWER-Schalter u ein.
Die Bezugstonhöhe (werkseitige Voreinstellung A4 = 440 Hz) blinkt etwa 2
Sekunden lang auf dem Display q. Das Stimmgerät schaltet danach in
den AUTO-Modus (AUTO erscheint auf dem Display q).
3. Stellen Sie nun, falls erforderlich, mit dem PITCH-Schalter r eine andere
Bezugstonhöhe ein (siehe “Einstellen der Bezugstonhöhe” weiter unten).
4. Spielen Sie einen Ton auf dem Instrument (es darf nur ein Ton klingen).
Stimmen Sie das Instrument nun mit Hilfe der Tonanzeigen, des Zeigers
und der Stimmanzeige w auf dem Display q.
4-1. Stimmen Sie das Instrument zunächst grob ein, bis der korrekte
Tonname auf dem Display blinkt.
4-2. Stimmen Sie das Instrument danach fein ein, bis der Zeiger in der Mitte
steht und die grüne LED der Stimmanzeige w leuchtet.
Die Saite stimmen, bis der
Zeite in der Mitte steht.
■ BAUTEILE
u Ein/Aus-
Schalter
(POWER)
r Tonhöhenschalter (PITCH)
y Eingebautes Mikrofon
w Stimmanzeige
q Display
3. Wenn der PITCH-Schalter r etwa 2 Sekunden lang nicht betätigt wird,
schaltet das Gerät automatisch auf Stimmbetrieb.
* Wenn Sie den POWER-Schalter u zum Ausschalten des Geräts auf OFF
stellen, wird die Bezugstonhöhe wieder auf A = 440 Hz rückgesetzt.
● Manuelles Stimmen: MANL.
1. Treffen Sie dieselben Vorbereitungen wie in Schritten 1 bis 3 unter
“Automatisches Stimmen”.
2. Drücken Sie dann den NOTE-Schalter t, bis der gewünschte Tonname
blinkt. Das Stimmgerät ist nun auf manuelles Stimmen geschaltet und
“MANL.” wird auf dem Display q angezeigt.
3. Zupfen Sie nun wie in Schritt 4 von “Automatisches Stimmen” die Saite an.
Stimmen Sie die Saite.
4. Wiederholen Sie Schritte 2 und 3, um die anderen Saiten zu stimmen.
Wenn diese LED leuchtet,
ist die Saite gut gestimmt.
Beispiel: Automatisches Stimmen auf “E”.
Der Tonname der zu
stimmenden Saite blinkt.
GUITAR auf dem
Display wählen.
AUTO-Betrieb
wählen.
Die Bezugstonhöhe
wird hier angezeigt.
i Ausgangsbuchse
(OUTPUT)
o Eingangsbuchse
(INPUT)
t Tonwahlschalter (NOTE)
e Modusschalter (MODE)
* Vor dem Wechseln der Batterie den Betriebs-schalter u unbedingt auf OFF
stellen.
435→436→437→438→439→440→441→442→443→444→445→ 446
YT-250
YT-250
CHROMATISCHES STIMMGERÄT

MANUAL DE INSTRUCCIONES
Gracias por adquirir el Autoafinador Cromático YAMAHA YT-250.
Lea detenidamente este manual y consérvelo en un lugar seguro
para futuras consultas.
Pila seca 6F22 o
006P de 9 V
■ CAMBIO DE PILAS
■ PRECAUCIONES
◆ Para evitar daños, no utilice el afinador en los siguientes entornos:
• lugares en los que la unidad quede expuesta a la luz solar directa;
• lugares sujetos a niveles extremos de temperatura o humedad;
• lugares con arena o polvo.
◆ Como alimentación del afinador, utilice únicamente una pila seca 6F22 o
006P de 9 V.
◆ Para prolongar la vida de la pila, procure siempre apagar el afinador
cuando no lo esté utilizando.
◆ Si deja una pila usada en la unidad durante un período de tiempo
prolongado, podría sulfatarse y ocasionar anomalías de funcionamiento.
Cuando se agote la pila, extráigala y sustitúyala lo antes posible.
◆ No someta el afinador a impactos o vibraciones, ni aplique excesiva fuerza
a los controles.
◆ No use nunca disolventes como la bencina o el aguarrás para limpiar el
afinador. Utilice un paño suave y seco.
◆ Después de leer el manual de instrucciones, consérvelo en un lugar seguro
para futuras consultas.
No arroje nunca al fuego las pilas usadas.
Mantenga siempre las pilas lejos del alcance de los niños.
■ RANURA DE INCLINACIÓN
El afinador puede inclinarse hacia atrás por medio de la ranura existente en su
panel posterior. Inserte una moneda u objeto plano similar en la hendidura y
recline la unidad como se ilustra en la figura.
Cuando se esté agotando la pila, el
indicador gráfico perderá intensidad.
El uso continuado del afinador puede
dar lugar a imprecisiones operativas.
Sustituya la pila por una nueva (pila
seca 6F22 o 006P de 9 V) lo antes
posible.
El compartimento de la pila se
encuentra en la parte posterior del
afinador. Extraiga la pila usada y
sustitúyala por una nueva del mismo
tipo. Preste atención para insertar la
pila con la polaridad correcta.
Base
Tapa del
compartimento
■ ESPECIFICACIONES
Indicadores : Pantalla de cristal líquido, guías de afinación
Notas de afinación : C, D, E, F, G, A, B, #
Escala : A0 (27 Hz) – C8 (4,186 Hz)
Precisión : ± 1 cont
Precisión de entonación : ± 3 cont
Margen de ajuste de tono estándar
: A4=435 – 446Hz (pasos de 1 Hz)
Entradas : INPUT (6ø monoaural), micrófono
Salida : OUTPUT (6ø monoaural)
Alimentación : pila seca de 9 V (006P o 6F22)
Vida útil de la pila : aproximadamente 50 horas (modo AUTO)
Dimensiones (anch. x alt. x prof.)
: 118 x 63 x 24,5 mm
Peso (pila incluida) : 130 g
Accesorio : una pila seca de 9 V (6F22)
* Las especificaciones y el diseño externo están sujetos a cambio sin previo aviso.
■ AJUSTE DEL TONO ESTÁNDAR
1. Sitúe el interruptor POWER u en la posición “ON” (encendido). El tono
estará ajustado a 440 Hz (intermitente).
2. Pulse continuamente el interruptor PITCH r hasta seleccionar el tono
estándar deseado (435 – 446 Hz).
■ PROCEDIMIENTOS DE AFINACIÓN
Existen dos métodos de afinación. El modo “AUTO” selecciona de forma
automática el nombre de la nota más próxima al tono recibido por el afinador, e
indica si el tono es alto o bajo. El modo “MANL.” le permite al usuario
seleccionar manualmente la nota deseada. Pulse el interruptor MODE e para
seleccionar el modo de afinación. En la esquina inferior izquierda de la pantalla
q se visualizará el modo seleccionado (AUTO o MANL.).
* Si pulsa el interruptor NOTE t en el modo automático, conmutará al modo manual.
● Afinación automática (AUTO)
1. Para afinar instrumentos eléctricos o electrónicos, conecte directamente el
instrumento a través de un cable a la entrada INPUT o del afinador. Si
conecta la salida OUTPUT i a un amplificador, éste podrá recibir la señal
del instrumento tanto si el afinador está encendido como apagado. No
obstante, la línea podría captar ruido añadido, de manera que convendrá
apagar el afinador durante la actuación.
* El micrófono integrado y no funcionará cuando haya un cable conectado a la
entrada INPUT o del afinador.
Para afinar instrumentos acústicos, utilice el micrófono interno del afinador
y toque la nota lo más cerca posible de éste (punto 4).
2. Encienda la unidad, situando el interruptor POWER u en la posición “ON”.
El tono estándar (preajuste de fábrica: A4=440 Hz) parpadeará en la
pantalla q durante unos 2 segundos. A continuación, el afinador activará
el modo automático (se visualizará “AUTO” en la pantalla).
3. Utilice el interruptor PITCH r para cambiar de tono estándar (véase
“Ajuste del tono estándar”, más adelante).
4. Toque una nota en el instrumento (no más de una al mismo tiempo). Utilice
el nombre de nota indicado en la pantalla q, la aguja y la guía de afinación
w como referencia.
4-1. Primero afine el instrumento de forma aproximada, para que el
indicador del nombre de nota correspondiente aparezca intermitente.
4-2. Después afine el instrumento hasta que la aguja quede centrada y el
indicador verde de la guía w se ilumine.
■ Los COMPONENTES
u Interruptor
POWER
(encendido/
apagado)
r Interruptor PITCH (tono)
y Micrófono integrado
w Guía de afinación
q Indicador gráfico
3. Si no se pulsa el interruptor PITCH r durante dos segundos, el afinador
regresará automáticamente al modo de afinación.
* Cuando se apaga el afinador, el ajuste de tono estándar restablece el ajuste
A=440 Hz.
● Afinación manual (MANL.)
1. Proceda igual que se ha indicado en los pasos 1 a 3 del modo automático.
2. Pulse repetidas veces el interruptor NOTE t hasta que parpadee el
nombre de nota deseado. El afinador estará en el modo manual, y en la
pantalla q se visualizará “MANL.”.
3. Igual que en el paso 4 del modo automático, toque la cuerda deseada y
proceda a su afinación.
4. Repita los pasos 2 y 3 para afinar las restantes cuerdas.
Ejemplo) uso del modo automático para afinar en “mi” (“E”).
i Terminal
OUTPUT
(salida)
o Terminal
INPUT
(entrada)
t Interruptor NOTE (nota)
e Interruptor MODE (modo)
* Apague siempre la unidad antes de cambiar la pila, situando el interruptor
POWER u en la posición “OFF”.
YT-250
YT-250
AFINADOR CROMÁTICO
Proceda a la afinación hasta que
la aguja descanse en el centro.
Cuando se ilumine el
indicador, la cuerda estará
afinada.
El nombre de nota de la
cuerda que se va a afinar
aparece intermitente.
Seleccione el
modo AUTO.
Se visualiza el
tono estándar.
435→436→437→438→439→440→441→442→443→444→445→446

Manuale d’istruzioni
Vi ringraziamo per avere acquistato l’accordatore cromatico Yamaha
YT-250.
Vi raccomandiamo di leggere attentamente questo manuale e di
conservarlo in un luogo sicuro per eventuali future consultazioni.
Pila a secco da 9V
tipo 6F22 o 006P.
■ SOSTITUZIONE DELLA PILA
■ PRECAUZIONI
◆ Per prevenire danni, non usate l’accordatore nelle seguenti condizioni:
• dove possa essere esposto alla luce solare diretta;
• dove possa essere sottoposto a valori estremi di temperatura o umidità;
• in posti sabbiosi e polverosi.
◆ Per l’accensione dell’accordatore, utilizzate solo una pila a secco da 9V tipo
6F22 o 006P.
◆ Per ottimizzare la durata della batteria, accertatevi che l’accordatore venga
spento (OFF) quando non deve essere adoperato.
◆ Se all’interno dell’accordatore viene lasciata una pila esaurita per un lungo
periodo, può esserci fuoriuscita di liquido e verificarsi pertanto un cattivo
funzionamento. Quando la pila si scarica, toglietela per sostituirla al più
presto.
◆ Non sottoponete l’accordatore a forti urti o vibrazioni. Non applicate mai
forza eccessiva per azionare i controlli.
◆ Non usate solventi come benzene o altri diluenti per effettuare la pulizia
dell’accordatore. Tenetelo pulito con l’ausilio di un panno morbido e
asciutto.
◆ Dopo avere letto questo manuale vi consigliamo di conservarlo in un luogo
sicuro per eventuali future consultazioni.
Le pile esaurite non devono essere bruciate.
Accertatevi anche di tenere le pile lontane dalla
portata di bambini.
Quando la carica della pila diminui-
sce, l’intensità luminosa dell’indica-
tore LCD si attenua. Insistere nel-
l’uso dell’accordatore in tali condizio-
ni può dare dei risultati non accurati.
Sostituite non appena possibile la pila
con una nuova (pila da 9V tipo 6F22
o 006P).
Lo scomparto per la pila è situato nella
parte posteriore dell’accordatore.
Estraete la pila esaurita e sostituitela
con una nuova dello stesso tipo.
Attenti a rispettare la polarità della pila.
Lato
inferiore
Coperchio
scomparto pila
■ IMPOSTAZIONE DEL PITCH STANDARD
1. Mettete su ON l’interruttore POWER u, per accendere. Il pitch viene
impostato su 440 Hz (display lampeggiante).
2. Continuate a premere l’interruttore PITCH r, fino a quando viene
selezionato il pitch standard desiderato (da 435 a 446 Hz).
■ PROCEDURE PER L’ACCORDATURA
Per l’accordatura sono disponibili due modi operativi. Il modo Automatico
(AUTO) seleziona automaticamente il nome della nota più vicina al pitch
(intonazione o altezza del suono) ricevuto dall’accordatore ed indica se il pitch è
alto (crescente) o basso (calante). Il modo Manual (MANL.) consente
all’utilizzatore di selezionare manualmente la nota da accordare. Premete
l’interruttore MODE e per la selezione del modo operativo di accordatura
desiderato. Nell’angolo inferiore sinistro del display LCD q appare il modo
selezionato: AUTO o MANL.
* Premendo l’interruttore NOTE t mentre è impostato il modo Auto, l’accordatore
passa al modo Manual.
● Auto Accordatura: AUTO
1. Per accordare strumenti elettrici o elettronici, usate un cavo da collegare
direttamente alla presa jack INPUT o dell’accordatore. (Collegando la
presa jack OUTPUT i ad un amplificatore, è possibile far ricevere da
quest’ultimo il segnale dello strumento, prescindendo dal fatto che
l’accordatore sia acceso o spento). Tuttavia, per evitare un maggior rumore
sulla linea, consigliamo di spegnere l’accordatore durante le performance).
*
Il microfono incorporato y non funziona se alla presa jack INPUT o
dell’accordatore è collegato un cavo.
Per accordare strumenti acustici, usate il microfono incorporato
nell’accordatore e suonate la nota più vicino possibile all’accordatore,
durante lo step 4.
2. Posizionate su ON l’interruttore d’accensione POWER u.
Sull’indicatore LCD q, per circa due secondi, lampeggia il pitch standard
(valore preimpostato in fabbrica: A4= 440 Hz). Successivamente,
l’accordatore si predispone automaticamente sul modo operativo Auto-
accordatura (sul display q appare l’indicazione AUTO).
3. Usate l’interruttore PITCH r per cambiare il pitch standard (fate
riferimento al paragrafo successivo: Regolazione del pitch standard).
4. Suonate una nota sullo strumento (suonatene una per volta). Usate il nome
della nota indicata sul display q, l’ago e la guida dell’accordatura w come
riferimento, quando accordate lo strumento.
4-1. Innanzitutto, effettuate un’accordatura approssimativa, di modo che
possa lampeggiare l’indicatore relativo al nome della nota appropriata.
4-2. Quindi, accordate fino a quando l’ago si arresta al centro e si accende il
LED verde della guida di accordatura w.
3. Quando non si preme l’interruttore PITCH r per circa 2 secondi,
l’accordatore ritornerà automaticamente al modo accordatura.
* Se l’interruttore POWER u viene spento (OFF), la regolazione del pitch
standard tornerà automaticamente sul valore: A = 440 Hz.
● Accordatura Manuale: MANL.
1. Eseguite le stesse regolazioni descritte ai punti o step 1-3 del paragrafo di
Accordatura AUTO.
2. Continuate a premere l’interruttore NOTE t fino a quando lampeggia il
nome della nota desiderata. Ora l’accordatore è disposto nel modo
manuale e, pertanto, sul display q appare “MANL.”.
3. Come avete fatto allo step 4 del paragrafo per l’accordatura automatica,
pizzicate la corda da accordare. Procedete con l’accordatura della corda.
4. Ripetete gli step 2 e 3 per accordare le altre corde.
Esempio) Usando il modo AUTO per accordare un “E” (Mi)
* Prima di sostituire la pila, mettete sempre su “OFF” l’interruttore POWER u.
YT-250
YT-250
ACCORDATORE CROMATICO
■ SPECIFICHE TECNICHE
IIndicatori : Display a cristalli liquidi, guide per l’accordatura
Note per l’accordatura : C (do), D (re), E (mi), F (fa), G (sol), A (la), B (si), #
Gamma di regolazione nota : A0 (27 Hz) - C8 (4186 Hz)
Precisione : ± 1 cent.
Precisione Intonazione : ± 3 cent.
Gamma di regolazione intonazione standard
: A4=435 - 446 Hz (incrementi di 1Hz)
Ingresso : INPUT (6 ø mono), microfono
Uscita : OUTPUT (6 ø mono)
Alimentazione : a batteria (pila da 9V tipo 006P o 6F22)
Durata della pila : circa 50 ore operative (modo AUTO)
Dimensioni (L x A x P) : 118 x 63 x 24,5 mm
Peso (pila inclusa) : 130 g
Accessori : 1 pila da 9V (6F22)
* Le specifiche tecniche e l’aspetto possono essere soggetti a variazioni senza alcun
preavviso.
■ SLITTA PER L’INCLINAZIONE
L’accordatore può essere inclinato verso il retro usando la slitta situata nel
pannello posteriore. Inserite una moneta o un oggetto piatto analogo all’interno
della slitta e inclinate come mostrato nell’illustrazione sotto riportata.
■ COMPONENTI
u Interruttore
POWER
r Interruttore PITCH
y Microfono incorporato
w Guida per l’accordatura
q Indicatore LCD
i Presa jack
OUTPUT
o Presa jack
INPUT
t Interruttore NOTE
e Interruttore MODE
Accordate fino a quando
l’ago si ferma al centro.
Quando questo LED si
accende, la corda viene
accordata.
Il nome della nota
corrispondente alla corda da
accordare lampeggia.
Selezionate il
modo AUTO.
Appare il Pitch
standard.
435→436→437→438→439→440→441→442→443→444→445→446

■ SPECIFICATIES
Indicators : Liquid crystal display, Tuning guides
Stemmingsnoten : C, D, E, F, G, A, B, #
Noot Instellingsbereik : A0 (27Hz) - C8 (4186Hz)
Accuratesse :
±1 cent
Accuratesse In Toonhoogte :
±3 cent
Standaard Toonhoogte Instellingsbereik
: A4=435
– 446Hz (1Hz steps)
Input : INPUT (6ø mono), microfoon
Output : OUTPUT (6ø mono)
Voedingbron : 9V droge cell batterij (006P of 6F22)
Batterij Levensduur : Ongeveer 50 uren (AUTO mode)
Afmetingen (B x H x D) : 118 x 63 x 24.5 mm (4.6" x 2.5" x 1.0")
Gewicht (inclusief batterij) : 130 g (4.6 oz)
Accessoires : 9V droge cell batterij (6F22) x 1
* Specificaties en uiterlijk kunnen wijzigen zonder dat hier vantevoren melding van
wordt gemaakt.
■ TILT GLEUF
De tuner kan schuin gezet worden met de gleuf in het achterpaneel. steek een
munt of een soortgelijk plat voorwerp in de gleuf en deze het schuin zoals getoont
in de illustratie hieronder.
6F22 of 006P 9V
droge cell batterij
■ BATTERIJ VERVANGEN
■ VOORZORGSMAATREGELEN
◆ Gebruik, om schade te voorkomen, de tuner niet op de volgende lokaties:
• plaatsen waar de unit in direct zonlicht is;
• plaatsen die bloot gesteld zijn aan extreme temperatuur en vochtigheid;
• plaatsen die stoffig zijn.
◆ Voorzie de tuner alleen van stroom met een 6F22 of 006P 9V dry cell batterij.
◆ Voor een maximale levensduur van de batterij moet u er voor zorgen dat u de
tuner uitzet als u deze niet gebruikt.
◆ Als u een uitgeputte batterij in de unit laat voor een langere periode, kan deze
gaan lekken en storing aan de unit veroorzaken. Als de batterij uitgeput raakt
kunt u deze het beste verwijderen en zo spoedig mogelijk vervangen.
◆ Stel de tuner niet bloot aan sterke schokken of vibraties. Oefen geen
overdreven kracht uit op de knoppen.
◆ Maak nooit de tuner schoon met oplosmiddelen zoals benzine of tinner. Veeg
het schoon met de zachte, droge doek.
◆ Nadat u de Nederlandstalige handleiding heeft gelezen zou u deze op een
veilige plaats moeten bewaren zodat u er later ook nog eens wat in op kunt
zoeken.
Verbrand de gebruikte batterijen niet.
Zorg er ook voor batterijen uit de buurt van kinderen te
houden.
Bij dit produkt zijn batterijen geleverd.
Wanneer deze leeg zijn, moet u ze niet weggooien
maar inleveren als KCA.
Als de kracht van de batterij opraakt,
dimt de LCD indicator.
Continue gebruik van de tuner kan
resulteren in een onjuiste werking.
Vervang de batterij zo spoedig mogelijk
door een nieuwe (6F22 of 006P 9V)
droge cell batterij.
Het batterijen kompartiment is geplaatst
op de achterkant van de tuner.
Verwijder de oude batterij en vervang
het met een nieuwe van hetzelfde type.
Let er op dat u de batterij met de juiste
polariteit aansluit.
Onderkant
Batterij deksel
* Zet altijd de POWER schakelaar u op "OFF" alvorens u de batterij vervangt.
NEDERLANDSTALIGE HANDLEIDING
Dank u wel voor de aanschaf van de YAMAHA YT-250 Chromatic Auto
Tuner.
Lees deze Nederlandstalige handleiding zorgvuldig door en bewaar deze
op een veilige plaats zodat u er later nog eens iets in op kunt zoeken.
■ STEMMING PROCEDURES
Om te stemmen zijn er twee stemmingsmodes aanwezig. De Auto (AUTO) mode
selecteert automatisch de dichtsbijzijnde noot naam aan de hand de toonhoogte
die ontvangen wordt door de tuner en geeft aan of de toonhoogte hoog of laag is.
Met de Manual (MANL.) mode kunt u handmatig de noot selecteren waarop
gestemd moet worden. Selecteer met de de MODE e schakelaar de gewenste
stemmingsmode. De geselecteerde mode, AUTO of MANL., wordt afgebeeld in
de linker onderkant in de display q.
* Als u de de NOTE t schakelaar in de Auto mode indrukt gaat de tuner ook naar de
Manual mode.
● Auto Tuning : AUTO
1. Sluit, om electrische of electronische instrumenten te stemmen, met een
kabel het instrument direct aan op de INPUT o jack van de tuner. (Sluit u de
OUTPUT i jack aan op een versterker ontvangt de versterker het signaal
van het instrument ongeacht of de tuner aan- of uitstaat. Dit kan er echter
voor zorgen dat er ruis wordt toegevoegd op het signaal, dus kunt u de tuner
heb beste uitzetten tijdens het spelen.)
* De ingebouwde microfoon y werkt niet als een kabel is aangesloten op de
INPUT o jack van de tuner.
Gebruik, om akoustische instrumenten te stemmen, de ingebouwde
microfoon van de tuner en speel de noot, tijdens stap 4, zo dicht mogelijk bij
de tuner.
2. Zet de POWER u schakelaar op ON.
De standaard toonhoogte (fabrieks voorinstelling A4=440Hz) knippert
ongeveer 2 seconden in de LCD display q. Hierna gaat de tuner
automatisch naar de Auto tuning mode (AUTO verschijnt in de display q).
3. Wijzig met de PITCH r schakelaar de standaard toonhoogte (zie het “De
Standaard Toonhoogte instellen” gedeelte hieronder).
4. Speel een noot op het instrument (speel alleen 1 noot tegelijkertijd). Gebruik
de nootnaam aangegeven in de display q, de naald en de stemmingshulp
w als een referentie tijdens het stemmen van het instrument.
4-1. Stem eerste het instrument ongeveer zodat de indicator voor de
geschikte nootnaam knippert.
4-2. Ga vervolgens door met stemmen totdat de naald in het midden rust en
de groene LED van de stemmingsleidraad w brandt.
Bijvoorbeeld) Stem met de AUTO mode een “E”.
YT-250
YT-250
CHROMATIC TUNER
■ COMPONENTEN
u POWER
schakelaar
r PITCH schakelaar
y Ingebouwde microfoon
w Stemmingsguide
q LCD indicator
i OUTPUT
jack
o INPUT
jack
t NOTE schakelaar
e MODE schakelaar
Stem totdat de naald rust
in het midden.
Als deze LED brand, is de
snaar gestemd.
De nootnaam van de snaar
die gestemd moet worden
knippert.
Selecteer de
AUTO mode.
Standard Toonhoogte
wordt getoond.
● Handmatig Stemmen: MANL.
1. Voer dezelfde instellingen uit zoals omschreven in stap 1-3 in de AUTO
stemmingsgedeelte.
2. Ga door met het indrukken van de NOTE t schakelaar totdat de gewenste
nootnaam knippert. De tuner is nu in de manual mode en “MANL.” verschijnt
in de display q.
3. Sla, zoals in stap 4 van het AUTO stemmingsgedeelte, de snaar aan die
gestemd moet worden. Ga door met stemmen van de snaar.
4. Herhaal stap 2 en 3 om de andere snaren te stemmen.
435→436→437→438→439→440→441→442→443→444→445→446
■ DE STANDAARD TOONHOOGTE INSTELLEN
1. Zet de POWER schakelaar u op ON. De toonhoogte is ingesteld op 440 Hz
(de display knippert).
2. Ga door met het indrukken van de PITCH schakelaar r totdat de gewenste
standaard toonhoogte (435 - 446Hz) is geselecteerd.
3. Als de PITCH schakelaar r ongeveer 2 seconden lang niet wordt ingedrukt,
keert de tuner automatisch terug naar de tuning mode.
* Als de POWER schakelaar u uitstaat, wordt de standaard toonhoogte gereset
naar A=440Hz.
-
 1
1
-
 2
2
-
 3
3
-
 4
4
-
 5
5
-
 6
6
-
 7
7


în alte limbi
- Türkçe: Yamaha YT-250 Kullanım kılavuzu
- français: Yamaha YT-250 Manuel utilisateur
- čeština: Yamaha YT-250 Uživatelský manuál
- русский: Yamaha YT-250 Руководство пользователя
- English: Yamaha YT-250 User manual
- polski: Yamaha YT-250 Instrukcja obsługi
- Deutsch: Yamaha YT-250 Benutzerhandbuch
- 日本語: Yamaha YT-250 ユーザーマニュアル
- italiano: Yamaha YT-250 Manuale utente
- español: Yamaha YT-250 Manual de usuario
- svenska: Yamaha YT-250 Användarmanual
- dansk: Yamaha YT-250 Brugermanual
- português: Yamaha YT-250 Manual do usuário
- Nederlands: Yamaha YT-250 Handleiding
Lucrări conexe
-
Yamaha YT-240 Manualul proprietarului
-
-
-
-
-
-
-
-
-
