Indesit WITP 82 (EU) Manualul utilizatorului
- Categorie
- Mașini de spălat
- Tip
- Manualul utilizatorului

1
GB
WASHING MACHINE
WITP 82
Instructions for use
Contents
Installation, 2-3
Unpacking and levelling
Electric and water connections
The first wash cycle
Technical details
Washing machine description, 4-5
Control panel
How to open and shut the drum
Leds
Starting and Programmes, 6
Briefly: how to start a programme
Programme table
Personalisations, 7
Setting the temperature
Functions
Detergents and laundry, 8
Detergent dispenser
Bleach cycle
Preparing your laundry
Special items
Precautions and advice, 9
General safety
Disposal
Saving energy and respecting the environment
Care and maintenance, 10
Cutting off the water or electricity supply
Cleaning your appliance
Caring for your appliance door and drum
Cleaning the pump
Checking the water inlet hose
Cleaning the detergent dispenser
Troubleshooting, 11
Service, 12
Before calling for Assistance
ES
English, 1
GB
Magyar, 13
HU
Română, 49
RO
Polski, 61
ES
PL
CZ
Český, 25
Slovenský, 37
SK

2
GB
! Keep this instruction manual in a safe place for future refe-
rence. Should the appliance be sold, transferred or moved,
make sure the instruction manual accompanies the washing
machine to inform the new owner as to its operation and
features.
! Read these instructions carefully: they contain vital infor-
mation on installation, use and safety.
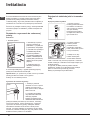
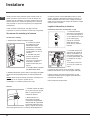
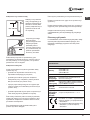
Unpacking and levelling
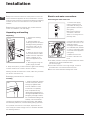
Unpacking
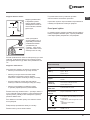
1. Unpack the washing
machine.
2. Check whether the
washing machine has been
damaged during transport.
If this is the case, do not
install it and contact your
retailer.
3. Remove the four protec-
tive screws and the rubber
washer with the respective
spacer, situated on the
rear of the appliance (see
figure).
4. Seal the gaps using the
plastic plugs provided.
5. Keep all the parts: you will need them again if the washing
machine needs to be moved to another location.
Warning: should the screws be re-used, make sure you fasten
the shorter ones at the top.
! Packaging materials are not children’s toys.
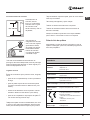
Levelling
1. Install the washing machine
on a flat sturdy floor, without
resting it up against walls,
furniture cabinets or other.
2. If the floor is not perfectly
level, compensate for any
unevenness by tightening or lo-
osening the adjustable front feet
(see figure); the angle of inclina-
tion, measured according to the
worktop, must not exceed 2°.
Levelling your appliance correctly will provide it with stability
and avoid any vibrations, noise and shifting during operation.
If it is placed on a fitted or loose carpet, adjust the feet in
such a way as to allow enough room for ventilation beneath
the washing machine.
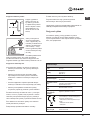
Electric and water connections
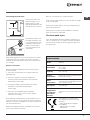
Connecting the water inlet hose
1. Connect the supply
pipe by screwing it to a
cold water tab using a ¾
gas threaded connection
(see figure).
Before performing the
connection, allow the
water to run freely until it is
perfectly clear.
2. Connect the other end of
the water inlet hose to the
washing machine,
screwing it onto the applian-
ce’s cold water inlet, situated
on the top right-hand side
on the rear of the appliance
(see figure).
3. Make sure there are
no kinks or bends in the
hose.
! The water pressure at the tap must be within the values
indicated in the Technical details table
(on the next page).
! If the water inlet hose is not long enough, contact a
specialist store or an authorised serviceman.
! Never use hoses that have already been used.
Installation

3
GB
Connecting the drain hose
Connect the drain hose,
without bending it, to a
draining duct or a wall
drain situated between 65
and 100 cm from the floor;
alternatively, place it over
the edge of a basin, sink
or tub, fastening the duct
supplied to the tap (see
figure). The free end of
the hose should not be
underwater.
! We advise against the use of hose extensions; in case
of absolute need, the extension must have the same
diameter as the original hose and must not exceed 150
cm in length.
Electric connection
Before plugging the appliance into the mains socket,
make sure that:
• the socket is earthed and in compliance with the
applicable law;
• the socket is able to sustain the appliance’s
maximum power load indicated in the Technical
details table (on the right);
• the supply voltage is included within the values i
ndicated on the Technical details table
(on the right);
• the socket is compatible with the washing
machine’s plug. If this is not the case, replace
the socket or the plug.
! The washing machine should not be installed in an ou-
tdoor environment, not even when the area is sheltered,
because it may be very dangerous to leave it exposed to
rain and thunderstorms.
! When the washing machine is installed, the mains so-
cket must be within easy reach.
! Do not use extensions or multiple sockets.
! The power supply cable must never be bent or dange-
rously compressed.
! The power supply cable must only be replaced by an
authorised serviceman.
Warning! The company denies all liability if and when
these norms are not respected.
The first wash cycle
Once the appliance has been installed, and before you
use it for the first time, run a wash cycle with detergent
and no laundry, setting the 90°C programme without a
pre-wash cycle.
65 - 100 cm
Technical details
Model
WITP 82
Dimensions
40 cm wide
85 cm high
60 cm deep
Capacity
from 1 to 5 kg
Electric
connections
Please refer to the technical data plate
fixed to the machine.
Water
connections
maximum pressure 1 MPa (10 bar)
minimum pressure 0.05 MPa (0.5 bar)
drum capacity 42 litres
Spin speed
up to 800 rpm
Control
programmes
according to
1061/2010
directive
programme 3; temperature 60°C and
40°C
This appliance is compliant with
the following European Community
Directives:
- 2004/108/CE (Electromagnetic
Compatibility)
- 2006/95/CE (Low Voltage)
- 2002/96/CE

4
GB
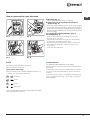
ON-OFF/LID LOCK led:
If this LED is on, the appliance Lid is locked to prevent it from being opened accidentally; to avoid any damages, you must
wait for the lamp to flash before you open the Lid.
.
! The rapid flashing of the ON-OFF/LID LOCK Led together with the flashing of at least one other LED indicates there is an
abnormality (see page 11).
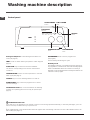
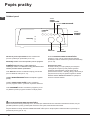
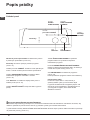
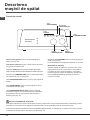
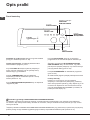
Control panel
Washing machine description
ON/OFF
button
TEMPERATURE
knob
START/RESET
button
FUNCTION
Buttons
PROGRAMME
knob
LEDs
LID LOCKED
LED
Detergent dispenser to add detergent and fabric sof-
tener (see page 8).
LEDs to find out which wash cycle phase is under way (see
page 5).
FUNCTION keys to select the functions available.
The button corresponding to the function selected will
remain on.
TEMPERATURE knob to set the temperature or the cold
wash cycle (see page 7).
ON/OFF key to turn the washing machine on and off.
START/RESET key to start the programmes or cancel
incorrect settings.
ON-OFF/LID LOCK led, to find out whether the washing
machine is on (flashing) and if the lid may be opened (see
page 5).
PROGRAMME knob to set the programmes
(see page 6).
The knob stays still during the cycle.
Standby mode
This washing machine, in compliance with new energy sa-
ving regulations, is fitted with an automatic standby system
which is enabled after about 30 minutes if no activity is
detected. Press the ON/OFF button briefly and wait for the
machine to start up again.

5
GB
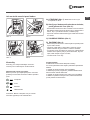
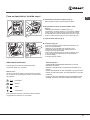
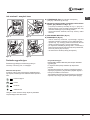
Fig. 1
Fig. 2
A) Opening (Fig. 1).
Lift the external lid and open it completely.
B) Then open the drum using both hands as
shown in Fig. 2:
- press the button indicated by the arrow in Fig. 2 lightly
downwards, with one hand firmly resting on the doors to
prevent them from suddenly opening and hurting your fingers;
- therefore follow the appliance doors along as these unhook
and open easily.
C) Loading the washing machine. (Fig. 3).
D) Shutting (Fig. 4).
- close the drum fully by first shutting the front door
followed by the rear one;
- then ensure the hooks on the front door are perfectly
housed within the seat of the rear door;
- after the hooks have clicked into position, press both
doors lightly downwards to make sure they do not
come loose;
- finally shut the external lid.
How to open and to close the drum
Fig. 3
Fig. 4
Function buttons
The FUNCTION BUTTONS also act like LEDS.
When a function is selected, the corresponding button is
illuminated.
If the function selected is incompatible with the program-
me set, the button will flash and the function will not be
enabled.
If you set a function that is incompatible with another fun-
ction you selected previously, only the last one selected
will be enabled.
Leds
The LEDS provide important information.
This is what they can tell you:
Cycle phase under way:
During the wash cycle, the LEDs gradually illuminate on
to indicate the cycle phase under way:
Prewash
Wash
Rinse
Spin cycle
Note: during draining, the LED corresponding to the Spin
cycle phase will be turned on.

6
GB
Starting and Programmes
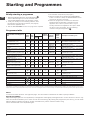
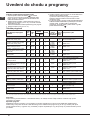
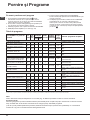
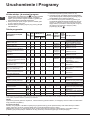
Programme table
Briefly: starting a programme
1. Switch the washing machine on by pressing button .
All the LEDS will light up for a few seconds and
the ON-OFF/DOOR LOCK Led will begin to flash.
2. Load your laundry into the washing machine, add
the detergent and any fabric softener (see page 8)
and shut the appliance door.
3. Set the PROGRAMME knob to the programme required.
4. Set the wash temperature (see page 7).
5. Start he programme by pressing the START/RESET
button. To cancel it, keep the START/RESET button
pressed for at least 2 seconds.
6. When the programme is finished, the ON-OFF/
DOOR LOCK Led will flash to indicate that the
appliance door can be opened. Take out your
laundry and leave the appliance door ajar to allow
the drum to dry thoroughly. Turn the washing
machine off by pressing button .
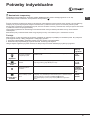
Type of fabric and degree of
soil
Pro-
gram-
mes
Wash
tem-
perat.
Detergent
Fabric
softener
Bleaching
/option
Bleach
Cycle
length
(minu-
tes)
Description of wash cycle
Pre-
wash
Wash
Cotton
Extremely soiled whites (she-
ets, tablecloths, etc.)
1
90°C
• • •
150
Pre-wash, wash cycle, rinse cycles,
intermediate and final spin cycles
Extremely soiled whites (she-
ets, tablecloths, etc.)
2
90°C
• •
Delicate/
Traditional
135
Wash cycle, rinse cycles, intermediate
and final spin cycles
Heavily soiled whites and fast
colours
3
60°C
• •
Delicate/
Traditional
160
Wash cycle, rinse cycles, intermediate
and final spin cycles
Heavily soiled whites and fast
colours
4
40°C
• •
Delicate/
Traditional
150
Wash cycle, rinse cycles, intermediate
and final spin cycles
Slightly soiled whites and delica-
te colours (shirts, jumpers, etc.)
5
30°C
• •
Delicate/
Traditional
80
Wash cycle, rinse cycles, intermediate
and final spin cycles
Synthetics
Heavily soiled fast colours
(baby linen, etc.)
6
60°C
• •
Delicate 105
Wash cycle, rinse cycles, anti-crease
or delicate spin cycle
Heavily soiled fast colours
(baby linen, etc.)
7
50°C
• •
Delicate 100
Wash cycle, rinse cycles, anti-crease
or delicate spin cycle
Delicate colours (all types of
slightly soiled garments)
8
40°C
• •
Delicate 95
Wash cycle, rinse cycles, anti-crease
or delicate spin cycle
Delicate colours (all types of
slightly soiled garments)
9
30°C
• •
30
Wash cycle, rinse cycles and delicate
spin cycl
Delicate
Wool
10
40°C
• •
65
Wash cycle, rinse cycles and delicate
spin cycle
Very delicate fabrics (curtains,
silk, viscose, etc.)
11
30°C
• •
55
Wash cycle, rinse cycles, anti-crease
or draining cycle
PARTIAL PROGRAMMES
Rinse
• •
Rinse cycles and spin cycle
Delicate rinse cycle
• •
Rinse cycles, anti-crease or draining
Spin cycle
Draining and heavy duty spin cycle
Delicate spin cycle
Draining and delicate spin cycle
Draining
Draining
Notes
For the anti-crease function: see opposite page. The information contained in the table is purely indicative.
Special programme
Daily Refresh (programme 9 for Synthetics) is designed to wash lightly soiled garments in a short amount of time: it only
lasts 30 minutes and allows you to save on both time and energy. By setting this programme (9 at 30°C), you can wash
different fabrics together (except for woollen and silk items), with a maximum load of 3 kg.
We recommend the use of liquid detergent.
The length of cycle shown on the display or in this booklet is an estimation only and is calculated assuming standard working conditions. The actual duration can vary accor-
ding to factors such as water temperature and pressure, the amount of detergent used, the amount and type of load inserted, load balancing and any wash options selected.

7
GB
Personalisations
C
Setting the temperature
Turn the TEMPERATURE knob to set the wash temperature (see Programme table on page 6).
The temperature can be lowered, or even set to a cold wash ( ).
Note. To avoid excessive vibrations, before every spin cycle the machine distributes the load in a uniform manner by conti-
nuously rotating the drum at a speed which is slightly faster than the normal washing speed.
When, despite repeated attempts, the load is still not evenly distributed, the machine spins at a lower speed than the set
frequency.
If the load is excessively unbalanced, the machine attempts to distribute it instead of spinning.
The balancing attempts may extend the total duration of the cycle, up to a maximum of 10 minutes.
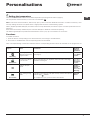
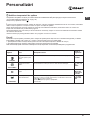
Functions
To enable a function:
1. press the button corresponding to the desired function, according to the table below;
2. the function is enabled when the corresponding button is illuminated.
Note: The rapid flashing of the button indicates that the corresponding function cannot be selected for the programme set.
Option Effect Comments Enabled
with pro-
grammes:
Bleaching
Bleaching cycle de-
signed to remove the
toughest stains.
Please remember to pour the bleach into extra compartment 4
(see page 8).
2, 3, 4, 5, 6,
7, 8, Rinse
cycles.
Extra Rinse
Increases the efficien-
cy of the rinse.
Recommended when the appliance has a full load or with large
quantities of detergent.
1, 2, 3, 4,
5, 6, 7, 8,
and Rinse
cycles.
800
400
Reduces the spin
speed.
All pro-
grammes
except
for 11 and
draining.
Anti-crease
Reduces fabric crea-
sing, making ironing
easier.
Setting this function will interrupt programmes 6, 7, 8, 11, Deli-
cate Rinse with a laundry soak (Anti-crease) and the Rinse phase
indicator light
will blink.
To complete the cycle, press the Anti-crease button.
6, 7, 8, 11,
Delicate
Rinse.

8
GB
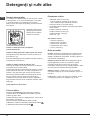
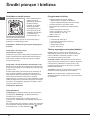
Detergent dispenser
Good washing results also depend on the correct dose of
detergent: adding too much detergent won’t necessarily make
for a more efficient wash, and may in fact cause build up on the
interior of your appliance and even pollute the environment.
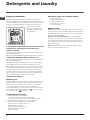
Open up the detergent
dispenser and pour in the
detergent and fabric softe-
ner, as follows.
compartment 1: Detergent for pre-wash (powder)
compartment 2: Detergent for the wash cycle
(powder or liquid)
Liquid detergent should only be poured in immediately prior
to the wash cycle start.
! Do not use hand wash detergent because it may form too much foam.
compartment 3: Additives (fabric softeners, etc.)
When pouring the softener in compartment 3, avoid exceeding
the “max” level indicated.
The softener is added automatically into the machine during
the last wash. At the end of the wash programme, some
water will be left in compartment 3. This is used for the inlet of
denser fabric softeners into the machine, i.e. to dilute the more
concentrated softeners. Should more than a normal amount
of water remain in compartment 3, this means the emptying
device is blocked. For cleaning instructions, see page 10. The
fabric softener should not overflow from the grid.
compartment 4: Bleach
Bleach cycle
Traditional bleach should be used on sturdy white fabrics, and
delicate bleach for coloured fabrics, synthetics and for wool.
When pouring in the bleach, be careful not to exceed the
“max” level indicated on compartment 4 (see figure).
To run the bleach cycle alone, pour the bleach into compart-
ment 4 and set the Rinse programme (for cotton fabrics)
and push the button Bleaching.
Preparing your laundry
• Divide your laundry according to:
- the type of fabric/the symbol on the label.
- the colours: separate coloured garments from whites.
• Empty all pockets and check for loose buttons.
• Do not exceed theweight limits stated below,
which refer to the weight when dry:
Sturdy fabrics: max 5 kg
Synthetic fabrics: max 2.5 kg
Delicate fabrics: max 2 kg
Wool: max 1 kg
How much does your laundry weigh?
1 sheet 400-500 g
1 pillow case 150-200 g
1 tablecloth 400-500 g
1 bathrobe 900-1,200 g
1 towel 150-250 g
Special items
Curtains: fold curtains and place them in a pillow case or
mesh bag. Wash them separately without exceeding half
the appliance load. Use programme 11 which excludes
the spin cycle automatically.
Quilted coats and windbreakers: if they are padded
with goose or duck down, they can be machine-washed.
Turn the garments inside out and load a maximum of 2-3
kg, repeating the rinse cycle once or twice and using the
delicate spin cycle.
Wool: for best results, use a specific detergent, taking
care not to exceed a load of 1 kg.
Detergents and laundry

9
GB
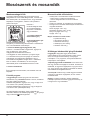
Precautions and advice
! The washing machine was designed and built in com-
pliance with the applicable international safety regula-
tions. The following information is provided for your safety
and should consequently be read carefully.
General safety
• This appliance has been designed for non-
professional, household use and its functions must
not be changed.
• This appliance is not intended for use by persons
(including children) with reduced physical, sensory or
mental capabilities, or lack of experience and know-
ledge, unless they have been given supervision or
instruction concerning use of the appliance by a person
responsible for their safety. Children should be supervi-
sed to ensure that they do not play with the appliance.
• This washing machine should only be used by
adults and in accordance with the instructions
provided in this manual.
• Never touch the washing machine when barefoot
or with wet or damp hands or feet.
• Do not pull on the power supply cable to unplug
the appliance from the electricity socket. Pull the
plug out yourself.
• Do not touch the drain water as it could reach
very high temperatures.
• Never force the washing machine door: this could
damage the safety lock mechanism designed to
prevent any accidental openings.
• In the event of a malfunction, do not under any
circumstances touch internal parts in order to
attempt repairs.
• Always keep children well away from the
appliance while in operation.
• Should it have to be moved, proceed with the
help of two or three people and handle it with the
utmost care. Never try to do this alone, because
the appliance is very heavy.
• Before loading your laundry into the washing
machine, make sure the drum is empty.
Disposal
The European Directive 2002/96/EC on Waste Electrical
and Electronic Equipment, requires that old household
electrical appliances must not be disposed of in the normal
unsorted municipal waste stream.
Old appliances must be collected separately in order to
optimise the recovery and recycling of the materials they
contain and reduce the impact on human health and the
environment. The crossed out “wheeled bin” symbol on
the product reminds you of your obligation, that when you
dispose of the appliance it must be separately collected.
Consumers may take their old appliance to public waste
collection areas, other communal collection areas, or if
national legislation allows return it to a retailer when pur-
chasing a similar new product.
All major household appliance manufacturers are active
in the creation of systems to manage the collection and
disposal of old appliances.
Saving energy and respecting the
environment
Environmentally-friendly technology
If you only see a little water through your appliance door,
this is because thanks to the latest technology, your
washing machine only needs less than half the amount
of water to get the best results: an objective reached to
respect the environment.
Saving on detergent, water, energy and time
• To avoid wasting resources, the washing machine
should be used with a full load. A full load instead
of two half loads allows you to save up to 50% on energy.
• The pre-wash cycle is only necessary on
extremely soiled garments. Avoiding it will save on
detergent, time, water and between 5 and 15% energy.
• Treating stains with a stain remover or leaving
them to soak before washing will cut down the
need to wash them at high temperatures. A
programme at 60°C instead of 90°C or one at
40°C instead of 60°C will save up to 50% on energy.
• Use the correct quantity of detergent depending on
the water hardness, how soiled the garments are and
the amount of laundry you have, to avoid wastage and
to protect the environment: despite being biodegra-
dable, detergents do contain ingredients that alter the
natural balance of the environment. In addition, avoid
using fabric softener as much as possible.
• If you use your washing machine from late in the
afternoon until the early hours of the morning, you
will help reduce the electricity board’s peak load.
• If your laundry has to be dried in a tumble dryer,
select a high spin speed. Having the least water
possible in your laundry will save you time and
energy in the drying process.

10
GB
Care and maintenance
Cutting off the water or electricity supply
• Turn off the water tap after every wash. This will limit the wear
of your appliance’s water system and also prevent leaks.
• Unplug your appliance when cleaning it and during all
maintenance operations.
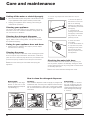
Cleaning your appliance
The exterior and rubber parts of your appliance can be cle-
aned with a soft cloth soaked in lukewarm soapy water. Do
not use solvents or abrasives.
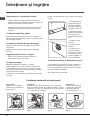
Cleaning the detergent dispenser
Remove the dispenser by raising it and pulling it out (see
figure). Wash it under running water; this operation should
be repeated frequently.
Caring for your appliance door and drum
• Always leave the appliance door ajar to prevent unplea-
sant odours from forming.
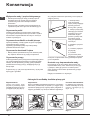
Cleaning the pump
The washing machine is fitted with a self-cleaning pump that
does not require any maintenance. Sometimes, small items
(such as coins or buttons) may fall into the pre-chamber that
protects the pump, situated in the lower part of the same.
! Make sure the wash cycle has ended and unplug the
appliance.
To recover any objects that have fallen into the pre-
chamber:
1. remove the plinth at
the bottom on the front
side of the washing
machine by pulling from
the side with your hands
(see figure);
2. unscrew the lid
rotating it anticlock-wise
(see figure): a little water
may trickle out. This is
perfectly normal;
3. clean the interior
thoroughly;
4. screw the lid back on;
5. reposition the panel,
making sure the hooks
are securely in place
before you push it onto
the appliance.
Checking the water inlet hose
Check the water inlet hose at least once a year. If you
see any cracks, replace it immediately: during the wash
cycles, water pressure is very strong and a cracked hose
could easily split open.
! Never use hoses that have already been used.
How to clean the detergent dispenser
Fig. 1
Fig. 2
Cleaning:
Then clean the dispenser under a tap (fig. 3) using an old
toothbrush and, once the pair of siphons inserted in the
top of compartments 1 and 2 (fig. 4) have been pulled
out, check whether the same are not clogged and then
rinse them.
Reassembly:
Do not forget to reinsert
the pair of siphons into the
special housings and then to
replace the dispenser into its
seat, clicking it into place (fig.
4, 2 and 1).
Disassembly:
Press lightly on the large
button on the front of the
detergent dispenser and pull
it upwards (fig. 1).
Fig. 3
Fig. 4

11
GB
Your washing machine could fail to work. Before calling for Assistance (see page 12), make sure the problem can’t easily
be solved by consulting the following list.
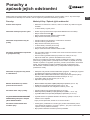
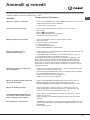
Troubleshooting
Problem
The washing machine won’t start.
The wash cycle won’t start.
The washing machine fails to load
water.
The washing machine continuou-
sly loads and unloads water.
The washing machine does not
drain or spin.
The washing machine vibrates too
much during the spin cycle.
The washing machine leaks.
The ON-OFF/DOOR LOCK Led
flashes rapidly at the same time
as at least one other LED.
There is too much foam.
Possible causes/Solution:
• The appliance is not plugged into the socket, or not enough to
make contact.
• There has been a power failure.
• The appliance door is not shut properly. The Lid locked Led flashes.
• The button has not been pressed.
• The START/RESET button has not been pressed.
• The water tap is not turned on.
• The water inlet hose is not connected to the tap.
• The hose is bent.
• The water tap is not turned on.
• There is a water shortage.
• The water pressure is insufficient.
• The START/RESET button has not been pressed.
• The drain hose is not fitted between 65 and 100 cm from the floor
(see page 3).
• The free end of the hose is underwater (see page 3).
• The wall drainage system doesn’t have a breather pipe.
If the problem persists even after these checks, turn off the water tap, switch the
appliance off and call for Assistance. If the dwelling is on one of the upper floors of
a building, there may be drain trap problems causing the washing machine to load
and unload water continuously. In order to avoid such an inconvenience, special
anti-drain trap valves are available in shops.
• The programme does not foresee the draining: some programmes
require enabling the draining manually (see page 6).
• The Anti-crease option is enabled: to complete the programme, press
the START/RESET button (see page 7).
• The drain hose is bent (see page 3).
• The drain duct is clogged.
• The drum was not unblocked correctly during installation (see page 2).
• The washing machine is not level (see page 2).
• The washing machine is closed in between furniture cabinets and
the wall (see page 2).
• The water inlet hose is not screwed on correctly (see page 2).
• The detergent dispenser is obstructed (to clean it, see page 10).
• The drain hose is not secured properly (see page 3).
• Switch off the machine and unplug the appliance; wait for
approximately 1 minute then switch it on again.
If the problem persists, contact Assistance.
• The detergent is not suitable for machine washing (it should bear
the definition “for washing machines” or “hand and machine wash”,or the like).
• You used too much detergent.

12
GB
Before calling for Assistance:
• Check whether you can solve the problem on your own (see page 11);
• Restart the programme to check whether the problem has been solved;
• If this is not the case, contact an authorised Technical Service Centre on the telephone number
provided on the guarantee certificate.
! Always request the assistance of authorised servicemen.
Notify the operator of:
• the type of problem;
• the appliance model (Mod.);
• the serial number (S/N).
This information can be found on the data plate situated on the rear of the washing machine.
Service

13
HU
Magyar
Összefoglalás
Üzembehelyezés, 14-15
Kicsomagolás és vízszintbe állítás
Víz és elektromos csatlakozás
Első mosási ciklus
Műszaki adatok
Mosógép leírása, 16-17
Vezérlőpanel
A forgódob kinyitása és bezárása
Visszajelző lámpák
Indítás és Programok, 18
Röviden: egy program elindítása
Programtáblázat
Program módosítások, 19
Hőmérséklet beállítása
Funkciók
Mosószerek és mosandók, 20
Mosószeradagoló ók
Mosandó ruhák előkészítése
Különleges bánásmódot igénylő darabok
Fehérítő program
Óvintézkedések és tanácsok, 21
Általános biztonság
Hulladékelhelyezés
Környezetvédelem
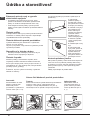
Karbantartás és törődés, 22
A víz elzárása és az elektromos áram kikapcsolása
A mosógép tisztítása
A mosószertartó tisztítása
Az ajtó és a forgódob gondozása
A szivattyú tisztítása
A vízbevezető cső ellenőrzése
A mosószertartó tisztítása
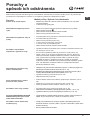
Rendellenességek és elhárításuk, 23
Szerviz, 24
Mielőtt a Szervizhez fordulna
HU
MOSÓGÉP
WITP 82
Használati utasítás

14
HU
! E kézikönyv megőrzése azért fontos, hogy bármikor
elővehesse, és megnézhesse. Ha a mosógépet eladná,
átadná vagy másnál helyezné el, gondoskodjon arról, hogy
e használati utasítás a géppel együtt maradjon, hogy az új
tulajdonos is megismerhesse a mosógép funkcióit és az
ezekre vonatkozó gyelmeztetéseket.
! Figyelmesen olvassa el az utasításokat: fontos
információkat tartalmaznak az üzembehelyezésről, a
használatról és a biztonságról.
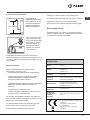
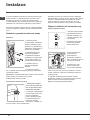
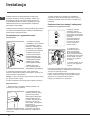
Kicsomagolás és vízszintbe állítás
Kicsomagolás
1. Csomagolja ki a
mosógépet.
2. Ellenőrizze, hogy a
mosógép nem sérült-e
meg aszállítás során. Ha a
gépen sérülést talál, ne
csatlakoztassa, és forduljon
a készülék eladójához.
3. Távolítsa el a hátoldalon
található, a szállításhoz
felszerelt 4 védőcsavart,
valamint a gumit a hozzá
tartozó távtartóval (lásd
ábra).
4. A furatokat zárja le
a tartozékként kapott
műanyag dugókkal.
5. Minden darabot őrizzen
meg: ha a mosógépet szállítani kell, előtte ezeket vissza
kell szerelni.
Figyelem: újbóli használat esetén a rövidebb csavarokat
felülre kell szerelni.
! A csomagolóanyag nem gyermekjáték
Vízszintezés
1. A mosógépet sík és
kemény padlóra állítsa,
úgy, hogy ne érjen falhoz,
bútorhoz vagy máshoz.
2. Ha a padló nem
tökéletese vízszintes,
az első lábak be-,
illetve kicsavarásával
kompenzálhatja azt (lásd
ábra). A dőlés a gép felső
burkolatán mérve nem lehet több, mint 2°.
A pontos vízszintezés biztosítja a gép stabilitását, így
az a működés során nem fog vibrálni, zajt okozni vagy
elmozdulni. Szőnyegpadló vagy szőnyeg esetén a
lábakat úgy állítsa be, hogy a mosógép alatt elegendő
hely maradjon a szellőzésre.
Víz és elektromos csatlakozás
Vízbevezető cső csatlakoztatása
1. A vízbevezetõ csõ
csatlakoztatásához
csavarozza fel a csövet
egy 3/4”-os külsõ
menettel rendelkezõ
hidegvíz csapra (lásd
ábra).
A csatlakoztatás elõtt
eressze meg a csapot
addig, amíg a víz
teljesen átlátszóvá nem
válik.
2. Csatlakoztassa a
vízbevezető csövet a
mosógéphez úgy, hogy
azt a hátul jobboldalon
fent lévő vízbemeneti
csonkra csavarozza (lásd
ábra).
3. Ügyeljen arra, hogy a
csövön ne legyen törés
vagy szűkület.
! A csapnál a víznyomásnak a Műszaki adatok
táblázatban szereplő határértékek között kell lennie
(lásd a szemben lévő oldalt).
! Amennyiben a vízbevezető cső nem elég hosszú,
forduljon szaküzlethez vagy megbízott szakemberhez.
! Soha ne alkalmazzon már használt csöveket.
Üzembehelyezés

15
HU
A leeresztőcső csatlakoztatása
A leeresztőcsövet
csatlakoztassa lefolyóhoz
vagy a padlótól 65 és 100
cm közötti magasságban
lévő fali lefolyószifonhoz
anélkül, hogy megtörné,
vagy akassza a mosdó
vagy a kád szélére úgy,
hogy a tartozékok között
lévő vezetőt a csaphoz
erősíti (lásd ábra). A
leeresztőcső szabad
végének nem szabad
vízbe merülnie.
! Toldások használata nem javasolt. Amennyiben
feltétlenül szükséges, a toldás átmérője egyezzen meg
az eredeti csőével, és semmiképpen se legyen 150 cm-
nél hosszabb.
Elektromos bekötés
Mielőtt a csatlakozódugót az aljzatba dugná,
bizonyosodjon meg arról, hogy:
• az aljzat földelése megfelel a törvény által előírtnak;
• az aljzat képes elviselni a gép Műszaki adatait
tartalmazó táblázatban megadott maximális
teljesítményfelvételt (lásd szemben);
• a hálózat feszültsége a Műszaki adatokat tartalmazó
táblázatban szereplő értékek közé esik (lásd
szemben);
• Az aljzat legyen kompatibilis a gép
csatlakozódugójával. Ellenkező esetben cserélje ki
az aljzatot vagy a csatlakozódugót.
! A mosógép nem állítható fel nyílt téren, még akkor sem,
ha a tér tetővel van fedve, mert nagyon veszélyes, ha a gép
esőnek vagy zivataroknak van kitéve.
! A csatlakozódugónak könnyen elérhető helyen kell
lennie akkor is, amikor a gép már a helyén áll.
! Ne használjon hosszabbítót vagy elosztót.
! Ne legyen a kábel megtörve vagy összenyomva.
! A hálózati kábelt csak megbízott szakember cserélheti.
Figyelem! A gyártó minden felelősséget elhárít,
amennyiben a fenti előírásokat gyelmen kívül hagyják.
Első mosási ciklus
Üzembehelyezés után, mielőtt a mosógépet használni
kezdené, végezzen egy 90°-os előmosás nélküli mosást
mosóporral de mosandó ruha nélkül.
65 - 100 cm
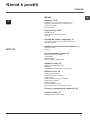
Mûszaki adatok
Modell
WITP 82
Méretek
szélesség 40 cm
magasság 85 cm
mélység 60 cm
Ruhatöltet:
1-tõl 5 kg-ig
Elektromos
csatlakozás
Lásd a készüléken található, muszaki jellem-
zoket tartalmazó adattáblát!
Vízcsatlakozások
maximális nyomás 1 MPa (10 bar)
minimális nyomás 0,05 MPa (0,5 bar)
dob ûrtartalma 42 liter
Centrifuga
fordulatszám
800 fordulat/perc-ig
Az 1061/2010
rendelet szerinti
vizsgálati
programok
3-as program; 60 °C-os és 40 °C-os hõmér-
séklet.
Ez a berendezés megfelel a következõ Uniós
Elõírásoknak:
- 2004/108/CE (Elektromágneses
összeférhetõség)
- 2006/95/CE (Alacsony feszültség)
- 2002/96/CE

16
HU
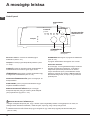
A mosógép leírása
BEKAPCSOLVA/AJTÓ ZÁRVA lámpa:
A világító visszajelző lámpa azt jelzi, hogy a véletlen nyitás megakadályozására a mosógépajtó be van zárva; az
esetleges károk elkerülése érdekében, mielőtt kinyitná, várja meg, amíg a lámpa villogni kezd.
! A BEKAPCSOLVA/AJTÓ ZÁRVA lámpa gyors villogása és egy másik lámpa egyidejű felvillanása hibát jelez
(lásd 23. oldal).
Vezérlő panel
Mosószer rekesz a mosószer és adalékanyagok
betöltésére (lásd 20. old.).
Lámpák a mosási program állapotának jelzésére. (lásd
17. oldal).
FUNKCIÓ gombok az elérhető funkciók kiválasztására. A
kiválasztott funkcióhoz tartozó gomb égve marad.
HŐMÉRSÉKLET tekerőgomb a mosási hőmérséklet vagy
a hidegmosás kiválasztására (lásd 19. old.).
KIKAPCSOLÁS/BEKACSOLÁS gomb a mosógép ki- és
bekapcsolására.
START/RESET gomb a programok elindítására vagy a
helytelen beállítások törlésére.
BEKAPCSOLVA/FEDŐ ZÁRVA lámpa a mosógép
bekapcsolt állapotát (villog) és a fedő nyitható állapotát
jelzi (folyamatosan ég) (lásd 17. old.).
PROGRAMOK tekerőgomb a programok beállítására
(lásd 18. old.).
A program futása alatt a tekerőgomb nem mozdul.
Készenléti üzemmód
Ez a mosógép - az energiatakarékosságra vonatkozó
legújabb eloírásoknak megfeleloen - automatikus
kikapcsolási (készenléti) rendszerrel van ellátva,
mely a használat 30 percnyi szüneteltetése esetén
bekapcsol. Nyomja meg röviden a BEKAPCSOLÁS/
KIKAPCSOLÁS gombot, és várjon, amíg a készülék
újrabekapcsol.
HŐMÉRSÉKLET
tekerőgomb
Lámpák
FUNKCIÓ
gombok
BEKAPCSOLÁS/
KIKAPCSOLÁS
gomb
START/RESET
gomb
FEDŐ ZÁRVA
lámpa
PROGRAMOK
tekerőgomb

17
HU
Visszajelző lámpák
A visszajelző lámpák fontos információkkal szolgálnak.
A következők olvashatók le róluk:
Folyamatban lévő mosási fázis:
A mosás során a visszajelzők egymás után gyulladnak
meg, ezzel jelezve a program előrehaladását:
Elemosás
Mosás
Öblítés
Centrifugálás
Megjegyzés: a vízürítés (szivattyúzás) során a
centrifugálási fázishoz tartozó visszajelző világít.
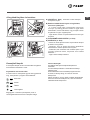
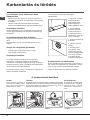
A forgódob kinyitása és bezárása
1. ábra
2. ábra
A) KINYITÁS (1. ábra). Felemelni a külső fedőlapot
és teljesen kinyitni.
B) Ezután mindkét kézzel kinyitni a forgódobot,
mint azt a 2) ábra jelzi:
- a 2. ábrán nyíllal jelölt nyomógombot megnyomni
és enyhe nyomást gyakorolva lefelé az egyik kezet
rátámasztani, amivel elkerülhető, hogy az ajtók hirtelen
kinyílásával az ujjak megsérüljenek.
- végül kézzel vezetve az ajtók kikattannak és könnyen
kinyílnak.
C) RUHANEMŰ BEHELYEZÉSE. (3. ábra)
D) BEZÁRÁS. (4. ábra)
- először az elülső ajtót leeresztve majd a hátsót ráhajtva
jól bezárni a forgódobot.
- ellenőrizni, hogy az elülső ajtó kampói tökéletesen
illeszkednek-e a hátsó ajtóban levő helyükre.
- a kattanás „klak” észlelése után mindkét ajtóra enyhe
nyomást gyakorolni lefelé, melyeknek nem szabad
kikattanni.
- végül a külső fedőlapot bezárni.
3. ábra
4. ábra
Funkció billentyűk
A FUNKCIÓ billentyűk visszajelző lámpaként is
működnek.
A funkció bekapcsolásakor a hozzá tartozó billentyű
világítani kezd.
Ha a kiválasztott funkció a beállított programmal nem
fér össze, a billentyű villog, és a funkció nem lesz
bekapcsolva.
Abban az esetben, ha egy másik, korábban kiválasztottal
össze nem férő funkciót kapcsol be, csak az utolsóként
választott marad bekapcsolva.

18
HU
Indítás és Programok
Röviden: egy program elindítása
1. Az billentyű megnyomásával kapcsolja be
a mosógépet. Néhány másodpercre az összes
visszajelző felgyullad, majd elalszik, és a
BEKAPCSOLVA/AJTÓZÁR visszajelző kezd villogni.
2. Rakja be a mosnivalót, töltse be a mosószert és
adalékanyagokat (lásd 20. oldal), majd zárja össze
az dob szárnyait, és csukja le a fedelet!
3. A PROGRAMOK tárcsával állítsa be a kívánt
mosóprogramot.
4. Állítsa be a mosási hőmérsékletet (lásd 19. oldal).
5. A START/RESET billentyű megnyomásával indítsa
el a programot. A törléshez tartsa nyomva a START/
RESET billentyűt legalább 2 másodpercen keresztül.
6. A program végeztével a BEKAPCSOLVA/AJTÓZÁR
visszajelző villog, azt jelezve, hogy az ajtót ki lehet
nyitni. Vegye ki a mosott ruhát, és az ajtót hagyja
kicsit nyitva, hogy a dob kiszáradhasson.
Az billentyűvel kapcsolja ki a mosógépet.
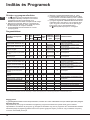
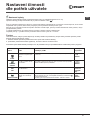
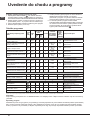
Programtáblázat
Kelmék és a szennyezõdés
természete
Pro-
gra-
mok
Hõ-
mér-
séklet
Mosószer
Öblítõ-
szer
Fehérítés /
Fehérítõszer
opció
Ciklus
idõtarta-
ma (perc)
Mosóciklus leírása
Elõ-
mosás
Mo-
sás
Pamut
Különösen szennyezett fehér an-
yagok (lepedõ, asztalterítõ, stb.)
1
90°C • • •
150
Elõmosás, mosás, öblítések, köztes és
végsõ centrifugálások
Különösen szennyezett fehér an-
yagok (lepedõ, asztalterítõ, stb.)
2
90°C • •
Kíméletes /
Hagyományos
135
Mosás, öblítések, köztes és végsõ
centrifugálások
Nagyon szennyezett tartós fehér
és színes anyagok
3
60°C • •
Kíméletes /
Hagyományos
160
Mosás, öblítések, köztes és végsõ
centrifugálások
Kevéssé szennyezett fehér és kén-
yes színes anyagok (ingek pulóve-
rek, stb.)
4
40°C • •
Kíméletes /
Hagyományos
150
Mosás, öblítések, köztes és végsõ
centrifugálások
Kevéssé szennyezett kényes
színes anyagok
5
30°C • •
Kíméletes /
Hagyományos
80
Mosás, öblítések, köztes és végsõ
centrifugálások
Szintetikus anyagok
Nagyon szennyezett tartós színes
anyagok (csecsemõruházat, stb.)
6
60°C • •
Kíméletes
105
Mosás, öblítések, gyûrõdésgátlás vagy
kíméletes centrifugálás
Nagyon szennyezett tartós színes
anyagok (csecsemõruházat, stb.)
7
50°C • •
Kíméletes
100
Mosás, öblítések, gyûrõdésgátlás vagy
kíméletes centrifugálás
Kényes színes anyagok (minden-
fajta enyhén szennyezett ruházat)
8
40°C • •
Kíméletes
95
Mosás, öblítések, gyûrõdésgátlás vagy
kíméletes centrifugálás
Kényes színes anyagok (min-
denfajta enyhén szennyezett
ruházat)
9
30°C • •
30
Mosás, öblítések és kíméletes
centrifugálás
Kényes anyagok
Gyapjú
10
40°C • •
65
Mosás, öblítések és kíméletes centrifugálás
Nagyon kényes kelmék (füg-
gönyök, selyem, viszkóz, stb.)
11
30°C • •
55
Mosás, öblítések, gyûrõdésgátlás vagy
szivattyúzás
RÉSZLEGES PROGRAMOK
Öblítés
• •
Öblítések és centrifugálás
Kíméletes öblítés
• •
Öblítések, gyûrõdésgátlás vagy szivattyúzás
Centrifugálás
Szivattyúzás és erõs centrifugálás
Kíméletes centrifugálás
Szivattyúzás és kíméletes centrifugálás
Szivattyúzás
Szivattyúzás
Megjegyzések
A gyűrődésgátlás leírásához: lásd Vasalj kevesebbet, szemben lévő oldal. A táblázatban szereplő értékek tájékoztató jellegűek.
Speciális program
Napközbeni 30’ (9-es program szintetikus anyagokhoz) programot kevéssé szennyezett ruhák gyors mosására
fejlesztettük ki: mindössze 30 percig tart, így energiát és időt takarít meg. A 9-es programot 30°C hőmérsékletre beállítva
különböző jellegű anyagokat együttesen lehet mosni (kivéve gyapjú és selyem), maximum 3 kg-os töltéssel. Folyékony
mosószer használatát javasoljuk.
A kijelzőn megjelenő vagy a kézikönyben feltüntetett ciklusidők szokásos körülmények alapján becsült értékek. A tényleges időt számos tényező befolyásolhatja – pl. a bemeneti vízn-
yomás, a környezeti hőmérséklet, a mosószer mennyisége, a ruhatöltet mennyisége és típusa, a ruhatöltet kiegyensúlyozása, a kiválasztott további opciók.

19
HU
Program módosítások
C
Hőmérséklet beállítása
A mosási hőmérsékletet a HŐMÉRSÉKLET tárcsa elforgatásával lehet beállítani (lásd a Programtáblázatot a 18). oldalon).
A hőmérsékletet a hideg vízzel történő mosásig lehet csökkenteni ( ).
! A minden centrifugálás elején jelentkező túlzott vibrálás elkerülése érdekében a készülék egyenletesen elosztja a
bepakolt ruhákat a dob folyamatos, a mosási sebességnél valamivel gyorsabb forgatásával.
Ha azonban az ismételt próbálkozások ellenére sem sikerül a bepakolt ruhát tökéletesen elosztani, a készülék a
beállítottnál kisebb fordulatszámon fog centrifugálni.
Abban az esetben, ha túlságosan nagy a kiegyensúlyozatlanság, a készülék végzi el az elosztást a centrifuga helyett.A
kiegyensúlyozásra tett esetleges próbálkozások maximum 10 perccel nyújthatják meg a ciklus teljes időtartamát.
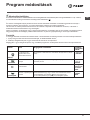
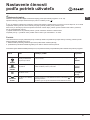
Funkciók
A mosógép különféle mosófunkciói lehetővé teszik a kívánt tisztítás és fehérség elérését. A funkciók bekapcsolásához:
1. nyomja meg a kívánt funkcióhoz tartozó billentyűt, az alábbi táblázat szerint;
2. a billentyű világítása azt jelzi, hogy a hozzá tartozó funkció be van kapcsolva.
Megjegyzés: A gyors villogás azt jelenti, hogy a beállított programhoz a billentyűhöz tartozó funkció nem kapcsolható be.
Funkciók Hatás Megjegyzések a használathoz A következõ
programokkal
mûködik:
Fehérítés
A fehérítés ciklus a
legmakacsabb foltok
eltávolítására alkalmas.
Ne felejtse al a fehérítõszert a 4-es berakható tartályba tölteni (lásd 20.
oldal).
2, 3, 4, 5, 6, 7,
8, Öblítések.
Extra Öblítés
Növeli az öblítés hatéko-
nyságát.
A mosógép teljes töltése esetén vagy nagymennyiségû mosószeradago-
lás esetén javasolt.
1, 2, 3, 4,
5, 6, 7, 8,
Öblítések.
800
400
Csökkenti a centrifuga
fordulatszámát.
Mindegyik,
kivéve a 11-et
és a szivatt-
yúzást.
Gyûrõdésgátlás
Csökkenti az anyagon a
ráncokat, megkönnyítve a
vasalást.
Ezen opciót beállítva a 6-os, 7-es, 8-as, 11-es programok és a kíméletes
öblítés félbeszakad úgy, hogy a mosott ruha az öblítõvízben marad
(Gyûrõdésgátlás), és az öblítési
fázist jelzõ lámpa villog:
A ciklus befejezéséhez nyomja meg a Gyûrõdésgátlás gombot.
6, 7, 8, 11,
kíméletes
öblítés

20
HU
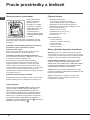
Mosószeradagoló ók
A mosás eredményessége függ a mosószer helyes
adagolásától is: ha túl sokat adagol belőle, a mosás nem
lesz hatékonyabb, de hozzájárul ahhoz, hogy lerakódás
képződjön a mosógépben, valamint a környezetet is
jobban szennyezi.
Húzza ki a
mosószeradagoló ókot,
és a következőképpen
tegye bele a mosószret
vagy az adalékot.
1. es tartály: Mosószer
előmosáshoz (por)
2. rekesz: Mosószer (por
vagy folyékony)
A folyékony mosószert helyezze közvetlen a rekeszbe az
erre a célra kialakított mérőedénybe.
3. rekesz: Adalékanyagok (lágyítószer, stb.)
Amikor a 3. rekeszbe betölti a lágyítószert, ügyeljen rá,
hogy ne lépje túl a “max” jelzést.
A lágyítószer automatikusan belekerül
a mosógépbe az utolsó öblítéskor. A program végén
a 3. rekeszben bizonyos mennyiségu víz marad. Ez
a túlságosan suru lágyítószer feloldására, vagy a
koncentrátumok higítására szolgál. Ha a 3. rekeszben
több víz marad, mint általában, az az ürítonyílás
eltömodését jelenti. A kitisztításához lásd 22. oldal.
4. rekesz: Fehérítőszer
! Ne használjon kézimosószert, mert túlzottan sok hab
képződik.
Fehérítő program
A hagyományos fehérítő programot az erős fehér
szövetekhez, míg a kímélő fehérítést a színes, szintetikus
és gyapjú ruhákhoz használja.
A fehérítő adagolásakor ügyeljen arra, hogy ne lépje túl a
4-es rekesz “max” jelzését (lásd ábra).
A fehérítő adagolásakor ügyeljen arra, hogy ne lépje túl a
4-es rekesz “max” jelzését (lásd ábra).
Ha csak fehéríteni szeretne, öntse a fehérítőt a 4.
rekeszbe, állítsa be az Öblítés programot és nyomja
meg a Fehérítés funkciógombot.
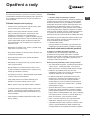
Mosandó ruhák előkészítése
• Osztályozza a mosandókat a következők szerint:
- kelme típusa / címkén lévő szimbólum.
- színek: válogassa külön a színes ruhákat a
fehérektől.
• Ürítse ki a zsebeket, és vizsgálja meg a gombokat.
• Ne lépje túl a mosandók száraz súlyára vonatkozóan
megadott értékeket:
Tartós anyagok: max. 5 kg
Szintetikus anyagok: max. 2,5 kg
Kényes anyagok: max. 2 kg
Gyapjú: max. 1 kg
Milyen nehezek a mosandó ruhák?
1 lepedő 400-500 g.
1 párnahuzat 150-200 g.
1 asztalterítő 400-500 g.
1 fürdőköpeny 900-1200 g.
1 törülköző 150-250 g.
Különleges bánásmódot igénylő darabok
Függönyök: hajtogatva tegye párnahuzatba
(vászonzsákba) vagy hálós zacskóba. Külön mossa
őket, és ne lépje túl a fél töltésnyi mennyiséget.
használja a 11-es programot, amelyik automatikusan
kikapcsolja a centrifugálást.
Toll/pehely ágyneműk és tollkabátok: ha a benne lévő
liba vagy kacsatoll mosógépben mosható. Fordítsa ki a
darabokat, és egyszerre legfeljebb 2-3 kg-nyit mosson
úgy, hogy egyszer vagy kétszer megismétli az öblítést,
és kíméletes centrifugálást használ.
Teniszcipők: tisztítsa meg a sártól. Együtt moshatók
a farmer és más tartós anyagokkal, de nem a fehér
ruhadarabokkal.
Gyapjú: a legjobb eredmény elérése érdekében
használjon speciális mosószert (gyapjúmosószert), és
ne lépje túl az 1 kg ruhatöltetet.
Mosószerek és mosandók
Pagina se încarcă...
Pagina se încarcă...
Pagina se încarcă...
Pagina se încarcă...
Pagina se încarcă...
Pagina se încarcă...
Pagina se încarcă...
Pagina se încarcă...
Pagina se încarcă...
Pagina se încarcă...
Pagina se încarcă...
Pagina se încarcă...
Pagina se încarcă...
Pagina se încarcă...
Pagina se încarcă...
Pagina se încarcă...
Pagina se încarcă...
Pagina se încarcă...
Pagina se încarcă...
Pagina se încarcă...
Pagina se încarcă...
Pagina se încarcă...
Pagina se încarcă...
Pagina se încarcă...
Pagina se încarcă...
Pagina se încarcă...
Pagina se încarcă...
Pagina se încarcă...
Pagina se încarcă...
Pagina se încarcă...
Pagina se încarcă...
Pagina se încarcă...
Pagina se încarcă...
Pagina se încarcă...
Pagina se încarcă...
Pagina se încarcă...
Pagina se încarcă...
Pagina se încarcă...
Pagina se încarcă...
Pagina se încarcă...
Pagina se încarcă...
Pagina se încarcă...
Pagina se încarcă...
Pagina se încarcă...
Pagina se încarcă...
Pagina se încarcă...
Pagina se încarcă...
Pagina se încarcă...
Pagina se încarcă...
Pagina se încarcă...
Pagina se încarcă...
Pagina se încarcă...
-
 1
1
-
 2
2
-
 3
3
-
 4
4
-
 5
5
-
 6
6
-
 7
7
-
 8
8
-
 9
9
-
 10
10
-
 11
11
-
 12
12
-
 13
13
-
 14
14
-
 15
15
-
 16
16
-
 17
17
-
 18
18
-
 19
19
-
 20
20
-
 21
21
-
 22
22
-
 23
23
-
 24
24
-
 25
25
-
 26
26
-
 27
27
-
 28
28
-
 29
29
-
 30
30
-
 31
31
-
 32
32
-
 33
33
-
 34
34
-
 35
35
-
 36
36
-
 37
37
-
 38
38
-
 39
39
-
 40
40
-
 41
41
-
 42
42
-
 43
43
-
 44
44
-
 45
45
-
 46
46
-
 47
47
-
 48
48
-
 49
49
-
 50
50
-
 51
51
-
 52
52
-
 53
53
-
 54
54
-
 55
55
-
 56
56
-
 57
57
-
 58
58
-
 59
59
-
 60
60
-
 61
61
-
 62
62
-
 63
63
-
 64
64
-
 65
65
-
 66
66
-
 67
67
-
 68
68
-
 69
69
-
 70
70
-
 71
71
-
 72
72


Indesit WITP 82 (EU) Manualul utilizatorului
- Categorie
- Mașini de spălat
- Tip
- Manualul utilizatorului
în alte limbi
- slovenčina: Indesit WITP 82 (EU) Užívateľská príručka
- polski: Indesit WITP 82 (EU) instrukcja