
MANUAL
XW401 SOLO
XW402 DUO
Gebruiksaanwijzing
Gebrauchsanweisung
Mode d’emploi
Bruksanvisning
Brugsvejledning
Käyttöopas
Uživatelská příručka
Používateľská príručka
Εγχειρίδιο χρήσης
دليل المستخدم

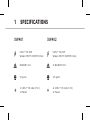
SPECIFICATIONS
PRODUCT OVERVIEW
USB-C™ PD 20W
Wireless 5W/7.5/10W/15W (max)
XW401 XW402
USB-C™ PD 20W
Wireless 5W/7.5/10W/15W (max)
80x80x8.5 mm 2x 80x80x8.5 mm
50 grams 100 grams
1x USB-C™ PD cable (1.5m)
1x Manual
2x USB-C™ PD cable (1.5m)
1x Manual
1

SPECIFICATIONS
PRODUCT OVERVIEW
XW402
2x 80x80x8.5 mm
100 grams
2x USB-C™ PD cable (1.5m)
1x Manual
2
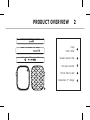
Input
USB-C 20W
Wireless output 15W
LED light indicator
Official Xtorm Label
Connection 2nd charger
1
2
3
4
5
1
4
5
3
2

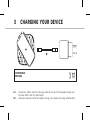
CHARGING YOUR DEVICE
COMPATIBLE
DEVICES
3
3A Connect the USB-C end of the charging cable to the input of the wireless charger and
the other USB-C end to a wall charger.
3B Place your device on top of the wireless charger, your device will charge automatically.
A
B

4A Create a dual charger by connecting 2 chargers together magnetically. The expansion
port transfers power, you only need to use 1 cable.
4B When the two chargers are connected together, the 15W maximum power will be split
between them in 10W/5W, or 7.5W/7.5W.
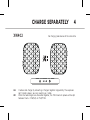
CHARGE SEPARATELY 4
XW402 For charging two devices at the same time

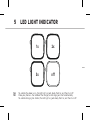
LED LIGHT INDICATOR5
5A To indicate the power is on, the LED light ring will slowly flash 3x, and then turn off.
5B Place your phone in the middle of the charger, and charging will start automatically.
To indicate charging has started, the LED light ring will slowly flash 3x, and then turn off.
1x 2x
off
3x

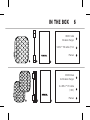
IN THE BOX 6
XW401 solo
Wireless charger
USB-C™ PD cable (1.5m
Manual
XW402 duo
2x Wireless charger
2x USB-C™ PD cable
(1.5m)
Manual
1
1
2
2
3
3
1 2 3
123

EN - ENGLISH
1 SPECIFICATIONS
2 PRODUCT OVERVIEW
3 CHARGING YOUR DEVICE
3.A Connect the USB-C end of the charging cable to the input of the wireless charger and the
other USB-C end to a wall charger.
3.B Lay your device on top of the wireless charger or in the charging stand, your device will
charge automatically.
4 RECHARGING THE POWER BANK
4.A Create a dual charger by connecting 2 chargers together magnetically. The expansion port
transfers power, you only need to use 1 cable.
4.B When the two chargers are connected together, the 15W maximum power will be split
between them in 10W/5W, or 7.5W/7.5W.

EN - ENGLISH
5 LED POWER INDICATOR
5.A To indicate the power is on, the LED light ring will slowly flash 3x, and then turn off.
5.B Place your phone in the middle of the charger or in the charging stand, and charging will
start automatically. To indicate charging has started, the LED light ring will slowly flash 3x, and
then turn off.
6 IN THE BOX

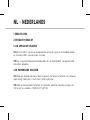
NL - NEDERLANDS
1 SPECIFICATIES
2 PRODUCTOVERZICHT
3 UW APPARAAT OPLADEN
3.A Sluit het USB-C uiteinde van de oplaadkabel aan op de ingang van de draadloze oplader
en het andere USB-C uiteinde op een muurlader.
3.B Leg uw apparaat bovenop de draadloze lader of in de laadstandaard, uw apparaat wordt
automatisch opgeladen.
4 DE POWERBANK OPLADEN
4.A Maak een dubbele lader door 2 laders magnetisch met elkaar te verbinden. De uitbreiding-
spoort brengt stroom over, u hoeft maar 1 kabel te gebruiken.
4.B Wanneer de twee laders met elkaar zijn verbonden, wordt het maximale vermogen van
15W tussen hen verdeeld in 10W/5W, of 7,5W/7,5W.

NL - NEDERLANDS
5 LED STROOMINDICATOR
5.A Om aan te geven dat de stroom is ingeschakeld, knippert de LED-lichtring langzaam 3x
en gaat dan uit.
5.B Plaats uw telefoon in het midden van de oplader of in de oplaadstandaard en het opladen
begint automatisch. Om aan te geven dat het opladen is begonnen, knippert de LED-ring
langzaam 3x en gaat dan uit.
6 IN DE DOOS

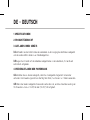
DE - DEUTSCH
1 SPEZIFIKATIONEN
2 PRODUKTÜBERSICHT
3 AUFLADEN IHRES GERÄTS
3.A Schließen Sie das USB-C-Ende des Ladekabels an den Eingang des drahtlosen Ladegeräts
und das andere USB-C-Ende an ein Wandladegerät an.
3.B Legen Sie Ihr Gerät auf das kabellose Ladegerät oder in die Ladestation, Ihr Gerät wird
automatisch aufgeladen.
4 WIEDERAUFLADEN DER POWERBANK
4.A Erstellen Sie ein duales Ladegerät, indem Sie 2 Ladegeräte magnetisch miteinander
verbinden. Der Erweiterungsanschluss überträgt den Strom, Sie müssen nur 1 Kabel verwenden.
4.B Wenn die beiden Ladegeräte miteinander verbunden sind, wird die maximale Leistung von
15 W zwischen ihnen in 10 W/5 W oder 7,5 W/7,5 W aufgeteilt.

DE - DEUTSCH
5 LED-STROMANZEIGE
5.A Um anzuzeigen, dass das Gerät eingeschaltet ist, blinkt der LED-Leuchtring langsam 3x
und schaltet sich dann aus.
5.B Legen Sie Ihr Telefon in die Mitte des Ladegeräts oder in die Ladestation, und der Ladevor-
gang beginnt automatisch. Um anzuzeigen, dass der Ladevorgang begonnen hat, blinkt der
LED-Leuchtring langsam dreimal und schaltet sich dann aus.
6 IM KARTON

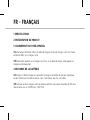
FR - FRANÇAIS
1 SPÉCIFICATIONS
2 PRÉSENTATION DU PRODUIT
3 CHARGEMENT DE VOTRE APPAREIL
3.A Connectez l’extrémité USB-C du câble de charge à l’entrée du chargeur sans fil et l’autre
extrémité USB-C à un chargeur mural.
3.B Posez votre appareil sur le chargeur sans fil ou sur le socle de charge, votre appareil se
chargera automatiquement.
4 RECHARGE DE LA BATTERIE
4.A Créez un double chargeur en connectant 2 chargeurs ensemble de manière magnétique.
Le port d’extension transfère le courant, vous n’avez besoin que d’un seul câble.
4.B Lorsque les deux chargeurs sont connectés ensemble, la puissance maximale de 15W sera
répartie entre eux en 10W/5W, ou 7,5W/7,5W.

FR - FRANÇAIS
5 INDICATEUR D’ALIMENTATION LED
5.A Pour indiquer que l’appareil est sous tension, l’anneau lumineux LED clignote lentement 3
fois, puis s’éteint.
5.B Placez votre téléphone au milieu du chargeur ou dans le support de charge, et la charge
commencera automatiquement. Pour indiquer que le chargement a commencé, l’anneau
lumineux LED clignote lentement 3 fois, puis s’éteint.
6 DANS LA BOÎTE

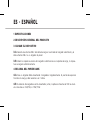
ES - ESPAÑOL
1 ESPECIFICACIONES
2 DESCRIPCIÓN GENERAL DEL PRODUCTO
3 CARGAR EL DISPOSITIVO
3.A Conecta el extremo USB-C del cable de carga a la entrada del cargador inalámbrico y el
otro extremo USB-C a un cargador de pared.
3.B Coloca tu dispositivo encima del cargador inalámbrico o en el soporte de carga, tu disposi-
tivo se cargará automáticamente.
4 RECARGA DEL POWER BANK
4.A Crea un cargador doble conectando 2 cargadores magnéticamente. El puerto de expansión
transfiere la energía, sólo necesitas usar 1 cable.
4.B Cuando los dos cargadores están conectados juntos, la potencia máxima de 15W se divid-
irá entre ellos en 10W/5W, o 7.5W/7.5W.

ES - ESPAÑOL
5 INDICADOR LED DE ALIMENTACIÓN
5.A Para indicar que el cargador está encendido, el anillo de luz LED parpadeará lentamente 3
veces y luego se apagará.
5.B Coloque el teléfono en el centro del cargador o en el soporte de carga, y la carga se ini-
ciará automáticamente. Para indicar que la carga ha comenzado, el anillo de luz LED parpadeará
lentamente 3 veces y luego se apagará.
6 EN LA CAJA

PT - PORTUGUÊS
1 ESPECIFICAÇÕES
2 VISÃO GERAL DO PRODUTO
3 CARREGAR O SEU DISPOSITIVO
3.A Ligar a extremidade USB-C do cabo de carregamento à entrada do carregador sem fios e
a outra extremidade USB-C a um carregador de parede.
3.B Coloque o seu dispositivo em cima do carregador sem fios ou no suporte de carga, o seu
dispositivo irá carregar automaticamente.
4 RECARREGAR O BANCO DE ENERGIA
4.A Criar um carregador duplo ligando 2 carregadores magneticamente. A porta de expansão
transfere energia, só é necessário utilizar 1 cabo.
4.B Quando os dois carregadores são ligados entre si, a potência máxima de 15W será dividida
entre eles em 10W/5W, ou 7.5W/7.5W.

PT - PORTUGUÊS
5 LED INDICADOR DE POTÊNCIA
5.A Para indicar que a energia está ligada, o anel de luz LED piscará lentamente 3x, e depois
desligar-se-á.
5.B Coloque o seu telefone no meio do carregador ou no suporte de carregamento, e o carre-
gamento começará automaticamente. Para indicar que o carregamento começou, o anel de luz
LED piscará lentamente 3x, e depois desligar-se-á.
6 NA CAIXA

IT - ITALIANO
1 SPECIFICHE TECNICHE
2 PANORAMICA DEL PRODOTTO
3 RICARICA DEL DISPOSITIVO
3.A Collegare l’estremità USB-C del cavo di ricarica all’ingresso del caricatore wireless e l’altra
estremità USB-C a un caricatore a muro.
3.B Appoggiare il dispositivo sul caricatore wireless o sulla base di ricarica: il dispositivo si
caricherà automaticamente.
4 RICARICA DEL POWER BANK
4.A Creare un caricatore doppio collegando magneticamente 2 caricatori. La porta di espansi-
one trasferisce l’energia, è sufficiente utilizzare 1 solo cavo.
4.B Quando i due caricabatterie sono collegati tra loro, la potenza massima di 15 W viene
suddivisa in 10W/5W o 7,5W/7,5W.
Pagina se încarcă...
Pagina se încarcă...
Pagina se încarcă...
Pagina se încarcă...
Pagina se încarcă...
Pagina se încarcă...
Pagina se încarcă...
Pagina se încarcă...
Pagina se încarcă...
Pagina se încarcă...
Pagina se încarcă...
Pagina se încarcă...
Pagina se încarcă...
Pagina se încarcă...
Pagina se încarcă...
Pagina se încarcă...
Pagina se încarcă...
Pagina se încarcă...
Pagina se încarcă...
Pagina se încarcă...
Pagina se încarcă...
Pagina se încarcă...
Pagina se încarcă...
Pagina se încarcă...
Pagina se încarcă...
Pagina se încarcă...
Pagina se încarcă...
Pagina se încarcă...
Pagina se încarcă...
Pagina se încarcă...
Pagina se încarcă...
Pagina se încarcă...
Pagina se încarcă...
Pagina se încarcă...
Pagina se încarcă...
Pagina se încarcă...
Pagina se încarcă...
Pagina se încarcă...
Pagina se încarcă...
Pagina se încarcă...
Pagina se încarcă...
Pagina se încarcă...
Pagina se încarcă...
Pagina se încarcă...
Pagina se încarcă...
Pagina se încarcă...
Pagina se încarcă...
Pagina se încarcă...
Pagina se încarcă...
Pagina se încarcă...
-
 1
1
-
 2
2
-
 3
3
-
 4
4
-
 5
5
-
 6
6
-
 7
7
-
 8
8
-
 9
9
-
 10
10
-
 11
11
-
 12
12
-
 13
13
-
 14
14
-
 15
15
-
 16
16
-
 17
17
-
 18
18
-
 19
19
-
 20
20
-
 21
21
-
 22
22
-
 23
23
-
 24
24
-
 25
25
-
 26
26
-
 27
27
-
 28
28
-
 29
29
-
 30
30
-
 31
31
-
 32
32
-
 33
33
-
 34
34
-
 35
35
-
 36
36
-
 37
37
-
 38
38
-
 39
39
-
 40
40
-
 41
41
-
 42
42
-
 43
43
-
 44
44
-
 45
45
-
 46
46
-
 47
47
-
 48
48
-
 49
49
-
 50
50
-
 51
51
-
 52
52
-
 53
53
-
 54
54
-
 55
55
-
 56
56
-
 57
57
-
 58
58
-
 59
59
-
 60
60
-
 61
61
-
 62
62
-
 63
63
-
 64
64
-
 65
65
-
 66
66
-
 67
67
-
 68
68
-
 69
69
-
 70
70


în alte limbi
Lucrări înrudite
-
Xtorm XA2065 Manual de utilizare
-
Xtorm XAT140 Manual de utilizare
-
Xtorm XVC2067 Manual de utilizare
-
Xtorm XE1201 Manual de utilizare
-
Xtorm XE110 Manual de utilizare
-
-
Xtorm XR201 Manual de utilizare
-
Xtorm XE1050 Manual de utilizare
-
Xtorm XR202 Manual de utilizare
-
Xtorm XVC2140 Manual de utilizare
Alte documente
-
xtrom XA2030 Manual de utilizare
-
 zwart Cazy CPB201PDB Manual de utilizare
-
 Epico 9915111300032 Manual de utilizare
-
Canyon 3 в 1 с технологией Qi CNS-WCS302W Manual de utilizare
-
Hama 00081713 Manual de utilizare
-
Hama 00 201688 Manual de utilizare
-
Hama 00201685 Manual de utilizare
-
Hama 00201687 Manual de utilizare
-
Hama 00201684 Manual de utilizare
-
Samsung EP-P4300 Manual de utilizare

