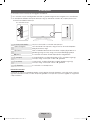
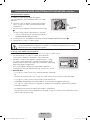
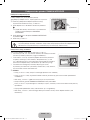
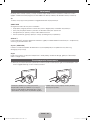
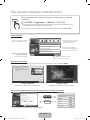
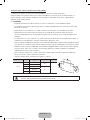
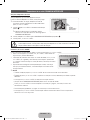
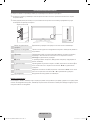
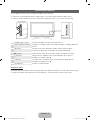
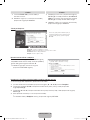
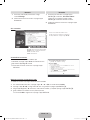
Samsung UE40D7000LS Ghid de inițiere rapidă
- Categorie
- Televizoare
- Tip
- Ghid de inițiere rapidă
Acest manual este potrivit și pentru

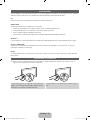
LED TV
user manual
imagine the possibilities
Thank you for purchasing this Samsung product.
To receive more complete service, please register
your product at
www.samsung.com/register
Model _____________ Serial No. _____________
E-MANUAL
© 2011 Samsung Electronics Co., Ltd. All rights reserved.
BN68-03438D-03
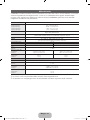
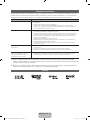
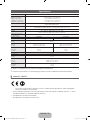
Contact SAMSUNG WORLDWIDE
If you have any questions or comments relating to Samsung products, please contact the SAMSUNG customer care centre.
Country
Customer Care Centre
Web Site
ALBANIA 42 27 5755 -
AUSTRIA 0810 - SAMSUNG (7267864, € 0.07/min) www.samsung.com
BELGIUM 02-201-24-18 www.samsung.com/be (Dutch)
www.samsung.com/be_fr (French)
BOSNIA 05 133 1999 -
BULGARIA 07001 33 11 www.samsung.com
CROATIA 062 SAMSUNG (062 726 7864) www.samsung.com
CZECH 800 - SAMSUNG (800-726786) www.samsung.com
Samsung Zrt., česká organizační složka, Oasis Florenc, Sokolovská394/17, 180 00, Praha 8
DENMARK 70 70 19 70 www.samsung.com
FINLAND 030 - 6227 515 www.samsung.com
FRANCE 01 48 63 00 00 www.samsung.com
GERMANY 01805 - SAMSUNG (726-7864 € 0,14/Min) www.samsung.com
GREECE 2106293100 www.samsung.com
HUNGARY 06-80-SAMSUNG (726-7864) www.samsung.com
ITALIA 800-SAMSUNG (726-7864) www.samsung.com
KOSOVO +381 0113216899 -
LUXEMBURG 261 03 710 www.samsung.com
MACEDONIA 023 207 777 -
MONTENEGRO 020 405 888 -
NETHERLANDS 0900-SAMSUNG (0900-7267864) (€ 0,10/Min) www.samsung.com
NORWAY 815-56 480 www.samsung.com
POLAND 0 801 1SAMSUNG (172678)
022-607-93-33
www.samsung.com
PORTUGAL 80820-SAMSUNG (726-7864) www.samsung.com
RUMANIA 08010 SAMSUNG (08010 7267864) – doar din reţeaua
Romtelecom, tarif local;
021.206.01.10 – din orice reţea, tarif normal
www.samsung.com
SERBIA 0700 Samsung (0700 726 7864) www.samsung.com
SLOVAKIA 0800 - SAMSUNG (0800-726 786) www.samsung.com/sk
SPAIN 902 - 1 - SAMSUNG (902 172 678) www.samsung.com
SWEDEN 0771 726 7864 (SAMSUNG) www.samsung.com
Switzerland 0848 - SAMSUNG(7267864, CHF 0.08/min) www.samsung.com/ch
www.samsung.com/ch_fr/(French)
U.K 0330 SAMSUNG (7267864) www.samsung.com
EIRE 0818 717100 www.samsung.com
LITHUANIA 8-800-77777 www.samsung.com
LATVIA 8000-7267 www.samsung.com
ESTONIA 800-7267 www.samsung.com
Turkey 444 77 11 www.samsung.com
LED TV user manual
[UD7000-XH]BN68-03438D-03L17.indb 1 2011-05-11 오후 5:14:29

English - 2
For more information on how to use the e-Manual (p. 14)
Figures and illustrations in this User Manual are provided for reference only and may differ from actual product
appearance. Product design and specifications may be changed without notice.
Digital TV notice
1. Functionalities related to Digital TV (DVB) are only available in countries/areas where DVB-T (MPEG2 and MPEG4 AVC) digital terrestrial signals are
broadcasted or where you are able to access to a compatible DVB-C (MPEG2 and MPEG4 AAC) cable-TV service. Please check with your local
dealer the possibility to receive DVB-T or DVB-C signal.
2. DVB-T is the DVB European consortium standard for the broadcast transmission of digital terrestrial television and DVB-C is that for the broadcast
transmission of digital TV over cable. However, some differentiated features like EPG (Electric Programme Guide), VOD (Video On Demand) and so
on, are not included in this specification. So, they cannot be workable at this moment.
3. Although this TV set meets the latest DVB-T and DVB-C standards, as of [August, 2008], the compatibility with future DVB-T digital terrestrial and
DVB-C digital cable broadcasts cannot be guaranteed.
4. Depending on the countries/areas where this TV set is used some cable-TV providers may charge an additional fee for such a service and you may
be required to agree to terms and conditions of their business.
5. Some Digital TV functions might be unavailable in some countries or regions and DVB-C might not work correctly with some cable service providers.
6. For more information, please contact your local Samsung customer care centre.
✎
The reception quality of TV may be affected due to differences in broadcasting method between the countries. Please check the TV
performance in the local SAMSUNG Authorized Dealer, or the Samsung Call Centre whether it can be improved by reconfiguring TV setting or
not.
Still image warning
Avoid displaying still images (like jpeg picture files) or still image element (like TV programme logo, panorama or 4:3 image format, stock or news bar at
screen bottom etc.) on the screen. Constant displaying of still picture can cause ghosting of LED screen, which will affect image quality. To reduce risk of
this effect, please follow below recommendations:
• Avoid displaying the same TV channel for long periods.
• Always try do display any image on full screen, use TV set picture format menu for best possible match.
• Reduce brightness and contrast values to minimum required to achieve desired picture quality, exceeded values may speed up the burnout process.
• Frequently use all TV features designed to reduce image retention and screen burnout, refer to e-Manual for details.
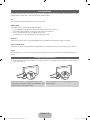
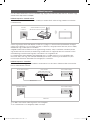
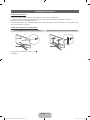
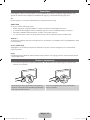
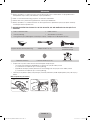
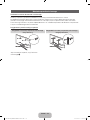
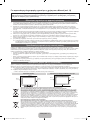
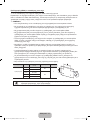
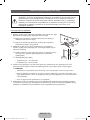
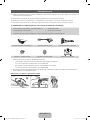
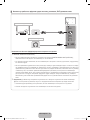
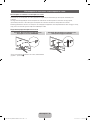
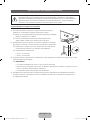
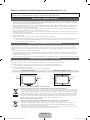
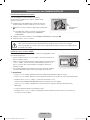
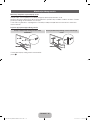
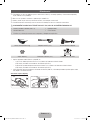
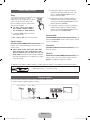
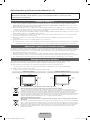
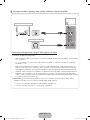
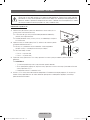
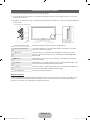
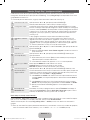
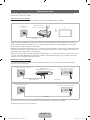
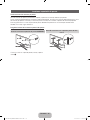
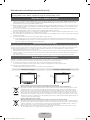
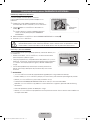
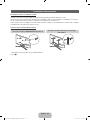
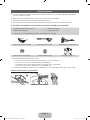
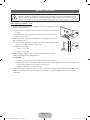
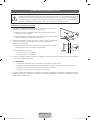
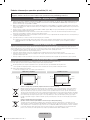
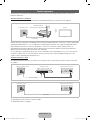
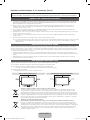
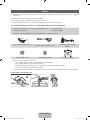
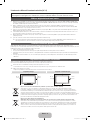
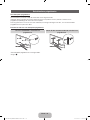
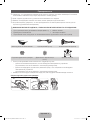
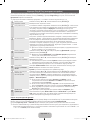
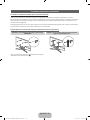
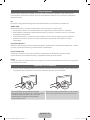
Securing the Installation Space
Keep the required distances between the product and other objects (e.g. walls) to ensure proper ventilation.
Failing to do so may result in fire or a problem with the product due to an increase in the internal temperature of the product.
✎
When using a stand or wall-mount, use parts provided by Samsung Electronics only.
• If you use parts provided by another manufacturer, it may result in a problem with the product or an injury due to the product falling.
✎
The appearance may differ depending on the product.
• Be careful when you contact the TV because some parts can be somewhat hot.
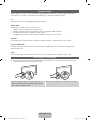
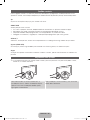
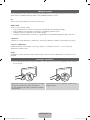
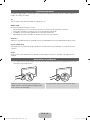
Installation with a stand. Installation with a wall-mount.
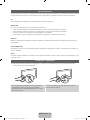
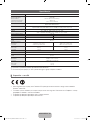
Correct Disposal of This Product (Waste Electrical & Electronic Equipment)
(Applicable in the European Union and other European countries with separate collection systems)
This marking on the product, accessories or literature indicates that the product and its electronic accessories (e.g. charger,
headset, USB cable) should not be disposed of with other household waste at the end of their working life. To prevent possible
harm to the environment or human health from uncontrolled waste disposal, please separate these items from other types of waste
and recycle them responsibly to promote the sustainable reuse of material resources. Household users should contact either the
retailer where they purchased this product, or their local government office, for details of where and how they can take these items
for environmentally safe recycling. Business users should contact their supplier and check the terms and conditions of the purchase
contract. This product and its electronic accessories should not be mixed with other commercial wastes for disposal.
Correct disposal of batteries in this product
(Applicable in the European Union and other European countries with separate battery return systems)
This marking on the battery, manual or packaging indicates that the batteries in this product should not be disposed of with other
household waste at the end of their working life. Where marked, the chemical symbols Hg, Cd or Pb indicate that the battery
contains mercury, cadmium or lead above the reference levels in EC Directive 2006/66. If batteries are not properly disposed of,
these substances can cause harm to human health or the environment. To protect natural resources and to promote material
reuse, please separate batteries from other types of waste and recycle them through your local, free battery return system.
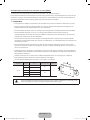
10 cm10 cm
10 cm
10 cm
10 cm
10 cm
10 cm
[UD7000-XH]BN68-03438D-03L17.indb 2 2011-05-11 오후 5:14:29

English - 3
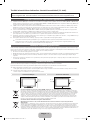
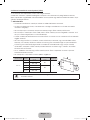
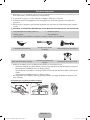
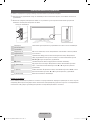
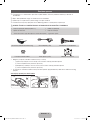
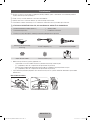
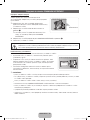
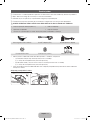
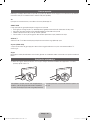
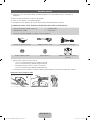
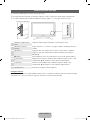
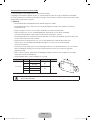
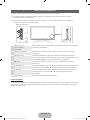
Accessories
✎
Please make sure the following items are included with your TV. If any items are missing, contact your
dealer.
✎
The items’ colours and shapes may vary depending on the models.
✎
Cables not included in the package contents can be purchased separately.
✎
Check that there is no accessory hidden behind packing materials when you open the box.
[
CAUTION: INSERT SECURELY LEST SHOULD BE DETACHED IN SET
• Remote Control & Batteries (AAA x 2) • Power Cord
• Owner’s Instructions • Cleaning-Cloth
• Warranty Card (Not available in some locations) / Safety Guide
Samsung 3D Active Glasses
Scart Adapter (2 EA) AV/Component Adapter
Holder-Wire stand Holder Ring (4 EA) CI Card Adapter
• An administration fee may be charged if either
– (a) an engineer is called out at your request and there is no defect in the product
(i.e. where you have failed to read this user manual)
– (b) you bring the unit to a repair centre and there is no defect in the product
(i.e. where you have failed to read this user manual).
• The amount of such administration charge will be advised to you before any work or home visit is carried out.
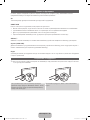
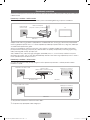
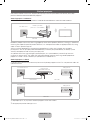
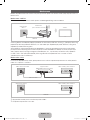
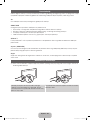
Assembling the Holder-Wire stand
[UD7000-XH]BN68-03438D-03L17.indb 3 2011-05-11 오후 5:14:30

English - 4
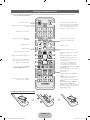
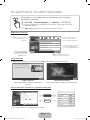
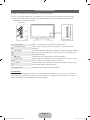
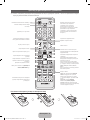
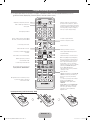
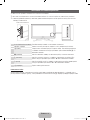
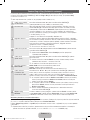
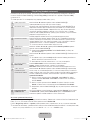
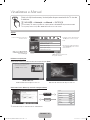
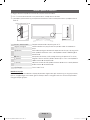
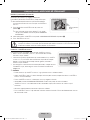
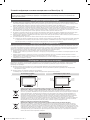
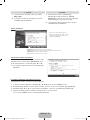
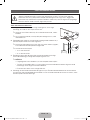
Viewing the Control Panel
✎
The product colour and shape may vary depending on the model.
✎
There are control buttons in rear of TV. When you touch the button, control icons appears.
✎
Any object (an electric wire, etc.) near the control panel may cause unintended activation of the OSD.
Remote control sensor Aim the remote control towards this spot on the TV.
Power Indicator Blinks and turns off when the power is on and lights up in standby mode.
E
(Source)
Toggles between all the available input sources. In the on-screen menu, use
this button as you would use the ENTER
E
button on the remote control.
m
(Menu)
Displays an on-screen menu, the OSD (on screen display) of your TV’s
features.
o
(Volume)
Adjusts the volume. In the OSD, use the
wv
buttons as you would use the
◄ and ► buttons on the remote control.
k
(Channel) Changes the channels. In the OSD, use the
<>
buttons as you would
use the ▼ and ▲ buttons on the remote control.
P
(Power)
Turns the TV on or off.
Standby mode
Do not leave your TV in standby mode for long periods of time (when you are away on a holiday, for example).
A small amount of electric power is still consumed even when the power button is turned off. It is best to unplug
the power cord.
TV Rear
[UD7000-XH]BN68-03438D-03L17.indb 4 2011-05-11 오후 5:14:30

English - 5
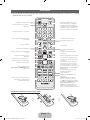
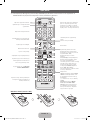
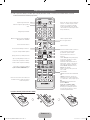
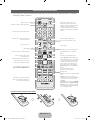
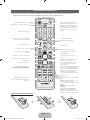
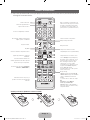
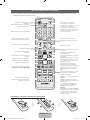
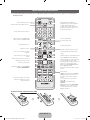
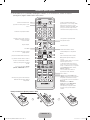
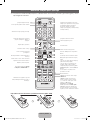
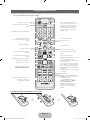
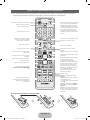
Viewing the Remote Control
✎
This is a special remote control for the visually impaired persons and has Braille points on the Power,
Channel and Volume buttons.
Installing batteries (Battery size: AAA)
CH LIST
MUTE
POWER
SOURCE
PRE-CH
E-MANUAL
P.SIZE
AD/SUBT.
TTX/MIX
ON/OFF
SOCIAL
TV
Turns the TV on and off.
Displays and selects the available video
sources.
Turns the remote control light on or off.
When on, the buttons become illuminated
for a moment when pressed. (Using the
remote control with this button set to On
will reduce the battery usage time.)
Returns to the previous channel.
Cuts off the sound temporarily.
Changes channels.
Displays channel lists on the screen.
Displays the EPG (Electronic Programme
Guide).
Displays information on the TV screen.
OFN (Optical Finger Navigation) Sensor
can be used as a pointer only in Web
Browser application.
If you don’t press any buttons within
30 seconds, the sensor will turn off
automatically. To wake up the sensor,
press ENTER, Navigation, Colour, REW,
FF, Return buttons.
While you use this sensor, the backlight
will not be operated.
Exits the menu.
Have direct access to channels.
Adjusts the volume.
Alternately select Teletext ON, Double,
Mix or OFF.
Opens the OSD.
Quickly select frequently used functions.
Link to various application services.
Returns to the previous menu.
Selects the on-screen menu items and
changes the values seen on the menu.
These buttons are for the Channel
Manager, SMART HUB menu, etc.
Use these buttons in a specific feature.
For details, refer to e-Manual.
SOCIAL TV: Displays the Social TV
screen.
SEARCH: Support to recommendation
search word and search function.
W
: Sets the video, which provided with
3D signal.
E-MANUAL: Displays the e-Manual.
P.SIZE: Selects the Picture size.
AD/SUBT.: Turns the audio description on
and off (not available in some locations). /
Displays digital subtitles.
[UD7000-XH]BN68-03438D-03L17.indb 5 2011-05-11 오후 5:14:31

English - 6
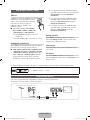
✎
For best cable connection to this product, be sure to use cables with a maximum thickness as below:
• Maximum thickness - 0.55 inches (14mm)
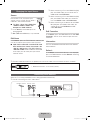
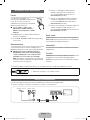
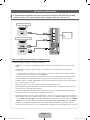
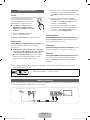
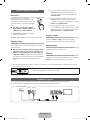
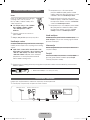
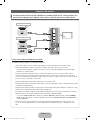
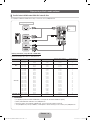
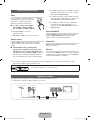
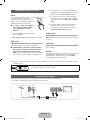
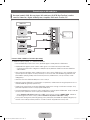
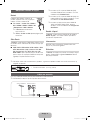
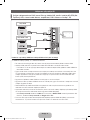
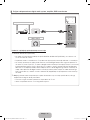
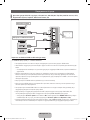
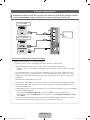
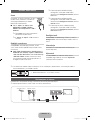
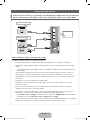
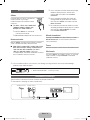
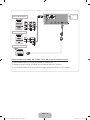
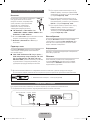
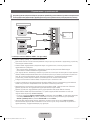
Connecting to an Antenna
When the TV is initially powered on, basic settings proceed automatically.
✎
Preset: Connecting the mains and antenna.
VHF/UHF Antenna CableSatellite
or
Changing the Input Source
Source
Use to select TV or an external input
sources such as a DVD / Blu-ray player /
cable box / STB satellite receiver.
■ TV / Ext.1 / Ext.2 / PC / HDMI1/DVI
/ HDMI2 / HDMI3 / HDMI4 / AV /
Component / USB / AllShare
✎
In the Source, connected inputs will
be highlighted.
✎
Ext.1, Ext.2 and PC always stay activated.
Edit Name
In the Source, press the TOOLS button, and then you
can set an external input sources name you want.
■ VCR / DVD / Cable STB / Satellite STB / PVR
STB / AV Receiver / Game / Camcorder / PC
/ DVI PC / DVI Devices / TV / IPTV / Blu-ray
/ HD DVD / DMA: Name the device connected
to the input jacks to make your input source
selection easier.
✎
When connecting a PC to the HDMI IN 1(DVI)
port with HDMI cable, you should set the TV
to PC mode under Edit Name.
✎
When connecting a PC to the HDMI IN 1(DVI)
port with HDMI to DVI cable, you should set
the TV to DVI PC mode under Edit Name.
✎
When connecting an AV devices to the HDMI
IN 1(DVI) port with HDMI to DVI cable, you
should set the TV to DVI Devices mode
under Edit Name.
Edit Favourites
In the Source, press the TOOLS button to select Edit
Favourites. You can set an external input source to
Favourites.
Information
You can see detailed information about the selected
external device.
Refresh
In the Source, If the external devices is not displayed,
press the TOOLS button to select Refresh. Searching
for connected devices.
SOURCE
[UD7000-XH]BN68-03438D-03L17.indb 6 2011-05-11 오후 5:14:31

English - 7
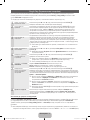
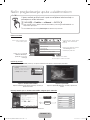
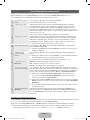
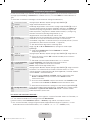
Plug & Play (Initial Setup)
When the TV is initially powered on, a sequence of on-screen prompts will assist in configuring basic settings.
Press the POWER
P
button. Plug & Play is available only when the Source is set to TV.
✎
Before turning on the TV, make sure the antenna cable is connected (p. 6).
1
Selecting the OSD
Language
Press the ▲ or ▼ button, then press the ENTER
E
button.
Select the desired OSD (On Screen Display) language.
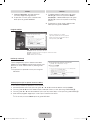
2
Setting up the Network
Set up your network connection. Press the ENTER
E
button to start. If you do
not know your network set up information or want to set to it later, select Skip.
We suggest you skip network connection setup now and refer to “Network
menu” in the e-Manual for set up requirements and instructions, and the
Network Connection section of this manual (p. 13).
You can set up the network connection later using the Network menu.
3
Software Upgrade Select Next to upgrade TV software. Your TV will automatically upgrade, if your
TV need a software upgrade. If you want to upgrade later, select the Skip. For
more information, refer to “Software Upgrade” (Preference Features → Support
Menu) in the e-Manual.
✎
This may take some time, depending on network status.
4
Selecting the usage
mode
Press the ▲ or ▼ button to select Home Use, and then press the ENTER
E
button twice.
✎
Select the Home Use mode. Store Demo mode is for retail environments.
5
Select Country
(Depending on the
country)
Press the ▲ or ▼ button, then press the ENTER
E
button. Select the
appropriate country.
✎
After selecting the country in the Country menu, some models may
proceed with an additional option to setup the pin number.
✎
When you input the PIN number, 0-0-0-0 is not available.
6
Setting the Clock
Mode
Set the Clock Mode automatically or manually.
Auto: Select the time zone where you are located.
Manual: Allows you to manually set the current date and time.
7
Selecting search
options for auto tuning
Press the ▲ or ▼ button, then press the ENTER
E
button. Select the channel
source to memorise. When setting the antenna source to Cable, a step appears
allowing you to assign numerical values (channel frequencies) to the channels.
For more information, refer to Channel → Auto Tuning.
✎
When Air or Cable is selected first: After all Air or Cable channels are
stored, the step for storing Satellite channels is displayed.
✎
When Satellite is selected first: After all Satellite channels are stored, the
step for storing Air or Cable channels is displayed.
✎
Press the ENTER
E
button at any time to interrupt the memorisation
process.
8
Enjoy your TV. If you want to watch a broadcast Programme, select Close. If you want to enjoy
the Smart Hub, select the Smart Hub. The Smart Hub will start. For more
detailed information, refer to “Smart Hub” in the e-Manual.
If You Want to Reset This Feature...
Select System - Plug & Play (Initial Setup). Enter your 4 digit PIN number. The default PIN number is “0-0-0-0”.
If you want to change the PIN number, use the Change PIN function.
You should do Plug & Play (MENU → System) again at home although you did in shop.
✎
If you forget the PIN code, press the remote control buttons in the following sequence in Standby mode,
which resets the PIN to “0-0-0-0”: MUTE → 8 → 2 → 4 → POWER (on).
[UD7000-XH]BN68-03438D-03L17.indb 7 2011-05-11 오후 5:14:32

English - 8
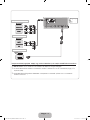
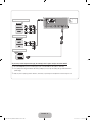
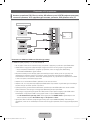
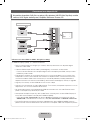
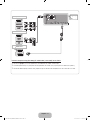
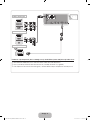
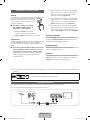
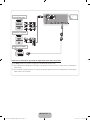
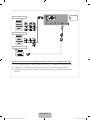
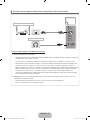
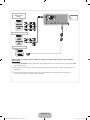
Connecting to AV devices
¦
Available devices: DVD, Blu-ray player, HD cable box, HD STB (Set-Top-Box) satellite
receiver, VCR, Digital Audio System, Amplifier, DVD home Theatre, PC
Using an HDMI or an HDMI to DVI cable (up to 1080p)
✎
HDMI IN 1(DVI), 2(ARC), 3, 4 / PC/DVI AUDIO IN
x
For better picture and audio quality, connect to a digital device using an HDMI cable.
x
An HDMI cable supports digital video and audio signals, and does not require an audio cable.
– To connect the TV to a digital device that does not support HDMI output, use an HDMI/DVI and
audio cables.
x
The picture may not display normally (if at all) or the audio may not work if an external device that
uses an older version of HDMI mode is connected to the TV. If such a problem occurs, ask the
manufacturer of the external device about the HDMI version and, if out of date, request an upgrade.
x
Be sure to use an HDMI cable with a thickness of 14 mm or less.
x
Be sure to purchase a certified HDMI cable. Otherwise, the picture may not display or a connection
error may occur.
x
A basic high-speed HDMI cable or one with ethernet is recommended. This product does not support
the ethernet function via HDMI.
x
This product supports the 3D and ARC (Audio Return Channel) functions via an HDMI cable. Note
that the ARC function is supported by the HDMI IN 2(ARC) port only.
– If 3D Auto View is set to On, some functions such as SMART HUB may be disabled. In this case,
set 3D Auto View or 3D Mode to Off.
x
The ARC function allows digital audio to output via the HDMI IN 2(ARC) port. It can be enabled only
when the TV is connected with an audio receiver that supports the ARC function.
(DVI)
(ARC)
HDMI OUT
DVI OUT
AUDIO OUT
R-AUDIO-L
HDMI connection
HDMI to DVI connection
[UD7000-XH]BN68-03438D-03L17.indb 8 2011-05-11 오후 5:14:32

English - 9
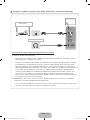
Using a Component (up to 1080p) or an Audio/Video (480i only) and a Scart Cable
✎
In Ext. mode, DTV Out supports MPEG SD Video and Audio only.
✎
When connecting to AV IN, connect the AV connector(yellow) to the TV jack(Green).
✎
To obtain the best picture quality, the Component connection is recommended over the A/V
connection.
AUDIO OUT
R-AUDIO-L
VIDEO OUT
AUDIO OUT
R-AUDIO-L
P
R
P
B
Y
COMPONENT OUT
G
B
B
W
W
R
R
Y
Y
W
W
R
R
R
R
G
EXT
Component connection
AV connection
SCART connection
[UD7000-XH]BN68-03438D-03L17.indb 9 2011-05-11 오후 5:14:32

English - 10
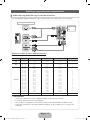
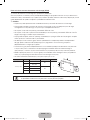
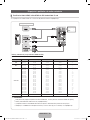
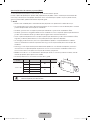
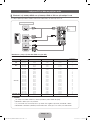
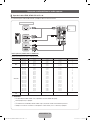
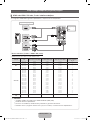
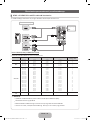
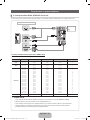
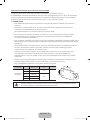
Connecting to a PC and Audio device
¦ Using an HDMI cable or an HDMI to DVI cable or a D-sub cable
✎
Connecting through the HDMI cable may not be supported depending on the PC.
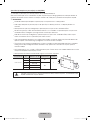
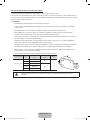
Display Modes (D-Sub and an HDMI to DVI Input)
Optimal resolution is 1920 X 1080 @ 60 Hz.
Mode Resolution Horizontal Frequency (KHz) Vertical Frequency (Hz) Pixel Clock Frequency (MHz) Sync Polarity (H / V)
IBM
640 x 350
720 x 400
31.469
31.469
70.086
70.087
25.175
28.322
+/-
-/+
MAC
640 x 480
832 x 624
1152 x 870
35.000
49.726
68.681
66.667
74.551
75.062
30.240
57.284
100.000
-/-
-/-
-/-
VESA DMT
640 x 480
640 x 480
640 x 480
800 x 600
800 x 600
800 x 600
1024 x 768
1024 x 768
1024 x 768
1152 x 864
1280 x 1024
1280 x 1024
1280 x 800
1280 x 800
1280 x 960
1360 x 768
1440 x 900
1440 x 900
1680 x 1050
31.469
37.861
37.500
37.879
48.077
46.875
48.363
56.476
60.023
67.500
63.981
79.976
49.702
62.795
60.000
47.712
55.935
70.635
65.290
59.940
72.809
75.000
60.317
72.188
75.000
60.004
70.069
75.029
75.000
60.020
75.025
59.810
74.934
60.000
60.015
59.887
74.984
59.954
25.175
31.500
31.500
40.000
50.000
49.500
65.000
75.000
78.750
108.000
108.000
135.000
83.500
106.500
108.000
85.500
106.500
136.750
146.250
-/-
-/-
-/-
+/+
+/+
+/+
-/-
-/-
+/+
+/+
+/+
+/+
-/+
-/+
+/+
+/+
-/+
-/+
-/+
VESA DMT /
DTV CEA
1920 x 1080p 67.500 60.000 148.500 +/+
✎
NOTE
x
For HDMI/DVI cable connection, you must use the HDMI IN 1(DVI) jack.
x
The interlace mode is not supported.
x
The set might operate abnormally if a non-standard video format is selected.
x
Separate and Composite modes are supported. SOG(Sync On Green) is not supported.
DVI OUT
AUDIO OUT
AUDIO OUT
PC OUT
HDMI OUT
PC connection
[UD7000-XH]BN68-03438D-03L17.indb 10 2011-05-11 오후 5:14:33

English - 11
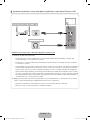
¦ Available devices: digital audio system, amplifier, DVD home theatre
Using an Optical (Digital) a Headphone Connection
✎
DIGITAL AUDIO OUT (OPTICAL)
x
When a digital audio system is connected to the DIGITAL AUDIO OUT (OPTICAL) jack, decrease the
volume of both the TV and the system.
x
5.1 CH (channel) audio is available when the TV is connected to an external device supporting 5.1 CH.
x
When the receiver (home theatre) is set to on, you can hear sound output from the TV’s optical jack.
When the TV is receiving a DTV signal, the TV will send 5.1 CH sound to the home theatre receiver.
When the source is a digital component such as a DVD / Blu-ray player / cable box / STB (Set-Top-
Box) satellite receiver and is connected to the TV via HDMI, only 2 CH audio will be heard from the
home theatre receiver. If you want to hear 5.1 CH audio, connect the digital audio out jack from your
DVD / Blu-ray player / cable box / STB satellite receiver directly to an amplifier or home theatre.
✎
Headphones
H
: You can connect your headphones to the headphones output on your set. While the
headphones are connected, the sound from the built-in speakers will be disabled.
x
Sound function may be restricted when connecting headphones to the TV.
x
Headphone volume and TV volume are adjusted separately.
OPTICAL
DVD home theatre connection
Headphones connection
[UD7000-XH]BN68-03438D-03L17.indb 11 2011-05-11 오후 5:14:33

English - 12
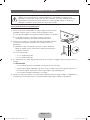
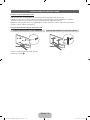
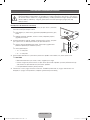
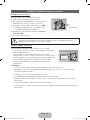
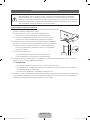
Connecting to a COMMON INTERFACE slot
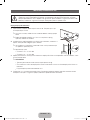
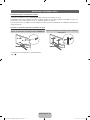
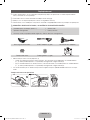
Attaching the CI Card Adapter
Attach the adapter as shown below.
To connect the CI CARD Adapter, follow these steps.
✎
We recommend attaching the adapter before installing
the wall mount, or inserting the “CI or CI+ CARD”.
1. Insert the CI CARD Adapter into the two holes on the
product 1.
✎
Please find a two holes on the rear of the TV. A two
holes is beside the COMMON INTERFACE port.
2. Connect the CI CARD Adapter into the COMMON
INTERFACE port on the product 2.
3. Insert the “CI or CI+ CARD”.
We recommand that you insert the CI card before you mount the TV on a wall. It may be difficult to
insert after the mounting. Insert the card after attaching the CI Card Adapter on TV. It is difficult to
attach the module if you insert the card before attaching.
Using the “CI or CI+ CARD”
To watch paid channels, the “CI or CI+ CARD” must be inserted.
• If you don’t insert the “CI or CI+ CARD”, some channels will display
the message “Scrambled Signal”.
• The pairing information containing a telephone number, the “CI or CI+
CARD” ID the Host ID and other information will be displayed in about
2~3 minutes. If an error message is displayed, please contact your
service provider.
• When the configuration of channel information has finished, the
message “Updating Completed” is displayed, indicating the channel
list is updated.
✎
NOTE
x
You must obtain a “CI or CI+ CARD” from a local cable service provider.
x
When removing the “CI or CI+ CARD”, carefully pull it out with your hands since dropping the “CI or CI+
CARD” may cause damage to it.
x
Insert the “CI or CI+ CARD” in the direction marked on the card.
x
The location of the COMMON INTERFACE slot may be different depending on the model.
x
“CI or CI+ CARD” is not supported in some countries and regions; check with your authorized dealer.
x
If you have any problems, please contact a service provider.
x
Insert the “CI or CI+ CARD” that supports the current antenna settings. The screen will be distorted or
will not be seen.
TV Rear
[UD7000-XH]BN68-03438D-03L17.indb 12 2011-05-11 오후 5:14:34

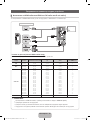
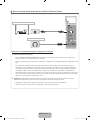
English - 13
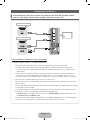
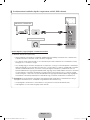
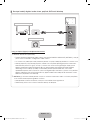
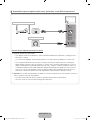
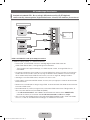
Network Connection
You can set up your TV so that it can access the Internet through your local area network (LAN) using a wired or
wireless connection.
Network Connection - Wireless
You can connect your TV to your LAN through a standard wireless router or modem.
Samsung’s Wireless LAN adapter supports the IEEE 802.11a/b/g and n communication protocols. Samsung
recommends using IEEE 802.11n. When you play the video over a IEEE 802.11b/g connection, the video may
not play smoothly.
Most wireless network systems incorporate a security system that requires devices that access the network
through an access point or wireless router (typically a wireless IP Sharer) to transmit an encrypted security code
called an access key.
If Pure High-throughput (Greenfield) 802.11n mode is selected and the Encryption type is set to WEP, TKIP or
TKIP AES (WPS2Mixed) for your wireless router, Samsung TVs will not support a connection in compliance with
new Wi-Fi certification specifications.
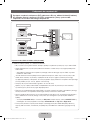
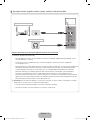
Network Connection - Wired
There are two main ways to connect your TV to your network using cable, depending on your network setup.
They are illustrated below:
✎
It is not supported when the network speed is under 10 Mbps.
✎
Use Cat 5 cable for the connection.
The LAN Port on
the Wall
LAN Cable
Wireless IP sharer
(Router having DHCP server)
TV
LAN CableModem Cable
The Modem Port on the Wall
TV Rear Panel
External Modem
(ADSL / VDSL / Cable TV)
The LAN Port on the Wall
TV Rear Panel
LAN Cable
[UD7000-XH]BN68-03438D-03L17.indb 13 2011-05-11 오후 5:14:35

English - 14
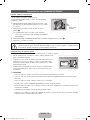
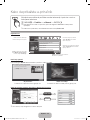
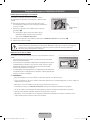
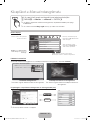
How to use the e-Manual
Screen Display
Using the Help
Display the e-Manual Guide & the Product Guide by pressing Help.
<
e-Manual
Guide>
The e-Manual guide appears as above.
<Product Guide>
The product guide appears as above.
How to toggle between the e-Manual and the corresponding menu(s).
✎
This function is not enabled in some menus.
You can read the introduction and instructions about the TV features stored in
your TV.
O
MENU
m
→ Support → e-Manual → ENTER
E
✎
If you want to return to e-Manual, press E-MANUAL button on remote.
✎
You can’t use the Try Now function, if the menu is not activated.
Basic Features
Changing the Preset Picture Mode
Adjusting Picture Settings
Changing the Picture Size
Changing the Picture Options
Setting up the TV with Your PC
IndexHelp
TV Screen: Displays the current
input source screen.
Help: Displays the e-Manual
Guide or Product guide. Press
ENTER
E
button.
Change the category. Press
l
or
r
button to select category you want.
Displays the sub-menu list. Press
ENTER
E
button to select sub-
menu you want.
Index: Displays index screen.
X: Exit the e-Manual.
Help Try Now Home Zoom Index
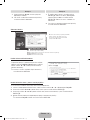
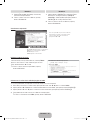
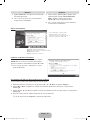
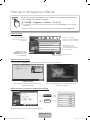
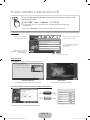
Basic Features > Changing the Preset Picture Mode (5/10)
Changing the Preset Picture Mode
■
Picture Mode t
Select your preferred picture type.
N When an input source is set to PC, the Picture Mode is only available the
Standard and Entertain.
• Dynamic: Suitable for a bright room.
• Standard: Suitable for a normal environment.
• Natural
for LED TV
/ Relax
for PDP TV
: Suitable for reducing eye strain.
• Movie: Suitable for watching movies in a dark room.
• Entertain (In PC mode only): Suitable for watching movies and games.
Picture
Picture Mode Standard
Tint (G/R) G 50 R 50
Colour 50
Sharpness 50
Brightness 45
Contrast 100
Backlight 14
E-MANUAL
Try Now
Return
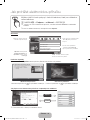
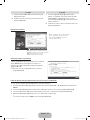
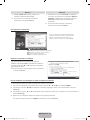
How to view the e-Manual
You can read the introduction and instructions about
the TV features stored in your TV.
O MENU
m
→ Support → e-Manual → ENTER
E
Basic Features
Changing the Preset Picture Mode
Adjusting Picture Settings
Changing the Picture Size
Changing the Picture Options
Setting up the TV with Your PC
IndexHelp
Return
Sync media from multiple devices with AllShare
AllShare™ syncs your digital devices so you can
enjoy music, movies and photos from your PC,
camera and mobile devices, on your larger TV
screen. Connects you to multiple PCs, as well.
E-MANUAL
[UD7000-XH]BN68-03438D-03L17.indb 14 2011-05-11 오후 5:14:43

English - 15
Method 1 Method 2
1. Select Try Now, if you want to execute the
corresponding menu(s).
2. To return to the e-Manual screen, press the
E-MANUAL button.
1. Press the ENTER
E
button when selecting
Contents Area. The “Are you sure?” is displayed.
Select Yes and then press the ENTER
E
button. The OSD window will be displayed.
2. To return to the e-Manual screen, press the
E-MANUAL button.
Viewing the Contents
Using the Zoom mode
When you view the e-Manual instruction, select the
Zoom to magnify the screen. You can scroll through
the magnified screen by using the
u
or
d
buttons.
✎
To return to the previous screen, press the
RETURN button.
How to search a keyword by using index page
✎
This function may not supported depending on the language.
1. If you want to search a keyword, press the
u
/
d
/
l
/
r
button to select Index.
2. Press the
l
or
r
button to select a character order you want, and then press the ENTER
E
button.
3. Press the
u
or
d
button to select a keyword you want to see, and then press the ENTER
E
button.
4. You can view the corresponding e-Manual instruction screen.
✎
To close the Index screen, press the RETURN button.
Basic Features > Changing the Preset Picture Mode (5/10)
Help Try Now Home Zoom Index
Changing the Preset Picture Mode
O MENU
m
→ Picture → Picture Mode → ENTER
E
■
Picture Mode t
Select your preferred picture type.
N When an input source is set to PC, the Picture Mode is only avalable
the Standard and Entertain.
• Dynamic: Suitable for a bright room.
• Standard: Suitable for a normal environment.
• Natural
for LED TV
/ Relax
for PDP TV
: Suitable for reducing eye strain.
• Movie: Suitable for watching movies in a dark room.
• Entertain(In PC mode only): Suitable for watching movies and games.
Try Now: Displays the corresponding menu(s).
Home: Moves to the e-Manual home screen.
Zoom: Magnifies a screen.
Index: Displays index screen.
Contents Area: You can view the corresponding
contents, if you selected a sub-menu. To move
previous or next page, press the
l
or
r
button.
Return
Changing the Preset Picture Mode
O MENU
m
→ Picture → Picture Mode → ENTER
E
■
Picture Mode t
Select your preferred picture type.
N When an input source is set to PC, the Picture Mode is only avalable the Standard
and Entertain.
• Dynamic: Suitable for a bright room.
• Standard: Suitable for a normal environment.
• Natural
for LED TV
/ Relax
for PDP TV
: Suitable for reducing eye strain.
• Movie: Suitable for watching movies in a dark room.
• Entertain (In PC mode only): Suitable for watching movies and games.
[UD7000-XH]BN68-03438D-03L17.indb 15 2011-05-11 오후 5:14:44

English - 16
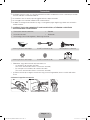
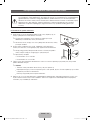
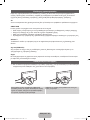
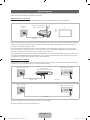
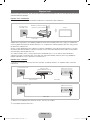
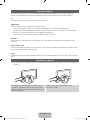
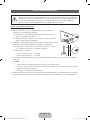
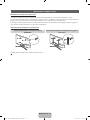
Installing the Wall Mount
Installing the Wall Mount Kit
The wall mount kit (sold separately) allows you to mount the TV on the wall.
For detailed information on installing the wall mount, see the instructions provided with the wall mount. Contact a
technician for assistance when installing the wall mount bracket.
Samsung Electronics is not responsible for any damage to the product or injury to yourself or others if you elect
to install the TV on your own.
Preparing before installing Wall-Mount
Case A. Installing the SAMSUNG Wall-Mount Case B. Installing another company’s Wall-Mount
To install a wall-mount, use the Holder-Ring 1.
1
1
[UD7000-XH]BN68-03438D-03L17.indb 16 2011-05-11 오후 5:14:44

English - 17
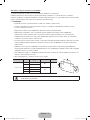
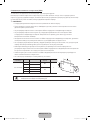
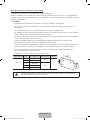
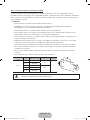
Wall Mount Kit Specifications (VESA)
✎
The wall mount kit is not supplied, but sold separately.
Install your wall mount on a solid wall perpendicular to the floor. When attaching to other building materials,
please contact your nearest dealer. If installed on a ceiling or slanted wall, it may fall and result in severe personal
injury.
✎
NOTE
x
Standard dimensions for wall mount kits are shown in the table below.
x
When purchasing our wall mount kit, a detailed installation manual and all parts necessary for assembly
are provided.
x
Do not use screws that do not comply with the VESA standard screw specifications.
x
Do not use screws that are longer than the standard dimension or do not comply with the VESA standard
screw specifications. Screws that are too long may cause damage to the inside of the TV set.
x
For wall mounts that do not comply with the VESA standard screw specifications, the length of the
screws may differ depending on the wall mount specifications.
x
Do not fasten the screws that are too strongly; this may damage the product or cause the product to fall,
leading to personal injury. Samsung is not liable for these kinds of accidents.
x
Samsung is not liable for product damage or personal injury when a non-VESA or non-specified wall
mount is used or the consumer fails to follow the product installation instructions.
x
Our 55” model do not comply with VESA Specifications. Therefore, you should use our dedicated wall
mount kit for this model.
x
Do not mount the TV at more than a 15 degree tilt.
Product Family inches VESA Spec. (A * B) Standard Screw Quantity
LED-TV
19~22 75 X 75
M4
4
23~27 200 X 100
32~40 200 X 200
M846~60 400 X 400
65~75 600 X 400
Do not install your Wall Mount Kit while your TV is turned on. It may result in personal injury
due to electric shock.
[UD7000-XH]BN68-03438D-03L17.indb 17 2011-05-11 오후 5:14:45

English - 18
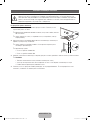
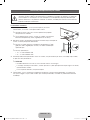
Securing the TV to the wall
Caution: Pulling, pushing, or climbing onto the TV may cause the TV to fall. In particular, ensure
that your children do not hang over or destabilize the TV; doing so may cause the TV to tip over,
resulting in serious injuries or death. Follow all safety precautions provided in the included Safety
Flyer. For added stability and safety, install the anti-fall device as follows.
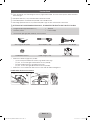
To Avoid the TV from Falling
1. Put the screws into the clamps and firmly fasten them onto the wall.
Confirm that the screws have been firmly installed onto the wal
l.
✎
You may need additional material such as an anchor depending on
the type of wall.
✎
Since the necessary clamps, screws, and string are not supplied,
please purchase these additionally.
2. Remove the screws from the back centre of the TV, put the screws into
the clamps, and then fasten the screws onto the TV agai
n.
✎
Screws may not be supplied with the product. In this case, please
purchase the screws of the following specifications.
✎
Screw Specifications
x
For a 19 ~ 27 inch: M4
x
For a 32 ~ 75 inch: M8
3. Connect the clamps fixed onto the TV and the clamps fixed onto the wall with a strong cable and then tie the
string tightly.
✎✎
NOTE
x
Install the TV near to the wall so that it does not fall backwards.
x
It is safe to connect the string so that the clamps fixed on the wall are equal to or lower than the
clamps fixed on the TV.
x
Untie the string before moving the TV.
4. Verify all connections are properly secured. Periodically check connections for any sign of fatigue for failure. If
you have any doubt about the security of your connections, contact a professional installer.
Wall
[UD7000-XH]BN68-03438D-03L17.indb 18 2011-05-11 오후 5:14:45

English - 19
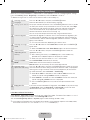
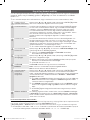
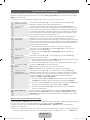
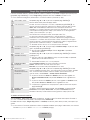
Troubleshooting
If you have any questions about the TV, first refer to this list. If none of these troubleshooting tips apply, please
visit “www.samsung.com,” then click on Support, or contact the call centre listed on the back-cover of this
manual.
Issues Solutions and Explanations
The TV won’t turn on. • Make sure the AC power cord is securely plugged in to the wall outlet and the TV.
• Make sure the wall outlet is working.
• Try pressing the POWER button on the TV to make sure the problem is not the remote. If the TV turns
on, refer to “Remote control does not work” below.
There is no picture/video. • Check cable connections (remove and reconnect all cables connected to the TV and external
devices).
• Set your external device’s (Cable/Sat Box, DVD, Blu-ray etc) video outputs to match the connections
to the TV input. For example, if an external device’s output is HDMI, it should be connected to an
HDMI input on the TV.
• Make sure your connected devices are powered on.
• Be sure to select the TV’s correct source by pressing the SOURCE button on the remote control.
• Reboot the connected device by reconnecting the device’s power cable.
The remote control does not work. • Replace the remote control batteries with the poles (+/–) in the right direction.
• Clean the sensor’s transmission window on the remote.
• Try pointing the remote directly at the TV from 5~6 feet away.
The cable/set top box remote control
doesn’t turn the TV on or off, or adjust the
volume.
• Programme the Cable/Set remote control to operate the TV. Refer to the Cable/Set user manual for
the SAMSUNG TV code.
✎
This TFT LED panel uses a panel consisting of sub pixels which require sophisticated technology to
produce. However, there may be a few bright or dark pixels on the screen. These pixels will have no impact
on the performance of the product.
✎
You can keep your TV as optimum condition to upgrade the latest firmware on web site (samsung.com →
Support → Downloads) by USB.
Licence
[UD7000-XH]BN68-03438D-03L17.indb 19 2011-05-11 오후 5:14:45

English - 20
List of Features
Excellent Digital Interface & Networking: With a built-in HD digital tuner, nonsubscription HD broadcasts can be
viewed without a cable box / STB (Set-Top-Box) satellite receiver.
3D
This exciting new feature enables you to view 3D content.
SMART HUB
The Gateway to all content integrated in one place
• It’s all integrated to guide you to easier and diverse entertainment choices
• Control your entertainment life with easy and simple user friendly UI
• Access to diverse Apps that are adding up every day
• Customize your TV, by App grouping & sorting to your taste
AllShare™
AllShare™ connects your TV and compatible Samsung mobile phones/devices through a network.
Anynet+(HDMI-CEC)
Allows you to control all connected Samsung devices that support Anynet+ with your Samsung TV’s remote.
Skype
With Skype you can say hello or share a laugh with anyone, anywhere. Communicate with people around the
world!
Storage and Maintenance
✎
If you attached some stickers on the TV screen, it remains some debris after removing the sticker. Please
clean it to watch TV.
Do not spray water or a cleaning agent directly onto
the product. Any liquid that goes into the product may
cause a failure, fire, or electric shock.
Clean the product with a soft cloth dapped in a small
amount of water.
[UD7000-XH]BN68-03438D-03L17.indb 20 2011-05-11 오후 5:14:46
Pagina se încarcă...
Pagina se încarcă...
Pagina se încarcă...
Pagina se încarcă...
Pagina se încarcă...
Pagina se încarcă...
Pagina se încarcă...
Pagina se încarcă...
Pagina se încarcă...
Pagina se încarcă...
Pagina se încarcă...
Pagina se încarcă...
Pagina se încarcă...
Pagina se încarcă...
Pagina se încarcă...
Pagina se încarcă...
Pagina se încarcă...
Pagina se încarcă...
Pagina se încarcă...
Pagina se încarcă...
Pagina se încarcă...
Pagina se încarcă...
Pagina se încarcă...
Pagina se încarcă...
Pagina se încarcă...
Pagina se încarcă...
Pagina se încarcă...
Pagina se încarcă...
Pagina se încarcă...
Pagina se încarcă...
Pagina se încarcă...
Pagina se încarcă...
Pagina se încarcă...
Pagina se încarcă...
Pagina se încarcă...
Pagina se încarcă...
Pagina se încarcă...
Pagina se încarcă...
Pagina se încarcă...
Pagina se încarcă...
Pagina se încarcă...
Pagina se încarcă...
Pagina se încarcă...
Pagina se încarcă...
Pagina se încarcă...
Pagina se încarcă...
Pagina se încarcă...
Pagina se încarcă...
Pagina se încarcă...
Pagina se încarcă...
Pagina se încarcă...
Pagina se încarcă...
Pagina se încarcă...
Pagina se încarcă...
Pagina se încarcă...
Pagina se încarcă...
Pagina se încarcă...
Pagina se încarcă...
Pagina se încarcă...
Pagina se încarcă...
Pagina se încarcă...
Pagina se încarcă...
Pagina se încarcă...
Pagina se încarcă...
Pagina se încarcă...
Pagina se încarcă...
Pagina se încarcă...
Pagina se încarcă...
Pagina se încarcă...
Pagina se încarcă...
Pagina se încarcă...
Pagina se încarcă...
Pagina se încarcă...
Pagina se încarcă...
Pagina se încarcă...
Pagina se încarcă...
Pagina se încarcă...
Pagina se încarcă...
Pagina se încarcă...
Pagina se încarcă...
Pagina se încarcă...
Pagina se încarcă...
Pagina se încarcă...
Pagina se încarcă...
Pagina se încarcă...
Pagina se încarcă...
Pagina se încarcă...
Pagina se încarcă...
Pagina se încarcă...
Pagina se încarcă...
Pagina se încarcă...
Pagina se încarcă...
Pagina se încarcă...
Pagina se încarcă...
Pagina se încarcă...
Pagina se încarcă...
Pagina se încarcă...
Pagina se încarcă...
Pagina se încarcă...
Pagina se încarcă...
Pagina se încarcă...
Pagina se încarcă...
Pagina se încarcă...
Pagina se încarcă...
Pagina se încarcă...
Pagina se încarcă...
Pagina se încarcă...
Pagina se încarcă...
Pagina se încarcă...
Pagina se încarcă...
Pagina se încarcă...
Pagina se încarcă...
Pagina se încarcă...
Pagina se încarcă...
Pagina se încarcă...
Pagina se încarcă...
Pagina se încarcă...
Pagina se încarcă...
Pagina se încarcă...
Pagina se încarcă...
Pagina se încarcă...
Pagina se încarcă...
Pagina se încarcă...
Pagina se încarcă...
Pagina se încarcă...
Pagina se încarcă...
Pagina se încarcă...
Pagina se încarcă...
Pagina se încarcă...
Pagina se încarcă...
Pagina se încarcă...
Pagina se încarcă...
Pagina se încarcă...
Pagina se încarcă...
Pagina se încarcă...
Pagina se încarcă...
Pagina se încarcă...
Pagina se încarcă...
Pagina se încarcă...
Pagina se încarcă...
Pagina se încarcă...
Pagina se încarcă...
Pagina se încarcă...
Pagina se încarcă...
Pagina se încarcă...
Pagina se încarcă...
Pagina se încarcă...
Pagina se încarcă...
Pagina se încarcă...
Pagina se încarcă...
Pagina se încarcă...
Pagina se încarcă...
Pagina se încarcă...
Pagina se încarcă...
Pagina se încarcă...
Pagina se încarcă...
Pagina se încarcă...
Pagina se încarcă...
Pagina se încarcă...
Pagina se încarcă...
Pagina se încarcă...
Pagina se încarcă...
Pagina se încarcă...
Pagina se încarcă...
Pagina se încarcă...
Pagina se încarcă...
Pagina se încarcă...
Pagina se încarcă...
Pagina se încarcă...
Pagina se încarcă...
Pagina se încarcă...
Pagina se încarcă...
Pagina se încarcă...
Pagina se încarcă...
Pagina se încarcă...
Pagina se încarcă...
Pagina se încarcă...
Pagina se încarcă...
Pagina se încarcă...
Pagina se încarcă...
Pagina se încarcă...
Pagina se încarcă...
Pagina se încarcă...
Pagina se încarcă...
Pagina se încarcă...
Pagina se încarcă...
Pagina se încarcă...
Pagina se încarcă...
Pagina se încarcă...
Pagina se încarcă...
Pagina se încarcă...
Pagina se încarcă...
Pagina se încarcă...
Pagina se încarcă...
Pagina se încarcă...
Pagina se încarcă...
Pagina se încarcă...
Pagina se încarcă...
Pagina se încarcă...
Pagina se încarcă...
Pagina se încarcă...
Pagina se încarcă...
Pagina se încarcă...
Pagina se încarcă...
Pagina se încarcă...
Pagina se încarcă...
Pagina se încarcă...
Pagina se încarcă...
Pagina se încarcă...
Pagina se încarcă...
Pagina se încarcă...
Pagina se încarcă...
Pagina se încarcă...
Pagina se încarcă...
Pagina se încarcă...
Pagina se încarcă...
Pagina se încarcă...
Pagina se încarcă...
Pagina se încarcă...
Pagina se încarcă...
Pagina se încarcă...
Pagina se încarcă...
Pagina se încarcă...
Pagina se încarcă...
Pagina se încarcă...
Pagina se încarcă...
Pagina se încarcă...
Pagina se încarcă...
Pagina se încarcă...
Pagina se încarcă...
Pagina se încarcă...
Pagina se încarcă...
Pagina se încarcă...
Pagina se încarcă...
Pagina se încarcă...
Pagina se încarcă...
Pagina se încarcă...
Pagina se încarcă...
Pagina se încarcă...
Pagina se încarcă...
Pagina se încarcă...
Pagina se încarcă...
Pagina se încarcă...
Pagina se încarcă...
Pagina se încarcă...
Pagina se încarcă...
Pagina se încarcă...
Pagina se încarcă...
Pagina se încarcă...
Pagina se încarcă...
Pagina se încarcă...
Pagina se încarcă...
Pagina se încarcă...
Pagina se încarcă...
Pagina se încarcă...
Pagina se încarcă...
Pagina se încarcă...
Pagina se încarcă...
Pagina se încarcă...
Pagina se încarcă...
Pagina se încarcă...
Pagina se încarcă...
Pagina se încarcă...
Pagina se încarcă...
Pagina se încarcă...
Pagina se încarcă...
Pagina se încarcă...
Pagina se încarcă...
Pagina se încarcă...
Pagina se încarcă...
Pagina se încarcă...
Pagina se încarcă...
Pagina se încarcă...
Pagina se încarcă...
Pagina se încarcă...
Pagina se încarcă...
Pagina se încarcă...
Pagina se încarcă...
Pagina se încarcă...
Pagina se încarcă...
Pagina se încarcă...
Pagina se încarcă...
Pagina se încarcă...
Pagina se încarcă...
Pagina se încarcă...
Pagina se încarcă...
Pagina se încarcă...
Pagina se încarcă...
Pagina se încarcă...
Pagina se încarcă...
Pagina se încarcă...
Pagina se încarcă...
Pagina se încarcă...
Pagina se încarcă...
Pagina se încarcă...
Pagina se încarcă...
Pagina se încarcă...
Pagina se încarcă...
Pagina se încarcă...
Pagina se încarcă...
Pagina se încarcă...
Pagina se încarcă...
Pagina se încarcă...
Pagina se încarcă...
Pagina se încarcă...
Pagina se încarcă...
Pagina se încarcă...
Pagina se încarcă...
Pagina se încarcă...
Pagina se încarcă...
Pagina se încarcă...
Pagina se încarcă...
Pagina se încarcă...
Pagina se încarcă...
Pagina se încarcă...
Pagina se încarcă...
Pagina se încarcă...
Pagina se încarcă...
Pagina se încarcă...
Pagina se încarcă...
Pagina se încarcă...
Pagina se încarcă...
Pagina se încarcă...
Pagina se încarcă...
-
 1
1
-
 2
2
-
 3
3
-
 4
4
-
 5
5
-
 6
6
-
 7
7
-
 8
8
-
 9
9
-
 10
10
-
 11
11
-
 12
12
-
 13
13
-
 14
14
-
 15
15
-
 16
16
-
 17
17
-
 18
18
-
 19
19
-
 20
20
-
 21
21
-
 22
22
-
 23
23
-
 24
24
-
 25
25
-
 26
26
-
 27
27
-
 28
28
-
 29
29
-
 30
30
-
 31
31
-
 32
32
-
 33
33
-
 34
34
-
 35
35
-
 36
36
-
 37
37
-
 38
38
-
 39
39
-
 40
40
-
 41
41
-
 42
42
-
 43
43
-
 44
44
-
 45
45
-
 46
46
-
 47
47
-
 48
48
-
 49
49
-
 50
50
-
 51
51
-
 52
52
-
 53
53
-
 54
54
-
 55
55
-
 56
56
-
 57
57
-
 58
58
-
 59
59
-
 60
60
-
 61
61
-
 62
62
-
 63
63
-
 64
64
-
 65
65
-
 66
66
-
 67
67
-
 68
68
-
 69
69
-
 70
70
-
 71
71
-
 72
72
-
 73
73
-
 74
74
-
 75
75
-
 76
76
-
 77
77
-
 78
78
-
 79
79
-
 80
80
-
 81
81
-
 82
82
-
 83
83
-
 84
84
-
 85
85
-
 86
86
-
 87
87
-
 88
88
-
 89
89
-
 90
90
-
 91
91
-
 92
92
-
 93
93
-
 94
94
-
 95
95
-
 96
96
-
 97
97
-
 98
98
-
 99
99
-
 100
100
-
 101
101
-
 102
102
-
 103
103
-
 104
104
-
 105
105
-
 106
106
-
 107
107
-
 108
108
-
 109
109
-
 110
110
-
 111
111
-
 112
112
-
 113
113
-
 114
114
-
 115
115
-
 116
116
-
 117
117
-
 118
118
-
 119
119
-
 120
120
-
 121
121
-
 122
122
-
 123
123
-
 124
124
-
 125
125
-
 126
126
-
 127
127
-
 128
128
-
 129
129
-
 130
130
-
 131
131
-
 132
132
-
 133
133
-
 134
134
-
 135
135
-
 136
136
-
 137
137
-
 138
138
-
 139
139
-
 140
140
-
 141
141
-
 142
142
-
 143
143
-
 144
144
-
 145
145
-
 146
146
-
 147
147
-
 148
148
-
 149
149
-
 150
150
-
 151
151
-
 152
152
-
 153
153
-
 154
154
-
 155
155
-
 156
156
-
 157
157
-
 158
158
-
 159
159
-
 160
160
-
 161
161
-
 162
162
-
 163
163
-
 164
164
-
 165
165
-
 166
166
-
 167
167
-
 168
168
-
 169
169
-
 170
170
-
 171
171
-
 172
172
-
 173
173
-
 174
174
-
 175
175
-
 176
176
-
 177
177
-
 178
178
-
 179
179
-
 180
180
-
 181
181
-
 182
182
-
 183
183
-
 184
184
-
 185
185
-
 186
186
-
 187
187
-
 188
188
-
 189
189
-
 190
190
-
 191
191
-
 192
192
-
 193
193
-
 194
194
-
 195
195
-
 196
196
-
 197
197
-
 198
198
-
 199
199
-
 200
200
-
 201
201
-
 202
202
-
 203
203
-
 204
204
-
 205
205
-
 206
206
-
 207
207
-
 208
208
-
 209
209
-
 210
210
-
 211
211
-
 212
212
-
 213
213
-
 214
214
-
 215
215
-
 216
216
-
 217
217
-
 218
218
-
 219
219
-
 220
220
-
 221
221
-
 222
222
-
 223
223
-
 224
224
-
 225
225
-
 226
226
-
 227
227
-
 228
228
-
 229
229
-
 230
230
-
 231
231
-
 232
232
-
 233
233
-
 234
234
-
 235
235
-
 236
236
-
 237
237
-
 238
238
-
 239
239
-
 240
240
-
 241
241
-
 242
242
-
 243
243
-
 244
244
-
 245
245
-
 246
246
-
 247
247
-
 248
248
-
 249
249
-
 250
250
-
 251
251
-
 252
252
-
 253
253
-
 254
254
-
 255
255
-
 256
256
-
 257
257
-
 258
258
-
 259
259
-
 260
260
-
 261
261
-
 262
262
-
 263
263
-
 264
264
-
 265
265
-
 266
266
-
 267
267
-
 268
268
-
 269
269
-
 270
270
-
 271
271
-
 272
272
-
 273
273
-
 274
274
-
 275
275
-
 276
276
-
 277
277
-
 278
278
-
 279
279
-
 280
280
-
 281
281
-
 282
282
-
 283
283
-
 284
284
-
 285
285
-
 286
286
-
 287
287
-
 288
288
-
 289
289
-
 290
290
-
 291
291
-
 292
292
-
 293
293
-
 294
294
-
 295
295
-
 296
296
-
 297
297
-
 298
298
-
 299
299
-
 300
300
-
 301
301
-
 302
302
-
 303
303
-
 304
304
-
 305
305
-
 306
306
-
 307
307
-
 308
308
-
 309
309
-
 310
310
-
 311
311
-
 312
312
-
 313
313
-
 314
314
-
 315
315
-
 316
316
-
 317
317
-
 318
318
-
 319
319
-
 320
320
-
 321
321
-
 322
322
-
 323
323
-
 324
324
-
 325
325
-
 326
326
-
 327
327
-
 328
328
-
 329
329
-
 330
330
-
 331
331
-
 332
332
-
 333
333
-
 334
334
-
 335
335
-
 336
336
-
 337
337
-
 338
338
-
 339
339
-
 340
340
-
 341
341
-
 342
342
-
 343
343
-
 344
344


Samsung UE40D7000LS Ghid de inițiere rapidă
- Categorie
- Televizoare
- Tip
- Ghid de inițiere rapidă
- Acest manual este potrivit și pentru
în alte limbi
- slovenčina: Samsung UE40D7000LS Stručná príručka spustenia
- eesti: Samsung UE40D7000LS Lühike juhend