Allview P9 Energy mini Manual de utilizare
- Categorie
- Smartphone-uri
- Tip
- Manual de utilizare
Acest manual este potrivit și pentru

1
P9 Energy Mini
USER MANUAL……...…………………………..4
РЪКОВОДСТВО ЗА УПОТРЕБА……..…..…15
BETRIEBSANLEITUNG....................................25
MANUAL DE USUARIO……….………………...40
HASZNÁLATI UTASÍTÁS …………………..…..52
INSTRUKCJA OBSŁUGI...................................60
MANUAL DE UTILIZARE……………………......73
РУКОВОДСТВО ПОЛЬЗОВАТЕЛЯ..…….…...84

2

3
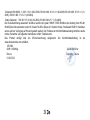
EN
BG
DE
ES
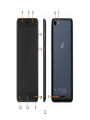
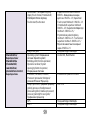
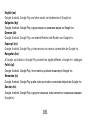
1
Power button
1
Бутонът за захранване
1
Power-Taste
1
Botón de encendido
2
Speaker
2
говорител
2
Lautsprecher
2
Altavoz
3
Micro USB plug
3
Micro USB щепсел
3
Micro-USB
3
Enchufe micro USB
4
Light-Proximity
sensor
4
Light-Сензор
за близост
4
Licht
Näherungssensor
4
Proximidad
sensor
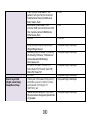
5
Volume buttons
5
сила на звука
5
Lautstärketasten
5
Volumen
6
Earphones jack
6
слушалки жак
6
Kopfhörerbuchse
6
Enchufe auriculares
7
Led Flash
7
Led Flash
7
LED-Blitz
7
LED Flash
8
Main camera
8
Назад камера
8
Zurück Kamera
8
Cámara trasera
9
Front camera
9
Предна камера
9
Zweite Kamera
9
Cámara frontal
10
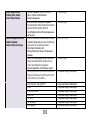
Back
10
назад
10
Zurück
10
Espalda
11
Home
11
дом
11
Zuhause
11
Casa
12
Recent apps
12
Скорошни приложения
12
Neue Apps
12
Aplicaciones recientes
HU
PL
RO
RU
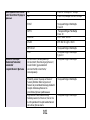
1
Bekapcsoló gomb
1
Przycisk zasilania
1
Buton pornire
1
Кнопка включения
2
Hangszóró
2
Głośnik
2
Difuzor
2
Динамик
3
Micro USB
3
Złącze micro USB
3
Mufa Micro USB
3
Разъем Микро USB
4
Fényre
Közelségérzékelő
4
Czujnik światła,
zbliżeniowy
4
Senzor lumina-
proximitate
4
Датчик света, близость
5
Hangerő gombok
5
Przyciski głośności
5
Butoane volum
5
Клавиша громскости
6
Fülhallgató jack
6
Złącze słuchawkowe
6
Mufa casti
6
Разъем гарнитуры
7
LED vaku
7
Dioda LED
7
Led Flash
7
Вспышка
8
Hátulsó kamera
8
Tylni aparat
8
Camera principala
8
Основная камера
9
Elülső kamera
9
Przedni aparat
9
Camera frontala
9
Передняя камера
10
Hát
10
Cofnij
10
Înapoi
10
назад
11
Otthon
11
Ekran domowy
11
Acasă
11
Главная
12
Legutóbbi
alkalmazások
12
Ostatnio używane
aplikacje
12
Aplicaţii recente
12
Недавние приложения

4
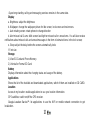
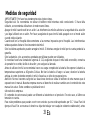
Notices for the use of phone
CAUTION! Please read carefully this instructions and follow them, in the case of dagerous situations.
Driving safety: It is recommended not to use the phone while driving. If you use it however, turn on the
Handsfree mode.
Turn off your phone while in an aircraft.
Interference caused by mobile phones affects aviation safety, and thus is illegal to use it on the plane.
Please make sure that your mobile phone is turned off when you are on the plane.
In hospital: When using the phone in a hospital must submit to the relevant rules specified by the hospital.
Any interference caused by wireless devices may affect the performance of the phone.
Approved service: Only approved repair shops can repair mobile phones. If you open the phone and try to
fix it yourself you will void the warranty of the product.
Accesories and batteries: Only accesories and batteries approved by the producer can be used.
Emergency calls: Make sure the phone is turned on and enabled if you wish to make an emergency call,
press the call key and confirm the location, explain what happened and do not close the call.
The battery and charging the battery: It is recommended to fully charge before first use of the device. Do
not expose the battery to temperatures above 40 C. Do not dispose the battery in fire or drop anywhere.
Return defective batteries in special centers or to the supplier center.
Warning: We take no responsibility for situations where the phone is used other than as provided in the
manual.
Our company reserves the right to make changes in the content of the manual without making this public.
These changes will be posted on the company website to the product it amends.
The contents of this manual may be different from that in the product. In this last case will be considered.

5
To avoid the problems that might occur with the service shops approved by Visual Fan Ltd. (because
Visual Fan reserves the right to stop the collaboration with any service shop which was previously
approved and mentioned in the waranty card on the date on which the product batch was sold on the
market), before taking a product to the service shop, please check the updated list of approved service
shps on Allview website at the section: “Support&Service – Approved service”.
For more product details visit www.allviewmobile.com. Do not cover the antenna with your hand or other
objects Failure to comply resulting in connectivity issues and rapid discharge of the battery.
All applications provided by third parties and installed in this device, may be modified and/or stopped at
any moment. Visual Fan Ltd will not be responsible in any way for modifications of the services or content
of these applications. Any request or question regarding third party applications may be addressed to
owners of these applications.
Device power on/off and standby
After inserting the SIM card, memory card and battery, start the phone by holding down the Power
button for 3 seconds. To power off, press and hold the same button and confirm. If you press the Power
button you will set phone in standby mode, to return shortly press the same button.
Unlocking, idle screen and applications menu
To unlock the screen when resuming from standby, slide your finger from the bottom to the top of the
screen. The main screen will be displayed
Home screen pages can be customized with shortcuts and widgets. At the top of the screen is placed
the notification bar that contains information about the mobile network signal, WiFi, Bluetooth, battery level,
time and events.

6
To display the applications menu, touch the Menu icon from the bottom of the main screen. Slide
the screen to left to scroll main menu. Touch the desired application icon to access it. Use the Back button
to return to the main screen.
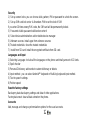
Dialing
To call a number, from the main screen open the dialer, dial the number and press the call key.
To answer a call drag the icon to the right, and to reject the call drag the icon to the left.
You can call numbers directly from Call log, touch the dial symbol from the right side of the desired
number.
Messaging
To create and send an SMS, proceed as follows:
- Open the applications menu;
- Open the Messaging application;
- From the bottom-right side of the screen touch Compose new message symbol;
- Write the message;
Note: You create an MMS by touching the attach symbol and adding media content: images, sound or
movies.
- In the top text box add the number or the name of the recipient;
- Tap the arrow -> symbol from the right side of the text box to send the message.

7
Contacts
Access the Contacts from menu applications.
Add new contact:
- Open Contacts from main menu;
- Tap the + symbol from the bottom-right side of the screen;
- Select the memory where you will store: account or phone entry;
- Enter contact information;
- Finally, tap Save.
Add new contact from call log:
- From the applications menu, open the Dialer;
- Tap the phone number you want to save;
- Tap New contact button;
- Select the memory where you will store: account or phone entry;
- Enter contact information;
- Finally, tap Save.
Import/export contacts
You can import or export contacts between memories and accounts available, as follows:
- Open Contacts;

8
- Press the Options button and select Import / Export;
- Choose memory from which to copy contacts;
- Choose in which memory to copy the contacts;
- Select contacts to copy;
- Press the Copy button;
Synchronize contacts with an account
Note: If you don’t have an account, you can create one which is also necessary for the Google Play
TM
store.
You can synchronize the contacts of an account by following the next steps:
- Open the applications menu -> Settings -> Applications -> ACCOUNTS;
- Touch the desired account; if you don’t have allready set, you can add a new one by touching the
button Add new account ;
- Tick the option Sync contact;
Customize contacts with photo
Note: The contacts from SIM card cannot be customized with photo.
To add a photo to one contacts follow the steps:
- Open Contacts;
- Touch the desired contact name;
- On the top-right of the screen touch the contact editing symbol;
- In the left corner of the screen touch the symbol to add image;
- Select the input method of image: photo shoot or from gallery.

9
Google Play store
Google Play store provides a multitude of applications from various categories: games, business,
communication, shopping, travel, entertainment, books, education, finance, photography, tools, media,
social, sports, news.
The first time you open the Google Play store, you will be prompted to authenticate. If you already have
a Google™ account, enter the data. If not, click the Create button to create a new account and follow the
steps on the screen.
Settings
Your service provider may default some device settings, so you may not be able to change these
settings.
WLAN
Touch Wi-Fi switch to activate. Open Wi-Fi to search for available networks automatically. Networks
without password can be used directly, for others you need to enter the password first.
Bluetooth
Touch Bluetooth switch to activate. Touch Bluetooth to enter the device searching screen. You can
modify settings by pressing the Menu button.

10
Data usage
Here you can activate or deactivate the data connection and see a chart of data usage status. You can
also set the data mobile limit for each SIM.
More
Airplane mode
Virtual Private Networks(VPN) Settings.
Tethering & portable hotspot
Wifi Direct
Mobile network
3G service: here you can enable/disable the 3G service.
Preffered networks
Access point names: add or modify the access points.
Network operators.
Sounds
This option allows you to set audio tones for incoming calls, e-mail alerts and SMS notifications.
Settings include: Vibration, Volume, Tone Audio, Reviews
Select General / Silent / Meeting / Outdoor profile by touching the right side circle.
Power Saving
You can choose one of the three power schemes:
-Closed
-Normal: calling and messaging are available; data connection remains the same state

11
-Super-long standby: calling and messaging services remains in the same state.
Display
a. Brightness: adjust the brightness
b. Wallpaper: change the wallpaper picture for idle screen, lock screen and main menu
c. Auto rotating screen: rotate phone to change direction
d. Alert missed call & sms: blink screen backlight on missed call or unread sms. You will also receive
notifications about missed calls and unread messages in the form of animated icons in the lock screen;
e. Sleep: adjust the delay before the screen automatically locks
f. Font size
Storage
1) View SD Card and Phone Memory.
2) Uninstall or Format SD Card.
Battery
Displays information about the charging status and usage of the battery.
Applications
Shows the list of the installed and downloaded applications, which of them are installed on SD CARD.
Location
Access to my location: enable applications to use your location information.
GPS satellites: switch on/off the GPS receiver.
Google Location Service™: let applications to use the WiFi or mobile network connection to get
localization.

12
Security
1) Set up screen locks: you can choose slide, pattern, PIN or password to unlock the screen.
2) Set up SIM card lock: enter 4-8numbers PIN to set the lock of SIM.
If you enter 10 times wrong PUK code, the SIM card will be permanently locked.
3) Password visible: password visible when enter it
4) Select device administration: add or delete device manager.
5) Unknown sources: install apps from unknown sources
6) Trusted credentials: show the trusted credentials
7) Install from SD card: install the encrypted certificate from SD card.
Languages and input
1) Selecting Language: include all the languages on the phone and totally amount of 12 kinds.
2) Spell checker
3) Personal Dictionary: add words to custom dictionary or delete.
4) Input method : you can select Android™ keyboard or MultiLing keyboard input method.
5) Text to speech settings
6) Pointer speed
Reset to factory settings
Backup my data: backup my settings and data of other applications.
Factory data reset: clear all data stored on the phone.
Accounts
Add, manage and change synchronization options for the used accounts.

13
Date and Time
1) Automatic date & time: use date and time provided by network or by GPS
2) Automatic time zone: check to use network-provided time zone
3) Set Date / Set time: touch to set date / time.
4) Selecting time zone Select Time Zone according to where you are.
4) Use 24 hour time format : ON/OFF
5) Select date format.
Schedule power on/off
You can set time of boot or shutdown the phone.
Schedule airplane on/off
You can set the time of activating or deactivating the plane mode.
Accessibility
1.Power button end call
2.Touch and hold delay
3.Install web scripts
Developer options
Set options dedicated to the Android software developers
About phone
You can check the information about: phone status, legal informations, software version.

14
DECLARATION OF CONFORMITY
Nr. 1433
We, S.C. Visual Fan S.R.L, with the social headquarters in Brasov, 61st Brazilor Street, post code 500313 Romania,
registered at the Register of Commerce Brasov under nr. J08/818/2002, CUI RO14724950, as importer, ensure, guarantee
and declare on own responsibility according to Art. 4 HG nr.1.022/2002 regarding the products and services regime, which
could put in danger the life and health, security and labour protection, that the ALLVIEW product P9 Energy Mini does not
put in danger the life, safety of labour, does cause adverse environmental impacts and is according to:
-The 2011/65/UE Directive regarding the usage restrictions of some dangerous substances ]n the electonic and electrical
equipments.
-The Directive regarding the radio and telecommunications equipments R&TTE 1999/5/CEE (HG 88/2003)
-The Directive regarding the ensurance of low voltage equipment users 73/32/CEE , modified by the 93/68/CEE
(HG457/2003) Directive.
-The Directive regarding the electromagnetic compatibility 89/336/CEE, modified by the 92/31/CEE si 93/68/CEE
(HG982/2007); RoHS Directive: EN50581:2012
-The safety requirements of the European Directive 2001/95/EC and of the EN 60065:2002/A12:2011 si EN 60950-
1:2006/ A1:2010 /A11:2009/A12:2011 standards, regarding the decibel level limit of the commercialized devices.
The product had been evaluated according to the following standards:
-Health: EN 50360:2001, EN 50361; EN 62209-1 : 2006
-Safety: EN 60950- 1: 2001 +A11:2004; EMC EN 301 489- 01 V1.6.1 (09-2005)
EN 301 489- 07 V1.3.1 (11-2005); EN 301 489- 17 V1.2.1 (08-2002)
-Radio spectrum: EN 301 511 V9.0.2 (03-2003);EN 300 328 V1.7.1 (10-2006)
The conformity assesment procedure was done according to the 1999/5/CEE Directive (of the Annex II of HG nr. 88/2003)
the documentation being at S.C. Visual Fan S.R.L., Brasov , 61st Brazilor Street, post code 500313 ,Romania at it will be
put at disposal on demand. The products conformity assesment procedure was fulfilled with the participation of the following
institutions: Telefication bv.
The product has the CE mark applied. The conformity declaration is available at www.allviewmobile.com.
CE 0560 Director
Brasov
01.09.2016
SAR 1.250W/kg COTUNA GHEORGHE

15
ИНСТРУКЦИЙ ЗА БЕЗОПАСНОСТ
ВНИМАНИЕ! Прочетете внимателно тези инструкций и ги следвайте.
Карайте предпазливо: Препоръчваме да не използвате телефона докато шофирате. Ако се наложи да го ползвате
- включете режим – СВОБОНИ РЪЦЕ.
Изключете телефона когато сте в самолет
Смущенията, причинени от мобилните телефони влияят на безопасността на въздухоплаването, и поради това е
незаконно, да го използвате в самолета . Моля уверете се, че телефона е изключен докато сте в самолета.
В болница: Когато използвате телефона в болница , трябва да се съобразявате с правилата определени от
болницата.
Оторизиран сервиз: Само оторизирани сервизи могат да ремонтират телефона. Ако отворите телефона и се
опитате само да оправите евентуална повреда, гаранцията автоматично става невалидна.
Аксесоари и батерий: Трябва да се използват, само аксессоари и батерий одобрени от производителя .
Спешни обаждания: Уверете се, че телефонът е включен, ако желаете да направите спешно повикване,
наберете 112 и натиснете клавиша за повикване. Потвърдете мястото, обяснете какво се е случило и не
затваряйте повикването.
Батерия и зареждане на батерията: Препоръчва се пълно зареждане на батерията преди използване на
устройството. Не излагайте батерията на температури над 40 градуса целзий. Не излагайте или хвърляйте батерията
в огън. Изхвърляйте батерийте в обозначените за това места.
Внимание: Не носим отговорност ако телефона е използван по различен начин от указанията в инсрукцията.
Нашата компания си запазва правото да прави промени в съдържанието на ръководството, без да оповестява това
публично. Тези промени ще бъдат оповестявани в сайта на компанията. Производителя - Visual Fan Ltd., си запазва

16
правото да спре работа със всеки сервизен център, упоменат на гаранционната карта, към датата на закупуване на
продукта.
За да избегнете недоразумения, преди да занесете устройството за ремонт в някой от сервизите, моля проверете
на страницата www.allviewmobile.com, дали избрания сервиз фигурира в обновения списък с упълномощени
сервизи.
За повече информация за продукта посетете www.allviewmobile.com. Не покривайте антената с ръка или от други
предмети Неспазването води до проблеми за свързване и бързо освобождаване от отговорност на батерията.
Всички приложения, предоставени от трети страни, както и инсталирани на това устройство, могат да бъдат
модифицирани и / или спрени във всеки един момент. Visual Fan ООД не носи отговорност по никакъв начин за
модификации на услугите или съдържанието на тези приложения. Всяко искане или въпрос по отношение на
приложения на трети лица, може да бъде адресирано до собствениците на тези приложения.
Включване изключване на устройството и режим на изчакване
След поставяне на SIM картите, картата памет и батерията, включете телефона, чрез натискане на захранващият
бутон за около 3 секунди. За да го изключите също задръжте захранващият бутон и после потвърдете. Ако натиснете
бутона за кратко телефона минава в режим на изчакване и екрана изгасва, за да излезете от режима на изчакване
пак натиснете за кратко същият бутон.
Отключване, начален екран и приложения
За да отключите екрана при възобновяване от режим на готовност, плъзнете пръста си от дъното към горната част
на екрана. Ще се появи основния екран.
Началният екран може да се персонализира с икони и приложения. В горната част на екрана има информационна
лента, която дава информация за силата на сигнала на мобилната мрежа, състояние на WiFi, Bluetooth, ниво на
батерията и времето.

17
За да видите менюто с всички приложения, докоснете Meню иконата в долният десен ъгъл на екрана. Приплъзнете
на ляво за да се превъртят всички икони на приложенията. Докоснете желаното приложение за да го потвърдите.
Използвайте бутона за връщане за да се върнете към главният екран.
Настройки на телефона
За да настроите телефона отидете в менюто с приложенията и натиснете Настройики / Settings. Менюто с
настройки е организирано в 4 подменюта:
А:Комуникаций:
1. Настройки на двете SIM карти: управление на GSM и 3G услуги.
- Гласово повикване: изберете предварително коя СИМ-карта да се използва при извършване на гласово повикване
или да пита преди всяко обаждане;
Повикване на данни: изберете предварително коя СИМ-карта да се използва при провеждане на видео разговор);
- Съобщения: изберете предварително коя СИМ-карта да се използва при изпращане на текстови съобщения;
2.Настройки на повикването: специални настройки за гласови разговори, видео разговори
3. Wireless & networks: Настройки за управление на мобилни мрежи WiFi, Bluetooth. – Самолетен режим: отметка в
квадратчето, за да деактивирате всички безжични връзки ;
- WiFi :отметка в квадратчето за да се включи WiFi мрежа;
- WiFi настройки: търсене, включване и изключване от WiFi мрежи;
Забележка! За да се включите в заключени мрежи трябва да въведете парола;
- Bluetooth: отметка в квадратчето, за да се включи Bluetooth ;
- Bluetooth настройки : отворете менюто, за да търси, Bluetooth устройства;
- Tethering and portable hotspot: подменю, за да настроите телефона си, като преносима точка за достъп до интернет;
може да споделяте вашата интернет връзка чрез WiFi или USB;

18
- Мобилни мрежи:
- 3G услуги: включете/изключете 3Gвръзката към определена SIM карта или изберете предпочитана мобилна
мрежа: GSM/WCDMA или само WCDMA;
- Име на точката за достъп: настройте името на точката за достъп – за мобилен достъп до интернет през
съответната мобилна мрежа;
B. Системни:
1. Аудио профили: добавяне изтриване или промяна на аудио профили . Можете да персонализирате аудио
профилите, чрез промяна на рингтон, разпознавателен звук, или вибраций .
2. Дисплей: настройки на яркостта на дисплея, скрийнсейвъра, интерфейс анимаций и автоматично завъртане на
дисплея;
3. Език и клавиатура: изберете език и метод за въвеждане на текст;
4. Дата и час: отворете за настройка на дата час и часова зона ;
5. Планиране на включване и изключване: Можете да настроите устройството за атоматично включване и
изключване в определен час.;
6. Планиране на вкл/изкл на самолетен режим: Самолетният режим може да се настрои за включване или
изключване в определен час.
C. Приложения:
1. Приложения:
- Unknown sources: отметка в квадратчето за да позволите инсталацията на приложения от други източници освен
официалния магазин за приложения;
- Предпочитана директория за инсталация: можете да изберете SD картата или вградената памет или да оставите
системата да реши сама;

19
-Управление на приложенията: Разглеждане преместване или изтриване на приложенията;
- Storage usage: менюто показва списък на всички инсталирани приложения;
2. Профили и синхронизиране
- Основни данни: отметка в квадратчето, за да позволи на приложенията да изпращат и получават данни по всяко
време;
- Автоматично синхронизиране: отметка в квадратчето, за да се позволи автоматичното синхронизиране на данните;
3. Privacy: да направите резервно копие или да възстановите фабричните настройки на устройството.
4. Сигурност:
- Заключване на екрана: определя метод за отключване,парола или друг.
- Заключване на SIM карта:активиране/деактивиране на заключване на SIM карта
-Парола: Проверете за показване на паролата, докато въвеждате ;
5. Местоположение:
- Използвайте wireless networks :отметка в квадратчето за да позволите на системата да определи вашето
местоположение чрез Wi Fi или мобилната мрежа.
- Използвайте GPS satellites отметка в квадратчето, за да се определи точното местоположение с помощта на GPS
приемник:;
- EPO assistance: Използвайте GPS спомагателни данни, за да се ускори GPS позициониранеto;
6. Съхранение:. вижте информация относно общата памет и използваната памет на микро SD карта
1. Достъп
2. Гласов вход и изход: Настройки за гласов вход;

20
3.За телефона: информация относно състоянието и използването на батерията, правни информации, модела
на телефона и версията на софтуера.
ИНСТРУМЕНТИ
КОНТАКТИ
Достъп до контактите чрез меню приложенията. По подразбиране ще се появят контакти от вашата СИМ-карта и
телефон.
Добавяне на нов контакт:
- Отворете контакти от главното меню;
- Докоснете + символа в горната дясна страна на екрана;
- Изберете паметта в която искате да съхраните: СИМ карта или телефонна памет
- Добавете информация за контакта;
- Накрая докоснете Готово / Done.
Добавяне на нов контакт от списъка с обажданията:
- От менюто с приложенията отворете call log;
- Докоснете телефонният номер който искате да запишете;
- Докоснете Нов контакт / New contact button;
- Изберете паметта в която искате да съхраните
- Добавете информация за контакта;
- Накрая докоснете Готово Done.
Прехвърляне на контакти
Вие можете да прехвърляте контакти между паметите както следва:
Pagina se încarcă ...
Pagina se încarcă ...
Pagina se încarcă ...
Pagina se încarcă ...
Pagina se încarcă ...
Pagina se încarcă ...
Pagina se încarcă ...
Pagina se încarcă ...
Pagina se încarcă ...
Pagina se încarcă ...
Pagina se încarcă ...
Pagina se încarcă ...
Pagina se încarcă ...
Pagina se încarcă ...
Pagina se încarcă ...
Pagina se încarcă ...
Pagina se încarcă ...
Pagina se încarcă ...
Pagina se încarcă ...
Pagina se încarcă ...
Pagina se încarcă ...
Pagina se încarcă ...
Pagina se încarcă ...
Pagina se încarcă ...
Pagina se încarcă ...
Pagina se încarcă ...
Pagina se încarcă ...
Pagina se încarcă ...
Pagina se încarcă ...
Pagina se încarcă ...
Pagina se încarcă ...
Pagina se încarcă ...
Pagina se încarcă ...
Pagina se încarcă ...
Pagina se încarcă ...
Pagina se încarcă ...
Pagina se încarcă ...
Pagina se încarcă ...
Pagina se încarcă ...
Pagina se încarcă ...
Pagina se încarcă ...
Pagina se încarcă ...
Pagina se încarcă ...
Pagina se încarcă ...
Pagina se încarcă ...
Pagina se încarcă ...
Pagina se încarcă ...
Pagina se încarcă ...
Pagina se încarcă ...
Pagina se încarcă ...
Pagina se încarcă ...
Pagina se încarcă ...
Pagina se încarcă ...
Pagina se încarcă ...
Pagina se încarcă ...
Pagina se încarcă ...
Pagina se încarcă ...
Pagina se încarcă ...
Pagina se încarcă ...
Pagina se încarcă ...
Pagina se încarcă ...
Pagina se încarcă ...
Pagina se încarcă ...
Pagina se încarcă ...
Pagina se încarcă ...
Pagina se încarcă ...
Pagina se încarcă ...
Pagina se încarcă ...
Pagina se încarcă ...
Pagina se încarcă ...
Pagina se încarcă ...
Pagina se încarcă ...
Pagina se încarcă ...
Pagina se încarcă ...
Pagina se încarcă ...
Pagina se încarcă ...
Pagina se încarcă ...
Pagina se încarcă ...
Pagina se încarcă ...
Pagina se încarcă ...
Pagina se încarcă ...
Pagina se încarcă ...
Pagina se încarcă ...
Pagina se încarcă ...
Pagina se încarcă ...
-
 1
1
-
 2
2
-
 3
3
-
 4
4
-
 5
5
-
 6
6
-
 7
7
-
 8
8
-
 9
9
-
 10
10
-
 11
11
-
 12
12
-
 13
13
-
 14
14
-
 15
15
-
 16
16
-
 17
17
-
 18
18
-
 19
19
-
 20
20
-
 21
21
-
 22
22
-
 23
23
-
 24
24
-
 25
25
-
 26
26
-
 27
27
-
 28
28
-
 29
29
-
 30
30
-
 31
31
-
 32
32
-
 33
33
-
 34
34
-
 35
35
-
 36
36
-
 37
37
-
 38
38
-
 39
39
-
 40
40
-
 41
41
-
 42
42
-
 43
43
-
 44
44
-
 45
45
-
 46
46
-
 47
47
-
 48
48
-
 49
49
-
 50
50
-
 51
51
-
 52
52
-
 53
53
-
 54
54
-
 55
55
-
 56
56
-
 57
57
-
 58
58
-
 59
59
-
 60
60
-
 61
61
-
 62
62
-
 63
63
-
 64
64
-
 65
65
-
 66
66
-
 67
67
-
 68
68
-
 69
69
-
 70
70
-
 71
71
-
 72
72
-
 73
73
-
 74
74
-
 75
75
-
 76
76
-
 77
77
-
 78
78
-
 79
79
-
 80
80
-
 81
81
-
 82
82
-
 83
83
-
 84
84
-
 85
85
-
 86
86
-
 87
87
-
 88
88
-
 89
89
-
 90
90
-
 91
91
-
 92
92
-
 93
93
-
 94
94
-
 95
95
-
 96
96
-
 97
97
-
 98
98
-
 99
99
-
 100
100
-
 101
101
-
 102
102
-
 103
103
-
 104
104
-
 105
105


Allview P9 Energy mini Manual de utilizare
- Categorie
- Smartphone-uri
- Tip
- Manual de utilizare
- Acest manual este potrivit și pentru