Indesit IWSND 51051CECO EU.L Manualul utilizatorului
- Categorie
- Mașini de spălat
- Tip
- Manualul utilizatorului

GB
1
Contents
Installation, 2-3
Unpacking and levelling
Connecting the electricity and water supplies
The first wash cycle
Technical data
Care and maintenance, 4
Cutting off the water or electricity supply
Cleaning the washing machine
Cleaning the detergent dispenser drawer
Caring for the door and drum of your appliance
Cleaning the pump
Checking the water inlet hose
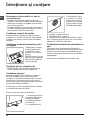
Precautions and tips, 5
General safety
Disposal
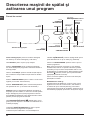
Description of the washing machine
and starting a wash cycle, 6-7
Control panel
Indicator lights
Starting a wash cycle
Wash cycles, 8
Table of wash cycles
Personalisation, 9
Setting the temperature
Setting the spin speed
Functions
Detergents and laundry, 10
Detergent dispenser drawer
Preparing the laundry
Garments requiring special care
Load balancing system
Troubleshooting, 11
Service, 12
Instructions for use
WASHING MACHINE
IWSND 51051
English, 1
GB
Česky, 13
CZ
Slovensky, 25
SK
Română,37
RO
HU
Magyar,49
Français,61
FR

2
GB
! This instruction manual should be kept in a safe
place for future reference. If the washing machi-
ne is sold, transferred or moved, make sure that
the instruction manual remains with the machine
so that the new owner is able to familiarise him-
self/herself with its operation and features.
! Read these instructions carefully: they con-
tain vital information relating to the safe instal-
lation and operation of the appliance.
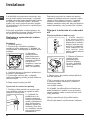
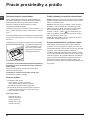
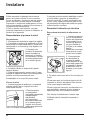
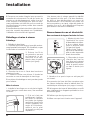
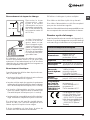
Unpacking and levelling
Unpacking
1. Remove the washing machine from its
packaging.
2. Make sure that the washing machine has
not been damaged during the transportation
process. If it has been damaged, contact the
retailer and do not proceed any further with
the installation process.
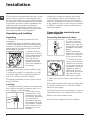
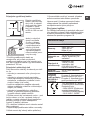
3. Remove the pro-
tective screws (used
during transportation)
and the rubber wa-
sher with the cor-
responding spacer,
located on the rear
part of the appliance
(see figure).
4. Close off the holes using the plastic plugs
provided.
5. Keep all the parts in a safe place: you will
need them again if the washing machine ne-
eds to be moved to another location.
! Packaging materials should not be used as
toys for children.
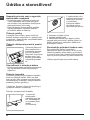
Levelling
1. Install the washing machine on a flat sturdy
floor, without resting it up against walls, furni-
ture cabinets or anything else.
2. If the floor is not
perfectly level, com-
pensate for any une-
venness by tightening
or loosening the
adjustable front feet
(see figure); the angle
of inclination, measu-
red in relation to the
worktop, must not
exceed 2°.
Levelling the machine correctly will provide
it with stability, help to avoid vibrations and
excessive noise and prevent it from shifting
while it is operating. If it is placed on carpet or
a rug, adjust the feet in such a way as to allow
a sufficient ventilation space underneath the
washing machine.
Connecting the electricity and
water supplies
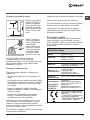
Connecting the water inlet hose
1. Insert seal A into
the end of the inlet
hose and screw the
latter onto a cold wa-
ter tap with a 3/4 gas
threaded mouth (see
figure).
Before making the
connection, allow the
water to run freely un-
til it is perfectly clear.
2. Connect the inlet
hose to the washing
machine by screwing
it onto the correspon-
ding water inlet of the
appliance, which is
situated on the top
right-hand side of the
rear part of the ap-
pliance (see figure).
3. Make sure that the hose is not folded over
or bent.
! The water pressure at the tap must fall within
the values indicated in the Technical details
table (see next page).
! If the inlet hose is not long enough, contact a
specialised shop or an authorised technician.
! Never use second-hand hoses.
! Use the ones supplied with the machine.
Installation
A

GB
3
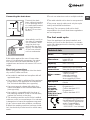
65 - 100 cm
Connecting the drain hose
Connect the drain
hose, without bending
it, to a drainage duct
or a wall drain located
at a height between
65 and 100 cm from
the floor;
alternatively, rest it on
the side of a washba-
sin or bathtub, faste-
ning the duct sup-
plied to the tap (see
figure). The free end
of the hose should
not be underwater.
! We advise against the use of hose exten-
sions; if it is absolutely necessary, the exten-
sion must have the same diameter as the
original hose and must not exceed 150 cm in
length.
Electrical connections
Before plugging the appliance into the electri-
city socket, make sure that:
•thesocketisearthedandcomplieswithall
applicable laws;
•thesocketisabletowithstandthemaximum
power load of the appliance as indicated in
the Technical data table (see opposite);
•thepowersupplyvoltagefallswithinthe
values indicated in the Technical data table
(see opposite);
•thesocketiscompatiblewiththeplugof
the washing machine. If this is not the case,
replace the socket or the plug.
! The washing machine must not be installed
outdoors, even in covered areas. It is extreme-
ly dangerous to leave the appliance exposed
to rain, storms and other weather conditions.
! When the washing machine has been instal-
led, the electricity socket must be within easy
reach.
! Do not use extension cords or multiple sockets.
! The cable should not be bent or compressed.
! The power supply cable must only be repla-
ced by authorised technicians.
Warning! The company shall not be held
responsible in the event that these regulations
are not respected.
The first wash cycle
Once the appliance has been installed, and
before you use it for the first time, run a wash
cycle with detergent and no laundry, using the
wash cycle 2.
Technical data
Model
IWSND 51051
Dimensions
width 59,5 cm
height 85 cm
depth 42 cm
Capacity
from 1 to 5 kg
Electrical
connections
please refer to the technical
data plate fixed to the machine
Water connec-
tion
maximum pressure
1 MPa (10 bar)
minimum pressure
0.05 MPa (0.5 bar)
drum capacity 40 litres
Spin speed
up to 1000 rotations per
minute
Test wash
cycles in
accordan-
ce with re-
gulations
1061/2010 and
1015/2010
Programme 2:
Cotton standard 60°C.
Programme 3:
Cotton standard 40°C.
This appliance conforms to
the following EC Directives:
- 2004/108/CE (Electroma-
gnetic Compatibility)
- 2012/19/EU - WEEE
- 2006/95/EC Low Voltage)

4
GB
Care and maintenance
Cutting off the water and electri-
city supplies
•Turnoffthewatertapaftereverywashcycle.
This will limit wear on the hydraulic system
inside the washing machine and help to pre-
vent leaks.
•Unplugthewashingmachinewhencleaning
it and during all maintenance work.
Cleaning the washing machine
The outer parts and rubber components of the
appliance can be cleaned using a soft cloth
soaked in lukewarm soapy water. Do not use
solvents or abrasives.
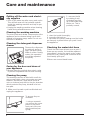
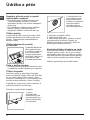
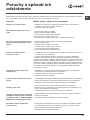
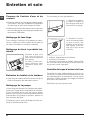
Cleaning the detergent dispenser
drawer
Remove the dispenser
by raising it and pul-
ling it out (see figure).
Wash it under running
water; this operation
should be repeated
frequently.
Caring for the door and drum of
your appliance
•Alwaysleavetheportholedoorajarinorder
to prevent unpleasant odours from forming.
Cleaning the pump
The washing machine is fitted with a self-cle-
aning pump which does not require any main-
tenance. Sometimes, small items (such as
coins or buttons) may fall into the pre-chamber
which protects the pump, situated in its bot-
tom part.
! Make sure the wash cycle has finished and
unplug the appliance.
To access the pre-
chamber:
1. using a screwdri-
ver, remove the cover
panel on the lower
front part of the wa-
shing machine (see
figure);
2. unscrew the lid
by rotating it anti-
clockwise (see figu-
re): a little water may
trickle out. This is
perfectly normal;
3. clean the inside thoroughly;
4. screw the lid back on;
5. reposition the panel, making sure the hooks
are securely in place before you push it onto
the appliance.
Checking the water inlet hose
Check the inlet hose at least once a year. If
there are any cracks, it should be replaced
immediately: during the wash cycles, water
pressure is very strong and a cracked hose
could easily split open.
! Never use second-hand hoses.

GB
5
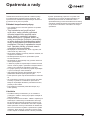
Precautions and tips
! This washing machine was designed and constructed in
accordance with international safety regulations. The fol-
lowing information is provided for safety reasons and must
therefore be read carefully.
General safety
• Thisappliancewasdesignedfordomesticuseonly.
• This appliance can be used by children aged
from 8 years and above and persons with re-
duced physical, sensory or mental capabilities
or lack of experience and knowledge if they
have been given supervision or instruction
concerning use of the appliance in a safe way
and understand the hazards involved. Chil-
dren shall not play with the appliance. Clea-
ning and user maintenance shall not be made
by children without supervision.
• Donottouchthemachinewhenbarefootorwithwetor
damp hands or feet.
• Donotpullonthepowersupplycablewhenunplugging
the appliance from the electricity socket. Hold the plug
and pull.
• Donotopenthedetergentdispenserdrawerwhilethe
machine is in operation.
• Donottouchthedrainedwaterasitmayreachextreme-
ly high temperatures.
• Neverforcetheportholedoor.Thiscoulddamagethe
safety lock mechanism designed to prevent accidental
opening.
• Iftheappliancebreaksdown,donotunderanycircum-
stances access the internal mechanisms in an attempt
to repair it yourself.
• Alwayskeepchildrenwellawayfromtheappliancewhile
it is operating.
• Thedoorcanbecomequitehotduringthewashcycle.
• Iftheappliancehastobemoved,workinagroupoftwo
or three people and handle it with the utmost care. Never
try to do this alone, because the appliance is very heavy.
• Beforeloadinglaundryintothewashingmachine,make
sure the drum is empty.
Disposal
• Disposingofthepackagingmaterials:observelocal
regulations so that the packaging may be re-used.
• TheEuropeanDirective2012/19/EU-WEEEonWaste
Electrical and Electronic Equipment, requires that
old household electrical appliances must not be
disposed of in the normal unsorted municipal waste
stream. Old appliances must be collected separately
in order to optimise the recovery and recycling of the
materials they contain and reduce the impact on human
health and the environment. The crossed out “wheeled
bin” symbol on the product reminds you of your obliga-
tion, that when you dispose of the appliance it must be
separately collected.
Consumers should contact their local authority or
retailer for information concerning the correct
disposal of their old appliance.

6
GB
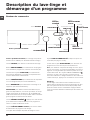
Detergent dispenser drawer: used to dispense deter-
gents and washing additives (see “Detergents and laundry”).
ON/OFF button: switches the washing machine on and
off.
WASH CYCLE knob: programmes the wash cycles. Du-
ring the wash cycle, the knob does not move.
FUNCTION buttons with indicator light: used to select the
available functions. The indicator light corresponding to the
selected function will remain lit.
TEMPERATURE knob: sets the temperature or the cold
wash cycle (see “Personalisation”).
SPIN SPEED knob: sets the spin speed or exclude the
spin cycle completely (see “Personalisation”).
DISPLAY: used to view the duration of the various cycles
available and the remaining time of a cycle in progress;
if the DELAY TIMER option has been selected, the
countdown to the start of the selected cycle will appear.
DELAY TMER button : press to set a delayed start
time for the selected wash cycle. The delay time will be
shown on the display.
WASH CYCLE PROGRESS
indicator light
s: used to
monitor the progress of the wash cycle. The illuminated
indicator light shows which phase is in progress.
DOOR LOCKED indicator light: indicates whether the
door may be opened or not (see next page).
START/PAUSE button with indicator light: starts or tem-
porarily interrupts the wash cycles.
N.B. To pause the wash cycle in progress, press this
button; the corresponding indicator light will flash orange,
while the indicator light for the current wash cycle phase
will remain lit in a fixed manner. If the DOOR LOCKED
indicator light is switched off, the door may be opened
(wait approximately 3 minutes).
To start the wash cycle from the point at which it was inter-
rupted, press this button again.
Standby mode
This washing machine, in compliance with new energy sa-
ving regulations, is fitted with an automatic standby system
which is enabled after about 30 minutes if no activity is
detected. Press the ON-OFF button briefly and wait for the
machine to start up again.
Description of the washing
machine and starting a wash cycle
WASH CYCLE
PROGRESS
DOOR LOCKED
indicator light
START/
PAUSE
button with
indicator light
Control panel
Detergent dispenser drawer
ON/OFF
button
WASH CYCLE
knob
TEMPERATURE
knob
FUNCTION
buttons with
indicator lights
SPIN SPEED
knob
DISPLAY
DELAY TIMER
button

GB
7
Indicator lights
The indicator lights provide important information.
This is what they can tell you:
Wash cycle phase indicator lights
Once the desired wash cycle has been selected and has
begun, the indicator lights switch on one by one to indicate
which phase of the cycle is currently in progress.
Function buttons and corresponding indicator lights
When a function is selected, the corresponding indicator
light will illuminate.
If the selected function is not compatible with the program-
med wash cycle, the corresponding indicator light will flash
and the function will not be activated.
If the selected function is not compatible with another
function which has been selected previously, the indicator
light corresponding to the first function selected will
flash and only the second function will be activated; the
indicator light corresponding to the enabled option will
remain lit.
Door locked indicator light
When the indicator light is on, the porthole door is locked
to prevent it from being opened; make sure the indicator
light is off before opening the door (wait approximately 3
minutes). To open the door during a running wash cycle,
press the START/PAUSE button; the door may be opened
once the DOOR LOCKED indicator light turns off.
Starting a wash cycle
1. Switch the washing machine on by pressing the ON/OFF button. All indicator lights will switch on for a few seconds, then
they will switch off and the START/PAUSE indicator light will pulse.
2. Load the laundry and close the door.
3. Set the WASH CYCLE knob to the desired programme.
4. Set the washing temperature (see “Personalisation”).
5. Set the spin speed (see “Personalisation”).
6. Measure out the detergent and washing additives (see “Detergents and laundry”).
7. Select the desired functions.
8. Start the wash cycle by pressing the START/PAUSE button and the corresponding indicator light will remain lit in a fixed
manner, in green.
To cancel the set wash cycle, pause the machine by pressing the START/PAUSE button and select a new cycle.
9. At the end of the wash cycle the indicator light will switch on. The door can be opened once the DOOR LOCK indi-
cator light turns off (wait approximately 3 minutes). Take out your laundry and leave the appliance door ajar to make sure the
drum dries completely. Switch the washing machine off by pressing the ON/OFF button.
Wash
Rinse
Spin
Drain
End of wash cycle

8
GB
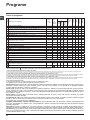
Wash cycles
Table of wash cycles
Sport Intensive (
wash cycle
12) is for washing heavily soiled sports clothing fabrics (tracksuits, shorts, etc.); for best
results, we recommend not exceeding the maximum load indicated in the “Table of wash cycles”.
Sport Light (
wash cycle
13) is for washing lightly soiled sports clothing fabrics (tracksuits, shorts, etc.); for best results,
we recommend not exceeding the maximum load indicated in the “Table of wash cycles”. We recommend using a liquid
detergent and dosage suitable for a half-load.
Sport Shoes (
wash cycle
14) is for washing sports shoes; for best results, do not wash more than 2 pairs simultaneously.
The 20° wash cycles (20° Zone) offer effective washing performance at low temperatures, reducing electricity usage and
expenditure while benefitting the environment.The 20° wash cycles meet all requirements:
Cotton Standard 20° (programme 6) ideal for lightly soiled cotton loads. The effective performance levels achieved at cold
temperatures, which are comparable to washing at 40°, are guaranteed by a mechanical action which operates at varying
speed, with repeated and frequent peaks.
Mix Light (programme 7) ideal for mixed loads (cotton and synthetics) with a normal soil level. The effective performance levels
achieved at cold temperatures are guaranteed by a mechanical action which operates at varying speed, across set average intervals.
20’ Refresh (programme 8) ideal for refreshing and washing lightly soiled garments in a few minutes. It lasts just 20 minutes
and therefore saves both time and energy. It can be used to wash different types of fabrics together (except for wool and silk),
with a maximum load of 1.5 kg.
The length of cycle shown on the display or in this booklet is an estimation only and is calculated assuming standard working conditions. The actual duration can vary according to factors such as
water temperature and pressure, the amount of detergent used, the amount and type of load inserted, load balancing and any wash options selected.
1) Test wash cycle in compliance with regulation 1061/2010: set wash cycle 2 with a temperature of 60°C.
This cycle is designed for cotton loads with a normal soil level and is the most efficient in terms of both electricity and water consumption; it should be used for garments
which can be washed at 60°C. The actual washing temperature may differ from the indicated value.
2) Test wash cycle in compliance with regulation 1061/2010: set wash cycle 3 with a temperature of 40°C.
This cycle is designed for cotton loads with a normal soil level and is the most efficient in terms of both electricity and water consumption; it should be used for garments
which can be washed at 40°C. The actual washing temperature may differ from the indicated value.
For all Test Institutes:
2) Long wash cycle for cottons: set wash cycle 3 with a temperature of 40°C.
3) Synthetic program along: set wash cycle 4 with a temperature of 40°C.
Wash cycles
Description of the wash cycle
Max.
temp.
(°C)
Max.
speed
(rpm)
Detergents
Max.
load (kg)
Residual
dampness %
Energy
consum-
ption kWh
Total water lt
Cycle
duration
Pre-
wash
Wash
Fabric
softener
Daily
1
Cotton with prewash: extremely soiled whites.
90° 1000
5
- - - **
2
Cotton Standard 60° (1): heavily soiled whites and resistant colours.
60°
(Max. 90°)
1000 -
5
62 0,89 47,5 220’
3
Cotton Standard 40° (2): lightly soiled whites and delicate colours.
40° 1000 -
5
62 0,80 61 215’
4
Synthetics: heavily soiled resistant colours.
60° 1000 -
3
44 0,70 46 145’
4
Synthetics (3): lightly soiled resistant colours.
40° 1000 -
3
- - - **
5
Mix Colored: lightly soiled whites and delicate colours.
40° 1000 -
5
- - - **
20° Zone
6
Cotton Standard 20°: lightly soiled whites and delicate colours.
20° 1000 -
5
- - - **
7 Mix Light
20° 1000 -
5
- - - **
8 20’ Refresh
20° 800 -
1,5
- - - **
Special
9
Silk/Curtains: for garments in silk and viscose, lingerie.
30° 0 -
1
- - - **
10
Wool: for wool, cashmere, etc.
40° 800 -
1
- - - **
11 Jeans
40° 800 -
2,5
- - - **
Sport
12 Sport Intensive
30° 600 -
2,5
- - - **
13 Sport Light
30° 600 -
2,5
- - - **
14 Sport Shoes
30° 600 -
Max. 2
Pairs
- - - **
Partial wash cycles
Rinse
- 1000 - -
5
- - - **
Spin + Drain
- 1000 - - - 5
- - - **
Only Drain *
- - - - 5
- - - **
* If you select programme and exclude the spin cycle, the machine will drain only.
** The duration of the wash cycle can be checked on the display.

GB
9
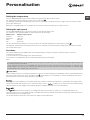
Personalisation
Setting the temperature
Turn the TEMPERATURE knob to set the wash temperature (see Table of wash cycles).
The temperature may be lowered, or even set to a cold wash .
The washing machine will automatically prevent you from selecting a temperature which is higher than the maximum value
set for each wash cycle.
! Exception: if the 2 programme is selected, the temperature can be increased up to a value of 90°C.
Setting the spin speed
Turn the SPIN SPEED knob to set the spin speed for the selected wash cycle.
The maximum spin speeds available for each wash cycle are as follows:
Wash cycles Maximum spin speed
Cottons 1000 rpm
Synthetics 1000 rpm
Wool 800 rpm
Silk drain only
The spin speed may be lowered, or the spin cycle can be excluded altogether by selecting the symbol .
The washing machine will automatically prevent you from selecting a spin speed which is higher than the maximum speed
set for each wash cycle.
Functions
The various wash functions available with this washing machine will help to achieve the desired results, every time.
To activate the functions:
1. Press the button corresponding to the desired function;
2. the function is enabled when the corresponding indicator light is illuminated.
Note:
- If the selected function is not compatible with the programmed wash cycle, the corresponding indicator light will flash and
the function will not be activated.
- If the selected function is not compatible with another function which has been selected previously, the indicator light
corresponding to the first function selected will flash and only the second function will be activated; the indicator light
corresponding to the enabled option will remain lit.
Delay timer
To set a delayed start for the selected programme, press the corresponding button repeatedly until the required delay period
has been reached. When this option is enabled, the symbol lights up on the display. To remove the delayed start option
press the button until the text “OFF” appears on the display.
Selecting this option enables you to suitably adjust drum rotation, temperature and water to a reduced load of lightly soiled
cotton and synthetic fabrics (refer to the “
“Table of wash cycles”
). “ ” enables you to wash in less time thereby saving
water and electricity. We suggest using a liquid detergent suitably measured out to the load quantity.
The function saves energy by not heating the water used to wash your laundry - an advantage both to the
environment and to your energy bill. Instead, intensified wash action and water optimisation ensure great wash results in the
same average time of a standard cycle.
For the best washing results we recommend the usage of a liquid detergent.

10
GB
Detergents and laundry
Detergent dispenser drawer
Good washing results also depend on the correct dose of
detergent: adding too much detergent will not necessa-
rily result in a more efficient wash, and may in fact cause
build up on the inside of your appliance and contribute to
environmental pollution.
! Do not use hand washing detergents because these
create too much foam.
! Use powder detergent for white cotton garments, for pre-
washing, and for washing at temperatures over 60°C.
! Follow the instructions given on the detergent packaging.
Open the detergent di-
spenser drawer and pour
in the detergent or washing
additive, as follows.
compartment 1: Compartment 1: Pre-wash deter-
gent (powder)
compartment 2: Detergent for the wash cycle
(powder or liquid)
Liquid detergent should only be poured in immediately
prior to the start of the wash cycle.
compartment 3: Additives (fabric softeners, etc.)
The fabric softener should not overflow the grid.
Preparing the laundry
•Dividethelaundryaccordingto:
- the type of fabric/the symbol on the label
- the colours: separate coloured garments from whites.
•Emptyallgarmentpocketsandcheckthebuttons.
• Do not exceed the values listed in the “Table of wash
cycles”, which refer to the weight of the laundry when dry.
How much does your laundry weigh?
1 sheet 400-500 g
1 pillow case 150-200 g
1 tablecloth 400-500 g
1 bathrobe 900-1200 g
1 towel 150-250 g
Garments requiring special care
Silk: use special wash cycle 9 to wash all silk garments.
We recommend the use of special detergent which has
been designed to wash delicate clothes.
Curtains: fold curtains and place them in a pillow case or
mesh bag. Use wash cycle 9.
Wool: all wool garments can be washed using programme 10,
even those carrying the “hand-wash only” label. For
best results, use special detergents and do not exceed
1 kg of laundry.
Jeans: Turn garments inside-out before washing and use
a liquid detergent. Use programme 11.
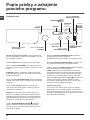
Load balancing system
Before every spin cycle, to avoid excessive vibrations and
to distribute the load in a uniform manner, the drum rotates
continuously at a speed which is slightly greater than the
washing rotation speed. If, after several attempts, the load
is not balanced correctly, the machine spins at a reduced
spin speed. If the load is excessively unbalanced, the
washing machine performs the distribution process instead
of spinning. To encourage improved load distribution and
balance, we recommend small and large garments are
mixed in the load.
1
2
3

GB
11
Troubleshooting
Your washing machine could fail to work. Before contacting the Technical Assistance Centre (see “Assistance”), make sure
that the problem cannot be solved easily using the following list.
Problem:
The washing machine does not
switch on.
The wash cycle does not start.
The washing machine does not
take in water (“H2O” will flash on
the display).
The washing machine continuously
takes in and drains water.
The washing machine does not
drain or spin.
The washing machine vibrates a lot
during the spin cycle.
The washing machine leaks.
The “function” indicator lights and
the “start/pause” indicator light flash,
while one of the “phase in progress”
indicator lights and the “door locked”
indicator light will remain lit in a fixed
manner.
There is too much foam.
Possible causes / Solutions:
• Theapplianceisnotpluggedintothesocketfully,orisnotmakingcontact.
• Thereisnopowerinthehouse.
• Thewashingmachinedoorisnotclosedproperly.
• TheON/OFFbuttonhasnotbeenpressed.
• TheSTART/PAUSEbuttonhasnotbeenpressed.
• Thewatertaphasnotbeenopened.
• Adelayedstarthasbeenset(see “Personalisation”).
• Thewaterinlethoseisnotconnectedtothetap.
• Thehoseisbent.
• Thewatertaphasnotbeenopened.
• Thereisnowatersupplyinthehouse.
• Thepressureistoolow.
• TheSTART/PAUSEbuttonhasnotbeenpressed.
• Thedrainhoseisnotfittedataheightbetween65and100cmfromthefloor
(see “Installation”).
• Thefreeendofthehoseisunderwater(see “Installation”).
• Thewalldrainagesystemisnotfittedwithabreatherpipe.
If the problem persists even after these checks, turn off the water tap, switch
the appliance off and contact the Assistance Service. If the dwelling is on one of
the upper floors of a building, there may be problems relating to water drainage,
causing the washing machine to fill with water and drain continuously. Special
anti-draining valves are available in shops and help to avoid this inconvenience.
• Thewashcycledoesnotincludedraining:somewashcyclesrequirethedrain
phase to be started manually.
• Thedrainhoseisbent(see “Installation”).
• Thedrainageductisclogged.
• Thedrumwasnotunlockedcorrectlyduringinstallation(see “Installation”).
• Thewashingmachineisnotlevel(see “Installation”).
• Thewashingmachineistrappedbetweencabinetsandwalls(see “Installation”).
• Thewaterinlethoseisnotscrewedonproperly(see “Installation”).
• Thedetergentdispenserdrawerisblocked(forcleaninginstructions,see “Care
and maintenance”).
• Thedrainhoseisnotfixedproperly(see “Installation”).
• Switchoffthemachineandunplugit,waitforapproximately1minuteandthen
switch it back on again.
If the problem persists, contact the Technical Assistance Service.
• Thedetergentisnotsuitableformachinewashing(itshoulddisplaythetext
“for washing machines” or “hand and machine wash”, or the like).
• Toomuchdetergentwasused.

12
GB
Service
Before calling for Assistance:
• Check whether you can solve the problem alone (see “Troubleshooting”);
• Restarttheprogrammetocheckwhethertheproblemhasbeensolved;
• Ifthisisnotthecase,contactanauthorisedTechnicalAssistanceCentreusingthetelephonenumberprovidedonthe
guarantee certificate.
! Always request the assistance of authorised technicians.
Have the following information to hand:
• thetypeofproblem;
• theappliancemodel(Mod.);
• theserialnumber(S/N).
This information can be found on the data plate applied to the rear of the washing machine, and can also be found on the
front of the appliance by opening the door.

CZ
13
Česky
Obsah
Instalace, 14-15
Rozbalení a vyrovnání do vodorovné polohy
Připojení k elektrické a k vodovodní síti
První prací cyklus
Technické údaje
Údržba a péče, 16
Uzavření přívodu vody a vypnutí elektrického napájení
Čištění pračky
Čištění dávkovače pracích prostředků
Péče o dvířka a buben
Čištění čerpadla
Kontrola přítokové hadice na vodu
Opatření a rady, 17
Základní bezpečnostní pokyny
Likvidace
Popis pračky a zahájení pracího programu, 18-19
Ovládací panel
Kontrolky
Zahájení pracího programu
Prací programy, 20
Tabulka pracích programů
Uživatelská nastavení, 21
Nastavení teploty
Nastavení rychlosti odstřeďování
Funkce
Prací prostředky a prádlo, 22
Dávkovač pracích prostředků
Příprava prádla
Oděvy vyžadující zvláštní péči
Systém automatického vyvážení náplně
Poruchy a způsob jejich odstranění, 23
Servisní služba, 24
CZ
IWSND 51051
Návod k použití
PRAČKA

14
CZ
! Je důležité uschovat tento návod tak, aby-
ste jej mohli kdykoli konzultovat. V případě
prodeje, darování nebo přestěhování pračky
se ujistěte, že zůstane uložen v blízkosti
pračky, aby mohl posloužit novému majiteli
při seznámení s její činností a s příslušnými
upozorněními.
! Pozorně si přečtěte uvedené pokyny: ob-
sahují důležité informace týkající se instala-
ce, použití a bezpečnosti při práci.
Rozbalení a vyrovnání do vodoro-
vné polohy
Rozbalení
1. Rozbalte pračku.
2. Zkontrolujte, zda během přepravy
nedošlo k jejímu poškození. V případě, že
je poškozena, ji nezapojujte a obraťte se na
prodejce.
3. Odstraňte
šrouby chránící
před poškozením
během přepravy a
gumovou podložku
s příslušnou
rozpěrkou, které se
nacházejí v zadní
části (viz obrázek).
4. Uzavřete otvory po šroubech plastovými
krytkami z příslušenství.
5. Uschovejte všechny díly: v případě
opětovné přepravy pračky je bude třeba na-
montovat zpět.
! Obaly nejsou hračky pro děti!
Vyrovnání do vodorovné polohy
1. Pračku je třeba umístit na rovnou a pe-
vnou podlahu, aniž by se opírala o stěnu,
nábytek či něco jiného.
2. V případě, že
podlaha není do-
konale vodorovná,
mohou být případné
rozdíly vykompenzo-
vány šroubováním
předních nožek (viz
obrázek); Úhel sklo-
nu, naměřený na pra-
covní ploše, nesmí
přesáhnout 2°.
Dokonalé vyrovnání do vodorovné polohy
zabezpečí stabilitu zařízení a zamezí vzniku
vibrací a hluku během činnosti. V případě
instalace na podlahovou krytinu nebo na
koberec nastavte nožky tak, aby pod pračkou
zůstal dostatečný volný prostor pro ventilaci.
Připojení k elektrické a k vodovodní
síti
Připojení přítokové hadice vody
1. Vložte těsnění
A do koncové části
přítokové hadice a
připevněte ji k uzávěru
studené vody se závi-
tem 3/4“ (viz obrázek).
Před připojením ha-
dice nechte vodu
odtéci, dokud nebude
průzračná.
2. Připojte přítokovou
hadici k pračce
prostřednictvím
příslušné přípojky
na vodu, umístěné
vpravo nahoře (viz
obrázek).
3. Dbejte na to, aby hadice nebyla příliš oh-
nutá ani stlačená.
! Tlak v rozvodu vody se musí pohybovat
v rozmezí hodnot uvedených v tabulce s
technickými údaji
(viz vedlejší strana).
! V případě, že délka přítokové hadice ne-
bude dostatečná, obraťte se na specializo-
vanou prodejnu nebo na autorizovaný tech-
nický personál.
! Nikdy nepoužívejte již použité hadice.
! Používejte hadice z příslušenství zařízení.
A
Instalace

CZ
15
65 - 100 cm
Připojení vypouštěcí hadice
Připojte vypouštěcí
hadici, aniž byste ji
ohýbali, k odpado-
vému potrubí nebo
k odpadu ve stěně,
který se nachází od
65 do 100 cm nad
zemí;
nebo ji uchyťte k
okraji umývadla či
vany a připevněte
vodicí držák
z příslušenství ke
kohoutu (viz obrá-
zek). Volný konec
vypouštěcí hadi-
ce nesmí zůstat
ponořený do vody.
! Použití prodlužovacích hadic se
nedoporučuje; je-li však nezbytné,
prodlužovací hadice musí mít stejný průměr
jako originální hadice a její délka nesmí
přesáhnout 150 cm.
Připojení k elektrické síti
Před zasunutím zástrčky do zásuvky se
ujistěte, že:
• Je zásuvka uzemněna a že vyhovuje nor-
mám;
• je zásuvka schopna snést maximální zátěž
odpovídající jmenovitému příkonu zařízení,
uvedenému v tabulce s technickými údaji
(viz vedle);
• hodnota napájecího napětí odpovídá
údajům uvedeným v tabulce s technickými
údaji (viz vedle);
• je zásuvka kompatibilní se zástrčkou
pračky. V opačném případě je třeba
vyměnit zásuvku nebo zástrčku.
! Pračka nesmí být umístěna venku – pod
širým nebem, a to ani v případě, že by se
jednalo o místo chráněné před nepřízní
počasí, protože je velmi nebezpečné vystavit
ji působení deště a bouří.
! Po denitivní instalaci pračky musí zásuvka
zůstat snadno přístupná.
! Nepoužívejte prodlužovací kabely a rozvodky.
! Kabel nesmí být ohnutý ani stlačený.
! Výměna kabelu musí být svěřena výhradně
autorizovanému technickému personálu.
Upozornění! Výrobce neponese žádnou
odpovědnost za následky nerespektování
uvedených předpisů.
První prací cyklus
Po instalaci zařízení je třeba ještě předtím,
než je použijete na praní prádla, provést
jeden zkušební cyklus s pracím prostředkem
a bez náplně prádla nastavením pracího
programu 2.
Technické údaje
Model IWSND 51051
Rozměry
šířka 59,5 cm
výška 85 cm
hloubka 42 cm
Kapacita od 1 do 5 kg
Napájení
Viz štítek s technickými údaji,
aplikovaný na zařízení.
Připojení k
rozvodu vody
maximální tlak
1 MPa (10 bar)
minimální tlak
0.05 MPa (0.5 bar)
kapacita bubnu 40 litrů
Rychlost
odstřeďování
až do 1000 otáček za minutu
Kontrolní
programy po-
dle předpisy
1061/2010 a
1015/2010
program 2;
standardní program pro
bavlnu pro praní při 60°C.
program 3;
standardní program pro
bavlnu pro praní při 40°C.
Toto zařízení odpovídá ná-
sledujícím normám Evrop-
ské unie:
- 2004/108/CE (Elektroma-
gnetická kompatibilita)
- 2006/95/CE (Nízké napětí)
- 2012/19/EU - WEEE

16
CZ
Uzavření přívodu vody a vypnutí
elektrického napájení
• Po každém praní uzavřete přívod vody.
Tímto způsobem dochází k omezení
opotřebení pračky a ke snížení nebezpečí
úniku vody.
• Před zahájením čištění pračky a během
operací údržby vytáhněte zástrčku
napájecího kabelu z elektrické zásuvky.
Čištění pračky
Vnější části a části z gumy se mohou čistit
hadrem navlhčeným ve vlažné vodě a sa-
ponátu. Nepoužívejte rozpouštědla ani
abrazivní látky.
Čištění dávkovače pracích
prostředků
Vytáhněte dávkovač
jeho nadzvednutím
a vytažením směrem
ven (viz obrázek).
Umyjte jej pod prou-
dem vody; tento druh
vyčištění je třeba
provádět pravidelně.
Péče o dvířka a buben
• Dvířka ponechte pokaždé pootevřená, aby
se zabránilo tvorbě nepříjemných zápachů.
Čištění čerpadla
Součástí pračky je samočisticí čerpadlo,
které nevyžaduje údržbu. Může se však stát,
že se v jeho vstupní části, určené k jeho
ochraně a nacházející se v jeho spodní části,
zachytí drobné předměty (mince, knoíky).
! Ujistěte se, že byl prací cyklus ukončen, a
vytáhněte zástrčku ze zásuvky.
Přístup ke vstupní části čerpadla:
1. pomo-
cí šroubováku
odstraňte krycí pa-
nel nacházející se v
přední části pračky
(viz obrázek);
2. odšroubujte víko
jeho otáčením proti
směru hodinových
ručiček (viz obrázek):
vytečení malého
množství vody je
zcela běžným jevem;
3. dokonale vyčistěte vnitřek;
4. zašroubujte zpět víko;
5. namontujte zpět panel, přičemž se před
jeho přisunutím k zařízení ujistěte, že
došlo ke správnému zachycení háčků do
příslušných podélných otvorů.
Kontrola přítokové hadice na vodu
Stav přítokové hadice je třeba zkontrolovat
alespoň jednou ročně. Jsou-li na ní viditel-
né praskliny nebo trhliny, je třeba ji vyměnit:
silný tlak působící na hadici během pracího
cyklu by mohl způsobit její náhlé roztržení.
! Nikdy nepoužívejte již použité hadice.
Údržba a péče

CZ
17
Opatření a rady
! Pračka byla navržena a vyrobena v souladu s platnými
mezinárodními bezpečnostním předpisy. Tato upozornění
jsou uváděna z bezpečnostních důvodů a je třeba si je
pozorně přečíst.
Základní bezpečnostní pokyny
• Toto zařízení bylo navrženo výhradně pro použití v
domácnosti.
• Toto zařízení mohou používat děti od 8
let a osoby se sníženými fyzickými, sen-
zorickými nebo duševními schopnostmi
nebo osoby s nedostatečnými zkušenostmi
a znalostmi, když se nacházejí pod
náležitým dohledem nebo když byly
náležitě vyškoleny ohledně bezpečného
použití zařízení a uvědomují si související
nebezpečí. Děti si nesmí hrát se zařízením.
Děti nesmí provádět operace údržby a
čištění bez dohledu.
• Nedotýkejte se zařízení bosí nebo v případě, že máte
mokré ruce či nohy.
• Nevytahujte zástrčku ze zásuvky tahem za kabel, ale
uchopením za zástrčku.
• Neotvírejte dávkovač pracích prostředků během
činnosti zařízení.
• Nedotýkejte se odčerpávané vody, protože může mít
velmi vysokou teplotu.
• Nepokoušejte se o násilné otevření dvířek: mohlo
by dojít k poškození bezpečnostního uzávěru, který
zabraňuje náhodnému otevření.
• Při výskytu poruchy se v žádném případě nepokoušejte
o opravu vnitřních částí zařízení.
• Vždy mějte pod kontrolou děti a zabraňte tomu, aby se
přibližovaly k zařízení během pracího cyklu.
• Během pracího cyklu mají dvířka tendenci ohřát se.
• V případě potřeby přemísťujte pračku ve dvou nebo
ve třech a věnujte celé operaci maximální pozornost.
Nikdy se nepokoušejte zařízení přemísťovat sami, je
totiž velmi těžké.
• Před zahájením vkládání prádla zkontrolujte, zda je
buben prázdný.
Likvidace
• Likvidace obalových materiálů: při jejich odstranění
postupujte v souladu s místním předpisy a dbejte na
možnou recyklaci.
• Evropská směrnice 2012/19/EU - WEEE o odpadních
elektrických a elektronických zařízeních stanovuje, že
staré domácí elektrické spotřebiče nesmí být od-
kládány do běžného netříděného domovního odpadu.
Staré spotřebiče musí být odevzdány do odděleného
sběru, a to za účelem recyklace a optimálního využití
materiálů, které obsahují, a z důvodu předcházení ne-
gativním dopadům na lidské zdraví a životní prostředí.
Symbol “přeškrtnuté popelnice” na výrobku vás
upozorňuje na povinnost odevzdat zařízení po
skončení jeho životnosti do odděleného sběru.
Spotřebitelé by měli kontaktovat příslušné místní
úřady nebo svého prodejce ohledně informací týka-
jících se správné likvidace starého zařízení.

18
CZ
Dávkovač pracích prostředků: slouží k dávkování pracích
prostředků a přídavných prostředků (viz „Prací prostředky
a prádlo“).
Tlačítko ON/OFF: slouží k zapnutí a vypnutí pračky.
Otočný ovladač PROGRAMŮ: pro nastavení pracích
programů. Během pracího programu zůstane ve stejné
poloze.
FUNKČNÍ tlačítka s kontrolkami: slouží k volbě jednotli-
vých dostupných funkcí. Kontrolka zvolené funkce zůstane
rozsvícena.
Otočný ovladač ODSTŘEĎOVÁNÍ: slouží k nastavení
odstřeďování nebo k jeho vyloučení (viz „Uživatelská
nastavení“).
Otočný ovladač TEPLOTY: slouží k nastavení teploty praní
nebo praní ve studené vodě (viz „Uživatelská nastavení“).
DISPLEJ: slouží k zobrazení doby trvání různých programů,
které jsou k dispozici, a po zahájení cyklu i zbývající doby
ukončení probíhajícího programu; v případě nastavení
ODLOŽENÝ START bude zobrazena doba chybějící do
zahájení zvoleného programu.
ODLOŽENÝ START : stiskněte za účelem nastavení
odloženého startu zvoleného programu. Doba, o kterou
bude start odložen, bude zobrazena na displeji.
Kontrolky
PRŮBĚHU PRACÍHO CYKLU: slouží ke kon-
trole průběhu pracího programu.
Rozsvícená
kontrolka
poukazuje na probíhající fázi.
Kontrolka ZABLOKOVANÁ DVÍŘKA: informuje o tom, zda
je možné otevřít dvířka (viz vedlejší strana).
Tlačítko s kontrolkou Slouží ke spuštění
nebo dočasnému přerušení programů.
POZN.: Stisknutí tohoto tlačítka slouží k přerušení probíha-
jícího praní; příslušná kontrolka bude blikat oranžovým
světlem, zatímco kontrolka probíhající fáze zůstane
rozsvícena stálým světlem. Když bude kontrolka ZABLO-
KOVANÁ DVÍŘKA zhasnuta, bude možné otevřít dvířka
(vyčkejte přibližně 3 minuty).
Za účelem opětovného zahájení praní z bodu, ve kterém
bylo přerušeno, znovu stiskněte toto tlačítko.
Pohotovostní režim
Za účelem shody s novými předpisy souvisejícími s ener-
getickou úsporou je tato pračka vybavena systémem au-
tomatického vypnutí (přechodu do pohotovostního režimu
– standby), který je aktivován po uplynutí 30 minut, když
se pračka nepoužívá. Krátce stiskněte tlačítko ON/OFF
a vyčkejte na obnovení činnosti zařízení.
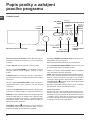
Popis pračky a zahájení
pracího programu
Ovládací panel
Kontrolky
PRŮBĚHU
PRACÍHO CYKLU
Kontrolka
ZABLOKOVANÁ
DVÍŘKA
Tlačítko s
kontrolkou
START/
PAUSE
Dávkovač pracích prostředků
Tlačítko
ON/OFF
Otočný ovladač
PROGRAMŮ
Otočný ovladač
TEPLOTY
Otočný ovladač
ODSTŘEĎOVÁNÍ
FUNKČNÍ
tlačítka
s kontrolkami
DISPLEJ
ODLOŽENÝ
START

CZ
19
Kontrolky
Kontrolky jsou zdrojem důležitých informací.
Informují nás o následujících skutečnostech:
Kontrolka aktuální fáze pracího programu:
Po zvolení a zahájení požadovaného pracího cyklu dojde
k postupnému rozsvícení kontrolek informujících o jeho
průběhu.
Funkční tlačítka a příslušné kontrolky
Po zvolení konkrétní funkce dojde k rozsvícení příslušné
kontrolky.
V případě, že zvolená funkce není kompatibilní s nasta-
veným pracím programem, příslušná kontrolka začne
blikat a funkce nebude aktivována.
V případě, že zvolená funkce není kompatibilní s jinou
předem zvolenou funkcí, kontrolka první funkce bude
blikat a bude aktivována pouze druhá, přičemž kontrolka
zvolené funkce se rozsvítí stálým světlem.
Kontrolka zablokovaných dvířek
Rozsvícení této kontrolky poukazuje na to, že dvířka jsou
zajištěna kvůli zamezení náhodnému otevření; aby se zabrá-
nilo poškození dvířek, před jejich otevřením je třeba vyčkat,
dokud uvedená kontrolka nezhasne; (vyčkejte přibližně 3 mi-
nuty). Za účelem otevření dvířek v průběhu pracího cyklu
stiskněte tlačítko START/PAUSE; když bude kontrolka
ZABLOKOVANÁ DVÍŘKA zhasnutá, bude možné otevřít
dvířka.
Zahájení pracího programu
1. Zapněte pračku stisknutím tlačítka ON/OFF. Všechny kontrolky se rozsvítí na několik sekund, poté se zhasnou a bude
blikat kontrolka START/PAUSE.
2. Naplňte pračku a zavřete dvířka.
3. Otočným ovladačem PROGRAMŮ nastavte požadovaný prací program.
4. Nastavte teplotu praní (viz „Uživatelská nastavení“).
5. Nastavte rychlost odstřeďování (viz „Uživatelská nastavení“).
6. Nadávkujte prací prostředek a přídavné prostředky (viz „Prací prostředky a prádlo“).
7. Zvolte požadované funkce.
8. Zahajte prací program stisknutím tlačítka START/PAUSE a příslušná kontrolka zůstane rozsvícena stálým světlem ze-
lené barvy. Zrušení nastaveného pracího cyklu se provádí přerušením činnosti zařízení stisknutím tlačítka START/PATA a
volbou nového cyklu.
9. Po ukončení pracího programu se rozsvítí kontrolka . Po zhasnutí kontrolky ZABLOKOVANÁ DVÍŘKA bude
možné otevřít dvířka (vyčkejte přibližně 3 minuty). Vytáhněte prádlo a nechte dvířka pootevřená, aby bylo umožněno
vysušení bubnu. Vypněte pračku stisknutím tlačítka ON/OFF.
Praní
Máchání
Odstřeďování
Odčerpání vody
Ukončení praní

20
CZ
Prací programy
Tabulka pracích programů
Sport Intensive (program 12) byl navržen pro velmi znečištěné látky sportovního oblečení (teplákové soupravy, šortky apod.);
pro dosažení optimálních výsledků se doporučuje nepřekračovat maximální náplň uvedenou v “Tabulka pracích programů”.
Sport Light (program 13) byl navržen pro mírně znečištěné látky sportovního oblečení (teplákové soupravy, šortky apod.);
pro dosažení optimálních výsledků se doporučuje nepřekračovat maximální náplň uvedenou v “Tabulka pracích programů”.
Doporučuje se použít tekutý prací prostředek a použít dávku vhodnou pro poloviční náplň.
Sport Shoes (program 14) byl navržen pro praní sportovní obuvi; pro dosažení optimálních výsledků neperte více než
2 páry najednou.
Programy 20° (20° Zone) nabízejí dobrou výkonnost praní při nízkých teplotách, přičemž umožňují nižší použití elektrické
energie s výhodami pro nanční úsporu i pro životní prostředí. Programy 20° vyhovují všem požadavkům:
Standardní program pro bavlnu pro praní při 20°C (program 6) ideální pro náplně ze znečištěné bavlny. Dobrá výkonnost
i za studena, srovnatelná s praním při 40 °C, je zaručena mechanickým působením, které je založeno na změně rychlosti v
krátkých nebo dlouhých intervalech.
Mix Light (program 7)ideální pro smíšené náplně (bavlna a syntetika), tvořené středně znečištěným prádlem. Dobrá výkonnost praní i
za studena je zaručena mechanickým působením, které je založeno na změně rychlosti ve středních nebo určených intervalech.
20’ Refresh (program 8) osvěžení ideální cyklus pro osvěžení a praní mírně znečištěného prádla v průběhu pár minut. Trvá
pouze 20 minut a šetří tak čas i energii. Umožňuje prát dohromady tkaniny různého druhu (s výjimkou vlny a hedvábí) při náplni
nepřesahující 1,5 kg.
Doba trvání cyklu uvedená na displeji nebo v návodu představuje odhad vypočítaný na základě standardních podmínek. Skutečná doba se může měnit v závislosti na četných faktorech, jako je
např. teplota a tlak vody na vstupu, teplota prostředí, množství pracího prostředku, množství a druh náplně, vyvážení náplně a zvolené volitelné funkce.
1) Kontrolní program podle předpisy 1061/2010: nastavte program 2 s teplotou 60°C.
Tento cyklus je vhodný pro praní běžně znečištěné bavlny a jedná se o nejúčinnější cyklus z hlediska kombinované spotřeby energie a vody určený pro prádlo, které
lze prát při teplotě do 60 °C. Skutečná teplota praní se může lišit od uvedené.
2) Kontrolní program podle předpisy 1061/2010: nastavte program 3 s teplotou 40°C.
Tento cyklus je vhodný pro praní běžně znečištěné bavlny a jedná se o nejúčinnější cyklus z hlediska kombinované spotřeby energie a vody určený pro prádlo, které
lze prát při teplotě do 40°C. Skutečná teplota praní se může lišit od uvedené.
Pro všechny Kontrolní ústavy:
2) Dlouhý program na praní bavlny: nastavte program 3 s teplotou 40°C.
3) Syntetický program spolu: nastavte program 4 s teplotou 40°C.
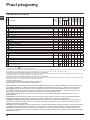
Programy
Popis programu
Max.
teplota
(°C)
Max. rychlost
(otáèky za minutu)
Prací pro-
støedky
Max. náplò (kg)
Zbytková
vlhkost %
Spotøeba
energie kWh
Celkové
mnoství vody lt
Cycle duration
Pøedpraní
Praní
Aviváz
Programy pro kazdodenní praní (Daily)
1
Bavlna + pøedpraní: mimoøádnì zneèištìné bílé prádlo.
90° 1000
5
- - - **
2
Standardní program pro bavlnu pro praní při 60°C (1): silnì zneèištìné bílé a barevné prádlo z odolných tkanin.
60°
(Max. 90°)
1000 -
5
62 0,89 47,5 220’
3
Standardní program pro bavlnu pro praní při 40°C (2): silnì zneèištìné bílé a barevné choulostivé prádlo.
40° 1000 -
5
62 0,80 61 215’
4
Syntetika: velmi zneèištìné barevné prádlo z odolných tkanin.
60° 1000 -
3
44 0,70 46 145’
4
Syntetika (3): èásteèné zneèištìné barevné prádlo z odolných tkanin.
40° 1000 -
3
- - - **
5
Barevná bavlna: málo zneèištìné bílé a barevné choulostivé prádlo.
40° 1000 -
5
- - - **
20° Zone
6
Standardní program pro bavlnu pro praní při 20°C: silnì zneèištìné bílé a barevné choulostivé prádlo.
20° 1000 -
5
- - - **
7
Mix Light
20° 1000 -
5
- - - **
8
20’ Refresh
20° 800 -
1,5
- - - **
Speciální programy (Special)
9
Hedvábí/Záclony: pro prádlo z hedvábí, viskózy, spodní prádlo.
30° 0 -
1
- - - **
10
Vlna: pro vlnu, kašmír atd.
40° 800 -
1
- - - **
11
Jeans
40° 800 -
2,5
- - - **
Sport
12
Sport Intensive
30° 600 -
2,5
- - - **
13
Sport Light
30° 600 -
2,5
- - - **
14
Sport Shoes
30° 600 -
Max. 2
páry.
- - - **
Dílèí programy
Máchání
- 1000 - -
5
- - - **
Odstøeïování + Odèerpání vody
- 1000 - - - 5
- - - **
Samostatné odčerpání vody *
- - - - 5
- - - **
* V případě volby programu a vyloučení odstřeďování zařízení provede pouze odčerpání vody.
** Je možné kontrolovat dobu trvání pracích programù na displeji.
Pagina se încarcă...
Pagina se încarcă...
Pagina se încarcă...
Pagina se încarcă...
Pagina se încarcă...
Pagina se încarcă...
Pagina se încarcă...
Pagina se încarcă...
Pagina se încarcă...
Pagina se încarcă...
Pagina se încarcă...
Pagina se încarcă...
Pagina se încarcă...
Pagina se încarcă...
Pagina se încarcă...
Pagina se încarcă...
Pagina se încarcă...
Pagina se încarcă...
Pagina se încarcă...
Pagina se încarcă...
Pagina se încarcă...
Pagina se încarcă...
Pagina se încarcă...
Pagina se încarcă...
Pagina se încarcă...
Pagina se încarcă...
Pagina se încarcă...
Pagina se încarcă...
Pagina se încarcă...
Pagina se încarcă...
Pagina se încarcă...
Pagina se încarcă...
Pagina se încarcă...
Pagina se încarcă...
Pagina se încarcă...
Pagina se încarcă...
Pagina se încarcă...
Pagina se încarcă...
Pagina se încarcă...
Pagina se încarcă...
Pagina se încarcă...
Pagina se încarcă...
Pagina se încarcă...
Pagina se încarcă...
Pagina se încarcă...
Pagina se încarcă...
Pagina se încarcă...
Pagina se încarcă...
Pagina se încarcă...
Pagina se încarcă...
Pagina se încarcă...
Pagina se încarcă...
-
 1
1
-
 2
2
-
 3
3
-
 4
4
-
 5
5
-
 6
6
-
 7
7
-
 8
8
-
 9
9
-
 10
10
-
 11
11
-
 12
12
-
 13
13
-
 14
14
-
 15
15
-
 16
16
-
 17
17
-
 18
18
-
 19
19
-
 20
20
-
 21
21
-
 22
22
-
 23
23
-
 24
24
-
 25
25
-
 26
26
-
 27
27
-
 28
28
-
 29
29
-
 30
30
-
 31
31
-
 32
32
-
 33
33
-
 34
34
-
 35
35
-
 36
36
-
 37
37
-
 38
38
-
 39
39
-
 40
40
-
 41
41
-
 42
42
-
 43
43
-
 44
44
-
 45
45
-
 46
46
-
 47
47
-
 48
48
-
 49
49
-
 50
50
-
 51
51
-
 52
52
-
 53
53
-
 54
54
-
 55
55
-
 56
56
-
 57
57
-
 58
58
-
 59
59
-
 60
60
-
 61
61
-
 62
62
-
 63
63
-
 64
64
-
 65
65
-
 66
66
-
 67
67
-
 68
68
-
 69
69
-
 70
70
-
 71
71
-
 72
72


Indesit IWSND 51051CECO EU.L Manualul utilizatorului
- Categorie
- Mașini de spălat
- Tip
- Manualul utilizatorului
în alte limbi
- français: Indesit IWSND 51051CECO EU.L Mode d'emploi
- English: Indesit IWSND 51051CECO EU.L User guide
- slovenčina: Indesit IWSND 51051CECO EU.L Užívateľská príručka