Philips hq 4810 micro act Manual de utilizare
- Categorie
- Aparate de bărbierit
- Tip
- Manual de utilizare
Acest manual este potrivit și pentru

HQ481
ENGLISH 4
15
28
39
50
61
72
84
95
106
118
130
142
153
164
175

4
Introduction
Congratulations on your purchase and welcome
to Philips! To fully benet from the support that
Philips offers, register your product at www.philips.
com/welcome.
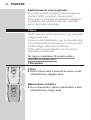
Important
Read this user manual carefully before you use the
appliance and save it for future reference.
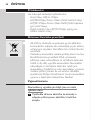
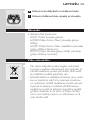
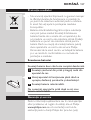
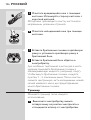
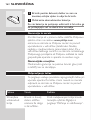
Danger
Keep the shaver and the mains cord dry.
Warning
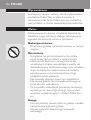
This appliance is not intended for use by persons
(including children) with reduced physical, sensory
or mental capabilities, or lack of experience
and knowledge, unless they have been given
supervision or instruction concerning use of the
appliance by a person responsible for their safety.
Children should be supervised to ensure that they
do not play with the appliance.
Do not use the shaver or the mains cord if it is
damaged.
If the mains cord is damaged, always have it
replaced with one of the original type in order to
avoid a hazard.
Caution
Always put the protection cap on the shaver
to protect the shaving heads when you are
travelling.
Only use the mains cord supplied.
Charge and store the shaver at a temperature
between 5°C and 35°C.
Do not recharge the shaver in a closed pouch.
-
-
-
-
-
-
-
-
-
ENGLISH

The appliance is equipped with an automatic
voltage selector and is suitable for mains
voltages from 100 to 240 volts.
Noise level: Lc = 60 dB(A)
Compliance with standards
This Philips appliance complies with all standards
regarding electromagnetic elds (EMF). If handled
properly and according to the instructions in this
user manual, the appliance is safe to use based on
scientic evidence available today.
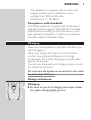
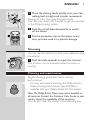
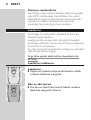
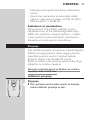
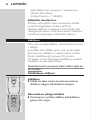
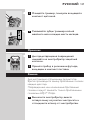
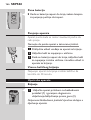
Charging
Make sure the appliance is switched off before you
start charging it.
When you charge the shaver for the rst time
or after a long period of disuse, let it charge
continuously for 4 hours. Charging normally takes
approx. 90 minutes.
You can also shave without charging, simply connect
the shaver to the mains.
Do not leave the appliance connected to the mains
for more than 24 hours.
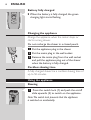
Charge indications
Charging
As soon as you start charging the empty shaver,
the green charging light goes on.
-
-
,
CHARGECHARGE
ENGLISH 5

Battery fully charged
When the battery is fully charged, the green
charging light starts ashing.
Charging the appliance
Charge the appliance when the motor stops or
starts running slower.
Do not recharge the shaver in a closed pouch.
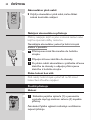
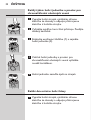
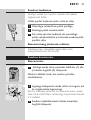
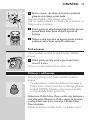
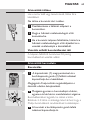
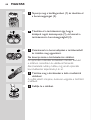
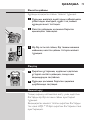
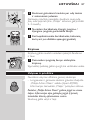
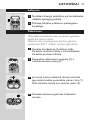
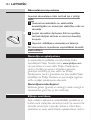
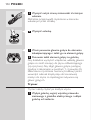
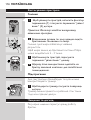
1 Put the appliance plug in the shaver.
2 Put the mains plug in the wall socket.
3 Remove the mains plug from the wall socket
and pull the appliance plug out of the shaver
when the battery is fully charged.
Cordless shaving time
A fully charged shaver has a cordless shaving time of
up to 50 minutes.
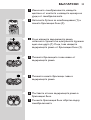
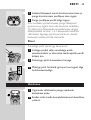
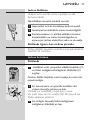
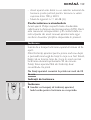
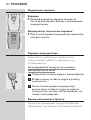
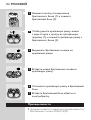
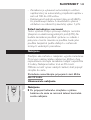
Shaving
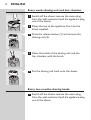
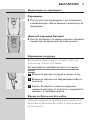
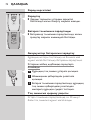
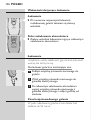
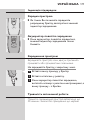
1 Press the switch lock (1) and push the on/off
slide upwards (2) to switch on the appliance.
Note: The switch lock prevents that the appliance
is switched on accidentally.
,
CHARGECHARGE
ENGLISH6

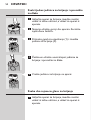
2 Move the shaving heads quickly over your skin,
making both straight and circular movements.
Shaving on a dry face gives the best results.
Your skin may need 2 or 3 weeks to get accustomed
to the Philips shaving system.
3 Push the on/off slide downwards to switch
off the shaver.
4 Put the protection cap on the shaver every
time you have used it, to prevent damage.
You can use the trimmer to trim your sideburns and
moustache.
1 Push the slide upwards to open the trimmer.
The trimmer can be activated while the motor is
running.
Cleaning and maintenance
Regular cleaning guarantees better shaving
performance.
For easy and optimal cleaning, the Philips Action
Clean (shaving head cleaner, type HQ100) is
available. Ask your Philips dealer for information.
Note: The Philips Action Clean may not be available in
all countries. Contact the Customer Care Centre in your
country about the availability of this accessory.
You can also clean the shaver in the following way:
-
ENGLISH 7

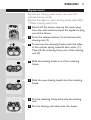
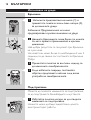
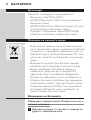
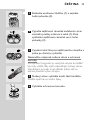
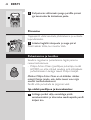
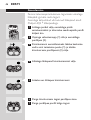
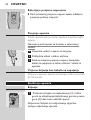
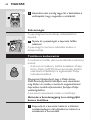
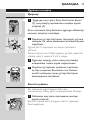
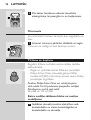
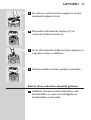
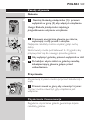
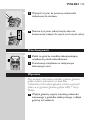
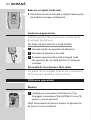
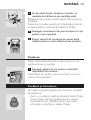
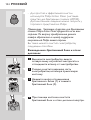
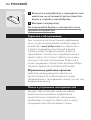
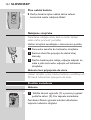
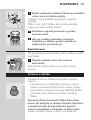
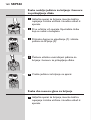
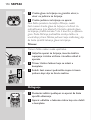
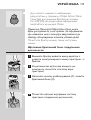
Every week: shaving unit and hair chamber
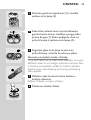
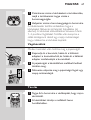
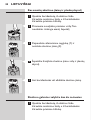
1 Switch off the shaver, remove the mains plug
from the wall socket and pull the appliance plug
out of the shaver.
2 Clean the top of the appliance rst. Use the
brush supplied.
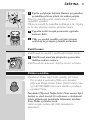
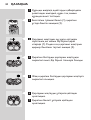
3 Press the release button (1) and remove the
shaving unit (2).
4 Clean the inside of the shaving unit and the
hair chamber with the brush.
5 Put the shaving unit back onto the shaver.
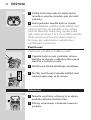
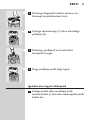
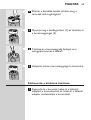
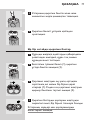
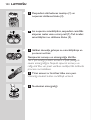
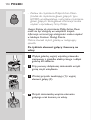
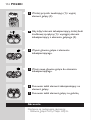
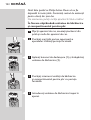
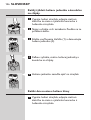
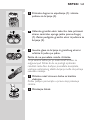
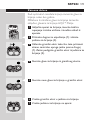
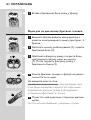
Every two months: shaving heads
1 Switch off the shaver, remove the mains plug
from the wall socket and pull the appliance plug
out of the shaver.
ENGLISH8

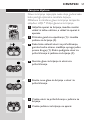
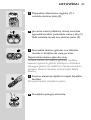
2 Press the release button (1) and remove the
shaving unit (2).
3 To remove the retaining frame, push the sides
of the central spring towards each other (1).
Then lift the retaining frame out of the shaving
unit (2).
4 Slide the shaving heads out of the retaining
frame and clean them one by one.
Do not mix up the cutters and the guards.
This is essential since each cutter has been
ground with its corresponding guard for optimal
performance. If you accidentally mix up the sets, it
could take several weeks before optimal shaving
performance is restored.
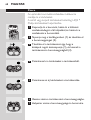
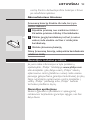
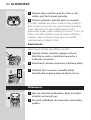
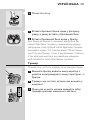
5 Clean the cutter with the short-bristled side of
the brush.
Brush carefully in the direction of the arrow.
6 Brush the guard.
ENGLISH 9

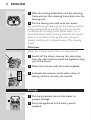
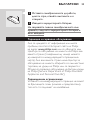
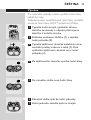
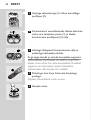
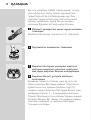
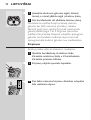
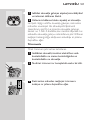
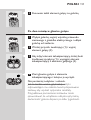
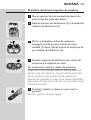
7 Slide the shaving heads back into the retaining
frame and put the retaining frame back into the
shaving unit.
8 Put the shaving unit back onto the shaver.
For extra thorough cleaning, put the shaving heads in
a degreasing liquid (e.g. alcohol) every six months.
To remove the shaving heads, follow steps 1 to 4
described above. After cleaning, lubricate the central
point on the inside of the guards with a drop of
sewing machine oil to prevent wear of the shaving
heads.
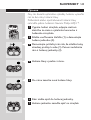
Clean the trimmer every time you have used it.
1 Switch off the shaver, remove the mains plug
from the wall socket and pull the appliance plug
out of the shaver.
2 Clean the trimmer with the brush supplied.
3 Lubricate the trimmer teeth with a drop of
sewing machine oil every six months.
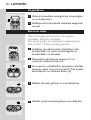
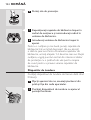
Storage
1
Put the protection cap on the shaver to
prevent damage.
2 Store the appliance in the luxury pouch
supplied.
ENGLISH10

Replacement
Replace the shaving heads every two years for
optimal shaving results.
Replace damaged or worn shaving heads with HQ4
Ç Philips shaving heads only.
1 Switch off the shaver, remove the mains plug
from the wall socket and pull the appliance plug
out of the shaver.
2 Press the release button (1) and remove the
shaving unit (2).
3 To remove the retaining frame, push the sides
of the central spring towards each other (1).
Then lift the retaining frame out of the shaving
unit (2).
4 Slide the shaving heads out of the retaining
frame.
5 Slide the new shaving heads into the retaining
frame.
6 Put the retaining frame back into the shaving
unit.
7 Put the shaving unit back onto the shaver.
ENGLISH 11

The following accessories are available:
HQ4+ Philips shaving heads.
HQ100 Philips Action Clean (shaving head
cleaner).
HQ101 Philips Action Clean rell (shaving head
cleaning liquid).
HQ110 Philips shaving head cleaner (shaving head
cleaning spray).
Environment
Do not throw away the appliance with the normal
household waste at the end of its life, but hand
it in at an ofcial collection point for recycling. By
doing this, you help to preserve the environment.
The built-in rechargeable battery contains
substances that may pollute the environment.
Always remove the battery before you discard
and hand in the appliance at an ofcial collection
point. Dispose of the battery at an ofcial
collection point for batteries. If you have trouble
removing the battery, you can also take the
appliance to a Philips service centre. The staff of
this centre will remove the battery for you and
will dispose of it in an environmentally safe way.
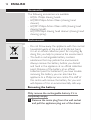
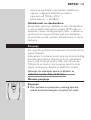
Removing the battery
Only remove the rechargeable battery if it is
completely empty.
1 Remove the mains plug from the wall socket
and pull the appliance plug out of the shaver.
-
-
-
-
-
-
ENGLISH12

2 Let the shaver run until it stops, undo the
screws and open the shaver.
3 Remove the rechargeable battery.
Do not connect the shaver to the mains again after
you have removed the rechargeable battery.
Guarantee & service
If you need information or if you have a problem,
please visit the Philips website at www.philips.com
or contact the Philips Customer Care Centre
in your country (you nd its phone number in
the worldwide guarantee leaet). If there is no
Customer Care Centre in your country, go to
your local Philips dealer or contact the Service
Department of Philips Domestic Appliances and
Personal Care BV.
Guarantee restrictions
The shaving heads (cutters and guards) are not
covered by the terms of the international guarantee
because they are subject to wear.
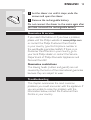
This chapter summarises the most common
problems you could encounter with the appliance. If
you are unable to solve the problem with the
information below, contact the Customer Care
Centre in your country.
ENGLISH 13

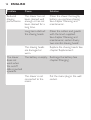
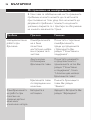
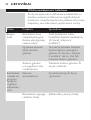
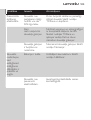
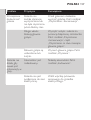
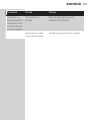
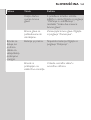
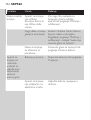
Problem Cause Solution
Reduced
shaving
performance
The shaver has not
been cleaned well
enough or has not
been cleaned for a
long time.
Clean the shaver thoroughly
before you continue shaving.
See chapter ‘Cleaning and
maintenance’.
Long hairs obstruct
the shaving heads.
Clean the cutters and guards
with the brush supplied.
See chapter ‘Cleaning and
maintenance’, section ‘Every
two months: shaving heads’.
The shaving heads
are damaged or
worn.
Replace the shaving heads. See
chapter ‘Replacement’.
The shaver
does not
work when
the on/off
slide is pushed
upwards.
The battery is empty. Recharge the battery. See
chapter ‘Charging’.
The shaver is not
connected to the
mains.
Put the mains plug in the wall
socket.
ENGLISH14

15
Поздравления за вашата покупка и добре дошли
във Philips! За да се възползвате изцяло от
предлаганата от Philips поддръжка, регистрирайте
продукта си на www.philips.com/welcome.
Преди да използвате уреда, прочетете
внимателно това ръководство за експлоатация и
го запазете за справка в бъдеще.
Пазете самобръсначката и захранващия кабел
сухи.
Този уред не е предназначен за ползване от
хора (включително деца) с намалени физически
усещания или умствени недъзи или без опит и
познания, ако са оставени без наблюдение и не
са инструктирани от страна на отговарящо за
тяхната безопасност лице относно начина на
използване на уреда.
Наглеждайте децата, за да не си играят с уреда.
Не използвайте самобръсначката или
захранващия кабел, ако са повредени.
Ако захранващият кабел е повреден, с
оглед предотвратяване на опасност винаги
заменяйте повредения захранващ кабел само с
оригинален такъв.
За да предпазите бръснещите глави при
пътуване, винаги поставяйте предпазната
капачка на самобръсначката.
Използвайте само доставения с комплекта
захранващ кабел.
-
-
-
-
-
-
-

Зареждайте и съхранявайте самобръсначката
при температури от 5°C до 35°C.
Не зареждайте самобръсначката в затворен
калъф.
Уредът е съоръжен с автоматичен селектор на
напрежение и е подходящ за напрежения на
мрежата в диапазона от 100 до 240 волта.
Ниво на шума: Lc= 60 dB[A]
Този уред Philips е в съответствие с всички
стандарти по отношение на електромагнитните
излъчвания (EMF). Ако се употребява правилно и
съобразно напътствията в Ръководството, уредът
е безопасен за използване според наличните
досега научни факти.
Проверете дали уредът е изключен, преди да
започнете да го зареждате.
Когато зареждате самобръсначката за първи
път или след като дълго не сте я използвали,
оставете я да се зарежда непрекъснато 4 часа.
Нормалното зареждане отнема около 90 минути.
Можете да се бръснете и без да зареждате
- просто свържете самобръсначката директно
към мрежата.
Не оставяйте уреда свързан към мрежата
повече от 24 часа.
-
-
-
-
16

Когато започне зареждането на изтощената
самобръсначка, светва зеленият индикатор за
зареждане.
Когато батерията се зареди напълно, зеленият
индикатор за зареждане започва да мига.
Зареждайте уреда, когато моторът спре или
започне да се върти по-бавно.
Не зареждайте самобръсначката в затворен
калъф.
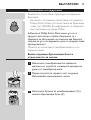
1 Включете щекера на уреда в гнездото му.
2 Включете щепсела на захранващия кабел в
контакта.
3 Когато батерията е напълно заредена,
извадете щепсела от контакта и издърпайте
щекера от самобръсначката.
Напълно заредената самобръсначка може да се
използва за бръснене без кабел в продължение
на 50 минути.
,
,
CHARGECHARGE
CHARGECHARGE
17

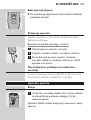
1 Натиснете предпазителя на ключа (1) и
преместете плъзгача за вкл./изкл. нагоре (2),
за да включите уреда.
Забележка: Предпазителят на ключа
предотвратява случайно включване на уреда.
2 Движете бръснещите глави бързо по кожата
си, като правите праволинейни и кръгови
движения.
Най-добри резултати се получават при бръснене
на суха кожа.
На кожата ви може би ще са необходими 2 или 3
седмици, за да свикне със системата за бръснене
Philips.
3 Преместете плъзгача за вкл./изкл. надолу, за
да изключите самобръсначката.
4 За да избегнете повреди, поставяйте
обратно предпазната капачка след всяка
употреба на самобръсначката.
Можете да ползвате машинката за подстригване,
за да подстрижете бакенбардите и мустаците.
1 Избутайте плъзгача нагоре, за да отворите
машинката за подстригване.
Ножчето може да бъде задействано, докато
електромоторът работи.
18

Редовното почистване гарантира по-ефикасно
бръснене.
За лесно и оптимално почистване се предлага
Philips Action Clean (за почистване на бръснеща
глава, тип HQ100). За информация се обърнете
към търговеца на уреди Philips.
Забележка: Philips Action Clean може да не се
предлага във всички страни. Свържете се с
Центъра за обслужване на клиенти във Вашата
страна, за да се осведомите дали се продава тази
принадлежност.
Можете да почиствате самобръсначката и по
следния начин:
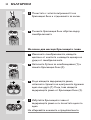
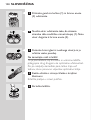
1 Изключете самобръсначката, извадете
щепсела от контакта и извадете щекера на
уреда от самобръсначката.
2 Първо почистете горната част на уреда.
Използвайте приложената четка.
3 Натиснете бутона за освобождаване (1) и
свалете бръснещия блок (2).
-
19

4 Почистете с четката вътрешността на
бръснещия блок и отделението за косми.
5 Сложете бръснещия блок обратно върху
самобръсначката.
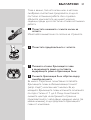
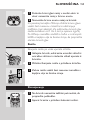
1 Изключете самобръсначката, извадете
щепсела от контакта и извадете щекера на
уреда от самобръсначката.
2 Натиснете бутона за освобождаване (1) и
свалете бръснещия блок (2).
3 За да извадите задържащата рамка,
натиснете страните на централната пружина
една към друга (1). След това извадете
задържащата рамка от бръснещия блок (2).
4 Избутайте бръснещите глави от
задържащата рамка и ги почистете една по
една.
Не обърквайте ножовете и предпазителите.
20

Това е важно, тъй като всеки нож е наточен
съобразно съответния предпазител, за да се
постигне оптимална работа. Ако случайно
объркате комплектите, ще минат няколко
седмици, преди да се постигне отново оптимална
работа.
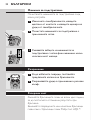
5 Почистете ножовете с късите косми на
четката.
Изчеткайте внимателно по посока на стрелката.
6 Почистете предпазителите с четката.
7 Плъзнете отново бръснещите глави
в задържащата рамка и поставете
задържащата рамка в бръснещия блок.
8 Сложете бръснещия блок обратно върху
самобръсначката.
За много старателно почистване потапяйте
бръснещите глави в обезмасляваща течност
(напр. спирт) на всеки шест месеца. За да
извадите бръснещите глави, изпълнете описаните
по-горе стъпки от 1 до 4. След почистването
смажете центъра на вътрешната страна на
предпазителите с капка фино машинно масло (за
шевни машини), за да предпазите бръснещите
глави от износване.
21

Почиствайте машинката за подстригване след
всяка употреба.
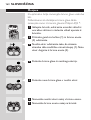
1 Изключете самобръсначката, извадете
щепсела от контакта и извадете щекера на
уреда от самобръсначката.
2 Почистете машинката за подстригване с
приложената четка.
3 Смазвайте зъбците на машинката за
подстригване с капка фино машинно масло
на всеки шест месеца.
1
За да избегнете повреди, поставяйте
предпазната капачка на бръсначката.
2 Съхранявайте уреда в приложения луксозен
калъф.
Сменяйте бръснещите глави на всеки две години,
за да постигнете оптимални резултати при
бръснене.
Заменяйте повредените или износени бръснещи
глави само с бръснещи глави Philips тип HQ4 Ç.
22
Pagina se încarcă...
Pagina se încarcă...
Pagina se încarcă...
Pagina se încarcă...
Pagina se încarcă...
Pagina se încarcă...
Pagina se încarcă...
Pagina se încarcă...
Pagina se încarcă...
Pagina se încarcă...
Pagina se încarcă...
Pagina se încarcă...
Pagina se încarcă...
Pagina se încarcă...
Pagina se încarcă...
Pagina se încarcă...
Pagina se încarcă...
Pagina se încarcă...
Pagina se încarcă...
Pagina se încarcă...
Pagina se încarcă...
Pagina se încarcă...
Pagina se încarcă...
Pagina se încarcă...
Pagina se încarcă...
Pagina se încarcă...
Pagina se încarcă...
Pagina se încarcă...
Pagina se încarcă...
Pagina se încarcă...
Pagina se încarcă...
Pagina se încarcă...
Pagina se încarcă...
Pagina se încarcă...
Pagina se încarcă...
Pagina se încarcă...
Pagina se încarcă...
Pagina se încarcă...
Pagina se încarcă...
Pagina se încarcă...
Pagina se încarcă...
Pagina se încarcă...
Pagina se încarcă...
Pagina se încarcă...
Pagina se încarcă...
Pagina se încarcă...
Pagina se încarcă...
Pagina se încarcă...
Pagina se încarcă...
Pagina se încarcă...
Pagina se încarcă...
Pagina se încarcă...
Pagina se încarcă...
Pagina se încarcă...
Pagina se încarcă...
Pagina se încarcă...
Pagina se încarcă...
Pagina se încarcă...
Pagina se încarcă...
Pagina se încarcă...
Pagina se încarcă...
Pagina se încarcă...
Pagina se încarcă...
Pagina se încarcă...
Pagina se încarcă...
Pagina se încarcă...
Pagina se încarcă...
Pagina se încarcă...
Pagina se încarcă...
Pagina se încarcă...
Pagina se încarcă...
Pagina se încarcă...
Pagina se încarcă...
Pagina se încarcă...
Pagina se încarcă...
Pagina se încarcă...
Pagina se încarcă...
Pagina se încarcă...
Pagina se încarcă...
Pagina se încarcă...
Pagina se încarcă...
Pagina se încarcă...
Pagina se încarcă...
Pagina se încarcă...
Pagina se încarcă...
Pagina se încarcă...
Pagina se încarcă...
Pagina se încarcă...
Pagina se încarcă...
Pagina se încarcă...
Pagina se încarcă...
Pagina se încarcă...
Pagina se încarcă...
Pagina se încarcă...
Pagina se încarcă...
Pagina se încarcă...
Pagina se încarcă...
Pagina se încarcă...
Pagina se încarcă...
Pagina se încarcă...
Pagina se încarcă...
Pagina se încarcă...
Pagina se încarcă...
Pagina se încarcă...
Pagina se încarcă...
Pagina se încarcă...
Pagina se încarcă...
Pagina se încarcă...
Pagina se încarcă...
Pagina se încarcă...
Pagina se încarcă...
Pagina se încarcă...
Pagina se încarcă...
Pagina se încarcă...
Pagina se încarcă...
Pagina se încarcă...
Pagina se încarcă...
Pagina se încarcă...
Pagina se încarcă...
Pagina se încarcă...
Pagina se încarcă...
Pagina se încarcă...
Pagina se încarcă...
Pagina se încarcă...
Pagina se încarcă...
Pagina se încarcă...
Pagina se încarcă...
Pagina se încarcă...
Pagina se încarcă...
Pagina se încarcă...
Pagina se încarcă...
Pagina se încarcă...
Pagina se încarcă...
Pagina se încarcă...
Pagina se încarcă...
Pagina se încarcă...
Pagina se încarcă...
Pagina se încarcă...
Pagina se încarcă...
Pagina se încarcă...
Pagina se încarcă...
Pagina se încarcă...
Pagina se încarcă...
Pagina se încarcă...
Pagina se încarcă...
Pagina se încarcă...
Pagina se încarcă...
Pagina se încarcă...
Pagina se încarcă...
Pagina se încarcă...
Pagina se încarcă...
Pagina se încarcă...
Pagina se încarcă...
Pagina se încarcă...
Pagina se încarcă...
Pagina se încarcă...
Pagina se încarcă...
Pagina se încarcă...
Pagina se încarcă...
Pagina se încarcă...
Pagina se încarcă...
Pagina se încarcă...
Pagina se încarcă...
Pagina se încarcă...
-
 1
1
-
 2
2
-
 3
3
-
 4
4
-
 5
5
-
 6
6
-
 7
7
-
 8
8
-
 9
9
-
 10
10
-
 11
11
-
 12
12
-
 13
13
-
 14
14
-
 15
15
-
 16
16
-
 17
17
-
 18
18
-
 19
19
-
 20
20
-
 21
21
-
 22
22
-
 23
23
-
 24
24
-
 25
25
-
 26
26
-
 27
27
-
 28
28
-
 29
29
-
 30
30
-
 31
31
-
 32
32
-
 33
33
-
 34
34
-
 35
35
-
 36
36
-
 37
37
-
 38
38
-
 39
39
-
 40
40
-
 41
41
-
 42
42
-
 43
43
-
 44
44
-
 45
45
-
 46
46
-
 47
47
-
 48
48
-
 49
49
-
 50
50
-
 51
51
-
 52
52
-
 53
53
-
 54
54
-
 55
55
-
 56
56
-
 57
57
-
 58
58
-
 59
59
-
 60
60
-
 61
61
-
 62
62
-
 63
63
-
 64
64
-
 65
65
-
 66
66
-
 67
67
-
 68
68
-
 69
69
-
 70
70
-
 71
71
-
 72
72
-
 73
73
-
 74
74
-
 75
75
-
 76
76
-
 77
77
-
 78
78
-
 79
79
-
 80
80
-
 81
81
-
 82
82
-
 83
83
-
 84
84
-
 85
85
-
 86
86
-
 87
87
-
 88
88
-
 89
89
-
 90
90
-
 91
91
-
 92
92
-
 93
93
-
 94
94
-
 95
95
-
 96
96
-
 97
97
-
 98
98
-
 99
99
-
 100
100
-
 101
101
-
 102
102
-
 103
103
-
 104
104
-
 105
105
-
 106
106
-
 107
107
-
 108
108
-
 109
109
-
 110
110
-
 111
111
-
 112
112
-
 113
113
-
 114
114
-
 115
115
-
 116
116
-
 117
117
-
 118
118
-
 119
119
-
 120
120
-
 121
121
-
 122
122
-
 123
123
-
 124
124
-
 125
125
-
 126
126
-
 127
127
-
 128
128
-
 129
129
-
 130
130
-
 131
131
-
 132
132
-
 133
133
-
 134
134
-
 135
135
-
 136
136
-
 137
137
-
 138
138
-
 139
139
-
 140
140
-
 141
141
-
 142
142
-
 143
143
-
 144
144
-
 145
145
-
 146
146
-
 147
147
-
 148
148
-
 149
149
-
 150
150
-
 151
151
-
 152
152
-
 153
153
-
 154
154
-
 155
155
-
 156
156
-
 157
157
-
 158
158
-
 159
159
-
 160
160
-
 161
161
-
 162
162
-
 163
163
-
 164
164
-
 165
165
-
 166
166
-
 167
167
-
 168
168
-
 169
169
-
 170
170
-
 171
171
-
 172
172
-
 173
173
-
 174
174
-
 175
175
-
 176
176
-
 177
177
-
 178
178
-
 179
179
-
 180
180
-
 181
181
-
 182
182
-
 183
183
-
 184
184


Philips hq 4810 micro act Manual de utilizare
- Categorie
- Aparate de bărbierit
- Tip
- Manual de utilizare
- Acest manual este potrivit și pentru
în alte limbi
Lucrări înrudite
-
Philips HQ6675/16 Manual de utilizare
-
Philips HQ441/15 Manual de utilizare
-
Philips HQ6927/16 Informații importante
-
Philips HQ6695 Manual de utilizare
-
Philips HQ6645/16 Manual de utilizare
-
-
-
-
Philips HQ9080/16 Manual de utilizare
-