Kruger Matz KM0945 Manualul proprietarului
- Categorie
- Jocuri video
- Tip
- Manualul proprietarului

Electronic bike horn
KM0945
DE
EN
PL
RO
BEDIENUNGSANLEITUNG
OWNER’S MANUAL
INSTRUKCJA OBSŁUGI
MANUAL DE UTILIZARE

DE DE
BedienungsanleitungBedienungsanleitung
SICHERHEITSANLEITUNGEN
Vor dem ersten Gebrauch des Produktes lesen Sie bitte
diese Bedienungsanleitung sorgfältig und bewahren
diese auf für späteres Nachschlagen. Der Hersteller
übernimmt keine Verantwortung für Schäden, die durch
unsachgemäße Handhabung und Verwendung des
Produktes verursacht wurden.
1. Der Hersteller übernimmt keine Verantwortung für
Schäden/Verletzungen, die durch unsachgemäße
Handhabung und Verwendung des Gerätes
verursacht wurden.
2. Gerät nicht ins Feuer werfen. Explosionsgefahr.
3. Verwenden Sie dieses Gerät nicht weiter, wenn es
beschädigt wurde.
4. Setzen Sie das Gerät nicht direktem Sonnenlicht und
anderen Wärmequellen aus.
5. Im Falle einer Beschädigung wenden Sie sich zur
Überprüfung oder Reparatur an einen autorisierten.
Wenn Sie dieses Gerät selbst reparieren, kann dies zu
Schäden und zum Erlöschen der Garantie führen.
6. Während des Ladevorgangs, kann sich das Gerat
erwärmen. Dies ist normal.
7. Schützen Sie dieses Gerät vor Wasser und anderen
Flüssigkeiten.
8. Den Lichtstrahl nicht direkt in die Augen richten.
9. Reinigen Sie dieses Gerät mit einem weichen, leicht
feuchten Tuch ohne Scheuermittel.

DE DE
BedienungsanleitungBedienungsanleitung
13
7
6
4
5
2
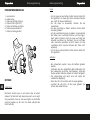
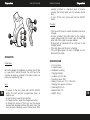
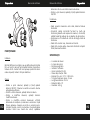
PRODUKTBESCHREIBUNG
1. Lautsprecher
2. Ladebuchse
3. Taste Lautstärke erhöhen
4. Taste EIN/AUS [ON/OFF]
5. Taste Lautstärke verringern
6. Taste Hupe einschalten
7. Taste Hornklang ändern
BETRIEB
Installation
Montieren Sie die Hupe so am Lenker oder an einem
anderen Teil des Fahrrads, dass diese nach vorne zeigt.
Die Hupentaste muss so nah wie möglich an der Stelle
montiert werden, an der sich Ihre Hand während der
Fahrt bendet.
Hupe
• Um die Hupe einzuschalten, halten Sie die Taste EIN/
AUS gedrückt. Die Hupe gibt einen einzelnen Piepton
aus. Jetzt ist diese einsatzbereit.
• Um die Hupe zu verwenden, drücken Sie die
Hupentaste.
• Um den Hornklang zu ändern, drücken Sie die Taste
Hornklang ändern.
• Um die Lautstärke der Hupe zu ändern, verwenden Sie
die Tasten zum Lautstärke Erhöhen und Verringern.
Nach jedem Drücken piept die Hupe und zeigt die
aktuelle Lautstärke an. Nachdem Sie die minimale
oder maximale Lautstärke erreicht haben, wird die
Lautstärke durch erneutes Drücken der Taste nicht
angezeigt.
• Um die Hupe auszuschalten, halten Sie die Taste EIN/
AUS gedrückt.
Auaden
• Bei schwachem Hupton muss die Batterie geladen
werden.
• Verbinden Sie das mitgelieferte MikroUSB-Kabel mit
der Ladebuchse (unter der Gummikappe). Verbinden
Sie das andere Ende des Kabels mit einem Netzgerät.
• Der Ladevorgang wird durch eine LED neben der
Ladebuchse angezeigt.
• Wenn die LED rot leuchtet, wird die Hupe geladen.
• Leuchtet die LED grün, ist die Hupe geladen. Sie
können das Kabel trennen.

EN EN
Owner’s manualOwner’s manual
DE DE
BedienungsanleitungBedienungsanleitung
Deutsch
Korrekte Entsorgung dieses Produkts
(Elektromüll)
(Anzuwenden in den Ländern der Europäischen Union
und anderen europäischen Ländern mit einem
separaten Sammelsystem) Die Kennzeichnung auf dem
Produkt bzw. auf der dazugehörigen Literatur gibt an,
dass es nach seiner Lebensdauer nicht zusammen mit
dam normalem Haushaltsmüll entsorgt werden darf.
Entsorgen Sie dieses Gerät bitte getrennt von anderen
Abfällen, um der Umwelt bzw. der menschlichen
Gesundheit nicht durch unkontrollierte Müllbeseitigung
zu schaden. Recyceln Sie das Gerät, um die nachhaltige
Wiederverwertung von stoichen Ressourcen zu
fördern. Private Nutzer sollten den Händler, bei dem das
Produkt gekauft wurde, oder die zuständigen Behörden
kontaktieren, um in Erfahrung zu bringen, wie sie das
Gerät auf umweltfreundliche Weise recyceln können.
Gewerbliche Nutzer sollten sich an Ihren Lieferanten
wenden und die Bedingungen des Verkaufsvertrags
konsultieren. Dieses Produkt darf nicht zusammen mit
anderem Gewerbemüll entsorgt werden. Hergestellt in
China für LECHPOL ELECTRONICS Sp. z o.o. Sp.k.,
ul. Garwolińska 1, 08-400 Miętne.
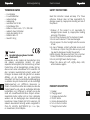
TECHNISCHE DATEN
• 4 Hornklänge
• 5 Lautstärkestufen
• Lenkermontage
• Ladeanzeige
• Lautstärke: bis 100 dB
• Schutzklasse: IP65
• Batterie: Lithium-Ionen / 3,7 V / 280 mAh
• Ladezeit: etwa 1,5 Stunden
• Länge des Kabels: 40 cm
• Material: ABS + PC
• Gewicht: 44,5 g
SAFETY INSTRUCTIONS
Read this instruction manual and keep it for future
reference. Producer does not take responsibility for
damages caused by inappropriate handling and use of
the product.
1. Producer of this product is not responsible for
damages/injuries caused by inappropriate handling
and using of the device.
2.Do not throw the device into re. Explosion hazard.
3.Do not use this device if it has been damaged.
4.Do not expose it to direct sunlight and other sources
of heat.
5.In case of damage, contact authorized service point
for check-up or repair. Fixing this device on your own
may lead to damage and voiding the warranty.
6.While charging, the device may heat. This is a normal.
7. Protect this device from water and other liquids.
8.Do not point light beam directly at eyes.
9.Clean the device with soft, slightly damp cloth,
without abrasive agents.
PRODUCT DESCRIPTION
1. Speaker
2. Charging socket
3. Increase volume button
4. ON/OFF button
5. Volume decrease button
6. Turn on the horn button
7. Change the horn button

EN EN
Owner’s manualOwner’s manual
13
7
6
4
5
2
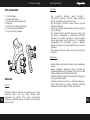
OPERATION
Installation
Mount the speaker to handlebar, or another part of bike
in a way that it points forward. The pilot has to be
mounted as close as possible to the place, where you
place your hand during ride.
Horn
• To power on the horn, press and hold the ON/OFF
button. The horn will emit a single beep. Now it is
ready to use.
• To use the horn, press the horn button.
• To change the horn, press the change horn button.
• To change the volume of the horn, use the volume
increase and decrease buttons. After each press, the
horn will beep, indicating current volume level. After
reaching minimum or maximum level of volume,
pressing the button again will not indicate volume
level.
• To turn o the horn, press and hold the ON/OFF
button.
Charging
• If the sound of the horn is weak, the battery has to be
charged.
• Connect provided microUSB cable to the charging
socket (placed under the rubber cap). Connect the
other end of the cable to a power adapter.
• Charging will be indicated with an LED next to the
charging socket.
• If the LED glows red, the horn is charging.
• If the LED glows green, the horn is charged. You can
disconnect the cable.
SPECIFICATION
• 4 horn sounds
• 5 volume levels
• Handlebar mounting
• Charging indicator
• Loudess: up to 100 dB
• Protection class: IP65
• Battery: lithium-ion / 3,7 V / 280 mAh
• Charging time: approx. 1,5 hours
• Cable length: 40 cm
• Material: ABS + PC
• Weight: 44,5 g

EN EN
Owner’s manualOwner’s manual
PL
Instrukcja obsługi
PL
Instrukcja obsługi
KWESTIE BEZPIECZEŃSTWA
Przed użyciem należy dokładnie zapoznać się z treścią
instrukcji obsługi oraz zachować ją w celu późniejszego
wykorzystania. Producent nie ponosi odpowiedzialności
za nieprawidłowe użycie produktu.
1. Producent nie ponosi odpowiedzialności za
jakiekolwiek uszkodzenia / urazy spowodowane
niewłaściwym użytkowaniem.
2. Nie należy wrzucać urządzenia do ognia. Ryzyko
wybuchu baterii.
3. Zabrania się używać urządzenia, jeśli jest
uszkodzone.
4. Urządzenie należy chronić przed bezpośrednim
nasłonecznieniem oraz promieniowaniem UV.
5. W wypadku uszkodzenia, należy oddać urządzenie do
autoryzowanego punktu serwisowego w celu
sprawdzenia/naprawy. Podejmowanie prób
własnoręcznej naprawy, może prowadzić do uszkodzenia
urządzenia oraz skutkuje unieważnieniem gwarancji.
6. Podczas ładowania urządzenie może się nagrzewać.
Jest to normalne zjawisko.
7. Urządzenie należy chronić przed zalaniem i wilgocią.
8. Nigdy nie należy kierować źródła światła
bezpośrednio w oczy.
9. Urządzenie należy czyścić przy pomocy miękkiej,
lekko wilgotnej ściereczki bez użycia środków
żrących.
English
Correct Disposal of This Product
(Waste Electrical & Electronic Equipment)
(Applicable in the European Union and other
European countries with separate collection systems)
This marking shown on the product or its literature,
indicates that it should not be disposed with other
household wastes at the end of its working life. To
prevent possible harm to the environment or human
health from uncontrolled waste disposal, please
separate this from other types of wastes and recycle it
responsibly to promote the sustainable reuse of
material resources. Household users should contact
either the retailer where they purchased this product, or
their local government oce, for details of where and
how they can take this item for environmentally safe
recycling. Business users should contact their supplier
and check the terms and conditions of the purchase
contract. This product should not be mixed with other
commercial wastes for disposal.
Made in China for LECHPOL ELECTRONICS Sp. z o.o.
Sp.k., ul. Garwolińska 1, 08-400 Miętne.

PL
Instrukcja obsługi
PL
Instrukcja obsługi
OPIS URZĄDZENIA
1. Źródło dźwięku
2. Gniazdo ładowania
3. Przycisk zwiększenia głośności
4. Włącznik
5. Przycisk zmniejszenia głośności
6. Przycisk włączenia klaksonu
7. Przycisk zmiany dźwięku
OBSŁUGA
Montaż
Dzwonek należy zamontować do kierownicy lub innego
elementu roweru tak, aby źródło dźwięku było
skierowane do przodu. Pilot należy zamontować
możliwie jak najbliżej miejsca, na którym spoczywa ręka
podczas jazdy.
13
7
6
4
5
2
Dzwonek
• Aby uruchomić dzwonek, należy nacisnąć i
przytrzymać włącznik. Dzwonek wyda pojedynczy
dźwięk, sygnalizując gotowość do pracy.
• Aby skorzystać z dzwonka należy nacisnąć przycisk
włączenia klaksonu.
• Aby zmienić dźwięk dzwonka należy nacisnąć przycisk
zmiany dźwięku.
• Aby zmienić poziom głośności dzwonka należy użyć
przycisków zmniejszenia i zwiększenia głośności
dzwonka. Po każdym naciśnięciu zostanie wydany
dźwięk wskazujący poziom głośności. Po osiągnięciu
najwyższego lub najniższego poziomu dźwięku,
kolejne naciśnięcia nie będą sygnalizowały poziomu
głośności.
• Aby wyłączyć dzwonek należy nacisnąć i przytrzymać
włącznik.
Ładowanie
• Jeżeli dźwięk dzwonka jest słaby, należy naładować
baterię.
• Należy podłączyć dołączony kabel microUSB do
gniazda ładowania (pod zaślepką). Drugi koniec kabla
należy podłączyć do ładowarki sieciowej.
• Ładowanie będzie sygnalizowane diodą znajdującą się
obok gniazda ładowania.
• Jeżeli dioda świeci na czerwono, dzwonek ładuje się.
• Jeżeli dioda świeci na zielono, dzwonek zakończył
ładowanie. Można odłączyć kabel od dzwonka.

RO RO
Manual de utilizareManual de utilizare
PL PL
Instrukcja obsługiInstrukcja obsługi
Poland
Prawidłowe usuwanie produktu
(zużyty sprzęt elektryczny i elektroniczny)
Oznaczenie umieszczone na produkcie lub w
odnoszących się do niego tekstach wskazuje, że po
upływie okresu użytkowania nie należy usuwać z innymi
odpadami pochodzącymi z gospodarstw domowych. Aby
uniknąć szkodliwego wpływu na środowisko naturalne i
zdrowie ludzi wskutek niekontrolowanego usuwania
odpadów, prosimy o oddzielenie produktu od innego
typu odpadów oraz odpowiedzialny recykling w celu
promowania ponownego użycia zasobów materialnych
jako stałej praktyki. W celu uzyskania informacji na
temat miejsca i sposobu bezpiecznego dla środowiska
recyklingu tego produktu użytkownicy w
gospodarstwach domowych powinni skontaktować się z
punktem sprzedaży detalicznej, w którym dokonali
zakupu produktu, lub z organem władz lokalnych.
Użytkownicy w rmach powinni skontaktować się ze
swoim dostawcą i sprawdzić warunki umowy zakupu.
Produktu nie należy usuwać razem z innymi odpadami
komercyjnymi.
Wyprodukowano w CHRL dla LECHPOL ELECTRONICS
Sp. z o.o. Sp.k., ul. Garwolińska 1, 08-400 Miętne.
SPECYFIKACJA
• 4 dźwięki do wyboru
• 5 poziomów głośności
• Mocowanie na kierownicę
• Wskaźnik ładowania
• Głośność: do 100 dB
• Klasa ochrony: IP65
• Akumulator: litowo-jonowy / 3,7 V / 280 mAh
• Czas ładowania: ok. 1,5 godziny
• Długość przewodu: 40 cm
• Materiał: ABS + PC
• Waga: 44,5 g
INSTRUCȚIUNI PRIVID SIGURANȚA
Citiți cu atenție acest manual de instrucțiuni și păstrați-
l pentru consultări ulterioare. Producătorul nu își asumă
răspunderea pentru daunele cauzate de manipularea și
utilizarea necorespunzătoare a produsului.
1. Producătorul nu își asumă răspunderea pentru
daunele/accidentările cauzate de manipularea și
utilizarea necorespunzătoare a acestui produs.
2. Nu aruncați dispozitivul în foc. Pericol de explozie.
3. Nu utilizați acest dispozitivu dacă este deteriorat.
4. Nu expuneți produsul la lumina directă a soarelui sau
la alte surse de căldură.
5. În caz de deteriorare, contactați un service autorizat
pentru vericare și/sau reparații. Repararea acestui
produs pe cont propriu poate duce la deteriorarea
dispozitivului și la anularea garanției.
6. În timpul încărcării, dispozitivul se poate încălzi.
Acest fenomen este normal.
7. Feriți dispozitivul de apă și alte lichide.
8. Nu îndreptați fasciculul de lumină direct spre ochi.
9. Curățați dispozitiuvl cu un material texil moale, ușor
umezit, fără agenți abrazivi.
DESCRIEREA PRODUSULUI
1. Difuzor
2. Mufă încărcare
3. Buton creștere volum
4. Buton ON/OFF
5. Buton reducere volum
6. Buton pornire claxon
7. Buton modicare claxon

RO RO
Manual de utilizareManual de utilizare
13
7
6
4
5
2
FUNCȚIONARE
Instalare
Montați difuzorul pe mâner, sau pe altă parte a bicicletei
într-un mod în care să e îndreptat înainte. Dispozitivul
trebuie să e montat cât mai aproape posibil de locul
unde vă puneți mâna în timpul călatoriei.
Claxon
• Pentru a porni claxonul, apăsați și țineți apăsat
butonul ON/OFF. Claxonul va emite un sunet. Acuma
este gata de utilizare.
• Pentru a utiliza claxonul, apăsați butonul claxon.
• Pentru a modica claxonul, apăsați butonul
modicare claxon.
• Pentru a modica volumul claxonului, utilizați
butoanele de creștere și reducere a volumului. După
ecare apăsare, claxonul va emite un semnal sonor,
indicând nivelul curent al volumului. După atingerea
nivelului minim sau maxim de volum, apăsarea
butonului din nou va indica nivelul volumului.
• Pentru a opri claxonul, apăsați și țineți apăsat butonul
ON/OFF.
Încărcarea
• Dacă sunetul claxonului este slab, bateria trebuie
încărcată.
• Conectați cablul microUSB furnizat la mufa de
încărcare (plasată sub capacul de cauciuc). Conectați
celălalt capăt al cablului la un adaptor de alimentare.
• Încărcarea va indicată de LED-ul de lângă mufa de
încărcare.
• Dacă LED-ul este roșu, claxonul se încarcă.
• Dacă LED-ul este verde, claxul este încărcat complet.
Puteți deconecta cablul.
SPECIFICAȚII
• 4 sunete de claxon
• 5 nivele de volum
• Montare pe ghidon
• Indicator încărcare
• Volum: până la 100 dB
• Clasa de protecție: IP65
• Baterie: litiu-ion / 3,7 V / 280 mAh
• Timp de încărcare: aprox. 1,5 ore
• Lungimea cablului: 40 cm
• Material: ABS + PC
• Greutate: 44,5 g

RO RO
Manual de utilizareManual de utilizare
Romania
Reciclarea corecta a acestui produs
(reziduuri provenind din aparatura electrica si
electronica)
Marcajale de pe acest produs sau mentionate in
instructiunile sale de folosire indica faptul ca produsul
nu trebuie aruncat impreuna cu alte reziduuri din
gospod arie atunci cand nu mai este in stare de
functionare. Pentru a preveni posibile efecte daunatoare
asupra mediului inconjurator sau a san ata tii oamenilor
datorate evacuarii necontrolate a reziduurilor, vă rugăm
să separați acest produs de alte tipuri de reziduuri si să-
l reciclati in mod responsabil pentru a promova
refolosirea resurselor materiale. Utilizatorii casnici sunt
rugati să ia legatura e cu distribuitorul de la care au
achizitionat acest produs, e cu autoritatile locale,
pentru a primi informatii cu privire la locul si modul in
care pot depozita acest produs in vederea reciclarii sale
ecologice. Utilizatorii institutionali sunt rugati să ia
legatura cu furnizorul și să verice condițiile stipulate in
contractul de vanzare. Acest produs nu trebuie
amestecat cu alte reziduuri de natura comerciala.
Distribuit de Lechpol Electronic SRL, Republicii nr. 5,
Resita, CS, ROMANIA.

is a registered trademark
-
 1
1
-
 2
2
-
 3
3
-
 4
4
-
 5
5
-
 6
6
-
 7
7
-
 8
8
-
 9
9
-
 10
10
-
 11
11


Kruger Matz KM0945 Manualul proprietarului
- Categorie
- Jocuri video
- Tip
- Manualul proprietarului
în alte limbi
- English: Kruger Matz KM0945 Owner's manual
- polski: Kruger Matz KM0945 Instrukcja obsługi
- Deutsch: Kruger Matz KM0945 Bedienungsanleitung


