Yamaha 150B Manual de utilizare
- Categorie
- Sintetizator
- Tip
- Manual de utilizare
Acest manual este potrivit și pentru


Congratulations! …and thank you for purchasing the
Yamaha P-150. The P-150 is a high-performance
electronic piano with full-scale, weighted action
keyboard, a selection of high quality piano and other
useful instrument voices, and versatile performance
and other advanced features which make it ideal for
professional stage and studio applications, as well as
for home entertainment and music study use. The P-
150’s main features include:
■ High quality AWM piano
and other sounds
The P-150 features a selection of twelve high quality instrument
voices generated by Yamaha’s patented AWM (Advanced Wave
Memory) sound generation technology. There are several piano
sounds—including a concert grand piano, with full-bodied bass
tones and reverberating high notes, that accurately captures the
natural characteristics of a real grand piano—plus various
electric pianos, vibes, organ combinations, strings and electric
and upright bass. With a maximum simultaneous “polyphonic”
note output of 32 notes, the P-150 delivers uncompromising
performance capabilities.
■ Organ combination editing
The P-150 comes equipped with two preset organ voices, plus
organ combination editing features which let you create your
own organ sounds and store them in Performances for instant
recall. The organ combination editing features give you precise
control over flute footages as well as attack settings.
■ Digital signal processing
The P-150 has a built-in digital signal processor that lets you
apply stereo reverb, chorus, symphonic and tremolo effects to
the voices, and lets you tailor the quality of the voices to suit
your needs with an internal equalizer, as well as a three-band
graphic equalizer on the upper panel.
■ Touch-sensitive keyboard with velocity
scaling
The P-150’s full-range 88-key, weighted action piano keyboard
incorporates Yamaha’s unique Action Effect II keyboard
technology, which gives it the genuine feel and response of a
real piano keyboard. You can even adjust the keyboard’s
sensitivity level, or velocity scaling, to suit your playing style, for
both internal tone generator and MIDI message transmission.
■ Dual and Split voice modes
The P-150’s Dual and Split modes let you play two voices at
once, a “main” voice and a “sub” voice, either by layering the two
voices of your choice (Dual mode) or by assigning a different
voice to each end of the keyboard (Split mode). In Split mode,
the key transposition values can be set independently for both
main and sub voices.
■ One-touch Performance recall
The P-150 features a Performance Play mode that lets you store
up to 24 Performances, or configurations of all voice, MIDI and
other parameter settings, for recall at the touch of a button. This
lets you instantly change your sound and entire setup as you
play, or between songs in a live set. The P-150 is set at the
factory with 24 Preset Performances, but you can overwrite them
and store User Performances which you create yourself. The P-
150 features extensive editing and storing capabilities.
■ Master keyboard features
The P-150 offers many of the control features standard in a MIDI
master keyboard, including velocity sensitivity, pitch bend and
modulation wheels, an assignable CS (continuous slider),
program change send and receive capabilities, MIDI transpose
and merge functions, and bulk dumping and multitimbral
capabilities. Plus, the P-150 gives you the option of connecting a
foot controller (FC) that can be assigned MIDI and other
functions in the same manner as the CS. With its powerful MIDI
capabilities, the P-150 can easily feature at the heart of an
expanded MIDI system.
1
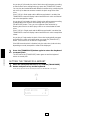
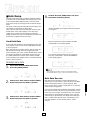
How to Use this Manual
This owner’s manual is organized and designed to help you get set
up and begin enjoying the P-150 as quickly as possible, as well as
to easily locate and learn about any feature you need.
The GETTING STARTED section briefly but thoroughly explains the
proper procedure for setting up the instrument, listening to the on-
board Demo songs, and exploring the basic voices.
The VOICE PLAY MODE, PERFORMANCE PLAY MODE and EDIT
MODE sections include explanations of each feature and step-by-
step details about how to access and manipulate the many
parameters.
An APPENDIX provides Voice and Performance lists and other
technical information, including descriptions of error messages and
a troubleshooting guide, plus MIDI specifications and other MIDI
related information.
Finally, an alphabetical INDEX lets you quickly reference the page
number of any feature you want to locate.
Special Symbols
Throughout this manual two special symbols are used to connote
additional information.
Indicates an important cautionary note for the feature being
described.
Indicates a supplementary explanation for the feature being
described.

2
■ Location
Do not use the P-150 in locations where it will be exposed to
direct sunlight, extreme temperatures, high humidity or
excessive dust or vibration.
■ Handling
Avoid rough handling. Do not drop the P-150 or subject it to
shock, as these can damage the instrument’s internal circuitry.
Also, do not apply excessive force to the controls or terminals.
When moving the P-150, first unplug the AC power cord and all
other cables to prevent damage to the cords and jacks. When
removing plugs from terminals, always grip the plugs directly
rather than pulling on the cord.
■ Cleaning
To clean the P-150, use a slightly moist cloth and a neutral
cleanser. Do not use abrasive cleansers, waxes, solvents, or
chemically treated cloths, as these may damage the cabinet’s
finish or dull the keys.
■ AC Power
The power requirements of your P-150 has been set to match
the main power supply voltage in your area. Make sure that your
local AC mains voltage matches the voltage as specified on the
name plate located on the rear panel of your P-150. If you plan
to use your P-150 in an area with a different voltage, be sure to
use an appropriate converter. If you have any doubts about
voltage compatibility, please consult your local Yamaha dealer.
■ Electromagnetic Interference
Avoid using your P-150 near televisions, radios or other devices
which generate electromagnetic fields, as electromagnetic
interference can cause the P-150 to malfunction, and may
generate interference noise in the other devices as well.
■ Extended Disuse
Electrical storms can cause power surges which can damage the
P-150’s circuitry even if the power switch is turned off. Therefore,
it is best to disconnect the P-150’s power cord from the AC outlet
when you will not be using it for an extended period of time.
■ Service and Modification
The P-150 contains no user serviceable parts, so never open the
instrument’s cabinet or tamper with the internal circuitry or
mechanisms in any way. Doing so can result in electrical shock
or damage to the P-150. Refer all servicing to qualified Yamaha
service personnel.
■ Backup Battery
The P-150’s internal settings are preserved by a lithium backup
battery which has a life span of approximately five years. (The
battery’s life span may differ, depending on the time elapsed
between your P-150’s date of manufacture and the date you
purchased it.) When the battery charge runs low, the “ERROR1
REPLACE BATTERY” error message will appear in the LCD
screen. If this message appears, save any settings you may
want to keep to an external data storage device (such as the
Yamaha MDF2 Data Filer) using the bulk dump procedure, then
contact a qualified Yamaha service center to have the battery
replaced. Do not attempt to replace the backup battery yourself!
YAMAHA CANNOT BE HELD RESPONSIBLE FOR DAMAGE
CAUSED BY IMPROPER HANDLING OR OPERATION OF THE
P-150!
The LCD screen displays as illustrated in this manual are for instructional
purposes only, and may appear somewhat different from your P-150’s.

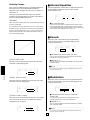
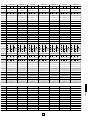
INTRODUCTION............................................................................................................ 1
PRECAUTIONS............................................................................................................. 2
UPPER PANEL.............................................................................................................. 4
REAR PANEL ................................................................................................................ 9
P-150 OVERVIEW....................................................................................................... 10
GETTING STARTED ................................................................................................... 14
Setting up the P-150............................................................................................................. 14
Turning on the Power ........................................................................................................... 16
Playing the Demo Songs...................................................................................................... 17
Playing the Voices................................................................................................................ 18
VOICE PLAY MODE.................................................................................................... 19
Single Mode.......................................................................................................................... 20
Stereo/Mono Piano...............................................................................................................21
Electric/Upright Bass ............................................................................................................ 21
Reverb Effects ...................................................................................................................... 22
Modulation Effects................................................................................................................ 23
Panel Equalizer..................................................................................................................... 25
Main and Sub Voices............................................................................................................ 25
Dual Mode ............................................................................................................................ 26
Split Mode............................................................................................................................. 28
Transpose............................................................................................................................. 33
MIDI Transmit Enable........................................................................................................... 36
MIDI Panic ............................................................................................................................ 37
PERFORMANCE PLAY MODE................................................................................... 38
Selecting Single Voices........................................................................................................ 39
Selecting Dual Voices...........................................................................................................40
Selecting Split Voices........................................................................................................... 40
EDIT MODE................................................................................................................. 42
System.................................................................................................................................. 44
MIDI Filter ............................................................................................................................. 46
Program Change (PC) Table................................................................................................ 46
Channel ................................................................................................................................ 47
Local..................................................................................................................................... 48
Continuous Slider (CS) / Foot Controller (FC)...................................................................... 48
Panel Switch (PS)................................................................................................................. 50
Name.................................................................................................................................... 50
Organ Combination...............................................................................................................50
Pitch Bend Wheel (PB) / Modulation Wheel (MW) ............................................................... 51
Keyboard Sensitivity............................................................................................................. 51
Internal Equalizer.................................................................................................................. 52
Reverb.................................................................................................................................. 52
Modulation ............................................................................................................................ 52
STORE......................................................................................................................... 53
APPENDIX................................................................................................................... 55
Bulk Dump .............................................................................................................................55
Initialize................................................................................................................................. 56
Using MIDI............................................................................................................................ 57
Error Messages .................................................................................................................... 60
Troubleshooting.................................................................................................................... 61
Specifications.........................................................................................................................63
Factory Default Settings ........................................................................................................64
Blank Chart............................................................................................................................70
MIDI Data Format ..................................................................................................................72
MIDI Implementation Chart....................................................................................................81
Index......................................................................................................................................82
3
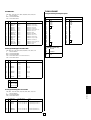
UPPER PANEL
REAR PANEL
P-150 OVERVIEW
GETTING STARTED
VOICE PLAY MODE
PERFORMANCE
PLAY MODE
EDIT MODE
STORE
APPENDIX

4
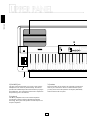
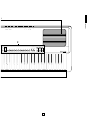
UPPER PANEL
ON/ OFF
POWER
CONTRAST
PITCH MODULATION
MIN
MAX
VOLUME
-1/NO +1/YES
BALANCE DETUNE
PAGE
PS1 PS2 SPLIT TRANSPOSE MIDI
C3
DATA ENTRY
CS
A
B
1
1 [PHONES] jack
This jack on the front panel lets you connect a pair of stereo
headphones to the P-150 for private listening. The internal
speakers will automatically be disconnected when you plug in
the headphones. The sound of the internal voices output from
the [OUTPUT] jacks is not affected.
2 Keyboard
This 88-key weighted action, touch-sensitive keyboard
incorporates Yamaha’s unique Action Effect II keyboard
technology, which gives it the genuine feel and response of a
real piano keyboard.
3 Speakers
These two built-in 13 cm speakers each provide an output of 20
watts. If you connect the P-150 to an external monitor system,
you may choose to turn the speakers off using the [SPEAKER]
switch located on the rear panel.

5
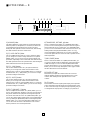
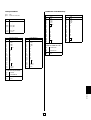
UPPER PANEL
OUT
MIDI
IN THRU FOOT CONTROLLER SOFT SOSTENUTO SUSTAIN
ONOFF
SPEAKEROUTPUT
L/MONO R
INPUT
L/MONOL/MONO R
EDIT PERF.B VOICE
STORE PERF.A
SYSTEM
MIDI FILTER PC TABLE CHANNEL LOCAL CS FC PS NAME ORGAN
COMBINATION
PB MW KBD SENS. INT.EQ
PIANO 1
123456789101112
PIANO 2 PIANO 3 PIANO 4 E.PIANO 1 E.PIANO 2 E.PIANO 3 VIBES ORGAN1 ORGAN2 STRINGS BASS HALL
STAGE
ROOM
TREMOLO
SYMPHONIC
CHORUS
REVERB MODULATION
HIGHMIDDLELOW
EQUALIZEREFFECT
C
3
2

6
UPPER PANEL
ON/ OFF
POWER
PITCH
MODULATION
1
2 3
1 [POWER] switch
This switch turns the power on and off. When the power is
turned on, the mode and status designated when the power was
previously turned off will still be active.
2 [PITCH] wheel
This wheel can be used to bend the pitch of the notes that you
play, up or down; the wheel automatically returns to the center
position when you release it. (In Dual mode, both voices are
affected; in Split mode, only the main voice is affected.) When
the MIDI Transmit Switch is enabled, you can use it to transmit
pitch bend messages to other instruments. You can assign the
pitch bend range to any value within a one-octave range.
3 [MODULATION] wheel
This wheel can be used in various ways. Normally you will use it
to apply a vibrato effect to the notes that you play, with
increasing intensity as you roll it upwards; the wheel remains at
the specific position that you set it when you let go of it. (In Dual
mode, both voices are modulated; in Split mode, only the main
voice is modulated. The vibrato effect cannot be applied to Piano
voices 1 ~ 4.) You can also assign it to control reverb depth or
modulation speed. When MIDI transmission is enabled, you can
use it to transmit modulation messages to other instruments.
■UPPER PANEL—A

7
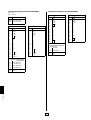
UPPER PANEL
1 [VOLUME] slider
This slider adjusts the overall volume of sound output from the
internal speakers (or headphones, if connected) as well as the
sound output from the [OUTPUT] jacks on the rear panel.
Moving the slider upward increases volume level, while moving
the slider downward decreases volume level.
2 [CS, DATA ENTRY] slider
This is a multiple function slider. As a [CS] (continuous slider),
you can assign it to control a variety of functions. As a [DATA
ENTRY] slider, you can use it to change specific settings and
parameters, depending on the current mode and status. Moving
the slider upward increases the specified value, while moving the
slider downward decreases the specified value.
3 [PS1, –1/NO] button
This is a dual function button. As a [PS1] (Panel Switch 1)
button, you can assign it to control various functions of the
internal voices as well as connected MIDI devices, as set by the
PS Edit function. As a [–1/NO] button, you can use it to change
parameter settings in decrements.
4 [PS2, +1/YES] button
This is a dual function button. As a [PS2] (Panel Switch 2)
button, you can assign it to control various functions of the
internal voices as well as connected MIDI devices, as set by the
PS Edit function. As a [+1/YES] button, you can use it to change
parameter settings in increments.
5 [SPLIT, BALANCE, 1] button
This is a multiple function button. As a [SPLIT] button, you can
use it to enter Split mode, whether in Voice Play or Performance
Play mode, determine the split point and assign the keyboard
area for the main and sub voices. As a [BALANCE] button, you
can use it to set the relative volume levels of each Split and Dual
voice, by holding the [BALANCE] button and moving the [DATA
ENTRY] slider ". As a [1] (cursor left) button in Edit mode, you
can use it to move the cursor to the left in the LCD screen in
order to position it over a desired parameter.
6 [TRANSPOSE, DETUNE, q] button
This is a multiple function button. As a [TRANSPOSE] button,
you can use it to set the keyboard transpose value for single as
well as both Dual voices or Split voices. As a [DETUNE] button,
you can use it to set the detune value for the two Dual voices, by
holding it and moving the [DATA ENTRY] slider ". As a [q]
(cursor right) button in Edit mode, you can use it to move the
cursor to the right in the LCD screen in order to position it over a
desired parameter.
7 [MIDI, PAGE] button
This is a dual function button. As a [MIDI] transmit button, you
can use it to quickly enable or disable the P-150’s transmission
of MIDI messages. You can also hold the [MIDI] button while
pressing other buttons to access certain features. As a [PAGE]
button, you can use it to step through the various pages of Edit
functions when the P-150 is in Edit mode.
8 [CONTRAST] dial
This dial lets you adjust the contrast of the LCD screen for
optimum visibility. Rotating it to the left will decrease screen
contrast, while rotating it to the right will increase screen
contrast.
9 LCD screen
This backlit 32-character Liquid Crystal Display screen provides
various information about the modes and operating status of the
P-150. Certain messages are displayed only temporarily, but you
can designate the “Popup Time” according to your preference.
CONTRAST
MIN
MAX
VOLUME
-1/NO +1/YES
BALANCE DETUNE
PAGE
PS1 PS2 SPLIT TRANSPOSE MIDI
C3
DATA ENTRY
CS
1 2 3 4 5 6
7
89
■ UPPER PANEL— B

8
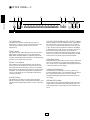
UPPER PANEL
1 [STORE] button
This button lets you store changes that you make to a
Performance, as well as copy the current Performance into
any Performance memory. The P-150 can store 24
Performances.
2 [EDIT] button
This button lets you enter Edit mode and access the various
Edit functions. After pressing it once, the LED above the
[EDIT] button will begin blinking, as will the light above the
currently selected [EDIT SELECT] button % . Pressing it again
will return you to the previous Play mode.
3 [PERF. A, B] buttons
These buttons let you enter Performance Play mode and
select any of the 24 Performances. The P-150 is set at the
factory with 24 Preset Performances, but you can overwrite
them and store User Performances which you create yourself.
The [PERF. A] and [PERF. B] banks hold 12 Performances
each, and a lit LED above one of the buttons indicates the
currently active bank.
4 [VOICE] button
This button lets you enter Voice Play mode by pressing
[VOICE] and then pressing a [VOICE SELECT] button % . A lit
LED above the [VOICE] button indicates you’re in Voice Play
mode.
5 [VOICE, PERFORMANCE, EDIT SELECT] buttons
These 12 buttons each have multiple functions, depending on
the current mode. In Voice Play mode you can use them to
select any of the 12 preset AWM instrument voices you want
to play; the voice names are printed in red above the buttons.
In Performance Play mode you can use them to select any of
the 24 Performances (12 Performances per bank); the
Performance numbers are printed above the buttons. In Edit
mode, you can use them to select the Edit functions; the Edit
function names are printed in green below the buttons.
6 [REVERB] button
This button lets you select either a Room, Stage or Hall reverb
effect, or no reverb effect, to apply to the currently selected
voice. Each voice has a default reverb setting preprogrammed
at the factory which you can change.
7 [MODULATION] button
This button lets you select either a Chorus, Symphonic or
Tremolo modulation effect, or no modulation effect, to apply to
the currently selected voice. Each voice has a default
modulation setting preprogrammed at the factory which you
can change.
8 [EQUALIZER] sliders
These sliders let you graphically adjust the level of the sound
output of the P-150 in three bands: High, Middle and Low. In
Dual and Split modes, the changes you make will affect both
voices.
EDIT PERF.B VOICE
STORE PERF.A
SYSTEM
MIDI FILTER PC TABLE CHANNEL LOCAL CS FC PS NAME ORGAN
COMBINATION
PB MW KBD SENS. INT.EQ
PIANO 1
123456789101112
PIANO 2 PIANO 3 PIANO 4 E.PIANO 1 E.PIANO 2 E.PIANO 3 VIBES ORGAN1 ORGAN2 STRINGS BASS HALL
STAGE
ROOM
TREMOLO
SYMPHONIC
CHORUS
REVERB MODULATION
HIGHMIDDLELOW
EQUALIZEREFFECT
1
3 456 7 8
2
■UPPER PANEL—C

SPEAKER
ON OFF
R L/MONO
SOFTSOSTENUTOSUSTAIN FOOT CONTROLLER
MIDI
OUT
THRU IN
R L/MONO
INPUT
OUTPUT
1 2 3 5 64
9
1 [SPEAKER] switch
This switch lets you turn off the P-150’s internal speakers. It
does not affect the output from the [OUTPUT] jacks or the
[PHONES] jack.
2 [INPUT] jacks
These jacks let you input line-level signals from another
electronic instrument, such as a rhythm programmer, external
tone generator, or synthesizer, and monitor it through the P-
150’s internal speakers. Use the [L/MONO] jack when
connecting only a single line.
3 [OUTPUT] jacks
These jacks output line-level signals which can be input directly
to an external amplifier, mixer or other audio device. Use the
[L/MONO] jack if your audio equipment has only one input.
4 Pedal jacks
These jacks let you connect up to three foot pedals and use
them as sustain, sostenuto and soft pedals. A single FC4
footswitch is included with your P-150. If you wish to attach
additional foot pedals, be sure to use only Yamaha models FC4
or FC5.
5 [FOOT CONTROLLER] jack
This jack lets you connect a foot controller (Yamaha FC7,
available separately) for use as an auxiliary controller. The [FC]
foot controller can be assigned to control a variety of functions,
including reverb depth or modulation speed, which lets you
change these parameters by foot as you play.
6 [MIDI] terminals
These terminals allow the P-150 to communicate with other MIDI
devices, using standard MIDI cables. To control the P-150 using
a sequencer or another keyboard, connect the MIDI out jack of
the external device to the [MIDI IN] jack of the P-150. To control
another device (such as a synthesizer or tone generator) using
the P-150, connect the [MIDI OUT] jack of the P-150 to the MIDI
in jack of the external device. The [MIDI THRU] jack simply
passes the data received at the P-150’s [MIDI IN] jack through
unaffected, and is used when connecting three or more MIDI
devices in a series.

10
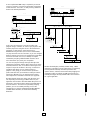
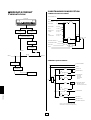
P-150 OVERVIEW
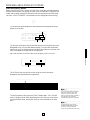
■Voice Play and Performance Play Modes
The P-150 has two basic Play modes, Voice Play mode and Performance Play
mode. Within each mode are various Voice and Performance parameters, or
settings that you can change, which make up the sound of the selected voice and
the specific operating status of the P-150.
A group of overall System settings apply to both Voice Play and Performance Play
modes, and Edit mode lets you access and edit a wide variety of System and other
functions, as shown in the following illustration.
As the above illustration shows, the primary difference between Voice Play mode
and Performance Play mode is:
■ In Voice Play mode, a single set of Performance parameter settings apply to any
voice (and its specified Voice parameter settings) which you select.
■ In Performance Play mode, a complete set of Performance parameters can be
configured specifically for any particular voice (and its specified Voice parameter
settings). The P-150 can store up to 24 Performances for instant recall.
Normally you will operate in Voice Play mode, Auto Store status (See “About Store
Type”, next page)—as you select sounds and make parameter assignments as
dictated by your current music session. Then you can store those settings to any
of the 24 Performances, which you can then access at any time by the press of a
[PERFORMANCE SELECT] button in Performance Play mode. (You can also
perform bulk dump operations of Performance data to and from an external MIDI
device such as the Yamaha MDF2 MIDI Data Filer.)
PERFORMANCE PLAY MODEVOICE PLAY MODE
SYSTEM
EDIT MODE / STORE FUNCTIONS
PERF.A
01~12
PERF.B
01~12
VOICE
PARAMETERS
VOICE 01~12
PAFORMANCE
PARAMETERS

11
P-150 OVERVIEW
■ Voice Parameters
In Voice Play mode, each of the P-150’s AWM instrument voices have a set of
Voice parameters that are initially set at the factory, but which you can change to
suit your needs.
These include controller parameters such as pitch bend range and modulation
wheel assignment, keyboard sensitivity parameters for internal or MIDI
applications, and effect parameters such as reverb type and depth, modulation
type and speed, and internal equalizer settings.
In Voice Play mode you can access a single set of Performance parameters and in
Performance Play mode you can access 24 sets of Performance parameters.
Although you can freely change the voices in Performance Play mode, only a
single set of Voice parameters is available for each Performance.
VOICE PARAMETERS
CONTROLLERS
• Pitch Bend Range
• Modulation Wheel Assign
KEYBOARD SENSITIVITY
• Internal
• MIDI
EFFECT
• Reverb Type, Speed
• Modulation Type, Speed
• Equalizer (Internal) Low, Mid, High
ABOUT STORE TYPE
You can choose the Store Type—Non Auto Store and Auto Store.
When Non Auto Store is selected, the store operation is always required
(except when modifying System related parameters; see page 13) if you want
to save the current settings.
When Auto Store is selected, all changes you make will automatically be
stored without the need to perform a specific storing procedure.
The default setting for a new (or initialized) P-150 is Non Auto Store. (For
information about changing the Store Type, see page 45.)
Explanations in this Owner’s Manual assume that Auto Store is selected.
Therefore, the LCD illustrations herein may be slightly different than the
screens on your P-150.

12
P-150 OVERVIEW
■Performance Parameters
In Performance Play mode, the P-150 has 24 sets of Performance parameters
which let you configure settings for specific music situations (i.e., for a certain style
of music, or a particular song, or for a practice session, or a live set, etc.). This
affords you the convenience of being able to recall those settings instantly at the
press of a button when in Performance Play mode.
Performance parameters include the voice selection (a set of voice parameters),
keyboard Single, Dual or Split mode and settings, main and sub voice
assignments, User organ combination values, transposition values, keyboard local
on or off setting, MIDI transmit and receive channel numbers, plus function
assignments for [PS1], [PS2], [CS] and [FC] (foot controller), the Performance
name and others.
In Voice Play mode you can specify settings for a single set of Performance
parameters.
Performance Parameters
VOICE SELECT
12 voices
(A set of voice parameters)
KEYBOARD MODE Single, Dual, Split
VOICE Main, Sub
PIANO 1/2 Stereo, Mono
BASS Electric, Upright
ORGAN COMBINATION
• Footage
• Response,
Attack (Length and Mode)
BALANCE –16 ~ 15
DETUNE 0 ~ 7
SPLIT POINT
• A-1 ~ C7
• MAIN VOICE (Upper, Lower)
TRANSPOSE
• Enable Switch
• Internal Main, Sub
• MIDI Main, Sub
MIDI CHANNEL
• Transmit
• Receive
LOCAL On, Off
CONTROLLERS
• PS 1/2 Assign
• CS Assign, Range
• FC Assign, Range
NAME Character select

13
P-150 OVERVIEW
Descriptions of all parameters and
details about how to access and
manipulate them are provided in the
appropriate sections herein. Also see
the Blank Chart on page 65.
■ System Settings
The P-150’s overall System settings encompass those “global” parameters which
are related to the instrument as a whole, and which therefore affect both Voice
Play and Performance Play modes.
These include master tuning, MIDI transmit enable, MIDI filter transmit and receive
parameter settings, MIDI program change table settings, and others.
SYSTEM
MIDI TRANSMIT ENABLE On, Off
• Master Tune
• Reverb Bypass
• Device Number
SYSTEM • MIDI Merge
• Performance Enable
• Popup Time
• Store Type
MIDI FILTER
• Transmit
• Receive
PROGRAM CHANGE TABLE
• Transmit Number, Bank
Select Number
• Receive Number
■Editing and Storing Features
When the P-150 is in Edit mode, you can access and modify the System and other
parameters.
A convenient Auto Store feature (which you can disengage) automatically stores
the System settings and other parameters as you change them. Within either
Voice Play mode or Performance Play mode, you can store the current set of all
settings as a User Performance.
There is a fine distinction between Voice Play mode store and Performance Play
mode store functions. In Voice Play mode, you can overwrite the current set of
Voice and Performance parameter settings. In Performance Play mode, you can
select a specific destination Performance in which to store the current
Performance parameter settings. Therefore, if you select a destination
Performance in which to store the current Voice Play mode Performance
parameter settings, you are storing it in the Performance Play mode.
You will find it most convenient to set up your Performances in Voice Play mode,
Auto Store status, since voice selection is so simple, then copy it to one of the 24
Performance memories for instant recall when you need it.
By switching into Non Auto Store status, you can be sure that your Performances
are protected, and any changes you make in one will not be applied unless you
specifically store, or overwrite, it. In Edit mode, the P-150 will prompt you
automatically whether or not to overwrite the current changes.
You can also dump Performance data to and from external MIDI devices.

14
GETTING STARTED
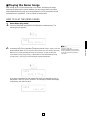
■Setting up the P-150
Although setting up the P-150 for basic play is easy and straightforward, be sure to
take heed of the Precautions on page 2 before you begin, then carefully follow the
simple steps as outlined below.
P-150 SETUP PROCEDURE
1.
Prepare a suitable location.
The P-150 is relatively small for an 88-key instrument, but it is very solidly
built and therefore quite heavy. First you’ll want to prepare a suitable location
for your P-150. Please do not hesitate to ask someone to help you take it out
of the box and carefully place it on an optionally available Yamaha LP-3
keyboard stand or a sturdy table.
2.
Plug in the power cord.
Next plug the P-150’s power cord into an AC outlet. Do not turn on the
[POWER] switch until you have made all connections as described below.
3.
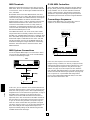
Connect the sustain pedal.
Next plug the supplied FC4 footswitch into the [SUSTAIN] jack on the rear
panel, so you can use it as a sustain pedal. If you have purchased additional
FC4 or FC5 footswitches, connect them to the [SOSTENUTO] and [SOFT]
jacks.
SPEAKER
ON OFF
R L/MONO
SOFTSOSTENUTOSUSTAIN FOOT CONTROLLER
MIDI
OUT
THRU IN
R L/MONO
INPUT
Footswitch FC4
OUTPUT

15
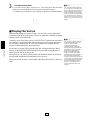
GETTING STARTED
Before connecting the P-150 to any
external device, be sure that the
power switches of all devices are
turned off.
4.
Connect external line-level components.
If you wish to monitor the P-150’s output using an external line-level mixer or
amplifier, connect the input of the external component to the P-150’s
[OUTPUT] jacks on the rear panel. (Use both jacks for stereo output; use the
[L/MONO] jack for mono output.)
If you wish to listen to your P-150 using headphones, connect a pair of
stereo headphones to the [PHONES] jack located on the left side of the front
panel. The P-150’s internal speakers will automatically be disconnected
whenever headphones are plugged into the [PHONES] jack.
If you wish to monitor the output of an external line-level device (such as a
rhythm programmer, tone generator or synthesizer) via the P-150’s internal
speakers, connect the output of the external device to the P-150’s [INPUT]
jacks on the rear panel. (Use both jacks for stereo input; use the [L/MONO]
jack for mono input.)
OUTPUT R
OUTPUT L/MONO
P-150
Amp
Speaker (L) Speaker (R)
P-150
INPUT R
INPUT L/MONO
P-150
Tone Generator

16
GETTING STARTED
5.
Connect MIDI devices.
If you wish to connect the P-150 to external MIDI devices such as a
rhythm programmer, tone generator or synthesizer, you will need special
MIDI cables which plug into the [MIDI] jacks on the rear panel. First,
however, you must determine a MIDI system configuration, based on your
particular needs or desires. Some examples of MIDI system connections,
along with information about MIDI, are provided on page 57.
6.
Attach the music stand.
Finally, attach the supplied music stand to the P-150 by carefully inserting
it into the groove located along the rear edge of the upper panel.
■ Turning on the Power
After setting up the P-150, you’re ready to turn on the power and begin enjoying
the instrument’s great sounds and many versatile performance and other features.
MIDI Cable
MIDI OUT
MIDI IN
P-150
Sequencer
Switch on the [POWER] button, then gradually raise the [VOLUME] slider until you
obtain a comfortable listening level.
ON/ OFF
POWER
PITCH
MODULATION
MIN
MAX
VOLUME
Always turn the P-150 on first, and
then turn on external MIDI and audio
devices last. However, if a line-level
device is plugged into the P-150’s
[INPUT] jacks, turn it on before
turning on the P-150. When turning
off the power of each device, simply
reverse the process.
Pagina se încarcă...
Pagina se încarcă...
Pagina se încarcă...
Pagina se încarcă...
Pagina se încarcă...
Pagina se încarcă...
Pagina se încarcă...
Pagina se încarcă...
Pagina se încarcă...
Pagina se încarcă...
Pagina se încarcă...
Pagina se încarcă...
Pagina se încarcă...
Pagina se încarcă...
Pagina se încarcă...
Pagina se încarcă...
Pagina se încarcă...
Pagina se încarcă...
Pagina se încarcă...
Pagina se încarcă...
Pagina se încarcă...
Pagina se încarcă...
Pagina se încarcă...
Pagina se încarcă...
Pagina se încarcă...
Pagina se încarcă...
Pagina se încarcă...
Pagina se încarcă...
Pagina se încarcă...
Pagina se încarcă...
Pagina se încarcă...
Pagina se încarcă...
Pagina se încarcă...
Pagina se încarcă...
Pagina se încarcă...
Pagina se încarcă...
Pagina se încarcă...
Pagina se încarcă...
Pagina se încarcă...
Pagina se încarcă...
Pagina se încarcă...
Pagina se încarcă...
Pagina se încarcă...
Pagina se încarcă...
Pagina se încarcă...
Pagina se încarcă...
Pagina se încarcă...
Pagina se încarcă...
Pagina se încarcă...
Pagina se încarcă...
Pagina se încarcă...
Pagina se încarcă...
Pagina se încarcă...
Pagina se încarcă...
Pagina se încarcă...
Pagina se încarcă...
Pagina se încarcă...
Pagina se încarcă...
Pagina se încarcă...
Pagina se încarcă...
Pagina se încarcă...
Pagina se încarcă...
Pagina se încarcă...
Pagina se încarcă...
Pagina se încarcă...
Pagina se încarcă...
Pagina se încarcă...
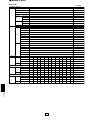
-
 1
1
-
 2
2
-
 3
3
-
 4
4
-
 5
5
-
 6
6
-
 7
7
-
 8
8
-
 9
9
-
 10
10
-
 11
11
-
 12
12
-
 13
13
-
 14
14
-
 15
15
-
 16
16
-
 17
17
-
 18
18
-
 19
19
-
 20
20
-
 21
21
-
 22
22
-
 23
23
-
 24
24
-
 25
25
-
 26
26
-
 27
27
-
 28
28
-
 29
29
-
 30
30
-
 31
31
-
 32
32
-
 33
33
-
 34
34
-
 35
35
-
 36
36
-
 37
37
-
 38
38
-
 39
39
-
 40
40
-
 41
41
-
 42
42
-
 43
43
-
 44
44
-
 45
45
-
 46
46
-
 47
47
-
 48
48
-
 49
49
-
 50
50
-
 51
51
-
 52
52
-
 53
53
-
 54
54
-
 55
55
-
 56
56
-
 57
57
-
 58
58
-
 59
59
-
 60
60
-
 61
61
-
 62
62
-
 63
63
-
 64
64
-
 65
65
-
 66
66
-
 67
67
-
 68
68
-
 69
69
-
 70
70
-
 71
71
-
 72
72
-
 73
73
-
 74
74
-
 75
75
-
 76
76
-
 77
77
-
 78
78
-
 79
79
-
 80
80
-
 81
81
-
 82
82
-
 83
83
-
 84
84
-
 85
85
-
 86
86
-
 87
87


Yamaha 150B Manual de utilizare
- Categorie
- Sintetizator
- Tip
- Manual de utilizare
- Acest manual este potrivit și pentru
în alte limbi
- Türkçe: Yamaha 150B Kullanım kılavuzu
- français: Yamaha 150B Manuel utilisateur
- čeština: Yamaha 150B Uživatelský manuál
- русский: Yamaha 150B Руководство пользователя
- English: Yamaha 150B User manual
- suomi: Yamaha 150B Ohjekirja
- polski: Yamaha 150B Instrukcja obsługi
- Deutsch: Yamaha 150B Benutzerhandbuch
- italiano: Yamaha 150B Manuale utente
- español: Yamaha 150B Manual de usuario
- svenska: Yamaha 150B Användarmanual
- dansk: Yamaha 150B Brugermanual
- português: Yamaha 150B Manual do usuário
- Nederlands: Yamaha 150B Handleiding
Lucrări înrudite
-
Yamaha S90 ES Manual de utilizare
-
Yamaha MO6 Manualul proprietarului
-
Yamaha ES6 Manual de utilizare
-
-
Yamaha Card Filer Manual de utilizare
-
Yamaha MOTIF7 Manual de utilizare
-
-
-
-