
• Please read this manual carefully before using refrigerator.
• Retain it for future reference.
REFRIGERATOR
User Manual
CHASD4351EW
C
CHASD4351EBC
EN
CS
DE
ES
FR
HU
IT
PL
RO
SK
SL
AR

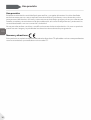
WARNING: Risk of e/il
EN
The symbol indicates there is a risk of since ammable materials are
used. Take care to avoid causingby ingiting ammable material.
VAROVÁNÍ: Nebezpeí /Ho Me
CS
Symbol je riziko ru, pr byly pty holavé Dbejte na to, aby
nedošlo ke vzniku ru zapním holavého materilu.
WARNUNG: Bdbe Mie!
DE
Das Symbol weist auf Brandgefahr hin, da brennbare Materialien verwendet werden. Verhindern
Sie die Entstehung von Bränden, die durch entammbare Materialien verursacht werden.
ADVERTENCIA: Riesgo de i l i
ES
El símbolo indica que existe riesgo de incendio, dado que se utilizan materiales inamables.
Se debe procurar evitar incendios mediante la combustión de materiales inamables.
ATTENTION : Risqd'ce de es iles
FR
Le symbole indique qu’il y a un risque d’incendie, car des matériaux inbles sont utilisés.
Évitez de provoquer un incendie en brûlant des matières inammables.
FIGYELEM: ú
HU
A szimbólum azt jelzi, hogy tzveszély ll fenn, mivel gyúlékony anyagokat hasznlnak. Ügyeljen
arra, hogy ne tegyzveszélyes gyú lékony anyagot.
ATTENZIONE: Riidile ibile
IT
Il simbolo indica il rischio di incendio nel caso di utilizzo di materiali inammabili. Fare
attenzione ed evitare l'insorgere di incendi a causa della combustione di materiali inammabili.
OSTENIE: Ro po/el
PL
Symbol wskazujstnieje ryz, ponuyteriae. Dbaj
o to, abyru poprzez zapalenie aln
AVERTISMENT: Risc de icedi
RO
Simbolul exis risc de incendiu deoarece sunt folosite materiale inamabile. Avei
grij i ev incendiile cauzate de aprinderea materialelor inamabile.
VAROVANIE: Riziko po/i
SK
Symbol oznauje nebezpeenstvo ru, pre sa ívajú horé materily. Dvajte
pozor, aby ste zabrnili vzniku pru vznietením horého materilu.
OPOZORILO: Nep e
SL
Simbol oznauje nevarnost poara, saj se uporabljajo vnetljivi materiali. Pazite, da ne povzroite
ra z vvnetljivega materiala.
AR
ﺮﻄﺧ دﻮ ٜ
ﺣو إ ﺰﻣﺮﻟا ﺸﻳ ﺐﺒﺴﺘﻟا ﺐﻨ ٜ
ﺤﺘﻟ رﺬ ا َّ
حﻮﺗ .لﺎﻌﺘﺷﻼﻟ ﺔﻠﺑﺎﻘﻟا داﻮﳌا ماﺪﺨﺘﺳا ﻳ ﺚﻴﺣ ﻖﻳﺮﺣ بﻮﺸﻧ
.لﺎﻌﺘﺷﻼﻟ ﺔﻠﺑﺎﻗ ةدﺎﻣ لﺎﻌﺷإ ﻖﻳﺮﻃ ﻦﻋ ﻖﻳﺮﺣ بﻮﺸﻧ

EN
Safety information .............................................................................................................5
Intended use .....................................................................................................................10
.........................................................................................................11
Use .......................................................................................................................................12
.........................................................................................................................13
Care and cleaning.............................................................................................................14
Troubleshooting ...............................................................................................................16
Installation ..........................................................................................................................19
Technical data ...................................................................................................................21
Customer service ............................................................................................................23
3

EN
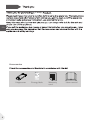
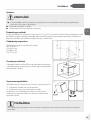
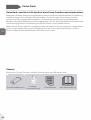
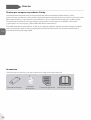
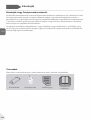
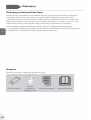
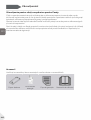
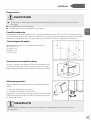
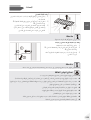
Accessories
Energy lable User manual
Warranty
card
4
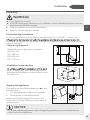
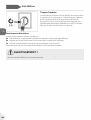
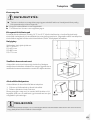
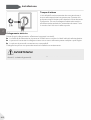
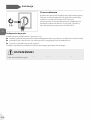
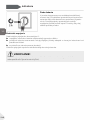
Hinge cover
Candy

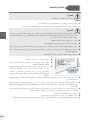
EN
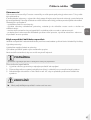
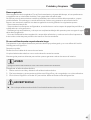
-
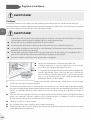
WARNING!
5

EN
WARNING!
▶
▶
▶-
▶
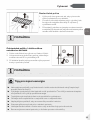
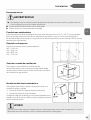
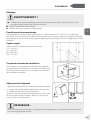
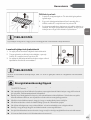
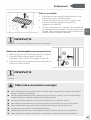
Installation
▶
▶
▶
▶
▶
obstruction.
▶
▶
▶
▶
▶
6

EN
WARNING!
▶
-
sible.
▶
▶
▶
▶-
▶
▶
▶-
▶
▶
▶
7

EN
WARNING!
▶-
ance or in the vicinity.
▶-
▶
▶
▶-
▶
-
▶
▶-
▶-
Maintenance / cleaning
▶
▶-
8

EN
WARNING!
▶
▶
-
▶
▶
▶-
▶
▶Eliminate the dust on the back of the unit at least once in the year to avoid haz-
▶
▶
▶
may cause the glass to break.
WARNING!
service.
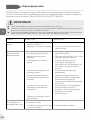
Refrigerant gas information
9

EN
Intended use
Intended use
-
ackfast and catering business. It is not intended for commercial or industrial use.
-
10

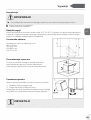
EN
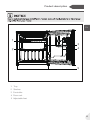
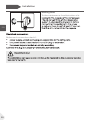
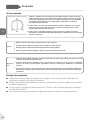
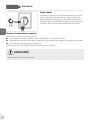
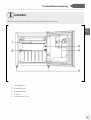
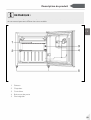
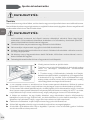
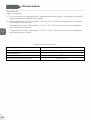
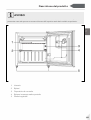
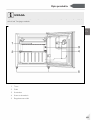
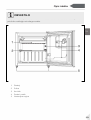
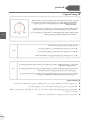
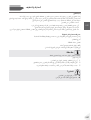
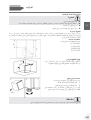
Product description
11
1
2
3
4
5
1 Tray
2 Shelves
3 Controller
4 Door rack
5 Adjustable feet

EN
Use
12
▶Remove all packaging materials, keep them out of children`s reach and dispose
them in an environmentally friendly manner.
▶Clean the inside and outside of the appliance with water and a mild detergent
before putting any food in it.
▶After the appliance has been levelled and cleaned, wait for at least 2-5 hours
before connecting it to the power supply. See Section INSTALLATION.
▶Precool the compartments at high settings before loading with food.
The "OFF" position on the knob is the shutdown position. When this position
is set, the refrigerator will not cool.If the refrigerator needs to be stopped for
a long time, please unplug the power plug.
The temperature in the refrigerator is adjusted by the temperature controller
and the smaller the power consumption of the refrigerator; The stronger the
the power consumption of the refrigerator.
The "MAX" position of the scale is the lowest temperature gear in the refrigerator.
This position can be used for quick freezing. After the food is completely frozen,
please turn the scale back to the original setting gear
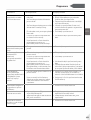
Gear Description
The common gear of the refrigerator is the "MID" position of the scale turned on
If the temperature in the box is too high, please increase the scale appropriately.
If the temperature in the box is too low, please reduce the gradient appropriately.
Please select the position of the temperature controller knob scale according to the actual needs.
When the ambient temperature of the refrigerator is high, if the scale number set is large, the ice
may not stop, and the temperature in the cabinet may be too low.
When the ambient temperature of the refrigerator is low, if the scale number is set to be small, the
refrigerator may not be started, resulting in high temperature in the box, which is not conducive to
food storage and preservation
After the temperature is adjusted, it takes a period of time to achieve the temperature balance in
the box. And the length of this period depends on the size of the changed gear, the ambient tem-
perature, the frequency of opening the door, and the amount of food stored in the box
Proposal
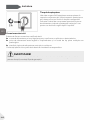
Reminder

EN
13
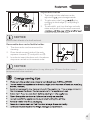
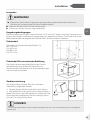
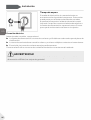
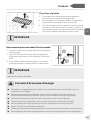
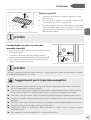
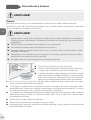
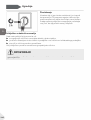
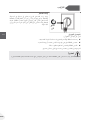
NOTICE
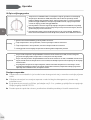
Ensure that all ends of a shelf are level.
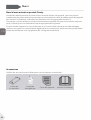
Adjustable shelves
1. The height of the shelves can be
adjusted t your storage needs.
2. To relocate a shelf, remo rst by
uplifting its hind edge and pulling it
out .
3. To reinstall it, put it on the lugs on both
sides and push it to the most rearward
inside the slots in the sides
NOTICE
When the appliance is switched on, it may take up to 12 hours for the correct
temperatures to be reached.
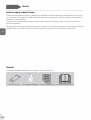
Removable door racks/bottle holder
1. The door racks can be removed for
cleaning:
2. Place hands on each side of the rack,
inwards and pull it out .
3. In order to insert the door rack, the above
steps are carried out in reverse order.
▶
▶
▶-
▶
▶
▶
▶
▶
▶
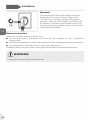
1
2
squeeze

EN
14
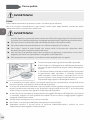
Cleaning
Clean the appliance when only little or no food is stored.
The appliance should be cleaned every four weeks for good maintenance and to
prevent bad stored food odors.
WARNING!
▶Do not clean the appliance with hard brushes, wire brushes, detergent powder,
petrol, amyl acetate, acetone and similar organic solutions, acid or alkaline so-
lutions. Please clean with special refrigerator detergent to avoid damage.
▶
▶Do not use water spray or steam to clean the appliance.
▶Do not clean the cold glass shelves with hot water. Sudden temperature change
may cause the glass to break .
▶Do not touch the inside surface of the freezer storage compartment, especial-
ly with wet hands, as your hands may freeze onto the surface.
▶In case of heating check the condition of frozen goods.
WARNING!
Disconnect the appliance from the power supply before cleaning.
▶Always keep the door gasket clean.
▶Clean the inside and housing of the applian-
ce with a sponge dampened in warm water and
neutral detergent.
▶1. Please scrub the interior and exterior of the
refrigerator, including door sealing, door rack,
glass shelves, boxes and so on, with a soft towel
or sponge dipped in warm water (you may add
neutral detergent into the warm water).
▶2. If there is liquid spilled, remove all the contaminated parts, directly rinse
▶3. If there is spilled cream (such as the cream, melting ice cream), please re-
move all the contaminated parts, put into the warm water with about 40 °C for
▶4. In case some small part or component gets stuck inside of the fridge (bet-
ween shelves or drawers), use small soft brush to release it. If you could not
reach the part, please contact Haier service
▶Rinse and dry with soft cloth.
▶ Do not clean any of the parts of the appliance in a dishwasher.
▶Allow at least 5 minutes before restarting the appliance as frequent starting
may damage the compressor.

EN
15
NOTICE
T .
WARNING!
▶Do no .
▶Never place the appliance horiz r
Non-use for a longer period
o or an ex ou will no
rator:
Take out the
ower c
ove.
r to pre r
Mo
1. ove all
2. o o ezer with
3. Do no rat to av r
Defrosting
water:

EN
before you contact an after sales service. See CUSTOMER SERVICE.
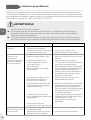
16
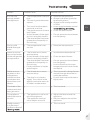
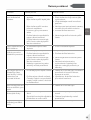
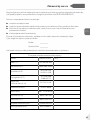
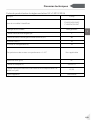
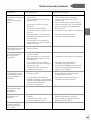
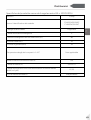
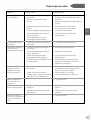
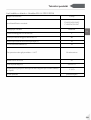
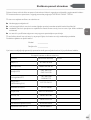
Problem Possible Cause Possible Solution
The compressor
does not work.
Mains plug is not connect-
ed in the mains socket.
The appliance is in the
defrosting cycle
Connect the mains plug.
This is normal for an automatic
defrosting
The appliance
runs frequently or
runs for a too long
period of time.
The indoor or outdoor
temperature is too high.
power for a period of time.
A door of the appliance is
not tightly closed.
The door has been opened
too frequently or for too
long.
The temperature setting
for the freezer compart-
ment is too low.
The door gasket is dirty,
worn, cracked or mis-
matched.
The required air circulation
is not guaranteed.
In this case, it is normal for the
appliance to run longer.
Normally, it takes 8 to 12 hours
for the appliance to cool down
completely.
Close the door/drawer and
ensure the appliance is located
on a level ground and there is
no food or container jarring the
door.
Do not open the door/drawer
too frequently.
Set the temperature higher
until a satisfactory refrigerator
temperature is obtained. It
takes 24 hours for the refriger-
ator temperature to become
stable.
Clean the door/drawer gasket
or replace them by the cus-
tomer service.
Ensure adequate ventilation.
The inside of the
refrigerator is dirty
and/or smells.
The inside of the refrigera-
tor needs cleaning.
Food of strong odour is
stored in the refrigerator.
Clean the inside of the re-
frig-erator.
Wrap the food thoroughly..
WARNING!
▶Before maintenance, deactivate the appliance and disconnect the mains plug
from the mains socket.
▶-
cause improper repairs can cause considerable consequential damages.
▶A damaged supply should only be replaced by the manufacturer, its service

EN
17
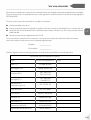
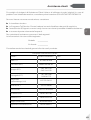
Problem Possible Cause Possible Solution
It is not cold
enough inside
the appliance.
The temperature is set too
high.
Too warm goods has been
stored.
Too much food has been
stored at one time.
The goods are too close to
each other.
A door/drawer of the appli-
ance is not tightly closed.
The door/drawer has been
opened too frequently or
for too long.
Reset the temperature.
Always cool down goods be-
fore storing them.
Always store small quantities
of food.
Leave a gap between several
Close the door/drawer.
Do not open the door/drawer
too frequently.
It is too cold
inside the appli-
ance.
The temperature is set
too low.
Reset the temperature.
Moisture forma-
tion on the inside
of the refrigerator
compartment.
The climate is too warm
and toodamp.
A door/drawer of the appli-
ance is not tightly closed.
The door/drawer has been
opened too frequently or
for too long.
Food containers or liquids
are left open.
Increase the temperature.
Close the door/drawer.
Do not open the door/drawer
too frequently.
Let hot foods cool to room
temperature and cover foods
and liquids.
Moisture accu-
mulates on the
refrigerators
outside surface
or between the
doors/door and
drawer.
The climate is too warm
and too damp.
The door is not closed
tightly. The cold air in the
appliance and the warm air
outside it condensates.
This is normal in damp climate
and will change when the hu-
midity decreases.
Ensure that he door/drawer is
tightly shut.
The sides of the
cabinet and door
strip get warm.
- This is normal.
The appliance
makes abnormal
sounds.
The appliance is not locat-
ed on level ground.
The appliance touches
some object around it.
Adjust the feet to level the
appliance.
Remove objects around the
appliance.
A slight sound
is to be heard
similar to that of
- This is normal.

EN
18
▶
▶
▶
▶
▶
-
number and form to contact the technical assistance.
candy-home.com

EN
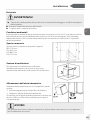
Installation
19
NOTICE
For a free standing appliance: this refrigerating appliance is not intended to be
used as a built-in appliance
Unpacking
Environmental conditions
The room temperature should always be between 16° C and 43° C, since it can
not install the appliance near other heat-emitting appliances (ovens, refrigerators)
without isolation.
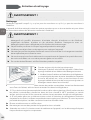
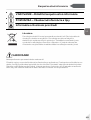
Space requirement
Required space when door is opened:
W1=742 mm
D1=425 mm
D2=892 mm
D3=776 mm
WARNING!
▶The appliance is heavy.
▶Keep all packaging materials out of children´s reach and dispose them in an en-
vironmentally friendly manner.
Ventilaton cross-section
-
ance for safety reasons, the information of
the required ventilation cross sections must
be observed.
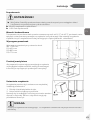
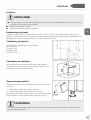
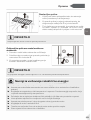
Aigning the appliance
The appliance should be placed on a at and
solid surface.
1. Tilt the refrigerator slightly backwards.
2. Set the feet to the desired level.
Make sure the distance to the wall on the
hinge side is at least 100 mm for the door to
open properly.
1. 2.
▶Take the appliance out of the packaging.
▶Remove all packaging materials.
D3
W1

EN
Installation
Waiting time
To the maintenance-free lubrication oil is
2 h
WARNING!
Before each connection check if:
▶
▶
▶
20
Pagina se încarcă...
Pagina se încarcă...
Pagina se încarcă...
Pagina se încarcă...
Pagina se încarcă...
Pagina se încarcă...
Pagina se încarcă...
Pagina se încarcă...
Pagina se încarcă...
Pagina se încarcă...
Pagina se încarcă...
Pagina se încarcă...
Pagina se încarcă...
Pagina se încarcă...
Pagina se încarcă...
Pagina se încarcă...
Pagina se încarcă...
Pagina se încarcă...
Pagina se încarcă...
Pagina se încarcă...
Pagina se încarcă...
Pagina se încarcă...
Pagina se încarcă...
Pagina se încarcă...
Pagina se încarcă...
Pagina se încarcă...
Pagina se încarcă...
Pagina se încarcă...
Pagina se încarcă...
Pagina se încarcă...
Pagina se încarcă...
Pagina se încarcă...
Pagina se încarcă...
Pagina se încarcă...
Pagina se încarcă...
Pagina se încarcă...
Pagina se încarcă...
Pagina se încarcă...
Pagina se încarcă...
Pagina se încarcă...
Pagina se încarcă...
Pagina se încarcă...
Pagina se încarcă...
Pagina se încarcă...
Pagina se încarcă...
Pagina se încarcă...
Pagina se încarcă...
Pagina se încarcă...
Pagina se încarcă...
Pagina se încarcă...
Pagina se încarcă...
Pagina se încarcă...
Pagina se încarcă...
Pagina se încarcă...
Pagina se încarcă...
Pagina se încarcă...
Pagina se încarcă...
Pagina se încarcă...
Pagina se încarcă...
Pagina se încarcă...
Pagina se încarcă...
Pagina se încarcă...
Pagina se încarcă...
Pagina se încarcă...
Pagina se încarcă...
Pagina se încarcă...
Pagina se încarcă...
Pagina se încarcă...
Pagina se încarcă...
Pagina se încarcă...
Pagina se încarcă...
Pagina se încarcă...
Pagina se încarcă...
Pagina se încarcă...
Pagina se încarcă...
Pagina se încarcă...
Pagina se încarcă...
Pagina se încarcă...
Pagina se încarcă...
Pagina se încarcă...
Pagina se încarcă...
Pagina se încarcă...
Pagina se încarcă...
Pagina se încarcă...
Pagina se încarcă...
Pagina se încarcă...
Pagina se încarcă...
Pagina se încarcă...
Pagina se încarcă...
Pagina se încarcă...
Pagina se încarcă...
Pagina se încarcă...
Pagina se încarcă...
Pagina se încarcă...
Pagina se încarcă...
Pagina se încarcă...
Pagina se încarcă...
Pagina se încarcă...
Pagina se încarcă...
Pagina se încarcă...
Pagina se încarcă...
Pagina se încarcă...
Pagina se încarcă...
Pagina se încarcă...
Pagina se încarcă...
Pagina se încarcă...
Pagina se încarcă...
Pagina se încarcă...
Pagina se încarcă...
Pagina se încarcă...
Pagina se încarcă...
Pagina se încarcă...
Pagina se încarcă...
Pagina se încarcă...
Pagina se încarcă...
Pagina se încarcă...
Pagina se încarcă...
Pagina se încarcă...
Pagina se încarcă...
Pagina se încarcă...
Pagina se încarcă...
Pagina se încarcă...
Pagina se încarcă...
Pagina se încarcă...
Pagina se încarcă...
Pagina se încarcă...
Pagina se încarcă...
Pagina se încarcă...
Pagina se încarcă...
Pagina se încarcă...
Pagina se încarcă...
Pagina se încarcă...
Pagina se încarcă...
Pagina se încarcă...
Pagina se încarcă...
Pagina se încarcă...
Pagina se încarcă...
Pagina se încarcă...
Pagina se încarcă...
Pagina se încarcă...
Pagina se încarcă...
Pagina se încarcă...
Pagina se încarcă...
Pagina se încarcă...
Pagina se încarcă...
Pagina se încarcă...
Pagina se încarcă...
Pagina se încarcă...
Pagina se încarcă...
Pagina se încarcă...
Pagina se încarcă...
Pagina se încarcă...
Pagina se încarcă...
Pagina se încarcă...
Pagina se încarcă...
Pagina se încarcă...
Pagina se încarcă...
Pagina se încarcă...
Pagina se încarcă...
Pagina se încarcă...
Pagina se încarcă...
Pagina se încarcă...
Pagina se încarcă...
Pagina se încarcă...
Pagina se încarcă...
Pagina se încarcă...
Pagina se încarcă...
Pagina se încarcă...
Pagina se încarcă...
Pagina se încarcă...
Pagina se încarcă...
Pagina se încarcă...
Pagina se încarcă...
Pagina se încarcă...
Pagina se încarcă...
Pagina se încarcă...
Pagina se încarcă...
Pagina se încarcă...
Pagina se încarcă...
Pagina se încarcă...
Pagina se încarcă...
Pagina se încarcă...
Pagina se încarcă...
Pagina se încarcă...
Pagina se încarcă...
Pagina se încarcă...
Pagina se încarcă...
Pagina se încarcă...
Pagina se încarcă...
Pagina se încarcă...
Pagina se încarcă...
Pagina se încarcă...
Pagina se încarcă...
Pagina se încarcă...
Pagina se încarcă...
Pagina se încarcă...
Pagina se încarcă...
Pagina se încarcă...
Pagina se încarcă...
Pagina se încarcă...
Pagina se încarcă...
Pagina se încarcă...
Pagina se încarcă...
Pagina se încarcă...
Pagina se încarcă...
Pagina se încarcă...
Pagina se încarcă...
Pagina se încarcă...
Pagina se încarcă...
Pagina se încarcă...
Pagina se încarcă...
Pagina se încarcă...
Pagina se încarcă...
Pagina se încarcă...
Pagina se încarcă...
Pagina se încarcă...
Pagina se încarcă...
Pagina se încarcă...
Pagina se încarcă...
Pagina se încarcă...
Pagina se încarcă...
Pagina se încarcă...
Pagina se încarcă...
Pagina se încarcă...
Pagina se încarcă...
Pagina se încarcă...
Pagina se încarcă...
Pagina se încarcă...
Pagina se încarcă...
Pagina se încarcă...
Pagina se încarcă...
Pagina se încarcă...
Pagina se încarcă...
Pagina se încarcă...
Pagina se încarcă...
Pagina se încarcă...
Pagina se încarcă...
Pagina se încarcă...
Pagina se încarcă...
Pagina se încarcă...
Pagina se încarcă...
Pagina se încarcă...
Pagina se încarcă...
Pagina se încarcă...
Pagina se încarcă...
Pagina se încarcă...
Pagina se încarcă...
Pagina se încarcă...
-
 1
1
-
 2
2
-
 3
3
-
 4
4
-
 5
5
-
 6
6
-
 7
7
-
 8
8
-
 9
9
-
 10
10
-
 11
11
-
 12
12
-
 13
13
-
 14
14
-
 15
15
-
 16
16
-
 17
17
-
 18
18
-
 19
19
-
 20
20
-
 21
21
-
 22
22
-
 23
23
-
 24
24
-
 25
25
-
 26
26
-
 27
27
-
 28
28
-
 29
29
-
 30
30
-
 31
31
-
 32
32
-
 33
33
-
 34
34
-
 35
35
-
 36
36
-
 37
37
-
 38
38
-
 39
39
-
 40
40
-
 41
41
-
 42
42
-
 43
43
-
 44
44
-
 45
45
-
 46
46
-
 47
47
-
 48
48
-
 49
49
-
 50
50
-
 51
51
-
 52
52
-
 53
53
-
 54
54
-
 55
55
-
 56
56
-
 57
57
-
 58
58
-
 59
59
-
 60
60
-
 61
61
-
 62
62
-
 63
63
-
 64
64
-
 65
65
-
 66
66
-
 67
67
-
 68
68
-
 69
69
-
 70
70
-
 71
71
-
 72
72
-
 73
73
-
 74
74
-
 75
75
-
 76
76
-
 77
77
-
 78
78
-
 79
79
-
 80
80
-
 81
81
-
 82
82
-
 83
83
-
 84
84
-
 85
85
-
 86
86
-
 87
87
-
 88
88
-
 89
89
-
 90
90
-
 91
91
-
 92
92
-
 93
93
-
 94
94
-
 95
95
-
 96
96
-
 97
97
-
 98
98
-
 99
99
-
 100
100
-
 101
101
-
 102
102
-
 103
103
-
 104
104
-
 105
105
-
 106
106
-
 107
107
-
 108
108
-
 109
109
-
 110
110
-
 111
111
-
 112
112
-
 113
113
-
 114
114
-
 115
115
-
 116
116
-
 117
117
-
 118
118
-
 119
119
-
 120
120
-
 121
121
-
 122
122
-
 123
123
-
 124
124
-
 125
125
-
 126
126
-
 127
127
-
 128
128
-
 129
129
-
 130
130
-
 131
131
-
 132
132
-
 133
133
-
 134
134
-
 135
135
-
 136
136
-
 137
137
-
 138
138
-
 139
139
-
 140
140
-
 141
141
-
 142
142
-
 143
143
-
 144
144
-
 145
145
-
 146
146
-
 147
147
-
 148
148
-
 149
149
-
 150
150
-
 151
151
-
 152
152
-
 153
153
-
 154
154
-
 155
155
-
 156
156
-
 157
157
-
 158
158
-
 159
159
-
 160
160
-
 161
161
-
 162
162
-
 163
163
-
 164
164
-
 165
165
-
 166
166
-
 167
167
-
 168
168
-
 169
169
-
 170
170
-
 171
171
-
 172
172
-
 173
173
-
 174
174
-
 175
175
-
 176
176
-
 177
177
-
 178
178
-
 179
179
-
 180
180
-
 181
181
-
 182
182
-
 183
183
-
 184
184
-
 185
185
-
 186
186
-
 187
187
-
 188
188
-
 189
189
-
 190
190
-
 191
191
-
 192
192
-
 193
193
-
 194
194
-
 195
195
-
 196
196
-
 197
197
-
 198
198
-
 199
199
-
 200
200
-
 201
201
-
 202
202
-
 203
203
-
 204
204
-
 205
205
-
 206
206
-
 207
207
-
 208
208
-
 209
209
-
 210
210
-
 211
211
-
 212
212
-
 213
213
-
 214
214
-
 215
215
-
 216
216
-
 217
217
-
 218
218
-
 219
219
-
 220
220
-
 221
221
-
 222
222
-
 223
223
-
 224
224
-
 225
225
-
 226
226
-
 227
227
-
 228
228
-
 229
229
-
 230
230
-
 231
231
-
 232
232
-
 233
233
-
 234
234
-
 235
235
-
 236
236
-
 237
237
-
 238
238
-
 239
239
-
 240
240
-
 241
241
-
 242
242
-
 243
243
-
 244
244
-
 245
245
-
 246
246
-
 247
247
-
 248
248
-
 249
249
-
 250
250
-
 251
251
-
 252
252
-
 253
253
-
 254
254
-
 255
255
-
 256
256
-
 257
257
-
 258
258
-
 259
259
-
 260
260
-
 261
261
-
 262
262
-
 263
263
-
 264
264
-
 265
265
-
 266
266
-
 267
267
-
 268
268


Candy CHASD4351EBC Manual de utilizare
- Tip
- Manual de utilizare
- Acest manual este potrivit și pentru
în alte limbi
- français: Candy CHASD4351EBC Manuel utilisateur
- slovenčina: Candy CHASD4351EBC Používateľská príručka
- polski: Candy CHASD4351EBC Instrukcja obsługi
- Deutsch: Candy CHASD4351EBC Benutzerhandbuch
- italiano: Candy CHASD4351EBC Manuale utente
- español: Candy CHASD4351EBC Manual de usuario